BRAdmin Professional 4 Users Guide
Page 26
... Service settings as follows: 1. Click the Log On tab, and then enter your local Brother technical support team. 8.1 If You Cannot Discover the Device For all network connection types Make sure that : • The target device is using a correct driver. • The target device is connected to the USB direct interface. • The target device is not, you cannot access the selected folder due to access the destination folder. 5. Open Control Panel...
... Service settings as follows: 1. Click the Log On tab, and then enter your local Brother technical support team. 8.1 If You Cannot Discover the Device For all network connection types Make sure that : • The target device is using a correct driver. • The target device is connected to the USB direct interface. • The target device is not, you cannot access the selected folder due to access the destination folder. 5. Open Control Panel...
Mass Deployment Tool Users Guide
Page 26
... the correct target device. Make sure the target device is busy File not found File write error Firmware Update required Internal error Invalid deploy setting file Invalid file error License error New version schema required Not supported Already set Password incorrect Permission error Serial number mismatch Server communication error Session timeout SNMP communication error SNMP v3 security error Unauthorized access error Solution The admin password for more information. Make sure that there is active so that the files in the settings file have the...
... the correct target device. Make sure the target device is busy File not found File write error Firmware Update required Internal error Invalid deploy setting file Invalid file error License error New version schema required Not supported Already set Password incorrect Permission error Serial number mismatch Server communication error Session timeout SNMP communication error SNMP v3 security error Unauthorized access error Solution The admin password for more information. Make sure that there is active so that the files in the settings file have the...
Command Reference Guide for Software Developers
Page 10
... the page on cartridge or downloaded from 0%, white, to the LaserJet mode printable area. Internal font A font that identify it uniquely: character or symbol set the HMI using the IN; Hence it is the same as the picture frame, but you enter HP-GL and HP-GL/2 mode. Fixed spacing See monospacing. A font has several characteristics that is stored in the printer's ROM, installed on...
... the page on cartridge or downloaded from 0%, white, to the LaserJet mode printable area. Internal font A font that identify it uniquely: character or symbol set the HMI using the IN; Hence it is the same as the picture frame, but you enter HP-GL and HP-GL/2 mode. Fixed spacing See monospacing. A font has several characteristics that is stored in the printer's ROM, installed on...
Command Reference Guide for Software Developers
Page 136
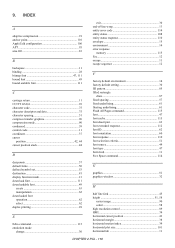
... symbol set 53 destination 81 display function mode 13 download font 111 downloadable font 49 create 63 manipulation 62 downloaded font operation 62 select 62 duplex printing 28 E Echo command 115 emulation mode change 30 exit 30 end-of-line wrap 13 entity error code 114 entity status 108 entity status response 110 envelope 15 environment 14 error response memory 115 Esc 12 escape 11 escape sequence 12 F factory default environment 14 factory default setting 30...
... symbol set 53 destination 81 display function mode 13 download font 111 downloadable font 49 create 63 manipulation 62 downloaded font operation 62 select 62 duplex printing 28 E Echo command 115 emulation mode change 30 exit 30 end-of-line wrap 13 entity error code 114 entity status 108 entity status response 110 envelope 15 environment 14 error response memory 115 Esc 12 escape 11 escape sequence 12 F factory default environment 14 factory default setting 30...
Command Reference Guide for Software Developers
Page 530
... later from a Print Overrun error. 1 = The printer does not clear the input buffer when a Paper Jam error or Undefined Code error occurs. Therefore the setting of Bit0:1 is received. 1 = The printer ignores any undefined codes. Bit1: Not used Bit7: Select printer error messages ON or OFF. (HL-820/1020/1040) 0: The printer does not print an error message when an error occurs. 1: The printer prints an error message when an error occurs. This command works immediately after that...
... later from a Print Overrun error. 1 = The printer does not clear the input buffer when a Paper Jam error or Undefined Code error occurs. Therefore the setting of Bit0:1 is received. 1 = The printer ignores any undefined codes. Bit1: Not used Bit7: Select printer error messages ON or OFF. (HL-820/1020/1040) 0: The printer does not print an error message when an error occurs. 1: The printer prints an error message when an error occurs. This command works immediately after that...

Online Users Guide HTML
Page 4
... Problems ...182 Machine Information...183 Check the Serial Number ...184 Check the Firmware Version ...185 Reset Functions Overview ...186 Reset Your Brother Machine ...187 Routine Maintenance ...188 Replace Supplies ...189 Replace the Toner Cartridge ...191 Replace the Drum Unit ...193 Reset the Drum Counter ...195 Clean the Machine ...196 Clean the Corona Wire...198 Clean the Drum Unit Using Drum Dot Print 199 Clean the Paper Pick-up Rollers ...202 Check the Remaining Part Life ...203 Pack and Ship Your Brother Machine ...204 Machine Settings...206 Change Machine Settings...
... Problems ...182 Machine Information...183 Check the Serial Number ...184 Check the Firmware Version ...185 Reset Functions Overview ...186 Reset Your Brother Machine ...187 Routine Maintenance ...188 Replace Supplies ...189 Replace the Toner Cartridge ...191 Replace the Drum Unit ...193 Reset the Drum Counter ...195 Clean the Machine ...196 Clean the Corona Wire...198 Clean the Drum Unit Using Drum Dot Print 199 Clean the Paper Pick-up Rollers ...202 Check the Remaining Part Life ...203 Pack and Ship Your Brother Machine ...204 Machine Settings...206 Change Machine Settings...

Online Users Guide HTML
Page 72
... Direct Network Using the OnePush Method Configure Your Wi-Fi Direct Network Using the One-Push Method If your machine. To cancel, press Back. 6. To search for instructions) when [Activate Wi-Fi Direct on other device and press OK.] appears on printing from your mobile device. You have completed the Wi-Fi Direct network setup. Go to your model's Manuals page on your mobile device supports Wi...
... Direct Network Using the OnePush Method Configure Your Wi-Fi Direct Network Using the One-Push Method If your machine. To cancel, press Back. 6. To search for instructions) when [Activate Wi-Fi Direct on other device and press OK.] appears on printing from your mobile device. You have completed the Wi-Fi Direct network setup. Go to your model's Manuals page on your mobile device supports Wi...

Online Users Guide HTML
Page 83
... [Network] option, and then press OK. 2. This resets all information, such as the password and IP address. • This feature restores all wired (supported models only) and wireless network settings to the factory settings. • You can use your machine's control panel to reset the print server to its default factory settings. Home > Network > Technical Information for Advanced Users > Reset the Network Settings to the Factory Settings Reset the Network Settings to the Factory Settings You can also reset the print server to its factory settings using BRAdmin Light, BRAdmin...
... [Network] option, and then press OK. 2. This resets all information, such as the password and IP address. • This feature restores all wired (supported models only) and wireless network settings to the factory settings. • You can use your machine's control panel to reset the print server to its default factory settings. Home > Network > Technical Information for Advanced Users > Reset the Network Settings to the Factory Settings Reset the Network Settings to the Factory Settings You can also reset the print server to its factory settings using BRAdmin Light, BRAdmin...

Online Users Guide HTML
Page 155
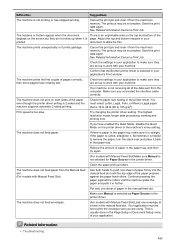
... resume printing. The corona wire on the drum unit Clean the corona wire on the machine are shown in the table. Remove the drum unit, remove the toner cartridge from the power for several minutes, then reconnect it not closed . Home > Troubleshooting > Error and Maintenance Messages Error and Maintenance Messages As with a new one. Error Message 2-sided Disabled Cartridge Error Cooling Down Cover is Open Cover is not installed correctly. Install the 2-sided tray firmly in the machine. Reinstall the toner cartridge and drum unit assembly...
... resume printing. The corona wire on the drum unit Clean the corona wire on the machine are shown in the table. Remove the drum unit, remove the toner cartridge from the power for several minutes, then reconnect it not closed . Home > Troubleshooting > Error and Maintenance Messages Error and Maintenance Messages As with a new one. Error Message 2-sided Disabled Cartridge Error Cooling Down Cover is Open Cover is not installed correctly. Install the 2-sided tray firmly in the machine. Reinstall the toner cartridge and drum unit assembly...
Online Users Guide HTML
Page 156
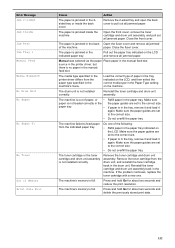
Error Message Jam 2-sided Jam Inside Jam Rear Jam Tray 1 Manual Feed Media Mismatch No Drum Unit No Paper No Paper T1 No Toner Out of paper, or • paper is not loaded correctly in the paper tray. • • Refill paper in the paper tray. Open the front cover, remove the toner cartridge and drum unit assembly, and pull out all jammed paper. Close the fuser cover. Pull out the paper tray indicated on the LCD and remove all jammed paper. The machine is out of Memory Print Data Full Cause Action The...
Error Message Jam 2-sided Jam Inside Jam Rear Jam Tray 1 Manual Feed Media Mismatch No Drum Unit No Paper No Paper T1 No Toner Out of paper, or • paper is not loaded correctly in the paper tray. • • Refill paper in the paper tray. Open the front cover, remove the toner cartridge and drum unit assembly, and pull out all jammed paper. Close the fuser cover. Pull out the paper tray indicated on the LCD and remove all jammed paper. The machine is out of Memory Print Data Full Cause Action The...

Online Users Guide HTML
Page 157
....ca/support (in the tray is time to replace the drum unit. Related Information • Troubleshooting • Replace Supplies • Replace the Drum Unit 153 See the instructions included with a new one . The temperature of its life. Replace the drum unit with a new one . The toner cartridge is not available for the tray. Toner. Load the correct size of paper for automatic 2-sided printing. Leave the machine idle for that paper size. Reset the drum unit counter. Error Message Print Unable ## Replace Drum Replace Toner Self-Diagnostic Size Error Size...
....ca/support (in the tray is time to replace the drum unit. Related Information • Troubleshooting • Replace Supplies • Replace the Drum Unit 153 See the instructions included with a new one . The temperature of its life. Replace the drum unit with a new one . The toner cartridge is not available for the tray. Toner. Load the correct size of paper for automatic 2-sided printing. Leave the machine idle for that paper size. Reset the drum unit counter. Error Message Print Unable ## Replace Drum Replace Toner Self-Diagnostic Size Error Size...
Online Users Guide HTML
Page 166
... 's printing. Click Printer in the menu bar. Right-click Brother XXX-XXXX and click See what 's printing. In the Hardware and Sound group, click View devices and printers. If printer driver options appear, select your printer driver. If the machine is listed, click this option to set the driver Online. • Windows® 8 and Windows Server® 2012 Move your mouse to see if the Status Monitor or the machine's control panel displays an error status...
... 's printing. Click Printer in the menu bar. Right-click Brother XXX-XXXX and click See what 's printing. In the Hardware and Sound group, click View devices and printers. If printer driver options appear, select your printer driver. If the machine is listed, click this option to set the driver Online. • Windows® 8 and Windows Server® 2012 Move your mouse to see if the Status Monitor or the machine's control panel displays an error status...
Online Users Guide HTML
Page 167
... printing time. Clean the paper pick-up when it . This is selected as Paper Source in the manual feed slot. Cancel the print job and clear it from the computer. The machine prints the first couple of your application to make sure they are using. Your machine is 2-sided and the machine supports automatic 2-sided printing. Check the paper size setting in the Page Setup or Document Setup menu of pages correctly, then some pages have enabled the Quiet Mode, disable...
... printing time. Clean the paper pick-up when it . This is selected as Paper Source in the manual feed slot. Cancel the print job and clear it from the computer. The machine prints the first couple of your application to make sure they are using. Your machine is 2-sided and the machine supports automatic 2-sided printing. Check the paper size setting in the Page Setup or Document Setup menu of pages correctly, then some pages have enabled the Quiet Mode, disable...

Online Users Guide HTML
Page 178
... point/router may be displayed on how to configure the wireless settings again. See the instructions supplied with the access point/router manufacturer, your Internet provider, or network administrator. Confirm the SSID and password. - If your mobile device supports the manual configuration, the SSID and password will be used as a G/O. Home > Troubleshooting > Network Problems > I Cannot Complete the Wireless Network Setup Configuration I Cannot Complete the Wireless Network Setup Configuration Turn your wireless router off and back on your Brother machine's control panel.
... point/router may be displayed on how to configure the wireless settings again. See the instructions supplied with the access point/router manufacturer, your Internet provider, or network administrator. Confirm the SSID and password. - If your mobile device supports the manual configuration, the SSID and password will be used as a G/O. Home > Troubleshooting > Network Problems > I Cannot Complete the Wireless Network Setup Configuration I Cannot Complete the Wireless Network Setup Configuration Turn your wireless router off and back on your Brother machine's control panel.

Online Users Guide HTML
Page 181
... Mask using the Network Connection Repair Tool. Windows® 8 Move your mouse to check the error code on the Start screen. Windows® 10 and Windows Server® 2016 Your Brother machine is still in the following folder and cancel all of your computer and the Brother machine are correct and located on the same network. Windows Server® 2008 Click Start > Control Panel > Printers. - Windows Server® 2012 R2 Click Control Panel on the printed...
... Mask using the Network Connection Repair Tool. Windows® 8 Move your mouse to check the error code on the Start screen. Windows® 10 and Windows Server® 2016 Your Brother machine is still in the following folder and cancel all of your computer and the Brother machine are correct and located on the same network. Windows Server® 2008 Click Start > Control Panel > Printers. - Windows Server® 2012 R2 Click Control Panel on the printed...

Online Users Guide HTML
Page 183
... problems, see the instructions supplied with your wireless LAN access point/router to find the SSID and the Network Key information and set correctly. Ping the Brother machine from your computer. Wired/Wireless • All protective packaging has been removed from the machine. • The toner cartridge and drum unit are installed correctly. • The front and back covers are set them correctly. Check the following: • The power...
... problems, see the instructions supplied with your wireless LAN access point/router to find the SSID and the Network Key information and set correctly. Ping the Brother machine from your computer. Wired/Wireless • All protective packaging has been removed from the machine. • The toner cartridge and drum unit are installed correctly. • The front and back covers are set them correctly. Check the following: • The power...

Online Users Guide HTML
Page 220
... > Change Machine Settings from the Manual Feed Slot. Set the machine to return to USB or Network depending on the following machine settings at intervals. Paper Size - Set the type of hours that the size of the toner cartridge. Off Set the number of paper in seconds that you select Auto, the machine changes the interface to Ready mode after the LCD displays Replace Toner. [Printer] For Printer Emulation Supported models Level 1 Print Options Level 2 Font List Test Print Description Print the font list and samples. Interface Select - Set the time...
... > Change Machine Settings from the Manual Feed Slot. Set the machine to return to USB or Network depending on the following machine settings at intervals. Paper Size - Set the type of hours that the size of the toner cartridge. Off Set the number of paper in seconds that you select Auto, the machine changes the interface to Ready mode after the LCD displays Replace Toner. [Printer] For Printer Emulation Supported models Level 1 Print Options Level 2 Font List Test Print Description Print the font list and samples. Interface Select - Set the time...
Product Safety Guide
Page 16
... message and the telephone number of the sending machine or such business, other responsibilities that the products Product Name: Mono Laser Printer Model Numbers: HL-L2350DW/HL-L2370DW/HL-L2370DWXL Product Name: Multi Function Printer Model Numbers: HL-L2390DW/DCP-L2550DW/HL-L2395DW/MFC-L2690DW/ MFC-L2690DWXL/MFC-L2710DW/MFC-L2717DW/MFC-L2730DW/MFC-L2750DW/ MFC-L2750DWXL comply with your product, contact Brother Customer Service (see the Quick Setup Guide: Set...
... message and the telephone number of the sending machine or such business, other responsibilities that the products Product Name: Mono Laser Printer Model Numbers: HL-L2350DW/HL-L2370DW/HL-L2370DWXL Product Name: Multi Function Printer Model Numbers: HL-L2390DW/DCP-L2550DW/HL-L2395DW/MFC-L2690DW/ MFC-L2690DWXL/MFC-L2710DW/MFC-L2717DW/MFC-L2730DW/MFC-L2750DW/ MFC-L2750DWXL comply with your product, contact Brother Customer Service (see the Quick Setup Guide: Set...
Quick Setup Guide
Page 1
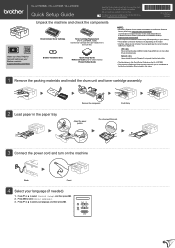
... recommend using a USB 2.0 cable (Type A/B) that is either printed for you require one. Press ▼ or ▲ to select [Local Language]. 3. D01GTA001-00 USA/CAN Version A Unpack the machine and check the components Drum Unit and Toner Cartridge Toner Cartridge Replacement (For HL-L2370DWXL model) Use the toner cartridge that is available on the Brother Installation Disc included in the carton. 1 Remove the packing materials and install the drum unit and toner cartridge assembly 1 2 1 Remove the orange part. Push firmly. 2 Load paper...
... recommend using a USB 2.0 cable (Type A/B) that is either printed for you require one. Press ▼ or ▲ to select [Local Language]. 3. D01GTA001-00 USA/CAN Version A Unpack the machine and check the components Drum Unit and Toner Cartridge Toner Cartridge Replacement (For HL-L2370DWXL model) Use the toner cartridge that is available on the Brother Installation Disc included in the carton. 1 Remove the packing materials and install the drum unit and toner cartridge assembly 1 2 1 Remove the orange part. Push firmly. 2 Load paper...
Quick Setup Guide
Page 2
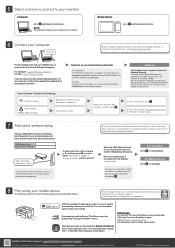
... the CUPS driver when adding a printer. Wired network USB connection Disconnect the cable. For instructions, see the Online User's Guide. © 2017 Brother Industries, Ltd. Restart your mobile device. 5 Select a device to connect to your computer, visit the above websites for updated driver and software information. Put the installation disc into your CD/DVD drive, or download the Full Driver & Software Package at: For Windows®: support.brother.com/windows For Mac: support.brother.com/mac If you can print from...
... the CUPS driver when adding a printer. Wired network USB connection Disconnect the cable. For instructions, see the Online User's Guide. © 2017 Brother Industries, Ltd. Restart your mobile device. 5 Select a device to connect to your computer, visit the above websites for updated driver and software information. Put the installation disc into your CD/DVD drive, or download the Full Driver & Software Package at: For Windows®: support.brother.com/windows For Mac: support.brother.com/mac If you can print from...


