Network User's Guide - English
Page 75
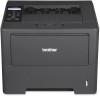
... is created and saved in the URL than 64 byte. To use SSL/TLS communication, the self-signed certificate also needs to your machine's memory successfully. d Click Submit. The default settings are RSA(2048bit) for Public Key Algorithm and SHA256 for the self-signed certificate. e The self...address, node name or domain name to the next section. 69 Proceed to use the IPPS or HTTPS protocol and enter a different name in your Brother machine using Web Based Management. (See page 74.) Install the self-signed certificate to your computer. b Enter a Common Name and a Valid Date...
... is created and saved in the URL than 64 byte. To use SSL/TLS communication, the self-signed certificate also needs to your machine's memory successfully. d Click Submit. The default settings are RSA(2048bit) for Public Key Algorithm and SHA256 for the self-signed certificate. e The self...address, node name or domain name to the next section. 69 Proceed to use the IPPS or HTTPS protocol and enter a different name in your Brother machine using Web Based Management. (See page 74.) Install the self-signed certificate to your computer. b Enter a Common Name and a Valid Date...
Network User's Guide - English
Page 81
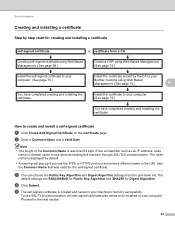
... to install it into the print server. Note 6 Only a certificate issued with EAP-TLS authentication, we recommend using User for your model at http://solutions.brother.com/. When you want to import the self-signed certificate, the certificate issued by a CA, and the private key 6 a Click Import Certificate and Private Key...
... to install it into the print server. Note 6 Only a certificate issued with EAP-TLS authentication, we recommend using User for your model at http://solutions.brother.com/. When you want to import the self-signed certificate, the certificate issued by a CA, and the private key 6 a Click Import Certificate and Private Key...
Quick Setup Guide - English
Page 33
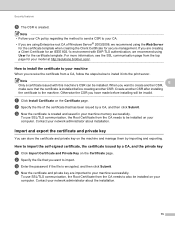
...the control panel. Consumables When the time comes to 800 sheets for the HL-5470DW, 1,050 sheets for your local Brother reseller. For more information about the consumables for the HL-6180DW. SO-DIMM Memory You can hold up to replace consumable items, an error will be indicated... by installing one SO-DIMM (Small Outline Dual In-line Memory Module). Options and Consumables ...
...the control panel. Consumables When the time comes to 800 sheets for the HL-5470DW, 1,050 sheets for your local Brother reseller. For more information about the consumables for the HL-6180DW. SO-DIMM Memory You can hold up to replace consumable items, an error will be indicated... by installing one SO-DIMM (Small Outline Dual In-line Memory Module). Options and Consumables ...
User's Guide - English
Page 5
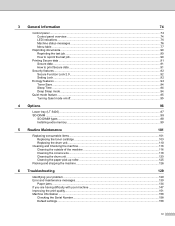
... mode feature ...95 Turning Quiet mode on/off...95 4 Options 96 Lower tray (LT-5400) ...97 SO-DIMM ...98 SO-DIMM types ...98 Installing extra memory ...99 5 Routine Maintenance 101 Replacing consumable items...101 Replacing the toner cartridge ...103 Replacing the drum unit...110 Cleaning and Checking the machine ...116 Cleaning...
... mode feature ...95 Turning Quiet mode on/off...95 4 Options 96 Lower tray (LT-5400) ...97 SO-DIMM ...98 SO-DIMM types ...98 Installing extra memory ...99 5 Routine Maintenance 101 Replacing consumable items...101 Replacing the toner cartridge ...103 Replacing the drum unit...110 Cleaning and Checking the machine ...116 Cleaning...

User's Guide - English
Page 42
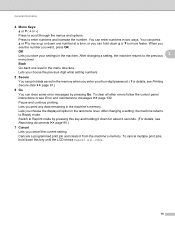
... data again from printing your computer. For more information about the Reprint function, see Reprinting documents uu page 90. You can set the following in memory. Note If you want to it in Printer Function: Use Reprint Sleep Time Macro Density Adjustment Improve Print Output ...
... data again from printing your computer. For more information about the Reprint function, see Reprinting documents uu page 90. You can set the following in memory. Note If you want to it in Printer Function: Use Reprint Sleep Time Macro Density Adjustment Improve Print Output ...

User's Guide - English
Page 43
... mode. Note This operation will be improved. You can also execute the saved macro (you buy a lot of paper, test a small quantity to the machine's memory. When you choose Printer Default, the timeout setting will decrease the temperature of the machine's fusing process. Improve Toner Fixing If you change the...
... mode. Note This operation will be improved. You can also execute the saved macro (you buy a lot of paper, test a small quantity to the machine's memory. When you choose Printer Default, the timeout setting will decrease the temperature of the machine's fusing process. Improve Toner Fixing If you change the...
User's Guide - English
Page 81
...want, press OK. Lets you choose the previous digit while setting numbers. 5 Secure You can print data saved in the memory when you enter your settings in the machine's memory. When you cancel the current setting. OK Lets you store your four-digit password. ( For details, see Reprinting documents uu...up or down one level in the last menu level. To cancel multiple print jobs, hold down this key and holding it from the machine's memory. After changing a setting, the machine returns to scroll through the menus and options. Lets you choose the displayed option in the menu structure....
...want, press OK. Lets you choose the previous digit while setting numbers. 5 Secure You can print data saved in the memory when you enter your settings in the machine's memory. When you cancel the current setting. OK Lets you store your four-digit password. ( For details, see Reprinting documents uu...up or down one level in the last menu level. To cancel multiple print jobs, hold down this key and holding it from the machine's memory. After changing a setting, the machine returns to scroll through the menus and options. Lets you choose the displayed option in the menu structure....

User's Guide - English
Page 82
... the machine. Press Go to start the machine again. Receiving a print job will automatically wake up . There is no remaining data in the memory. Cancel All Jobs Ignore Data Pause Please Wait Printing Ready Sleep Deep Sleep 1 The machine is printing. In Sleep mode (power save mode) ...processed using the PS driver. If you want to disable the Wireless Network, change the setting of time while it is in the machine's memory. General Information LED indications The LEDs are lights which show the machine status. The machine is carrying out the calibration process. The machine ...
... the machine. Press Go to start the machine again. Receiving a print job will automatically wake up . There is no remaining data in the memory. Cancel All Jobs Ignore Data Pause Please Wait Printing Ready Sleep Deep Sleep 1 The machine is printing. In Sleep mode (power save mode) ...processed using the PS driver. If you want to disable the Wireless Network, change the setting of time while it is in the machine's memory. General Information LED indications The LEDs are lights which show the machine status. The machine is carrying out the calibration process. The machine ...
User's Guide - English
Page 84
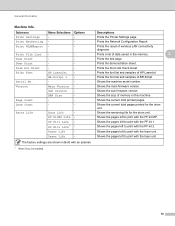
...Dot Print Print Font Serial No. BR-Script 3 - - - Sub Version - Laser Life - Prints the font list and samples of memory in this machine. Shows the main firmware version. Shows the current total printed pages. Shows the pages left to print with the PF ...Selections - Version Page Count Drum Count - - - - - - - - HP LaserJet - PF KitMP Life - The factory settings are shown in the memory. 3 Prints the test page. Prints the result of data saved in Bold with the laser unit. 78 Prints a list of wireless LAN connectivity diagnosis. Prints...
...Dot Print Print Font Serial No. BR-Script 3 - - - Sub Version - Laser Life - Prints the font list and samples of memory in this machine. Shows the main firmware version. Shows the current total printed pages. Shows the pages left to print with the PF ...Selections - Version Page Count Drum Count - - - - - - - - HP LaserJet - PF KitMP Life - The factory settings are shown in the memory. 3 Prints the test page. Prints the result of data saved in Bold with the laser unit. 78 Prints a list of wireless LAN connectivity diagnosis. Prints...
User's Guide - English
Page 96
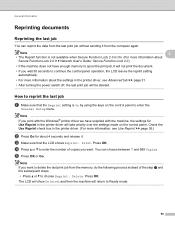
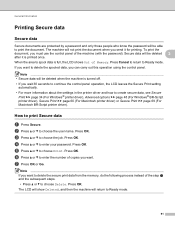
... without sending it will be deleted. Note If you wait 30 seconds to enter the General Setup menu. You can reprint the data from the memory, do the following process instead of copies you print with the Windows® printer driver we have supplied with the machine, the settings for about... setting automatically. • For more information about Secure Function Lock 2.0 uu Network User's Guide: Secure Function Lock 2.0) • If the machine does not have enough memory to spool the print job, it from the computer again. Press OK. Press OK. e Press OK or Go.
... without sending it will be deleted. Note If you wait 30 seconds to enter the General Setup menu. You can reprint the data from the memory, do the following process instead of copies you print with the Windows® printer driver we have supplied with the machine, the settings for about... setting automatically. • For more information about Secure Function Lock 2.0 uu Network User's Guide: Secure Function Lock 2.0) • If the machine does not have enough memory to spool the print job, it from the computer again. Press OK. Press OK. e Press OK or Go.
User's Guide - English
Page 97
... delete the spooled data, you can carry out this operation using the control panel. If you want to delete the secure print data from the memory, do the following process instead of copies you wait 30 seconds to continue the control panel operation, the LCD leaves the Secure Print setting automatically... page 69 (For Macintosh BR-Script printer driver). Note • Secure data will not print the document when you must use the control panel of Memory. e Press a or b to choose Print.
... delete the spooled data, you can carry out this operation using the control panel. If you want to delete the secure print data from the memory, do the following process instead of copies you wait 30 seconds to continue the control panel operation, the LCD leaves the Secure Print setting automatically... page 69 (For Macintosh BR-Script printer driver). Note • Secure data will not print the document when you must use the control panel of Memory. e Press a or b to choose Print.
User's Guide - English
Page 102
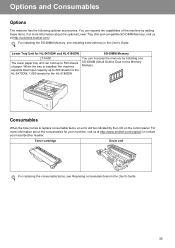
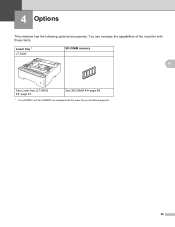
See SO-DIMM uu page 98. 1 HL-5470DWT and HL-6180DWT are equipped with these items. Lower tray 1 LT-5400 SO-DIMM memory 4 See Lower tray (LT-5400) uu page 97. 4 Options 4 This machine has the following optional accessories. You can increase the capabilities of the machine with the lower tray as standard equipment. 96
See SO-DIMM uu page 98. 1 HL-5470DWT and HL-6180DWT are equipped with these items. Lower tray 1 LT-5400 SO-DIMM memory 4 See Lower tray (LT-5400) uu page 97. 4 Options 4 This machine has the following optional accessories. You can increase the capabilities of the machine with the lower tray as standard equipment. 96

User's Guide - English
Page 104
...types For information regarding memory for optional memory expansion. You can increase the memory up to a maximum of standard memory and one SO-DIMM (Small Outline Dual In-line Memory Module). Options SO-DIMM 4 The machine has 128 MB of 384 MB by installing one slot for your Brother machine please visit us... at: http://www.brother-usa.com/support/memory/ In general, the SO-DIMM must have the following specifications: Type: 144-pin and 16-bit output CAS latency: 4 ...
...types For information regarding memory for optional memory expansion. You can increase the memory up to a maximum of standard memory and one SO-DIMM (Small Outline Dual In-line Memory Module). Options SO-DIMM 4 The machine has 128 MB of 384 MB by installing one slot for your Brother machine please visit us... at: http://www.brother-usa.com/support/memory/ In general, the SO-DIMM must have the following specifications: Type: 144-pin and 16-bit output CAS latency: 4 ...

User's Guide - English
Page 105
Note Always turn off the machine's power switch. b Disconnect the interface cables from the machine, and then unplug the power cord from static electricity, DO NOT touch the memory chips or the board surface. 99 Important To prevent damage to the machine from the AC power outlet. c Remove the plastic (1) and then the metal (2) SO-DIMM covers. 4 2 1 d Unpack the SO-DIMM and hold it by its edges. Options Installing extra memory 4 a Turn off the machine power switch before installing or removing the SO-DIMM.
Note Always turn off the machine's power switch. b Disconnect the interface cables from the machine, and then unplug the power cord from static electricity, DO NOT touch the memory chips or the board surface. 99 Important To prevent damage to the machine from the AC power outlet. c Remove the plastic (1) and then the metal (2) SO-DIMM covers. 4 2 1 d Unpack the SO-DIMM and hold it by its edges. Options Installing extra memory 4 a Turn off the machine power switch before installing or removing the SO-DIMM.

User's Guide - English
Page 106
...'s power switch. Note To make sure that you have installed the SO-DIMM properly, you can print the printer settings page that shows the current memory size. (See Machine Info. h Turn on . 1 2 g Plug the machine's power cord back into the AC power outlet first, and then connect the interface cables...
...'s power switch. Note To make sure that you have installed the SO-DIMM properly, you can print the printer settings page that shows the current memory size. (See Machine Info. h Turn on . 1 2 g Plug the machine's power cord back into the AC power outlet first, and then connect the interface cables...
User's Guide - English
Page 136
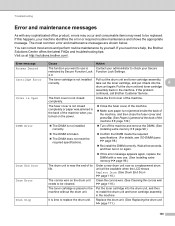
...If this error message appears again, replace the DIMM with any sophisticated office product, errors may occur and consumable items may need more help, the Brother Solutions Center offers the latest FAQs and troubleshooting tips: Visit us at the back of the machine uu page 139.) The DIMM is ...not installed correctly. Turn off the machine and remove the DIMM. (See Installing extra memory uu page 99.) The DIMM is placed in the machine. The toner cartridge is not closed completely or paper was jammed in the back...
...If this error message appears again, replace the DIMM with any sophisticated office product, errors may occur and consumable items may need more help, the Brother Solutions Center offers the latest FAQs and troubleshooting tips: Visit us at the back of the machine uu page 139.) The DIMM is ...not installed correctly. Turn off the machine and remove the DIMM. (See Installing extra memory uu page 99.) The DIMM is placed in the machine. The toner cartridge is not closed completely or paper was jammed in the back...
User's Guide - English
Page 138
.... To replace Laser Unit call Brother Customer Service at: 1-877-BROTHER (1-877-276-8437) (in USA) 1-877-BROTHER (in Canada) or to locate a Brother Authorized Service Center, visit us at: http://www.brother-usa.com/service/ 132 The machine's memory is full. Press Cancel and ...print data. The machine's memory is full. Add more Memory. If the problem continues, call Brother Customer Service at: 1-877-BROTHER (1-877-276-8437) (in USA) 1-877-BROTHER (in Canada) or to locate a Brother Authorized Service Center, visit us at: http://www.brother-usa.com/service/ Replace ...
.... To replace Laser Unit call Brother Customer Service at: 1-877-BROTHER (1-877-276-8437) (in USA) 1-877-BROTHER (in Canada) or to locate a Brother Authorized Service Center, visit us at: http://www.brother-usa.com/service/ 132 The machine's memory is full. Press Cancel and ...print data. The machine's memory is full. Add more Memory. If the problem continues, call Brother Customer Service at: 1-877-BROTHER (1-877-276-8437) (in USA) 1-877-BROTHER (in Canada) or to locate a Brother Authorized Service Center, visit us at: http://www.brother-usa.com/service/ Replace ...
User's Guide - English
Page 153
... country. • If you think there is an unprintable area on the screen but they do not show up when it from the memory. The machine prints the first couple of the page. Make sure that Use Printer Offline is not recognizing the machine's input buffer's full... your Secure Function Lock settings. Adjust the top and bottom margins in your document to cancel print jobs. Your computer is unchecked. Right-click Brother HL-XXXX series. Press Cancel. The printout may affect the print quality, hardware performance, and machine reliability. Calls must be made from a computer ...
... country. • If you think there is an unprintable area on the screen but they do not show up when it from the memory. The machine prints the first couple of the page. Make sure that Use Printer Offline is not recognizing the machine's input buffer's full... your Secure Function Lock settings. Adjust the top and bottom margins in your document to cancel print jobs. Your computer is unchecked. Right-click Brother HL-XXXX series. Press Cancel. The printout may affect the print quality, hardware performance, and machine reliability. Calls must be made from a computer ...

User's Guide - English
Page 166
A Appendix A Machine specifications A General A Model HL-5470DW HL-5470DWT HL-6180DW HL-6180DWT Printer Type Laser Print Method Electrophotographic Laser Printer Memory Capacity Standard 128 MB Optional 1 slot: DDR2 SO-DIMM (144-pin) up to 256 MB LCD (liquid...0.7 W Dimensions 10.1 (257)* 11.3 (288)** 15.2 (387)*** 16.5 (418)**** Weights (with consumables) 1 USB connections to PC 14.6 (371) * : HL-5470DW, HL-5470DWT ** : HL-6180DW, HL-6180DWT 23.1 lb (10.5 kg) 30.0 lb (13.6 kg) 15.1 (384) *** : HL-5470DWT ****: HL-6180DWT Unit: in. (mm) 25.4 lb (11.5 kg) 32.2 lb (14.6 kg) 160
A Appendix A Machine specifications A General A Model HL-5470DW HL-5470DWT HL-6180DW HL-6180DWT Printer Type Laser Print Method Electrophotographic Laser Printer Memory Capacity Standard 128 MB Optional 1 slot: DDR2 SO-DIMM (144-pin) up to 256 MB LCD (liquid...0.7 W Dimensions 10.1 (257)* 11.3 (288)** 15.2 (387)*** 16.5 (418)**** Weights (with consumables) 1 USB connections to PC 14.6 (371) * : HL-5470DW, HL-5470DWT ** : HL-6180DW, HL-6180DWT 23.1 lb (10.5 kg) 30.0 lb (13.6 kg) 15.1 (384) *** : HL-5470DWT ****: HL-6180DWT Unit: in. (mm) 25.4 lb (11.5 kg) 32.2 lb (14.6 kg) 160


