Network User's Guide - English
Page 24
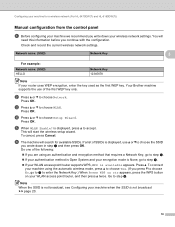
Your Brother machine supports the use a or b to choose the SSID you are using the automatic wireless mode, press a to step i. If your WLAN access point/router supports WPS, WPS is not broadcast uu page 20. 18 To cancel, press ... This will need this information before you press b to choose No, go to choose Yes. (If you continue with the configuration. Press a. f The machine will search for a wireless network (For HL-5470DW(T) and HL-6180DW(T)) Manual configuration from the control panel 3 a Before configuring your machine we recommend you write down in step ...
Your Brother machine supports the use a or b to choose the SSID you are using the automatic wireless mode, press a to step i. If your WLAN access point/router supports WPS, WPS is not broadcast uu page 20. 18 To cancel, press ... This will need this information before you press b to choose No, go to choose Yes. (If you continue with the configuration. Press a. f The machine will search for a wireless network (For HL-5470DW(T) and HL-6180DW(T)) Manual configuration from the control panel 3 a Before configuring your machine we recommend you write down in step ...
Network User's Guide - English
Page 26
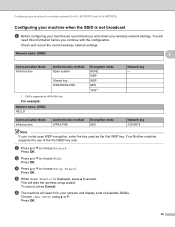
Check and record the current wireless network settings. Your Brother machine supports the use of available SSIDs. Network name: (SSID) 3 Communication Mode Infrastructure Authentication method Open system Shared key WPA/WPA2-PSK Encryption mode NONE WEP WEP AES TKIP 1 Network key - 1 TKIP is supported...key. You will start the wireless setup wizard. Configuring your machine for a wireless network (For HL-5470DW(T) and HL-6180DW(T)) Configuring your machine when the SSID is not broadcast 3 a Before configuring your machine we recommend you continue with the configuration.
Check and record the current wireless network settings. Your Brother machine supports the use of available SSIDs. Network name: (SSID) 3 Communication Mode Infrastructure Authentication method Open system Shared key WPA/WPA2-PSK Encryption mode NONE WEP WEP AES TKIP 1 Network key - 1 TKIP is supported...key. You will start the wireless setup wizard. Configuring your machine for a wireless network (For HL-5470DW(T) and HL-6180DW(T)) Configuring your machine when the SSID is not broadcast 3 a Before configuring your machine we recommend you continue with the configuration.

Network User's Guide - English
Page 29
...GTC PEAP/MS-CHAPv2 PEAP/GTC EAP-TTLS/CHAP EAP-TTLS/MS-CHAP EAP-TTLS/MS-CHAPv2 EAP-TTLS/PAP EAP-TLS Encryption mode CKIP AES TKIP AES TKIP AES TKIP AES TKIP AES TKIP AES TKIP AES TKIP AES TKIP AES TKIP AES TKIP User ID...FAST/MS-CHAPv2 Encryption mode AES User ID Brother Password - - 3 Password 12345678 23 Check and record the current wireless network settings. Configuring your machine for a wireless network (For HL-5470DW(T) and HL-6180DW(T)) Configuring your machine for an enterprise wireless network 3 a Before configuring your machine we recommend you continue with the configuration.
...GTC PEAP/MS-CHAPv2 PEAP/GTC EAP-TTLS/CHAP EAP-TTLS/MS-CHAP EAP-TTLS/MS-CHAPv2 EAP-TTLS/PAP EAP-TLS Encryption mode CKIP AES TKIP AES TKIP AES TKIP AES TKIP AES TKIP AES TKIP AES TKIP AES TKIP AES TKIP AES TKIP User ID...FAST/MS-CHAPv2 Encryption mode AES User ID Brother Password - - 3 Password 12345678 23 Check and record the current wireless network settings. Configuring your machine for a wireless network (For HL-5470DW(T) and HL-6180DW(T)) Configuring your machine for an enterprise wireless network 3 a Before configuring your machine we recommend you continue with the configuration.
Network User's Guide - English
Page 34
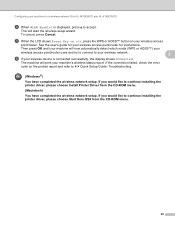
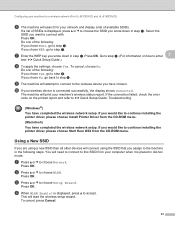
.... 28 Configuring your wireless access point/router for a wireless network (For HL-5470DW(T) and HL-6180DW(T)) d When WLAN Enable? e When the LCD shows Press Key on rtr, press the WPS or AOSS™ button on the printed report and refer to continue installing the printer driver, please choose Start Here OSX from the CD... network. 3 f If your wireless access point/router uses and try to connect to accept. Then press OK and your machine will now automatically detect which mode (WPS or AOSS™) your wireless device is connected successfully, the display shows Connected.
.... 28 Configuring your wireless access point/router for a wireless network (For HL-5470DW(T) and HL-6180DW(T)) d When WLAN Enable? e When the LCD shows Press Key on rtr, press the WPS or AOSS™ button on the printed report and refer to continue installing the printer driver, please choose Start Here OSX from the CD... network. 3 f If your wireless access point/router uses and try to connect to accept. Then press OK and your machine will now automatically detect which mode (WPS or AOSS™) your wireless device is connected successfully, the display shows Connected.

Network User's Guide - English
Page 38
...Mode Ad-hoc Encryption mode WEP Note Your Brother machine supports the use of the computer you are connecting with must be set to choose Setup Wizard. Note The wireless network settings of the first WEP key only. Press OK. Configuring your machine for a wireless network (For HL-5470DW(T) and HL-6180DW...(T)) Configuration in Ad-hoc mode with a configured SSID, you will need this information before you continue with the configuration. You will start the wireless setup wizard. Press OK....
...Mode Ad-hoc Encryption mode WEP Note Your Brother machine supports the use of the computer you are connecting with must be set to choose Setup Wizard. Note The wireless network settings of the first WEP key only. Press OK. Configuring your machine for a wireless network (For HL-5470DW(T) and HL-6180DW...(T)) Configuration in Ad-hoc mode with a configured SSID, you will need this information before you continue with the configuration. You will start the wireless setup wizard. Press OK....
Network User's Guide - English
Page 39
.... Press OK. Go to step h. (For information on the printed report and refer to continue installing the printer driver, please choose Start Here OSX from the CD-ROM menu. (Macintosh)...Network. Press OK. If a list of the following : If you wrote down in Ad-hoc mode. Do one of SSIDs is placed in step a. i The machine will connect using a new SSID.... This will print your machine's wireless status report. Configuring your machine for a wireless network (For HL-5470DW(T) and HL-6180DW(T)) f The machine will need to connect to this SSID from your computer when it is displayed, ...
.... Press OK. Go to step h. (For information on the printed report and refer to continue installing the printer driver, please choose Start Here OSX from the CD-ROM menu. (Macintosh)...Network. Press OK. If a list of the following : If you wrote down in Ad-hoc mode. Do one of SSIDs is placed in step a. i The machine will connect using a new SSID.... This will print your machine's wireless status report. Configuring your machine for a wireless network (For HL-5470DW(T) and HL-6180DW(T)) f The machine will need to connect to this SSID from your computer when it is displayed, ...
Network User's Guide - English
Page 50
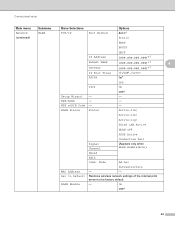
Mode Ad-hoc MAC Address Set to the factory default. - WPS w/PIN Code - WLAN Status Status Active(11n) Active(11b) Active(11g) Wired LAN Active WLAN ... only when WLAN Enable is On.) Speed SSID Comm. On Off* 44 Restores wireless network settings of the internal print server to Default WLAN Enable Infrastructure - - Control panel setup Main menu Network (continued) Submenu WLAN Menu Selections TCP/IP Boot Method Options Auto* Static RARP BOOTP DHCP IP Address (000.000.000...
Mode Ad-hoc MAC Address Set to the factory default. - WPS w/PIN Code - WLAN Status Status Active(11n) Active(11b) Active(11g) Wired LAN Active WLAN ... only when WLAN Enable is On.) Speed SSID Comm. On Off* 44 Restores wireless network settings of the internal print server to Default WLAN Enable Infrastructure - - Control panel setup Main menu Network (continued) Submenu WLAN Menu Selections TCP/IP Boot Method Options Auto* Static RARP BOOTP DHCP IP Address (000.000.000...

Quick Setup Guide - English
Page 24
...Network Users One push setup using the PIN Method of WPS (Wi-Fi Protected Setup) in the Network User's Guide. This will automatically detect which mode (WPS or AOSS™) your wireless access point/router has the WPS or AOSS™ symbol as shown below. A four level indicator at ...machine's LCD will automatically be printed. e When Press Key on rtr appears, press the WPS or AOSS™ button on page 25. b Place the Brother machine within range of your wireless access point/router. Refer to choose WLAN and press OK. Press a or b to the instructions provided with your wireless...
...Network Users One push setup using the PIN Method of WPS (Wi-Fi Protected Setup) in the Network User's Guide. This will automatically detect which mode (WPS or AOSS™) your wireless access point/router has the WPS or AOSS™ symbol as shown below. A four level indicator at ...machine's LCD will automatically be printed. e When Press Key on rtr appears, press the WPS or AOSS™ button on page 25. b Place the Brother machine within range of your wireless access point/router. Refer to choose WLAN and press OK. Press a or b to the instructions provided with your wireless...
User's Guide - English
Page 81
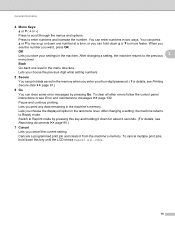
...-digit password. ( For details, see Reprinting documents uu page 90.) 7 Cancel Lets you print any data remaining in two ways. Press to Reprint mode by pressing Go. OK Lets you choose the previous digit while setting numbers. 5 Secure You can press a or b to move faster. To clear...instructions or see the number you choose the displayed option in the machine. You can print data saved in the menu structure. Pause and continue printing. Lets you want, press OK. You can hold down this key and holding it from the machine's memory. Lets you cancel the...
...-digit password. ( For details, see Reprinting documents uu page 90.) 7 Cancel Lets you print any data remaining in two ways. Press to Reprint mode by pressing Go. OK Lets you choose the previous digit while setting numbers. 5 Secure You can press a or b to move faster. To clear...instructions or see the number you choose the displayed option in the machine. You can print data saved in the menu structure. Pause and continue printing. Lets you want, press OK. You can hold down this key and holding it from the machine's memory. Lets you cancel the...
User's Guide - English
Page 87
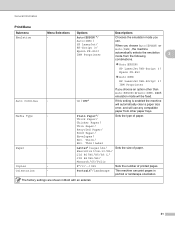
.../ C5 / Folio - 1* / 2 / ... / 999 Sets the number of printed pages. - General Information Print Menu Submenu Emulation Auto Continue Media Type Paper Copies Orientation Menu Selections Options Descriptions - Auto(EPSON)* / Chooses the emulation mode you Auto(IBM) / use any compatible paper from the following 3 combinations. Auto(EPSON) HP LaserJet / BR-Script...(IBM) HP LaserJet / BR-Script 3 / IBM Proprinter If you choose Auto(EPSON) or Auto(IBM), the machine automatically selects the emulation mode from other than Auto(EPSON) or Auto(IBM), each emulation...
.../ C5 / Folio - 1* / 2 / ... / 999 Sets the number of printed pages. - General Information Print Menu Submenu Emulation Auto Continue Media Type Paper Copies Orientation Menu Selections Options Descriptions - Auto(EPSON)* / Chooses the emulation mode you Auto(IBM) / use any compatible paper from the following 3 combinations. Auto(EPSON) HP LaserJet / BR-Script...(IBM) HP LaserJet / BR-Script 3 / IBM Proprinter If you choose Auto(EPSON) or Auto(IBM), the machine automatically selects the emulation mode from other than Auto(EPSON) or Auto(IBM), each emulation...
User's Guide - English
Page 94
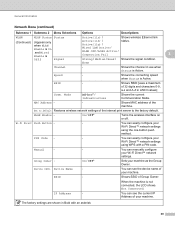
... / Off* Turns the wireless interface on or off. Shows SSID of the machine. General Information Network Menu (continued) Submenu 1 Submenu 2 Menu Selections Options Descriptions WLAN (Continued) WLAN Status Status (Appears only when WLAN Enable is On and Wired Enable is Active. Shows the connecting speed...-hoc* / Infrastructure Shows the current Communication Mode. You can manually configure your Wi-Fi Direct™ network settings using the one-button push method. On / Off* Sets your machine. You can see the device name of the internal print server to the factory default. Wi...
... / Off* Turns the wireless interface on or off. Shows SSID of the machine. General Information Network Menu (continued) Submenu 1 Submenu 2 Menu Selections Options Descriptions WLAN (Continued) WLAN Status Status (Appears only when WLAN Enable is On and Wired Enable is Active. Shows the connecting speed...-hoc* / Infrastructure Shows the current Communication Mode. You can manually configure your Wi-Fi Direct™ network settings using the one-button push method. On / Off* Sets your machine. You can see the device name of the internal print server to the factory default. Wi...
User's Guide - English
Page 96
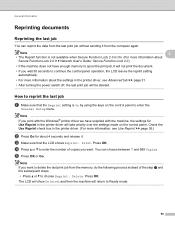
...control panel. Press OK. General Information Reprinting documents 3 Reprinting the last job 3 You can choose between 1 and 999 Copies. How to Ready mode. 90 Check the Use Reprint check box in the printer driver. (For more information about Secure Function Lock 2.0 uu Network User's Guide: ... • After turning the power switch off, the last print job will take priority over the settings made on the control panel to continue the control panel operation, the LCD leaves the reprint setting automatically. • For more information about 4 seconds and release it. You can...
...control panel. Press OK. General Information Reprinting documents 3 Reprinting the last job 3 You can choose between 1 and 999 Copies. How to Ready mode. 90 Check the Use Reprint check box in the printer driver. (For more information about Secure Function Lock 2.0 uu Network User's Guide: ... • After turning the power switch off, the last print job will take priority over the settings made on the control panel to continue the control panel operation, the LCD leaves the reprint setting automatically. • For more information about 4 seconds and release it. You can...
User's Guide - English
Page 97
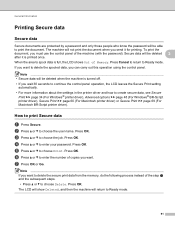
The machine will not print the document when you wait 30 seconds to continue the control panel operation, the LCD leaves the Secure Print setting automatically. • For more information about the ...will be able to delete the secure print data from the memory, do the following process instead of Memory. If you want. How to Ready mode. b Press a or b to enter your password. Note If you can carry out this operation using the control panel. Press OK. d Press.... The LCD will show Deleted, and then the machine will return to delete the spooled data, you want to Ready mode. 91
The machine will not print the document when you wait 30 seconds to continue the control panel operation, the LCD leaves the Secure Print setting automatically. • For more information about the ...will be able to delete the secure print data from the memory, do the following process instead of Memory. If you want. How to Ready mode. b Press a or b to enter your password. Note If you can carry out this operation using the control panel. Press OK. d Press.... The LCD will show Deleted, and then the machine will return to delete the spooled data, you want to Ready mode. 91
User's Guide - English
Page 137
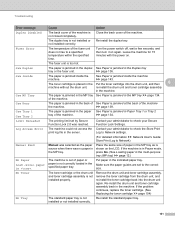
.... The machine is out of paper or paper is jammed in Paper Tray 1 or Tray 2 tray of the machine. The toner cartridge is in Pause mode, press Go. (See Loading paper in the multi-purpose tray (MP tray) uu page 12.) No Paper Load paper in the specified paper tray. Jam... back in the indicated paper tray. Turn the power switch off, wait a few seconds, and then turn it on . uu page 139. If the problem continues, replace the toner cartridge. (See Replacing the toner cartridge uu page 104) No Tray The standard paper tray is not closed completely. uu page 134...
.... The machine is out of paper or paper is jammed in Paper Tray 1 or Tray 2 tray of the machine. The toner cartridge is in Pause mode, press Go. (See Loading paper in the multi-purpose tray (MP tray) uu page 12.) No Paper Load paper in the specified paper tray. Jam... back in the indicated paper tray. Turn the power switch off, wait a few seconds, and then turn it on . uu page 139. If the problem continues, replace the toner cartridge. (See Replacing the toner cartridge uu page 104) No Tray The standard paper tray is not closed completely. uu page 134...
User's Guide - English
Page 154
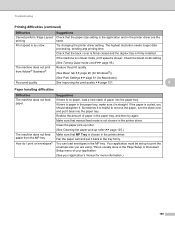
... (See Basic tab uu page 26 (for Windows®)) (See Print Settings uu page 61 (for more information.) 148 Troubleshooting Printing difficulties (continued) Difficulties Suggestions Cannot perform 'Page Layout' Check that the paper size setting in the application and in the MP tray. Check the Quiet... mode setting. (See Turning Quiet mode on envelopes? Reduce the amount of paper in Quiet mode, print speed is in the paper tray, and then try again. If the machine is slower. ...
... (See Basic tab uu page 26 (for Windows®)) (See Print Settings uu page 61 (for more information.) 148 Troubleshooting Printing difficulties (continued) Difficulties Suggestions Cannot perform 'Page Layout' Check that the paper size setting in the application and in the MP tray. Check the Quiet... mode setting. (See Turning Quiet mode on envelopes? Reduce the amount of paper in Quiet mode, print speed is in the paper tray, and then try again. If the machine is slower. ...


