Quick Setup Guide - English
Page 2
...Drum Unit Assembly ...9 Load Paper in the Paper Tray ...10 Print a Test Page ...11 Setting Your Language on the Control Panel 12 Step 2 Installing the Driver For USB Interface Cable Users ...14 For Parallel Interface Cable Users ...17 For Network Interface Cable Users (For HL-6050DN 19 For Brother Peer-to-Peer Network Printer... Users (LPR / NetBIOS 19 For Network Shared Printer Users ...22 For USB Interface Cable Users ...24 For Mac OS® 8.6 to...
...Drum Unit Assembly ...9 Load Paper in the Paper Tray ...10 Print a Test Page ...11 Setting Your Language on the Control Panel 12 Step 2 Installing the Driver For USB Interface Cable Users ...14 For Parallel Interface Cable Users ...17 For Network Interface Cable Users (For HL-6050DN 19 For Brother Peer-to-Peer Network Printer... Users (LPR / NetBIOS 19 For Network Shared Printer Users ...22 For USB Interface Cable Users ...24 For Mac OS® 8.6 to...
Quick Setup Guide - English
Page 6
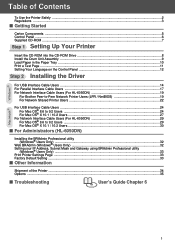
Save all packing materials and the printer carton. ■ The interface cable is IEEE 1284-compliant. ■ Use a Hi-Speed USB 2.0 certified cable if your computer uses a Hi-Speed USB 2.0 interface. 5 The ...; Getting Started Carton Components Printer 1 8 2 1 Face-down Output Tray Support Flap (Support Flap) 7 2 Control Panel 3 6 3 Multi-purpose Tray (MP Tray) 4 MP Tray Support Flap 4 5 Paper Tray 6 Front Cover Release Button 5 7 Front Cover 8 Face-down Output Tray (Top Output Tray) CD-ROM (including User's Guide) Quick Setup Guide Drum Unit Assembly (including Toner Cartridge...
Save all packing materials and the printer carton. ■ The interface cable is IEEE 1284-compliant. ■ Use a Hi-Speed USB 2.0 certified cable if your computer uses a Hi-Speed USB 2.0 interface. 5 The ...; Getting Started Carton Components Printer 1 8 2 1 Face-down Output Tray Support Flap (Support Flap) 7 2 Control Panel 3 6 3 Multi-purpose Tray (MP Tray) 4 MP Tray Support Flap 4 5 Paper Tray 6 Front Cover Release Button 5 7 Front Cover 8 Face-down Output Tray (Top Output Tray) CD-ROM (including User's Guide) Quick Setup Guide Drum Unit Assembly (including Toner Cartridge...

Quick Setup Guide - English
Page 10
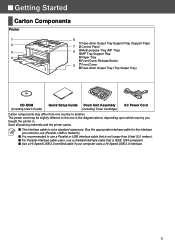
... USB Macintosh ® Network Fo r Administrators Go to distribute the toner evenly inside the assembly. Setting Up Your Printer Windows® USB Windows® Parallel 2 Install the Drum Unit Assembly Do NOT connect the interface cable. Rock it from side to side several times to the next page 9 You... will be prompted to connect the interface cable during the driver installation. 3 Put the drum unit assembly into the printer. 1 Open the front cover by pressing the front cover release button. Front cover release button 4 Close the front cover of the...
... USB Macintosh ® Network Fo r Administrators Go to distribute the toner evenly inside the assembly. Setting Up Your Printer Windows® USB Windows® Parallel 2 Install the Drum Unit Assembly Do NOT connect the interface cable. Rock it from side to side several times to the next page 9 You... will be prompted to connect the interface cable during the driver installation. 3 Put the drum unit assembly into the printer. 1 Open the front cover by pressing the front cover release button. Front cover release button 4 Close the front cover of the...

Quick Setup Guide - English
Page 35
... of UNIX Systems Laboratories. registered mark. Brother reserves the right to make changes without notice. When shipping the Printer, the DRUM UNIT assembly and TONER CARTRIDGE must ship your Printer, carefully package the Printer in the U.S and other errors relating to the Printer and may VOID THE WARRANTY. 1 Turn off the printer's power switch, and then unplug the...
... of UNIX Systems Laboratories. registered mark. Brother reserves the right to make changes without notice. When shipping the Printer, the DRUM UNIT assembly and TONER CARTRIDGE must ship your Printer, carefully package the Printer in the U.S and other errors relating to the Printer and may VOID THE WARRANTY. 1 Turn off the printer's power switch, and then unplug the...

Users Manual - English
Page 7
... 5-1 Toner cartridge ...5-2 TONER LOW Message ...5-2 TONER LIFE END message 5-2 Replacing the toner cartridge 5-3 Drum unit ...5-8 CHANGE DRUM SOON message 5-8 Replacing the drum unit ...5-8 Replacing Maintenance Parts ...5-13 Maintenance Messages 5-13 Cleaning ...5-14 Cleaning the outside of the printer 5-14 Cleaning the inside of the printer 5-15 Cleaning the corona wire ...5-17 6 Troubleshooting ...6-1 LCD messages ...6-1 Error messages ...6-1 Maintenance...
... 5-1 Toner cartridge ...5-2 TONER LOW Message ...5-2 TONER LIFE END message 5-2 Replacing the toner cartridge 5-3 Drum unit ...5-8 CHANGE DRUM SOON message 5-8 Replacing the drum unit ...5-8 Replacing Maintenance Parts ...5-13 Maintenance Messages 5-13 Cleaning ...5-14 Cleaning the outside of the printer 5-14 Cleaning the inside of the printer 5-15 Cleaning the corona wire ...5-17 6 Troubleshooting ...6-1 LCD messages ...6-1 Error messages ...6-1 Maintenance...
Users Manual - English
Page 9
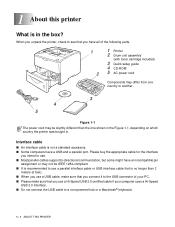
... power cord may differ from one shown in the Figure 1-1, depending on which country the printer was bought in the box? When you unpack the printer, check to see that you have all of the following parts. 1 2 1 Printer 2 Drum unit assembly (with toner cartridge included) 3 Quick setup guide 4 CD-ROM 5 AC power cord Components may...
... power cord may differ from one shown in the Figure 1-1, depending on which country the printer was bought in the box? When you unpack the printer, check to see that you have all of the following parts. 1 2 1 Printer 2 Drum unit assembly (with toner cartridge included) 3 Quick setup guide 4 CD-ROM 5 AC power cord Components may...
Users Manual - English
Page 85
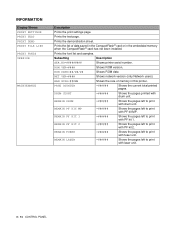
...REMAIN PF KIT 1 =###### Shows the pages left to print with drum unit. Prints the demonstration sheet. RAM SIZE=###MB Shows the size of data saved in the CompactFlash® card or in this printer. ROM VER=#### Shows ROM version. PAGE COUNTER =###### Shows the current...left to print with drum unit. NET VER=#### Shows network version (only Network users). Prints the test page. ROM DATE=##/##/## Shows ROM date. DRUM COUNT =###### Shows the pages printed with PF kit 2. REMAIN PF KIT MP =###### Shows the pages left to print with laser unit. 3 - 14 ...
...REMAIN PF KIT 1 =###### Shows the pages left to print with drum unit. Prints the demonstration sheet. RAM SIZE=###MB Shows the size of data saved in the CompactFlash® card or in this printer. ROM VER=#### Shows ROM version. PAGE COUNTER =###### Shows the current...left to print with drum unit. NET VER=#### Shows network version (only Network users). Prints the test page. ROM DATE=##/##/## Shows ROM date. DRUM COUNT =###### Shows the pages printed with PF kit 2. REMAIN PF KIT MP =###### Shows the pages left to print with laser unit. 3 - 14 ...
Users Manual - English
Page 116
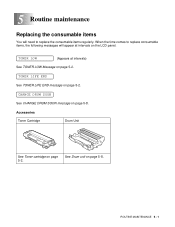
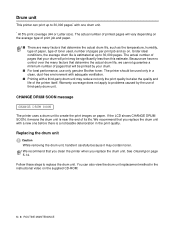
When the time comes to replace consumable items, the following messages will need to replace the consumable items regularly. CHANGE DRUM SOON See CHANGE DRUM SOON message on page 5-8. TONER LOW (Appears at intervals on the LCD panel. ROUTINE MAINTENANCE 5 - 1 See Drum unit on page 5-8. TONER LIFE END See TONER LIFE END message on page 5-2. Accessories Toner Cartridge Drum Unit See Toner cartridge on page 5-2. 5 Routine maintenance Replacing the consumable items You will appear at intervals) See TONER LOW Message on page 5-2.
When the time comes to replace consumable items, the following messages will need to replace the consumable items regularly. CHANGE DRUM SOON See CHANGE DRUM SOON message on page 5-8. TONER LOW (Appears at intervals on the LCD panel. ROUTINE MAINTENANCE 5 - 1 See Drum unit on page 5-8. TONER LIFE END See TONER LIFE END message on page 5-2. Accessories Toner Cartridge Drum Unit See Toner cartridge on page 5-2. 5 Routine maintenance Replacing the consumable items You will appear at intervals) See TONER LOW Message on page 5-2.
Users Manual - English
Page 117
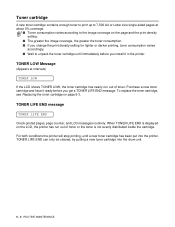
...install it in the printer. TONER LIFE END message TONER LIFE END Check printed pages, page counter, and LCD messages routinely. Toner cartridge A new toner cartridge contains enough toner to print up to unpack the toner cartridge until a new toner cartridge has been put into the drum unit. 5 - 2 ROUTINE... MAINTENANCE When TONER LIFE END is displayed on the LCD, the printer has run out of toner or the toner is not evenly distributed inside the cartridge. TONER LOW ...
...install it in the printer. TONER LIFE END message TONER LIFE END Check printed pages, page counter, and LCD messages routinely. Toner cartridge A new toner cartridge contains enough toner to print up to unpack the toner cartridge until a new toner cartridge has been put into the drum unit. 5 - 2 ROUTINE... MAINTENANCE When TONER LIFE END is displayed on the LCD, the printer has run out of toner or the toner is not evenly distributed inside the cartridge. TONER LOW ...
Users Manual - English
Page 118
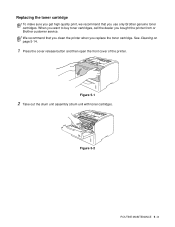
Figure 5-1 2 Take out the drum unit assembly (drum unit with toner cartridge). See Cleaning on page 5-14. 1 Press the cover release button and then open the front cover of the printer. When you want to buy toner cartridges, call the dealer you use only Brother genuine toner cartridges. Replacing the toner cartridge To make sure you get high quality print, we recommend that you clean the printer when you replace the toner cartridge. We recommend that you bought the printer from or Brother customer service. Figure 5-2 ROUTINE MAINTENANCE 5 - 3
Figure 5-1 2 Take out the drum unit assembly (drum unit with toner cartridge). See Cleaning on page 5-14. 1 Press the cover release button and then open the front cover of the printer. When you want to buy toner cartridges, call the dealer you use only Brother genuine toner cartridges. Replacing the toner cartridge To make sure you get high quality print, we recommend that you clean the printer when you replace the toner cartridge. We recommend that you bought the printer from or Brother customer service. Figure 5-2 ROUTINE MAINTENANCE 5 - 3

Users Manual - English
Page 119
... water. ■ Be sure to seal up the toner cartridge tightly so that toner powder does not spill out of the drum unit assembly. Caution ■ We recommend that you place the drum unit assembly on your local waste disposal office. 5 - 4 ROUTINE MAINTENANCE Figure 5-4 Caution Handle the toner cartridge carefully. If toner scatters on... separate from static electricity, do not touch the electrodes shown in Figure 5-3. If you accidentally spill or scatter toner. ■ To prevent damage to the printer from domestic waste.
... water. ■ Be sure to seal up the toner cartridge tightly so that toner powder does not spill out of the drum unit assembly. Caution ■ We recommend that you place the drum unit assembly on your local waste disposal office. 5 - 4 ROUTINE MAINTENANCE Figure 5-4 Caution Handle the toner cartridge carefully. If toner scatters on... separate from static electricity, do not touch the electrodes shown in Figure 5-3. If you accidentally spill or scatter toner. ■ To prevent damage to the printer from domestic waste.
Users Manual - English
Page 120
...will be damaged. ■ Brother strongly recommends that you do not refill the toner cartridge provided with both hands and gently rock it in unsatisfactory print quality. Our warranty coverage does not apply to problems caused by the use of a drum unit. Warranty coverage does not apply... to any problem that you put in direct sunlight or room light, the unit may result in the printer. Figure 5-5 Caution ■ Wait to unpack the toner cartridge until ...
...will be damaged. ■ Brother strongly recommends that you do not refill the toner cartridge provided with both hands and gently rock it in unsatisfactory print quality. Our warranty coverage does not apply to problems caused by the use of a drum unit. Warranty coverage does not apply... to any problem that you put in direct sunlight or room light, the unit may result in the printer. Figure 5-5 Caution ■ Wait to unpack the toner cartridge until ...

Users Manual - English
Page 121
Figure 5-8 Caution Make sure you put it in properly, the lock lever will lift automatically. If you insert the toner cartridge properly or it may separate from the drum unit. 7 Gently wipe the scanner window with a dry, soft cloth. 5 - 6 ROUTINE MAINTENANCE Figure 5-9 Caution Put the toner cartridge in the drum unit immediately after you hear it lock into place. To prevent degradation to the print quality, do not touch the shaded parts shown in Figure 5-7. Figure 5-7 6 Put the new toner cartridge firmly into the drum unit until you have removed the protective cover.
Figure 5-8 Caution Make sure you put it in properly, the lock lever will lift automatically. If you insert the toner cartridge properly or it may separate from the drum unit. 7 Gently wipe the scanner window with a dry, soft cloth. 5 - 6 ROUTINE MAINTENANCE Figure 5-9 Caution Put the toner cartridge in the drum unit immediately after you hear it lock into place. To prevent degradation to the print quality, do not touch the shaded parts shown in Figure 5-7. Figure 5-7 6 Put the new toner cartridge firmly into the drum unit until you have removed the protective cover.

Users Manual - English
Page 122
Close the front cover of the printer. Figure 5-11 ROUTINE MAINTENANCE 5 - 7 8 Clean the primary corona wire inside the drum unit by gently sliding the blue tab from right to left and left to the home position (▲) before you do not, printed pages may have a vertical stripe. Return the tab to right several times. Figure 5-10 9 Put the drum unit assembly back in the printer. If you put the drum unit back in the printer.
Close the front cover of the printer. Figure 5-11 ROUTINE MAINTENANCE 5 - 7 8 Clean the primary corona wire inside the drum unit by gently sliding the blue tab from right to left and left to the home position (▲) before you do not, printed pages may have a vertical stripe. Return the tab to right several times. Figure 5-10 9 Put the drum unit assembly back in the printer. If you put the drum unit back in the printer.
Users Manual - English
Page 123
... use only genuine Brother toner. Follow these steps to create the print images on page 5-14. Because we have no control over the many factors that you clean the printer when you replace the drum unit with a third-party drum unit may be used , number of the printer itself. Drum unit This printer can also view the drum unit replacement method in...
... use only genuine Brother toner. Follow these steps to create the print images on page 5-14. Because we have no control over the many factors that you clean the printer when you replace the drum unit with a third-party drum unit may be used , number of the printer itself. Drum unit This printer can also view the drum unit replacement method in...
Users Manual - English
Page 124
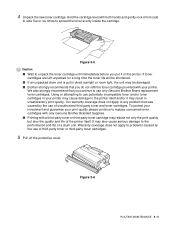
1 Press the cover release button and then open the front cover of disposable paper or cloth in Figure 5-13. Figure 5-12 2 Take out the drum unit assembly (drum unit with the toner cartridge). Figure 5-14 ROUTINE MAINTENANCE 5 - 9 Figure 5-13 Caution ■ We recommend that you accidentally spill or scatter toner. ■ To prevent damage to the printer from static electricity, do not touch the electrodes shown in case you place the drum unit assembly on a piece of the printer.
1 Press the cover release button and then open the front cover of disposable paper or cloth in Figure 5-13. Figure 5-12 2 Take out the drum unit assembly (drum unit with the toner cartridge). Figure 5-14 ROUTINE MAINTENANCE 5 - 9 Figure 5-13 Caution ■ We recommend that you accidentally spill or scatter toner. ■ To prevent damage to the printer from static electricity, do not touch the electrodes shown in case you place the drum unit assembly on a piece of the printer.
Users Manual - English
Page 125
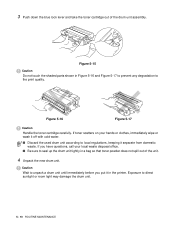
... before you have questions, call your hands or clothes, immediately wipe or wash it off with cold water. ■ Discard the used drum unit according to local regulations, keeping it in Figure 5-16 and Figure 5-17 to prevent any degradation to the print quality. If you put... parts shown in the printer. Figure 5-16 Figure 5-17 Caution Handle the toner cartridge carefully. If toner scatters on your local waste disposal office. ■ Be sure to direct sunlight or room light may damage the drum unit. 5 - 10 ROUTINE MAINTENANCE Exposure to seal up the drum unit tightly in a bag ...
... before you have questions, call your hands or clothes, immediately wipe or wash it off with cold water. ■ Discard the used drum unit according to local regulations, keeping it in Figure 5-16 and Figure 5-17 to prevent any degradation to the print quality. If you put... parts shown in the printer. Figure 5-16 Figure 5-17 Caution Handle the toner cartridge carefully. If toner scatters on your local waste disposal office. ■ Be sure to direct sunlight or room light may damage the drum unit. 5 - 10 ROUTINE MAINTENANCE Exposure to seal up the drum unit tightly in a bag ...
Users Manual - English
Page 126
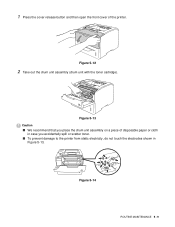
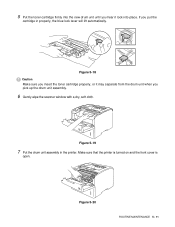
5 Put the toner cartridge firmly into place. Figure 5-18 Caution Make sure you put the cartridge in the printer. If you insert the toner cartridge properly, or it lock into the new drum unit until you hear it may separate from the drum unit when you pick up the drum unit assembly. 6 Gently wipe the scanner window with a dry, soft cloth. Figure 5-20 ROUTINE MAINTENANCE 5 - 11 Make sure that the printer is turned on and the front cover is open. Figure 5-19 7 Put the drum unit assembly in properly, the blue lock lever will lift automatically.
5 Put the toner cartridge firmly into place. Figure 5-18 Caution Make sure you put the cartridge in the printer. If you insert the toner cartridge properly, or it lock into the new drum unit until you hear it may separate from the drum unit when you pick up the drum unit assembly. 6 Gently wipe the scanner window with a dry, soft cloth. Figure 5-20 ROUTINE MAINTENANCE 5 - 11 Make sure that the printer is turned on and the front cover is open. Figure 5-19 7 Put the drum unit assembly in properly, the blue lock lever will lift automatically.

Users Manual - English
Page 127
8 Reset the drum counter. See the instructions supplied with the new drum unit. Caution Do not reset the drum counter when you replace only the toner cartridge. 9 Close the front cover of the printer. 5 - 12 ROUTINE MAINTENANCE
8 Reset the drum counter. See the instructions supplied with the new drum unit. Caution Do not reset the drum counter when you replace only the toner cartridge. 9 Close the front cover of the printer. 5 - 12 ROUTINE MAINTENANCE

Users Manual - English
Page 129
... the drum unit, make sure you clean the inside of the printer. Figure 5-21 5 Remove anything that contain ammonia. Cleaning with a soft cloth to remove dust. Cleaning the outside of the printer Clean the outside of the printer as follows: 1 Turn off the printer power switch, and then unplug the printer power... cord. 2 Take the paper tray out of the printer. 3 Open the multi-purpose tray. 4 Wipe the outside ...
... the drum unit, make sure you clean the inside of the printer. Figure 5-21 5 Remove anything that contain ammonia. Cleaning with a soft cloth to remove dust. Cleaning the outside of the printer Clean the outside of the printer as follows: 1 Turn off the printer power switch, and then unplug the printer power... cord. 2 Take the paper tray out of the printer. 3 Open the multi-purpose tray. 4 Wipe the outside ...


