Brother International HL 5370DW Support Question
Brother International HL 5370DW Support Question
Find answers below for this question about Brother International HL 5370DW - B/W Laser Printer.Need a Brother International HL 5370DW manual? We have 3 online manuals for this item!
Question posted by JrJimjo on December 9th, 2013
How To Clean Drum Unit For Model Hl-5370dw
The person who posted this question about this Brother International product did not include a detailed explanation. Please use the "Request More Information" button to the right if more details would help you to answer this question.
Current Answers
Related Brother International HL 5370DW Manual Pages
Users Manual - English - Page 9
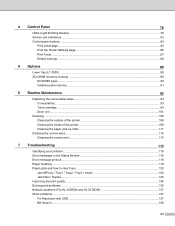
...Toner cartridge ...94 Drum unit ...101
Cleaning ...106 Cleaning the outside of the printer 106 Cleaning the inside of the printer...108 Cleaning the paper pick-up roller...111
Cleaning the corona wires ...113 Cleaning the corona wire......129 Solving print problems ...136 Network problems (For HL-5350DN and HL-5370DW 137 Other problems ...137 For Macintosh with USB ...137 BR-Script 3 ...138
viii
Users Manual - English - Page 89
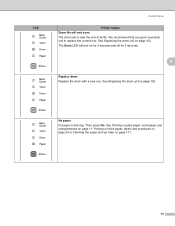
... its life. See Replacing the drum unit on page 111.
79 LED
Control Panel
Printer status Drum life will turn on page 102. Then press Go. See Printing on plain paper, bond paper and transparencies on page 11, Printing on thick paper, labels and envelopes on page 20 or Cleaning the paper pick-up roller...
Users Manual - English - Page 91
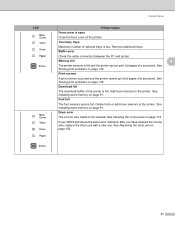
... memory area is full. If your LED's still shows the same error indication after you have cleaned the corona wire, replace the drum unit with a new one.
Delete fonts or add more memory to the printer. See Cleaning the corona wire on page 102.
81
Buffer error
Check the cable connection between the PC and...
Users Manual - English - Page 103
... consumable items 6
You will need to replace certain parts and clean the printer regularly. To prevent injury, when you have just used the printer, some internal parts of the printer will be extremely hot. Consumables
Toner Cartridge
See Toner cartridge on page 94.
6
Drum Unit
See Drum unit on page 101. 93
After you open the front cover...
Users Manual - English - Page 110
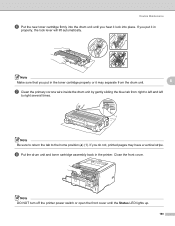
... in the printer. h Put the drum unit and toner cartridge assembly back in the toner cartridge properly or it in
properly, the lock lever will lift automatically. Note
Make sure that you hear it lock into place.
Close the front cover. If you do not, printed pages may separate from the drum unit.
6
g Clean the primary...
Users Manual - English - Page 111
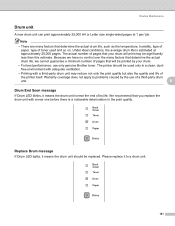
... of pages that you replace the drum unit with a new one before there is a noticeable deterioration in a clean, dustfree environment with adequate ventilation.
• Printing with a third-party drum unit may be used and so on. The actual number of
the printer itself. Replace Drum message
6
If Drum LED lights, it means the drum unit is estimated at 1 per/ job...
Users Manual - English - Page 112
... the drum unit, clean the inside of the printer.See Cleaning on page 106. Every time you need to reset the drum counter by completing the following steps:
a Press the front cover release button and then open the front cover.
6
b Take out the drum unit and toner cartridge assembly.
102 Routine Maintenance
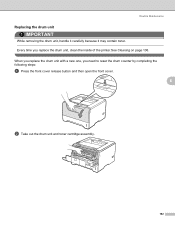
Replacing the drum unit
6
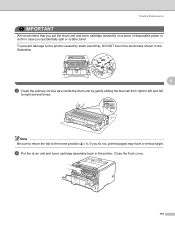
IMPORTANT
While removing the drum unit...
Users Manual - English - Page 113
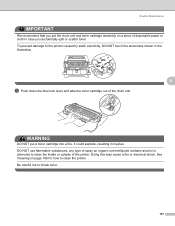
... toner cartridge assembly on page 106 for how to inhale toner.
103 Be careful not to clean the printer. See Cleaning on a piece of the drum unit. It could explode, resulting in the illustration.
6
c Push down the blue lock lever and take the toner cartridge out of disposable paper or cloth in ...
Users Manual - English - Page 116
...
Doing this may cause a fire or electrical shock. b Pull the paper tray completely out of the printer. DO NOT use cleaning materials that you replace the toner cartridge or the drum unit, make sure that contain ammonia.
6
DO NOT use flammable substances, any type of spray an organic solvent/liquids contains alcohol or ammonia...
Users Manual - English - Page 118
Routine Maintenance
6
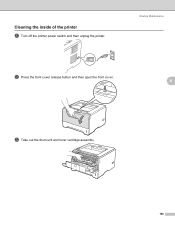
b Press the front cover release button and then open the front cover.
6
c Take out the drum unit and toner cartridge assembly.
108
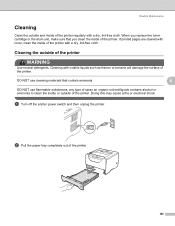
Cleaning the inside of the printer
a Turn off the printer power switch and then unplug the printer.
Users Manual - English - Page 123
Routine Maintenance
6 6
6
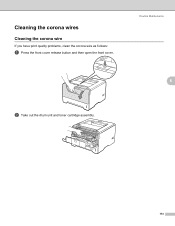
b Take out the drum unit and toner cartridge assembly.
113
Cleaning the corona wires
Cleaning the corona wire
If you have print quality problems, clean the corona wire as follows:
a Press the front cover release button and then open the front cover.
Users Manual - English - Page 124
... the home position (a) (1).
d Put the drum unit and toner cartridge assembly back in the illustration.
6
c Clean the primary corona wire inside the drum unit by gently sliding the blue tab from right to left and left
to right several times.
1
Note Be sure to return the tab to the printer caused by static electricity, DO NOT...
Users Manual - English - Page 126
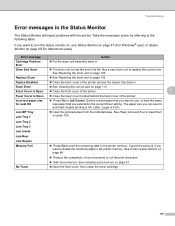
...
„ Press Go to replace the current one.
Drum End Soon
„ The drum unit is near the end of the printer.
Buy a new drum unit to print the remaining data in the printer memory. Replace Drum
„ See Replacing the drum unit on page 84.
„ Reduce the complexity of the printer and put the duplex tray back in the...
Users Manual - English - Page 139
... such as humidity, high temperatures, and so on page 6.
„ The drum unit may be contaminated. See Replacing the drum unit on page 102.
„ The fuser unit may be on page 5.
„ If the whole page is probably not the printer.
See Positioning the printer on .
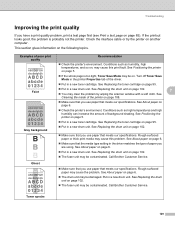
Gray background
„ Put in the driver matches the type...
Users Manual - English - Page 140
... the problem is not solved after printing a few pages, put in a new drum unit. (See Replacing the drum unit on page 102.)
White lines, bands or ribbing across the page
„ Check the printer's environment. Put in a new drum unit. See Cleaning the inside the drum unit by itself. Conditions such as high humidity and high temperatures may cause this...
Users Manual - English - Page 141
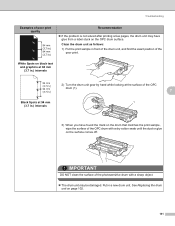
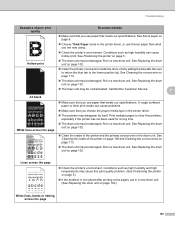
... dust or glue on the surface comes off. See Replacing the drum
unit on black text and graphics at 94 mm (3.7 in a new drum unit. Clean the drum unit as follows:
7
1) Put the print sample in front of the drum unit, and find the exact position of the OPC
drum (1).
7
Black Spots at 94 mm
1
(3.7 in.) intervals
3) When you have...
Users Manual - English - Page 151

... (Option) Face-down Face-up Manual Duplex Automatic Duplex
1 Calculated with 80 g/m2 (20 lb) paper
HL-5340D 50 sheets 250 sheets 250 sheets 150 sheets 1 sheet Yes Yes
HL-5350DN
HL-5370DW
141 Appendix
Software
0
Model
HL-5340D
HL-5350DN
HL-5370DW
Printer driver
Windows® 1 PCL driver for Windows® 2000 Professional, Windows® XP Home Edition, Windows...
Users Manual - English - Page 152
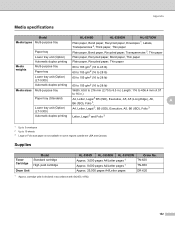
... 2 Up to 10 sheets 3 Legal or Folio size paper is declared in some regions outside the USA and Canada. Supplies 0
Toner Cartridge
Drum Unit
Model Standard cartridge High yield cartridge
HL-5340D HL-5350DN HL-5370DW Approx. 3,000 pages A4/Letter pages 1 Approx. 8,000 pages A4/Letter pages 1 Approx. 25,000 pages A4/Letter pages
Order No...
Quick Setup Guide - English - Page 1
... User's Guide)
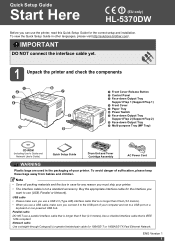
Quick Setup Guide
Drum Unit and Toner Cartridge Assembly
AC Power Cord
WARNING
Plastic bags are used in the packaging of your printer. • The interface cable is... twisted-pair cable for the correct setup and installation. Quick Setup Guide
Start Here
(EU only)
HL-5370DW
Before you can use (USB, Parallel or Network).
Parallel cable DO NOT use a parallel interface ...
Quick Setup Guide - English - Page 3
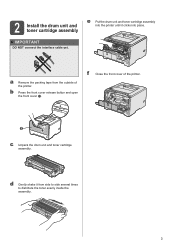
... front cover a.
d Gently shake it clicks into place.
IMPORTANT
DO NOT connect the interface cable yet. f Close the front cover of the printer.
2 Install the drum unit and toner cartridge assembly
e Put the drum unit and toner cartridge assembly into the printer until it from the outside of the printer.
11
c Unpack the drum unit and toner cartridge assembly.
Similar Questions

How To Reset Drum Error In Hl 5370dw
(Posted by lujjdill 9 years ago)

How To Reset Drum Unit On Hl-4040cdn
(Posted by eliaslla 9 years ago)

How To Reset Drum Light On Hl-5370dw
(Posted by kshepCindyL 10 years ago)

How Do You Reset The Drum On A Hl-5370dw Brother Printer
(Posted by smudavid 10 years ago)

How To Replace Fuser Unit Brother Hl-5370dw
(Posted by beaGa 10 years ago)