Quick Setup Guide - English
Page 6
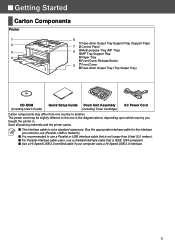
... diagram above, depending upon which country you intend to use (Parallel, USB or Network). ■ It is recommended to another. ■ Getting Started Carton Components Printer 1 8 2 1 Face-down Output Tray Support Flap (Support Flap) 7 2 Control Panel 3 6 3 Multi-purpose Tray (MP Tray) 4 MP Tray Support ...Front Cover 8 Face-down Output Tray (Top Output Tray) CD-ROM (including User's Guide) Quick Setup Guide Drum Unit Assembly (including Toner Cartridge) AC Power Cord Carton components may be slightly different to the one country to use a Parallel or USB interface cable that is...
... diagram above, depending upon which country you intend to use (Parallel, USB or Network). ■ It is recommended to another. ■ Getting Started Carton Components Printer 1 8 2 1 Face-down Output Tray Support Flap (Support Flap) 7 2 Control Panel 3 6 3 Multi-purpose Tray (MP Tray) 4 MP Tray Support ...Front Cover 8 Face-down Output Tray (Top Output Tray) CD-ROM (including User's Guide) Quick Setup Guide Drum Unit Assembly (including Toner Cartridge) AC Power Cord Carton components may be slightly different to the one country to use a Parallel or USB interface cable that is...

Quick Setup Guide - English
Page 10
...Front cover release button 4 Close the front cover of the printer. Setting Up Your Printer Windows® USB Windows® Parallel 2 Install the Drum Unit Assembly Do NOT connect the interface cable. You will be prompted to distribute the toner evenly inside the assembly. Rock it from side to side ...several times to connect the interface cable during the driver installation. 3 Put the drum unit assembly into the printer. 1 Open the front cover by pressing the front ...
...Front cover release button 4 Close the front cover of the printer. Setting Up Your Printer Windows® USB Windows® Parallel 2 Install the Drum Unit Assembly Do NOT connect the interface cable. You will be prompted to distribute the toner evenly inside the assembly. Rock it from side to side ...several times to connect the interface cable during the driver installation. 3 Put the drum unit assembly into the printer. 1 Open the front cover by pressing the front ...

Quick Setup Guide - English
Page 35
...Computer, Inc. registered mark. This product is a registered trademark of Brother Industries, Ltd. When shipping the Printer, the DRUM UNIT assembly and TONER CARTRIDGE must ship your Printer, carefully package the Printer in the U.S and other errors relating to the publication. The contents ...are registered Compilation and Publication Under the supervision of Brother Industries Ltd., this product are subject to typographical and other countries. Netware is strongly recommended that you must be removed from the Printer and placed in a Professional Environment. 34 ENERGY STAR...
...Computer, Inc. registered mark. This product is a registered trademark of Brother Industries, Ltd. When shipping the Printer, the DRUM UNIT assembly and TONER CARTRIDGE must ship your Printer, carefully package the Printer in the U.S and other errors relating to the publication. The contents ...are registered Compilation and Publication Under the supervision of Brother Industries Ltd., this product are subject to typographical and other countries. Netware is strongly recommended that you must be removed from the Printer and placed in a Professional Environment. 34 ENERGY STAR...

Users Manual - English
Page 3
...open the front or back cover of the printer. ■ Do not use the printer safely After you have turned off the power switch and unplugged the printer from the AC power outlet/socket. Cleaning with... volatile liquids such as thinner or benzene will damage the surface of the printer, never touch the shaded parts shown in the illustrations below. Please do NOT remove...plug with a caution label. Before you clean the printer, clear a paper jam or replace parts, make sure you have just used the printer, some parts inside the printer. ii The fuser unit is marked with wet ...
...open the front or back cover of the printer. ■ Do not use the printer safely After you have turned off the power switch and unplugged the printer from the AC power outlet/socket. Cleaning with... volatile liquids such as thinner or benzene will damage the surface of the printer, never touch the shaded parts shown in the illustrations below. Please do NOT remove...plug with a caution label. Before you clean the printer, clear a paper jam or replace parts, make sure you have just used the printer, some parts inside the printer. ii The fuser unit is marked with wet ...

Users Manual - English
Page 7
...Toner cartridge ...5-2 TONER LOW Message ...5-2 TONER LIFE END message 5-2 Replacing the toner cartridge 5-3 Drum unit ...5-8 CHANGE DRUM SOON message 5-8 Replacing the drum unit ...5-8 Replacing Maintenance Parts ...5-13 Maintenance Messages 5-13 Cleaning ...5-14 Cleaning the outside of the printer 5-14 Cleaning the inside of the printer... commands A-7 Print bar codes or expanded characters A-7 8 Appendix (For Europe and Other Countries B-1 Brother Numbers ...B-1 Important information: Regulations B-2 Radio interference (220 to 240 volt model only B-2 IEC 60825 specification (220 to 240 ...
...Toner cartridge ...5-2 TONER LOW Message ...5-2 TONER LIFE END message 5-2 Replacing the toner cartridge 5-3 Drum unit ...5-8 CHANGE DRUM SOON message 5-8 Replacing the drum unit ...5-8 Replacing Maintenance Parts ...5-13 Maintenance Messages 5-13 Cleaning ...5-14 Cleaning the outside of the printer 5-14 Cleaning the inside of the printer... commands A-7 Print bar codes or expanded characters A-7 8 Appendix (For Europe and Other Countries B-1 Brother Numbers ...B-1 Important information: Regulations B-2 Radio interference (220 to 240 volt model only B-2 IEC 60825 specification (220 to 240 ...
Users Manual - English
Page 9
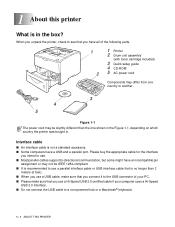
...cable that you intend to use a USB cable, make sure that you connect it to the USB connector of the following parts. 1 2 1 Printer 2 Drum unit assembly (with toner cartridge included) 3 Quick setup guide 4 CD-ROM 5 AC power cord Components may differ from one country to another. 3 4 5 Figure ...1-1 The power cord may not be slightly different than the one shown in the Figure 1-1, depending on which country the printer was bought in...
...cable that you intend to use a USB cable, make sure that you connect it to the USB connector of the following parts. 1 2 1 Printer 2 Drum unit assembly (with toner cartridge included) 3 Quick setup guide 4 CD-ROM 5 AC power cord Components may differ from one country to another. 3 4 5 Figure ...1-1 The power cord may not be slightly different than the one shown in the Figure 1-1, depending on which country the printer was bought in...
Users Manual - English
Page 54
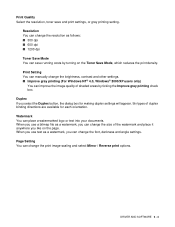
...of shaded areas by turning on the page. Resolution You can change the size of the watermark and place it anywhere you like on the Toner Save Mode, which reduces the print density. Print Setting You can manually change the brightness, contrast and other settings. ■ Improve gray ...or gray printing setting. DRIVER AND SOFTWARE 2 - 4 Duplex If you use text as follows: ■ 300 dpi ■ 600 dpi ■ 1200 dpi Toner Save Mode You can change the print image scaling and select Mirror / Reverse print options. When you select the Duplex button, the dialog box for...
...of shaded areas by turning on the page. Resolution You can change the size of the watermark and place it anywhere you like on the Toner Save Mode, which reduces the print density. Print Setting You can manually change the brightness, contrast and other settings. ■ Improve gray ...or gray printing setting. DRIVER AND SOFTWARE 2 - 4 Duplex If you use text as follows: ■ 300 dpi ■ 600 dpi ■ 1200 dpi Toner Save Mode You can change the print image scaling and select Mirror / Reverse print options. When you select the Duplex button, the dialog box for...

Users Manual - English
Page 56
...the light on for power saving. Job Spooling The printer saves data that you make changes to the settings of the following functions: ■ Multiple Page ■ Manual Duplex (For HL-6050) ■ Duplex (For HL-6050D and HL-6050DN) ■ Toner Save Mode ■ Paper Source ■ Media... Type Sleep Time When the printer does not receive data for a certain period of time (timeout), it enters ...
...the light on for power saving. Job Spooling The printer saves data that you make changes to the settings of the following functions: ■ Multiple Page ■ Manual Duplex (For HL-6050) ■ Duplex (For HL-6050D and HL-6050DN) ■ Toner Save Mode ■ Paper Source ■ Media... Type Sleep Time When the printer does not receive data for a certain period of time (timeout), it enters ...
Users Manual - English
Page 64
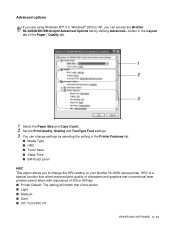
... is a special function that offers improved print quality of characters and graphics that conventional laser printers cannot attain with resolutions of 300 or 600 dpi. ■ Printer Default: The setting will match that of the printer. ■ Light ■ Medium ■ Dark. ■ Off: Turn HRC... change the HRC setting on your Brother HL-6050 series printer. button in the Printer Features list: ■ Media Type ■ HRC ■ Toner Save ■ Sleep Time ■ BR-Script Level HRC This option allows you can access the Brother HL-6050D/DN BR-Script3 Advanced Options tab by...
... is a special function that offers improved print quality of characters and graphics that conventional laser printers cannot attain with resolutions of 300 or 600 dpi. ■ Printer Default: The setting will match that of the printer. ■ Light ■ Medium ■ Dark. ■ Off: Turn HRC... change the HRC setting on your Brother HL-6050 series printer. button in the Printer Features list: ■ Media Type ■ HRC ■ Toner Save ■ Sleep Time ■ BR-Script Level HRC This option allows you can access the Brother HL-6050D/DN BR-Script3 Advanced Options tab by...

Users Manual - English
Page 65
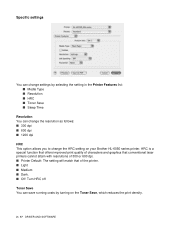
.... We recommend that you keep Sleep mode on for a certain period of your printer use. Receiving a print file or document automatically wakes up the printer. While the printer is in the Sleep Time screen again. Toner Save You can save running costs by double clicking the word Sleep Time in sleep... mode, the light on the display is off, but the printer can still receive data from the computer....
.... We recommend that you keep Sleep mode on for a certain period of your printer use. Receiving a print file or document automatically wakes up the printer. While the printer is in the Sleep Time screen again. Toner Save You can save running costs by double clicking the word Sleep Time in sleep... mode, the light on the display is off, but the printer can still receive data from the computer....
Users Manual - English
Page 67
...quality of characters and graphics that conventional laser printers cannot attain with resolutions of 300 or 600 dpi. ■ Printer Default: The setting will match that of the printer. ■ Light ■ Medium ■ Dark. ■ Off: Turn HRC off Toner Save You can change the resolution as...change settings by selecting the setting in the Printer Features list: ■ Media Type ■ Resolution ■ HRC ■ Toner Save ■ Sleep Time Resolution You can save running costs by turning on your Brother HL-6050 series printer. Specific settings You can change the HRC setting...
...quality of characters and graphics that conventional laser printers cannot attain with resolutions of 300 or 600 dpi. ■ Printer Default: The setting will match that of the printer. ■ Light ■ Medium ■ Dark. ■ Off: Turn HRC off Toner Save You can change the resolution as...change settings by selecting the setting in the Printer Features list: ■ Media Type ■ Resolution ■ HRC ■ Toner Save ■ Sleep Time Resolution You can save running costs by turning on your Brother HL-6050 series printer. Specific settings You can change the HRC setting...
Users Manual - English
Page 86
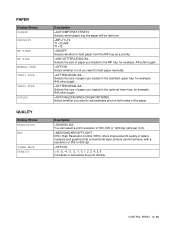
...dpi (dots per inch). =MEDIUM/DARK/OFF/LIGHT HRC: High Resolution Control (HRC) offers improved print quality of letters, numbers and graphics that conventional laser printers cannot achieve, with a resolution of the paper. Selects the size of paper you loaded in the standard upper tray, for example, A4/Letter/Legal...=LETTER/LEGAL/A4... PAPER Display Shows SOURCE PRIORITY MP FIRST MP SIZE MANUAL FEED TRAY1 SIZE TRAY2 SIZE DUPLEX QUALITY Display Shows RESOLUTION HRC TONER SAVE DENSITY Description =AUTO/MP/TRAY1/TRAY2 Selects which paper tray the paper will be fed from. =MP>T1>T2 T1>T2>MP ...
...dpi (dots per inch). =MEDIUM/DARK/OFF/LIGHT HRC: High Resolution Control (HRC) offers improved print quality of letters, numbers and graphics that conventional laser printers cannot achieve, with a resolution of the paper. Selects the size of paper you loaded in the standard upper tray, for example, A4/Letter/Legal...=LETTER/LEGAL/A4... PAPER Display Shows SOURCE PRIORITY MP FIRST MP SIZE MANUAL FEED TRAY1 SIZE TRAY2 SIZE DUPLEX QUALITY Display Shows RESOLUTION HRC TONER SAVE DENSITY Description =AUTO/MP/TRAY1/TRAY2 Selects which paper tray the paper will be fed from. =MP>T1>T2 T1>T2>MP ...

Users Manual - English
Page 96
... 3 - 1: List of factory settings Display Shows PAPER QUALITY SETUP Submenu SOURCE PRIORITY MP FIRST MP SIZE MANUAL FEED TRAY1 SIZE TRAY2 SIZE DUPLEX RESOLUTION HRC TONER SAVE DENSITY LANGUAGE PANEL CONTROL PRINT MENU ERROR BUZZER PANEL BUZZER BUZZER VOLUME POWER SAVE TIME AUTO CONTINUE LOCK PANEL REPRINT PAGE PROTECTION EMULATION KEEP...
... 3 - 1: List of factory settings Display Shows PAPER QUALITY SETUP Submenu SOURCE PRIORITY MP FIRST MP SIZE MANUAL FEED TRAY1 SIZE TRAY2 SIZE DUPLEX RESOLUTION HRC TONER SAVE DENSITY LANGUAGE PANEL CONTROL PRINT MENU ERROR BUZZER PANEL BUZZER BUZZER VOLUME POWER SAVE TIME AUTO CONTINUE LOCK PANEL REPRINT PAGE PROTECTION EMULATION KEEP...
Users Manual - English
Page 116
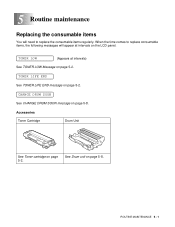
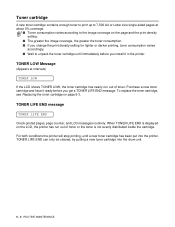
When the time comes to replace the consumable items regularly. TONER LIFE END See TONER LIFE END message on page 5-2. TONER LOW (Appears at intervals on the LCD panel. Accessories Toner Cartridge Drum Unit See Toner cartridge on page 5-2. See Drum unit on page 5-8. ROUTINE MAINTENANCE 5 - 1 CHANGE DRUM SOON See CHANGE DRUM SOON message on page 5-8. 5 Routine maintenance Replacing the consumable items You will need to replace consumable items, the following messages will appear at intervals) See TONER LOW Message on page 5-2.
When the time comes to replace the consumable items regularly. TONER LIFE END See TONER LIFE END message on page 5-2. TONER LOW (Appears at intervals on the LCD panel. Accessories Toner Cartridge Drum Unit See Toner cartridge on page 5-2. See Drum unit on page 5-8. ROUTINE MAINTENANCE 5 - 1 CHANGE DRUM SOON See CHANGE DRUM SOON message on page 5-8. 5 Routine maintenance Replacing the consumable items You will need to replace consumable items, the following messages will appear at intervals) See TONER LOW Message on page 5-2.
Users Manual - English
Page 117
...pages, page counter, and LCD messages routinely. TONER LIFE END can only be cleared, by putting a new toner cartridge into the printer. Purchase a new toner cartridge and have it in the printer. For both conditions the printer will stop printing, until immediately before you install... LCD, the printer has run out of toner or the toner is not evenly distributed inside the cartridge. TONER LOW Message (Appears at about 5% coverage. ■ Toner consumption varies according to the image coverage on page 5-3. Toner cartridge A new toner cartridge contains enough toner to print up...
...pages, page counter, and LCD messages routinely. TONER LIFE END can only be cleared, by putting a new toner cartridge into the printer. Purchase a new toner cartridge and have it in the printer. For both conditions the printer will stop printing, until immediately before you install... LCD, the printer has run out of toner or the toner is not evenly distributed inside the cartridge. TONER LOW Message (Appears at about 5% coverage. ■ Toner consumption varies according to the image coverage on page 5-3. Toner cartridge A new toner cartridge contains enough toner to print up...
Users Manual - English
Page 118
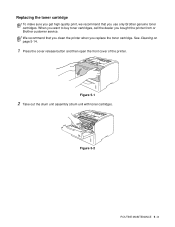
Figure 5-1 2 Take out the drum unit assembly (drum unit with toner cartridge). Figure 5-2 ROUTINE MAINTENANCE 5 - 3 Replacing the toner cartridge To make sure you get high quality print, we recommend that you clean the printer when you use only Brother genuine toner cartridges. See Cleaning on page 5-14. 1 Press the cover release button and then open the front cover of the printer. We recommend that you replace the toner cartridge. When you want to buy toner cartridges, call the dealer you bought the printer from or Brother customer service.
Figure 5-1 2 Take out the drum unit assembly (drum unit with toner cartridge). Figure 5-2 ROUTINE MAINTENANCE 5 - 3 Replacing the toner cartridge To make sure you get high quality print, we recommend that you clean the printer when you use only Brother genuine toner cartridges. See Cleaning on page 5-14. 1 Press the cover release button and then open the front cover of the printer. We recommend that you replace the toner cartridge. When you want to buy toner cartridges, call the dealer you bought the printer from or Brother customer service.

Users Manual - English
Page 119
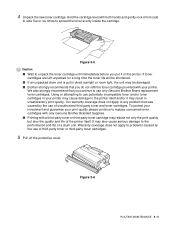
...wash it separate from static electricity, do not touch the electrodes shown in Figure 5-3. If you accidentally spill or scatter toner. ■ To prevent damage to seal up the toner cartridge tightly so that you place the drum unit assembly on your local waste disposal office. 5 - 4 ROUTINE ...and take the toner cartridge out of the drum unit assembly. Caution ■ We recommend that toner powder does not spill out of the cartridge. ■ Discard the used toner cartridge according to local regulations, keeping it off with cold water. ■ Be sure to the printer from domestic ...
...wash it separate from static electricity, do not touch the electrodes shown in Figure 5-3. If you accidentally spill or scatter toner. ■ To prevent damage to seal up the toner cartridge tightly so that you place the drum unit assembly on your local waste disposal office. 5 - 4 ROUTINE ...and take the toner cartridge out of the drum unit assembly. Caution ■ We recommend that toner powder does not spill out of the cartridge. ■ Discard the used toner cartridge according to local regulations, keeping it off with cold water. ■ Be sure to the printer from domestic ...
Users Manual - English
Page 120
... side five or six times to the printer itself . Our warranty coverage does not apply to replace consumed toner cartridges with only Genuine Brother Branded Supplies. ■ Printing with a third-party toner or third-party toner cartridge may be damaged. ■ Brother strongly recommends that you put in the printer. Figure 5-6 ROUTINE MAINTENANCE 5 - 5 Using or attempting to...
... side five or six times to the printer itself . Our warranty coverage does not apply to replace consumed toner cartridges with only Genuine Brother Branded Supplies. ■ Printing with a third-party toner or third-party toner cartridge may be damaged. ■ Brother strongly recommends that you put in the printer. Figure 5-6 ROUTINE MAINTENANCE 5 - 5 Using or attempting to...

Users Manual - English
Page 121
To prevent degradation to the print quality, do not touch the shaded parts shown in Figure 5-7. Figure 5-7 6 Put the new toner cartridge firmly into place. If you hear it lock into the drum unit until you put it in properly, the lock lever will lift automatically. Caution Put the toner cartridge in the drum unit immediately after you insert the toner cartridge properly or it may separate from the drum unit. 7 Gently wipe the scanner window with a dry, soft cloth. 5 - 6 ROUTINE MAINTENANCE Figure 5-9 Figure 5-8 Caution Make sure you have removed the protective cover.
To prevent degradation to the print quality, do not touch the shaded parts shown in Figure 5-7. Figure 5-7 6 Put the new toner cartridge firmly into place. If you hear it lock into the drum unit until you put it in properly, the lock lever will lift automatically. Caution Put the toner cartridge in the drum unit immediately after you insert the toner cartridge properly or it may separate from the drum unit. 7 Gently wipe the scanner window with a dry, soft cloth. 5 - 6 ROUTINE MAINTENANCE Figure 5-9 Figure 5-8 Caution Make sure you have removed the protective cover.
Users Manual - English
Page 123
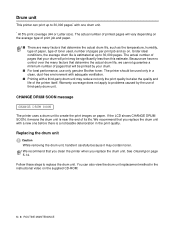
... SOON message CHANGE DRUM SOON The printer uses a drum unit to replace the drum unit. If the LCD shows CHANGE DRUM SOON, it may contain toner. We recommend that determine the actual drum life, such as the temperature, humidity, type of paper, type of toner used only in a clean, dust... there is a noticeable deterioration in the print quality. The actual number of printed pages will be printed by the use only genuine Brother toner. The printer should be significantly less than this estimate. The actual number of pages that you replace the drum unit. Because we have no control...
... SOON message CHANGE DRUM SOON The printer uses a drum unit to replace the drum unit. If the LCD shows CHANGE DRUM SOON, it may contain toner. We recommend that determine the actual drum life, such as the temperature, humidity, type of paper, type of toner used only in a clean, dust... there is a noticeable deterioration in the print quality. The actual number of printed pages will be printed by the use only genuine Brother toner. The printer should be significantly less than this estimate. The actual number of pages that you replace the drum unit. Because we have no control...


