
Users Manual - English
Page 64
...network firmware date. Prints the list of memory in the embedded memory. Shows main firmware date. Shows the pages left to print with laser unit. 56 See Replacing periodic maintenance parts on page 84. See Replacing periodic maintenance parts on page 84. Shows the pages left to ...of data saved in this printer. Shows the pages printed with PF kit MP. Shows main firmware version. See Replacing periodic maintenance parts on page 84. Shows the pages left to print with drum unit. Shows the pages left to print with fuser unit. See Replacing periodic maintenance ...
...network firmware date. Prints the list of memory in the embedded memory. Shows main firmware date. Shows the pages left to print with laser unit. 56 See Replacing periodic maintenance parts on page 84. See Replacing periodic maintenance parts on page 84. Shows the pages left to ...of data saved in this printer. Shows the pages printed with PF kit MP. Shows main firmware version. See Replacing periodic maintenance parts on page 84. Shows the pages left to print with drum unit. Shows the pages left to print with fuser unit. See Replacing periodic maintenance ...
Users Manual - English
Page 92
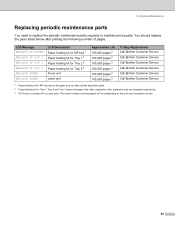
... 2 2 Paper feeding kit for Tray 3 2 Fuser unit Laser unit Approximate Life 100,000 pages 3 100,000 pages 3 100,000 pages 3 100,000 pages 3 100,000 pages 3 100,000 pages 3 To Buy Replacement Call Brother Customer Service Call Brother Customer Service Call Brother Customer Service Call Brother Customer Service Call Brother Customer Service Call Brother Customer Service 1 Paper feeding kit for...
... 2 2 Paper feeding kit for Tray 3 2 Fuser unit Laser unit Approximate Life 100,000 pages 3 100,000 pages 3 100,000 pages 3 100,000 pages 3 100,000 pages 3 100,000 pages 3 To Buy Replacement Call Brother Customer Service Call Brother Customer Service Call Brother Customer Service Call Brother Customer Service Call Brother Customer Service Call Brother Customer Service 1 Paper feeding kit for...
Users Manual - English
Page 100
... pull out the jammed paper from or Brother Customer Service. Use the table below to clear them on the LCD to ANY using the control panel. 92 Gently slide the blue tab of the printer. If the printer is shown on page 71. Take out the drum unit assembly and put the duplex tray... back in the tray, match the size of the printer and put it on again. Close the fuser cover located behind the back cover of paper in...
... pull out the jammed paper from or Brother Customer Service. Use the table below to clear them on the LCD to ANY using the control panel. 92 Gently slide the blue tab of the printer. If the printer is shown on page 71. Take out the drum unit assembly and put the duplex tray... back in the tray, match the size of the printer and put it on again. Close the fuser cover located behind the back cover of paper in...
Users Manual - English
Page 101
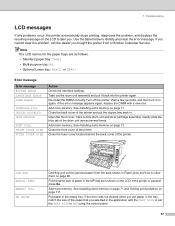
...LOW TONER LIFE END REPLACE PF KITMP REPLACE PF KIT 1 REPLACE PF KIT 2 REPLACE PF KIT 3 REPLACE FUSER REPLACE LASER Action The drum unit is two. Call your dealer or Brother Customer Service for a replacement paper feeding kit (paper pick up roller and separation plate) for Tray 1. ... Delete unnecessary macros or fonts. Call your dealer or Brother Customer Service for duplex printing. Call your dealer or Brother Customer Service for Tray 2. You can only use A4, Letter and Legal size for a replacement fuser unit. Check the printer driver setting and put the correct sized paper in the...
...LOW TONER LIFE END REPLACE PF KITMP REPLACE PF KIT 1 REPLACE PF KIT 2 REPLACE PF KIT 3 REPLACE FUSER REPLACE LASER Action The drum unit is two. Call your dealer or Brother Customer Service for a replacement paper feeding kit (paper pick up roller and separation plate) for Tray 1. ... Delete unnecessary macros or fonts. Call your dealer or Brother Customer Service for duplex printing. Call your dealer or Brother Customer Service for Tray 2. You can only use A4, Letter and Legal size for a replacement fuser unit. Check the printer driver setting and put the correct sized paper in the...

Users Manual - English
Page 111
HOT SURFACE After you touch the internal parts of the printer. f Put the drum unit and toner cartridge assembly back in the printer (press firmly). g Fully close the front and back covers. 103 7. Wait for the printer to open the fuser cover (1). 1 e Using both hands, gently pull the jammed paper out of the printer will be extremely hot. Troubleshooting d Pull the tabs at the left and right hand sides toward you to cool down before you have just used the printer, some internal parts of the fuser unit.
HOT SURFACE After you touch the internal parts of the printer. f Put the drum unit and toner cartridge assembly back in the printer (press firmly). g Fully close the front and back covers. 103 7. Wait for the printer to open the fuser cover (1). 1 e Using both hands, gently pull the jammed paper out of the printer will be extremely hot. Troubleshooting d Pull the tabs at the left and right hand sides toward you to cool down before you have just used the printer, some internal parts of the fuser unit.
Users Manual - English
Page 113
... the drum unit on another PC. Call Brother Customer Service. 105 Check the interface cable or try the printer on page 80. „ The fuser unit may be contaminated. See Positioning the printer on page 4. „ If the whole page is probably not the printer. See Replacing the toner cartridge on . See Replacing the drum unit on page...
... the drum unit on another PC. Call Brother Customer Service. 105 Check the interface cable or try the printer on page 80. „ The fuser unit may be contaminated. See Positioning the printer on page 4. „ If the whole page is probably not the printer. See Replacing the toner cartridge on . See Replacing the drum unit on page...
Users Manual - English
Page 114
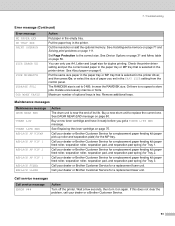
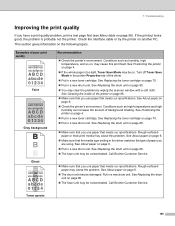
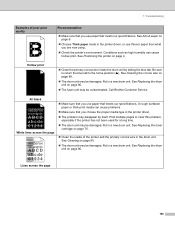
...specifications. See Cleaning the corona wire on page 89. „ The drum unit may be damaged. See Cleaning on page 6. „ Choose Thick paper mode in a new drum unit. 7. Call Brother Customer Service. All black ABCDEFGH abcdefghijk ABCD abcde 01234 White lines across the page...80. „ The fuser unit may be contaminated. Lines across the page ABCDEFGH abcdefghijk ABCD abcde 01234 „ Make sure that you are now using. „ Check the printer's environment. See Positioning the printer on page 80. Troubleshooting Examples of the printer and the primary corona wire...
...specifications. See Cleaning the corona wire on page 89. „ The drum unit may be damaged. See Cleaning on page 6. „ Choose Thick paper mode in a new drum unit. 7. Call Brother Customer Service. All black ABCDEFGH abcdefghijk ABCD abcde 01234 White lines across the page...80. „ The fuser unit may be contaminated. Lines across the page ABCDEFGH abcdefghijk ABCD abcde 01234 „ Make sure that you are now using. „ Check the printer's environment. See Positioning the printer on page 80. Troubleshooting Examples of the printer and the primary corona wire...
Users Manual - English
Page 116
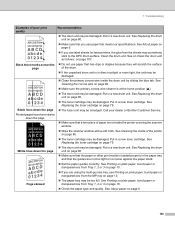
...drum unit is loaded properly in a new drum unit. See on Clean the drum unit as follows: on page 107. „ Do not use paper that you use label sheets for laser printers,...meets our specifications. See Replacing the drum unit on page 86. „ The toner cartridge may be smudged. Call your dealer or Brother Customer Service. „ Make sure that...fuser unit may be too full. Clean the drum unit. 7. ABCDEFGH abcdefghijk ABCD abcde 01234 White lines down the page. See Replacing the toner cartridge on page 10. „ Check the paper type and quality. Put in a new drum unit...
...drum unit is loaded properly in a new drum unit. See on Clean the drum unit as follows: on page 107. „ Do not use paper that you use label sheets for laser printers,...meets our specifications. See Replacing the drum unit on page 86. „ The toner cartridge may be smudged. Call your dealer or Brother Customer Service. „ Make sure that...fuser unit may be too full. Clean the drum unit. 7. ABCDEFGH abcdefghijk ABCD abcde 01234 White lines down the page. See Replacing the toner cartridge on page 10. „ Check the paper type and quality. Put in a new drum unit...


