
Users Manual - English
Page 9
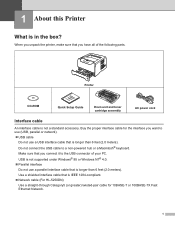
...is longer than 6 feet (2.0 meters). Buy the proper interface cable for 10BASE-T or 100BASE-TX Fast Ethernet Network. 1 1 About this Printer What is IEEE 1284-compliant. „ Network cable (For HL-5250DN) Use a straight-through Category5 (or greater) twisted-pair cable for the interface you want to use (USB... parts. Use a shielded interface cable that you unpack the printer, make sure that is in the box? Printer CD-ROM Quick Setup Guide Drum unit and toner cartridge assembly AC power cord Interface cable An interface cable is not a standard accessory. When you have ...
...is longer than 6 feet (2.0 meters). Buy the proper interface cable for 10BASE-T or 100BASE-TX Fast Ethernet Network. 1 1 About this Printer What is IEEE 1284-compliant. „ Network cable (For HL-5250DN) Use a straight-through Category5 (or greater) twisted-pair cable for the interface you want to use (USB... parts. Use a shielded interface cable that you unpack the printer, make sure that is in the box? Printer CD-ROM Quick Setup Guide Drum unit and toner cartridge assembly AC power cord Interface cable An interface cable is not a standard accessory. When you have ...
Quick Setup Guide - English
Page 8
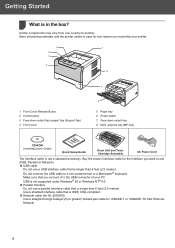
...cable Do not use a parallel interface cable that is IEEE 1284-compliant. „ Network cable (for HL-5250DN) Use a straight-through Category5 (or greater) twisted-pair cable for 10BASE-T or 100BASE-TX Fast Ethernet Network. 6 USB is not supported under Windows® 95 or Windows NT® 4.0. ...5 8 5 Paper tray 6 Power switch 7 Face-down output tray 8 Multi -purpose tray (MP tray) CD-ROM (including User's Guide) Quick Setup Guide Drum Unit and Toner Cartridge Assembly AC Power Cord The interface cable is longer than 6 feet (2.0 meters). Getting Started 1 What is in case ...
...cable Do not use a parallel interface cable that is IEEE 1284-compliant. „ Network cable (for HL-5250DN) Use a straight-through Category5 (or greater) twisted-pair cable for 10BASE-T or 100BASE-TX Fast Ethernet Network. 6 USB is not supported under Windows® 95 or Windows NT® 4.0. ...5 8 5 Paper tray 6 Power switch 7 Face-down output tray 8 Multi -purpose tray (MP tray) CD-ROM (including User's Guide) Quick Setup Guide Drum Unit and Toner Cartridge Assembly AC Power Cord The interface cable is longer than 6 feet (2.0 meters). Getting Started 1 What is in case ...

Quick Setup Guide - English
Page 10
... the Start button, Programs 1, your printer needs. Brother HL-5250DN), and then User's Guide. This file can be installed automatically when you install the driver. 1 All Programs for printer setup. Install Other Driver or Utilities (For Windows® users) Install optional drivers, utilities and Network management tools (For HL-5250DN users). You can also view the User...
... the Start button, Programs 1, your printer needs. Brother HL-5250DN), and then User's Guide. This file can be installed automatically when you install the driver. 1 All Programs for printer setup. Install Other Driver or Utilities (For Windows® users) Install optional drivers, utilities and Network management tools (For HL-5250DN users). You can also view the User...

Quick Setup Guide - English
Page 15
... (Windows® 98/Me/2000/XP only 14 For parallel interface cable users 16 For network interface cable users (For HL-5250DN 17 „ For Brother Peer-to-Peer network printer users (LPR/NetBIOS 17 „ For shared network printer users ...19 Macintosh® For USB interface cable users 20 „ For Mac ... For Mac OS® 9.1 to 9.2 users...22 For network interface cable users (For HL-5250DN 23 „ For Mac OS® X 10.2.4 or greater users 23 „ For Mac OS® 9.1 to find the best solution for Windows® in this Quick Setup Guide are based on Mac OS® X 10.4. 13 ...
... (Windows® 98/Me/2000/XP only 14 For parallel interface cable users 16 For network interface cable users (For HL-5250DN 17 „ For Brother Peer-to-Peer network printer users (LPR/NetBIOS 17 „ For shared network printer users ...19 Macintosh® For USB interface cable users 20 „ For Mac ... For Mac OS® 9.1 to 9.2 users...22 For network interface cable users (For HL-5250DN 23 „ For Mac OS® X 10.2.4 or greater users 23 „ For Mac OS® 9.1 to find the best solution for Windows® in this Quick Setup Guide are based on Mac OS® X 10.4. 13 ...

Quick Setup Guide - English
Page 25
Macintosh® 7 Double-click the Utilities folder. 2 Click Network cable users and follow the on the printer power switch. For Mac OS® 10.4 or greater users: Go to a free port on the menu ... to your Macintosh®. 8 Double-click the Printer Setup Utility icon. 3 Turn off the printer power switch. 4 Connect the network interface cable to the printer, and then connect it to Step 12. 23 Macintosh® Network Installing the Printer Driver For network interface cable users (For HL-5250DN) 5 For Mac OS® X 10.2.4 or greater users...
Macintosh® 7 Double-click the Utilities folder. 2 Click Network cable users and follow the on the printer power switch. For Mac OS® 10.4 or greater users: Go to a free port on the menu ... to your Macintosh®. 8 Double-click the Printer Setup Utility icon. 3 Turn off the printer power switch. 4 Connect the network interface cable to the printer, and then connect it to Step 12. 23 Macintosh® Network Installing the Printer Driver For network interface cable users (For HL-5250DN) 5 For Mac OS® X 10.2.4 or greater users...

Quick Setup Guide - English
Page 26
Macintosh® Network Note If there is now complete. 12 Choose Brother HL-5250DN series, and then click Add. Network User's Guide Chapter 6 . 24 The setup is more than one of the same model printer (HL-5250DN) connected on your network, the Ethernet address (MAC address) will be displayed after the model name. Go to Step 13. STEP2 Installing the Printer Driver Macintosh® 10 Make the following selection. 13 Click Printer Setup Utility, then Quit Printer Setup Utility. 11 Choose Brother HL-5250DN series, and then click Add.
Macintosh® Network Note If there is now complete. 12 Choose Brother HL-5250DN series, and then click Add. Network User's Guide Chapter 6 . 24 The setup is more than one of the same model printer (HL-5250DN) connected on your network, the Ethernet address (MAC address) will be displayed after the model name. Go to Step 13. STEP2 Installing the Printer Driver Macintosh® 10 Make the following selection. 13 Click Printer Setup Utility, then Quit Printer Setup Utility. 11 Choose Brother HL-5250DN series, and then click Add.

Network Users Manual - English
Page 46
The Printer Settings Page prints a report listing all the current printer settings including the network print server settings. Printing the Printer Settings Page Note Node name: Node name appears in the Ready state. 7 - 6 The default Node name is "BRN_xxxxxx" ("xxxxxx"... the IP address. Control panel setup NETBIOS/IP You can print the Printer Settings Page using the printer control panel. This change is valid after the print server has been reset. You can enable and disable the NetBIOS facility to print the Printer Settings Page (For HL-5250DN) 1 Make sure that the ...
The Printer Settings Page prints a report listing all the current printer settings including the network print server settings. Printing the Printer Settings Page Note Node name: Node name appears in the Ready state. 7 - 6 The default Node name is "BRN_xxxxxx" ("xxxxxx"... the IP address. Control panel setup NETBIOS/IP You can print the Printer Settings Page using the printer control panel. This change is valid after the print server has been reset. You can enable and disable the NetBIOS facility to print the Printer Settings Page (For HL-5250DN) 1 Make sure that the ...
Network Users Manual - English
Page 47
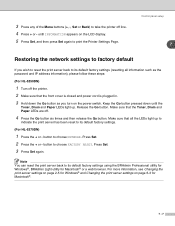
Control panel setup 7 Restoring the network settings to factory default If you turn on the power switch. For...Keep the Go button pressed down the Go button as the password and IP address information), please follow these steps: (For HL-5250DN) 1 Turn off the printer. 2 Make sure that the Toner, Drum and Paper LEDs are off line. 4 Press .... 2 Press the + or - Make sure that all information such as you wish to reset the print server back to choose NETWORK. Make sure that the front cover is closed and power cord is plugged in. 3 Hold down until INFORMATION appears on page 6-3...
Control panel setup 7 Restoring the network settings to factory default If you turn on the power switch. For...Keep the Go button pressed down the Go button as the password and IP address information), please follow these steps: (For HL-5250DN) 1 Turn off the printer. 2 Make sure that the Toner, Drum and Paper LEDs are off line. 4 Press .... 2 Press the + or - Make sure that all information such as you wish to reset the print server back to choose NETWORK. Make sure that the front cover is closed and power cord is plugged in. 3 Hold down until INFORMATION appears on page 6-3...
Network Users Manual - English
Page 48
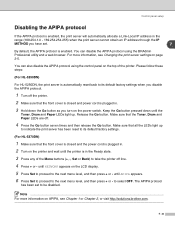
...LEDs light up . Please follow these steps: (For HL-5250DN) For HL-5250DN, the print server is automatically reset back to its default factory settings. (For HL-5270DN) 1 Make sure that the front cover is ...set to be disabled. to the next menu level, and then press + or - Control panel setup Disabling the APIPA protocol If the APIPA protocol is enabled, the print server will automatically allocate a...(+, -, Set or Back) to the next menu level, and then press + or - until NETWORK appears on APIPA, see Changing the print server settings on the printer and wait until APIPA appears. ...
...LEDs light up . Please follow these steps: (For HL-5250DN) For HL-5250DN, the print server is automatically reset back to its default factory settings. (For HL-5270DN) 1 Make sure that the front cover is ...set to be disabled. to the next menu level, and then press + or - Control panel setup Disabling the APIPA protocol If the APIPA protocol is enabled, the print server will automatically allocate a...(+, -, Set or Back) to the next menu level, and then press + or - until NETWORK appears on APIPA, see Changing the print server settings on the printer and wait until APIPA appears. ...


