Users Manual - English
Page 93
... until the Toner LED comes on. The print server has been reset to 4 above, however, hold down the Go button until the yellow Status LED comes on , release the Go button. 5 When all information such as you turn on the power switch. Network factory default setting (For HL-5070N) If you...visit http://solutions.brother.com CONTROL PANEL 3 - 11 When the Status LED comes on . Keep the button pressed down until the Status LED is plugged in. 3 Hold down the Go button as the password and IP address information), please follow steps 1 to its default factory settings (resetting all the ...
... until the Toner LED comes on. The print server has been reset to 4 above, however, hold down the Go button until the yellow Status LED comes on , release the Go button. 5 When all information such as you turn on the power switch. Network factory default setting (For HL-5070N) If you...visit http://solutions.brother.com CONTROL PANEL 3 - 11 When the Status LED comes on . Keep the button pressed down until the Status LED is plugged in. 3 Hold down the Go button as the password and IP address information), please follow steps 1 to its default factory settings (resetting all the ...
Users Manual - English
Page 109
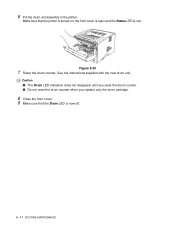
Caution ■ The Drum LED indication does not disappear until you reset the drum counter. ■ Do not reset the drum counter when you replace only the toner cartridge. 8 Close the front cover. 9 Make sure that the printer is turned on, the front cover is open and the Status LED is now off. 5 - 11 ROUTINE MAINTENANCE See the instructions supplied with the new drum unit. Make sure that the Drum LED is red. 6 Put the drum unit assembly in the printer. Figure 5-20 7 Reset the drum counter.
Caution ■ The Drum LED indication does not disappear until you reset the drum counter. ■ Do not reset the drum counter when you replace only the toner cartridge. 8 Close the front cover. 9 Make sure that the printer is turned on, the front cover is open and the Status LED is now off. 5 - 11 ROUTINE MAINTENANCE See the instructions supplied with the new drum unit. Make sure that the Drum LED is red. 6 Put the drum unit assembly in the printer. Figure 5-20 7 Reset the drum counter.


