Users Manual - English
Page 17
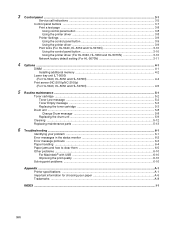
... Installing additional memory 4-2 Lower tray unit (LT-5000) (For HL-5040, HL-5050 and HL-5070N 4-4 Print server (NC-2010p/NC-2100p) (For HL-5040, HL-5050 and HL-5070N 4-5 5 Routine maintenance ...5-1 Toner cartridge ...5-2 Toner Low message ...5-2 Toner Empty message ...5-3 Replacing the toner cartridge 5-3 Drum unit ...5-8 Change Drum message ...5-8 Replacing the drum unit ...5-9 Cleaning ...5-12 Replacing maintenance parts ...5-13 6 Troubleshooting ...6-1 Identifying your problem ...6-1 Error messages in the status monitor 6-2 Error message printouts ...6-3 Paper handling ...6-4 Paper...
... Installing additional memory 4-2 Lower tray unit (LT-5000) (For HL-5040, HL-5050 and HL-5070N 4-4 Print server (NC-2010p/NC-2100p) (For HL-5040, HL-5050 and HL-5070N 4-5 5 Routine maintenance ...5-1 Toner cartridge ...5-2 Toner Low message ...5-2 Toner Empty message ...5-3 Replacing the toner cartridge 5-3 Drum unit ...5-8 Change Drum message ...5-8 Replacing the drum unit ...5-9 Cleaning ...5-12 Replacing maintenance parts ...5-13 6 Troubleshooting ...6-1 Identifying your problem ...6-1 Error messages in the status monitor 6-2 Error message printouts ...6-3 Paper handling ...6-4 Paper...
Users Manual - English
Page 41
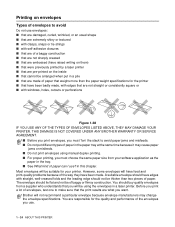
... printed by a laser printer ■ that are pre-printed on the inside ■ that cannot be arranged when put different types of paper in the paper tray at the same time because it may change the envelope specifications. in a pile ■ that are what you use ? A suitable envelope should not be of baggy or flimsy construction. Brother will be suitable for your software application as the paper...
... printed by a laser printer ■ that are pre-printed on the inside ■ that cannot be arranged when put different types of paper in the paper tray at the same time because it may change the envelope specifications. in a pile ■ that are what you use ? A suitable envelope should not be of baggy or flimsy construction. Brother will be suitable for your software application as the paper...

Users Manual - English
Page 60
Manual duplex printing from the paper tray 1 Choose the Manual Duplex mode you need from the printer driver. 2 The printer will now automatically print all the odd-numbered pages on the other side of the paper first. 3 Remove the printed even-numbered pages from the output tray and put them back in the printer driver. The PS driver does not support manual duplex printing. ABOUT THIS PRINTER 1 - 43 For more information about how to choose the settings, see the Help text in the paper tray, placing...
Manual duplex printing from the paper tray 1 Choose the Manual Duplex mode you need from the printer driver. 2 The printer will now automatically print all the odd-numbered pages on the other side of the paper first. 3 Remove the printed even-numbered pages from the output tray and put them back in the printer driver. The PS driver does not support manual duplex printing. ABOUT THIS PRINTER 1 - 43 For more information about how to choose the settings, see the Help text in the paper tray, placing...
Users Manual - English
Page 69
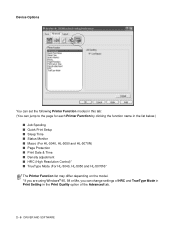
...; Job Spooling ■ Quick Print Setup ■ Sleep Time ■ Status Monitor ■ Macro (For HL-5040, HL-5050 and HL-5070N) ■ Page Protection ■ Print Date & Time ■ Density adjustment ■ HRC (High Resolution Control)* ■ TrueType Mode (For HL-5040, HL-5050 and HL-5070N)* The Printer Function list may differ depending on the model. * If you are using Windows® 95, 98 or Me, you can change settings of HRC and TrueType Mode in Print Setting in...
...; Job Spooling ■ Quick Print Setup ■ Sleep Time ■ Status Monitor ■ Macro (For HL-5040, HL-5050 and HL-5070N) ■ Page Protection ■ Print Date & Time ■ Density adjustment ■ HRC (High Resolution Control)* ■ TrueType Mode (For HL-5040, HL-5050 and HL-5070N)* The Printer Function list may differ depending on the model. * If you are using Windows® 95, 98 or Me, you can change settings of HRC and TrueType Mode in Print Setting in...

Users Manual - English
Page 70
... into sleep mode. Sleep mode acts as an overlay on any errors that you can reprint a document without sending the data again from the computer. Receiving a print file or document automatically wakes up the printer. Pressing one of the buttons will save a page of your data using the Reprint function, clear the Use Reprint check box in the Sleep Time screen again. Status Monitor This reports the printer status (any documents. Macro (For HL-5040, HL-5050 and HL-5070N...
... into sleep mode. Sleep mode acts as an overlay on any errors that you can reprint a document without sending the data again from the computer. Receiving a print file or document automatically wakes up the printer. Pressing one of the buttons will save a page of your data using the Reprint function, clear the Use Reprint check box in the Sleep Time screen again. Status Monitor This reports the printer status (any documents. Macro (For HL-5040, HL-5050 and HL-5070N...
Users Manual - English
Page 81
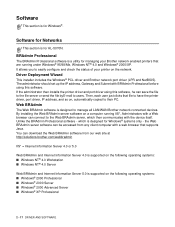
... easily configure and check the status of your Brother network enabled printers that supports Java. The administrator should set up the IP address, Gateway and Subnet with the device itself. the Web BRAdmin server software can connect to users. Driver Deployment Wizard This installer includes the Windows® PCL driver and Brother network port driver (LPR and NetBIOS). Unlike the BRAdmin Professional software - Software This section is for HL-5070N. You can save the file to the file server or send the file...
... easily configure and check the status of your Brother network enabled printers that supports Java. The administrator should set up the IP address, Gateway and Subnet with the device itself. the Web BRAdmin server software can connect to users. Driver Deployment Wizard This installer includes the Windows® PCL driver and Brother network port driver (LPR and NetBIOS). Unlike the BRAdmin Professional software - Software This section is for HL-5070N. You can save the file to the file server or send the file...
Users Manual - English
Page 106
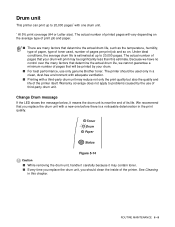
...-party drum unit. ROUTINE MAINTENANCE 5 - 8 Drum unit This printer can print up to 20,000 pages. The actual number of pages that will print may be used , number of the printer. We recommend that determine the actual drum life, such as the temperature, humidity, type of paper, type of toner used only in a clean, dust-free environment with adequate ventilation. ■ Printing with a third-party drum unit may contain toner. ■ Every time you replace the drum unit, you replace the drum unit...
...-party drum unit. ROUTINE MAINTENANCE 5 - 8 Drum unit This printer can print up to 20,000 pages. The actual number of pages that will print may be used , number of the printer. We recommend that determine the actual drum life, such as the temperature, humidity, type of paper, type of toner used only in a clean, dust-free environment with adequate ventilation. ■ Printing with a third-party drum unit may contain toner. ■ Every time you replace the drum unit, you replace the drum unit...
Users Manual - English
Page 112
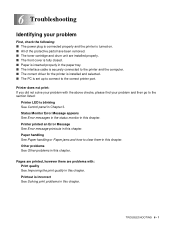
... the above checks, please find your problem First, check the following: ■ The power plug is connected properly and the printer is turned on. ■ All of the protective parts have been removed. ■ The toner cartridge and drum unit are problems with: Print quality See Improving the print quality in this chapter. 6 Troubleshooting Identifying your problem and then go to the section listed: Printer LED is blinking See Control panel in Chapter...
... the above checks, please find your problem First, check the following: ■ The power plug is connected properly and the printer is turned on. ■ All of the protective parts have been removed. ■ The toner cartridge and drum unit are problems with: Print quality See Improving the print quality in this chapter. 6 Troubleshooting Identifying your problem and then go to the section listed: Printer LED is blinking See Control panel in Chapter...
Users Manual - English
Page 113
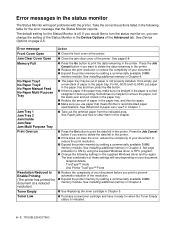
... use ? See Installing additional memory in Chapter 1. ■ Take out the jammed paper from the indicated area. The best combination of these settings will report problems with the printer. Error message Front Cover Open Jam Clear Cover Open Memory Full No Paper Tray1 No Paper Tray2 No Paper Manual Feed No Paper Multi Purpose Tray Jam Tray 1 Jam Tray 2 Jam Inside Jam Rear Jam Multi Purpose Tray Print Overrun Resolution Reduced to ON by adding a commercially available DIMM memory module. Set page protection to Enable Printing (The printer has printed the document...
... use ? See Installing additional memory in Chapter 1. ■ Take out the jammed paper from the indicated area. The best combination of these settings will report problems with the printer. Error message Front Cover Open Jam Clear Cover Open Memory Full No Paper Tray1 No Paper Tray2 No Paper Manual Feed No Paper Multi Purpose Tray Jam Tray 1 Jam Tray 2 Jam Inside Jam Rear Jam Multi Purpose Tray Print Overrun Resolution Reduced to ON by adding a commercially available DIMM memory module. Set page protection to Enable Printing (The printer has printed the document...
Users Manual - English
Page 114
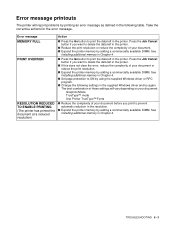
.... ■ Change the following table. Press the Job Cancel button if you want to delete the data left in Chapter 4. Error message MEMORY FULL PRINT OVERRUN RESOLUTION REDUCED TO ENABLE PRINTING (The printer has printed the document at a reduced resolution) Action ■ Press the Go button to print the data left in the supplied Windows driver and try again. TROUBLESHOOTING 6 - 3 The best combination of these settings will report problems by printing an error message as...
.... ■ Change the following table. Press the Job Cancel button if you want to delete the data left in Chapter 4. Error message MEMORY FULL PRINT OVERRUN RESOLUTION REDUCED TO ENABLE PRINTING (The printer has printed the document at a reduced resolution) Action ■ Press the Go button to print the data left in the supplied Windows driver and try again. TROUBLESHOOTING 6 - 3 The best combination of these settings will report problems by printing an error message as...
Users Manual - English
Page 115
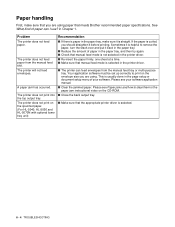
... paper in Chapter 1. Please see Paper jams and how to clear them or the paper jam instructional video on the envelope size you should straighten it is helpful to print on the CD-ROM. ■ Close the back output tray. ■ Make sure that the appropriate printer driver is selected. 6 - 4 TROUBLESHOOTING The printer does not feed paper from the manual feed tray or multi-purpose tray. Your application software must be set up correctly to remove the paper, turn...
... paper in Chapter 1. Please see Paper jams and how to clear them or the paper jam instructional video on the envelope size you should straighten it is helpful to print on the CD-ROM. ■ Close the back output tray. ■ Make sure that the appropriate printer driver is selected. 6 - 4 TROUBLESHOOTING The printer does not feed paper from the manual feed tray or multi-purpose tray. Your application software must be set up correctly to remove the paper, turn...
Users Manual - English
Page 116
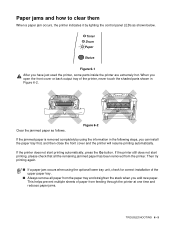
... open the front cover or back output tray of paper from the paper tray and straighten the stack when you have just used the printer, some parts inside the printer are extremely hot. Figure 6-2 If the jammed paper is removed completely by lighting the control panel LEDs as follows. Toner Drum Paper Status Figure 6-1 After you add new paper. If the printer does not start printing, please check that all paper from feeding through the printer at one time and reduces paper jams. TROUBLESHOOTING...
... open the front cover or back output tray of paper from the paper tray and straighten the stack when you have just used the printer, some parts inside the printer are extremely hot. Figure 6-2 If the jammed paper is removed completely by lighting the control panel LEDs as follows. Toner Drum Paper Status Figure 6-1 After you add new paper. If the printer does not start printing, please check that all paper from feeding through the printer at one time and reduces paper jams. TROUBLESHOOTING...
Users Manual - English
Page 124
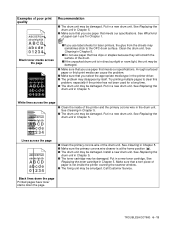
... media type in the printer driver. ■ The problem may be damaged. TROUBLESHOOTING 6 - 13 Examples of poor print quality ABCDEFGH abcdefghijk ABCD abcde 01234 Black toner marks across the page ABCDEFGH abcdefghijk ABCD abcde 01234 Recommendation ■ The drum unit may sometimes stick to clear this problem, especially if the printer has not been used for laser printers, the glue from the sheets may be damaged. Install a new drum unit. Black lines down the page Printed pages have toner...
... media type in the printer driver. ■ The problem may be damaged. TROUBLESHOOTING 6 - 13 Examples of poor print quality ABCDEFGH abcdefghijk ABCD abcde 01234 Black toner marks across the page ABCDEFGH abcdefghijk ABCD abcde 01234 Recommendation ■ The drum unit may sometimes stick to clear this problem, especially if the printer has not been used for laser printers, the glue from the sheets may be damaged. Install a new drum unit. Black lines down the page Printed pages have toner...
Users Manual - English
Page 127
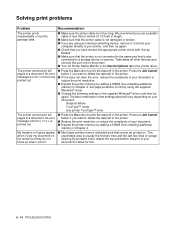
.... ■ Make sure that the printer cable is not connected to print the data left in the printer. See Installing additional memory in the printer. ■ If this . 6 - 16 TROUBLESHOOTING Adjust the top and bottom margins of less than 2 metres (6 1/2 feet) in the printer. Solving print problems Problem The printer prints unexpectedly or it . Take away all other devices and connect the port only to the printer. ■ Turn off Printer Status Monitor in...
.... ■ Make sure that the printer cable is not connected to print the data left in the printer. See Installing additional memory in the printer. ■ If this . 6 - 16 TROUBLESHOOTING Adjust the top and bottom margins of less than 2 metres (6 1/2 feet) in the printer. Solving print problems Problem The printer prints unexpectedly or it . Take away all other devices and connect the port only to the printer. ■ Turn off Printer Status Monitor in...
Quick Setup Guide - English
Page 2
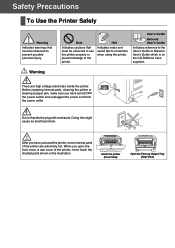
... Indicates notes and useful tips to the User's Guide or Network User's Guide which is on the CD-ROM we have supplied. After you have turned OFF the power switch and unplugged the power cord from the power outlet. Inside the printer (Front View) Open the Face-up Output Tray (Rear View) Before replacing internal parts, cleaning the printer or clearing a paper jam, make sure you open the front cover or rear cover of the printer are high...
... Indicates notes and useful tips to the User's Guide or Network User's Guide which is on the CD-ROM we have supplied. After you have turned OFF the power switch and unplugged the power cord from the power outlet. Inside the printer (Front View) Open the Face-up Output Tray (Rear View) Before replacing internal parts, cleaning the printer or clearing a paper jam, make sure you open the front cover or rear cover of the printer are high...
Quick Setup Guide - English
Page 3
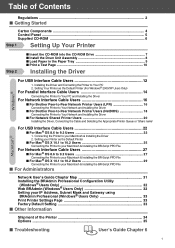
... Information Shipment of Contents Regulations ...2 ■ Getting Started Carton Components 4 Control Panel ...5 Supplied CD-ROM 6 Step 1 Setting Up Your Printer Step 2 ■ Insert the CD-ROM into the CD-ROM Drive 7 ■ Install the Drum Unit Assembly 8 ■ Load Paper in the Paper Tray 9 ■ Print a Test Page 10 Installing the Driver For USB Interface Cable Users 12 1. Connecting the Printer to Your PC 2. Table of the Printer 34 Options ...35 ■ Troubleshooting User's Guide Chapter 6 1
... Information Shipment of Contents Regulations ...2 ■ Getting Started Carton Components 4 Control Panel ...5 Supplied CD-ROM 6 Step 1 Setting Up Your Printer Step 2 ■ Insert the CD-ROM into the CD-ROM Drive 7 ■ Install the Drum Unit Assembly 8 ■ Load Paper in the Paper Tray 9 ■ Print a Test Page 10 Installing the Driver For USB Interface Cable Users 12 1. Connecting the Printer to Your PC 2. Table of the Printer 34 Options ...35 ■ Troubleshooting User's Guide Chapter 6 1
Quick Setup Guide - English
Page 8
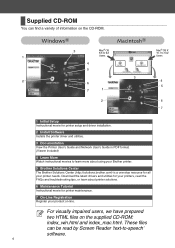
...-ROM. 1 2 6 3 Mac® OS 8.6 to 9.2 Users 4 5 6 7 1 2 Mac® OS X 10.1 to 10.2 Users 3 4 5 6 7 1 Initial Setup Instructional movie for printer setup and driver installation. 2 Install Software Installs the printer driver and utilities. 3 Documentation View the Printer User's Guide and Network User's Guide in PDF format. (Viewer included) 4 Learn More Watch instructional movies to -speech' software. For visually impaired users, we have prepared two HTML files on the supplied CD-ROM: index_win.html and index_mac.html. Download the latest drivers and...
...-ROM. 1 2 6 3 Mac® OS 8.6 to 9.2 Users 4 5 6 7 1 2 Mac® OS X 10.1 to 10.2 Users 3 4 5 6 7 1 Initial Setup Instructional movie for printer setup and driver installation. 2 Install Software Installs the printer driver and utilities. 3 Documentation View the Printer User's Guide and Network User's Guide in PDF format. (Viewer included) 4 Learn More Watch instructional movies to -speech' software. For visually impaired users, we have prepared two HTML files on the supplied CD-ROM: index_win.html and index_mac.html. Download the latest drivers and...
Quick Setup Guide - English
Page 13
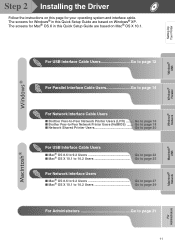
... interface cable. For USB Interface Cable Users Go to page 12 For Parallel Interface Cable Users Go to page 14 For Network Interface Cable Users ■ Brother Peer-to page 31 11 Macintosh® USB Macintosh® Network Fo r Administrators Go to page 16 ■ Brother Peer-to-Peer Network Printer Users (NetBIOS) ....... Setting Up Your Printer Windows® USB Windows® Parallel Windows® Network Step 2 Installing the Driver Follow the instructions on this page for Mac® OS X in this Quick Setup Guide are...
... interface cable. For USB Interface Cable Users Go to page 12 For Parallel Interface Cable Users Go to page 14 For Network Interface Cable Users ■ Brother Peer-to page 31 11 Macintosh® USB Macintosh® Network Fo r Administrators Go to page 16 ■ Brother Peer-to-Peer Network Printer Users (NetBIOS) ....... Setting Up Your Printer Windows® USB Windows® Parallel Windows® Network Step 2 Installing the Driver Follow the instructions on this page for Mac® OS X in this Quick Setup Guide are...
Quick Setup Guide - English
Page 14
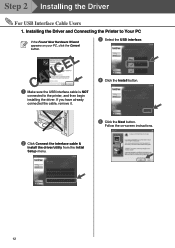
If you have already connected the cable, remove it. 4 Click the Install button. 5 Click the Next button. Installing the Driver and Connecting the Printer to the printer, and then begin installing the driver. Follow the on your PC, click the Cancel button. 3 Select the USB interface. Step 2 Installing the Driver For USB Interface Cable Users 1. CANCEL 1 Make sure the USB interface cable is NOT connected to Your PC If the Found New Hardware Wizard appears on -screen instructions. 2 Click Connect the interface cable & Install the driver/utility from the Initial Setup menu. 12
If you have already connected the cable, remove it. 4 Click the Install button. 5 Click the Next button. Installing the Driver and Connecting the Printer to the printer, and then begin installing the driver. Follow the on your PC, click the Cancel button. 3 Select the USB interface. Step 2 Installing the Driver For USB Interface Cable Users 1. CANCEL 1 Make sure the USB interface cable is NOT connected to Your PC If the Found New Hardware Wizard appears on -screen instructions. 2 Click Connect the interface cable & Install the driver/utility from the Initial Setup menu. 12
Quick Setup Guide - English
Page 26
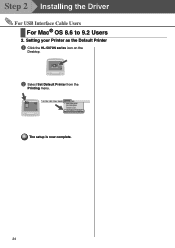
Setting your Printer as the Default Printer 1 Click the HL-5070N series icon on the Desktop. 2 Select Set Default Printer from the Printing menu. The setup is now complete. 24 Step 2 Installing the Driver For USB Interface Cable Users For Mac® OS 8.6 to 9.2 Users 2.
Setting your Printer as the Default Printer 1 Click the HL-5070N series icon on the Desktop. 2 Select Set Default Printer from the Printing menu. The setup is now complete. 24 Step 2 Installing the Driver For USB Interface Cable Users For Mac® OS 8.6 to 9.2 Users 2.


