Users Manual - English
Page 83
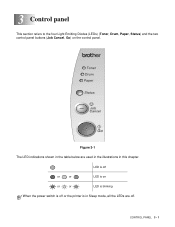
LED is on the control panel. CONTROL PANEL 3 - 1 3 Control panel This section refers to the four Light Emitting Diodes (LEDs) (Toner, Drum, Paper, Status) and the two control panel buttons (Job Cancel, Go) on or or LED is blinking When the power switch is off or the printer is in Sleep mode, all the LEDs are used in the illustrations in the table below are off or or LED is off . Figure 3-1 The LED indications shown in this chapter.
LED is on the control panel. CONTROL PANEL 3 - 1 3 Control panel This section refers to the four Light Emitting Diodes (LEDs) (Toner, Drum, Paper, Status) and the two control panel buttons (Job Cancel, Go) on or or LED is blinking When the power switch is off or the printer is in Sleep mode, all the LEDs are used in the illustrations in the table below are off or or LED is off . Figure 3-1 The LED indications shown in this chapter.
Users Manual - English
Page 87
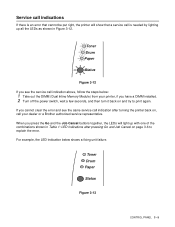
... Toner Drum Paper Status Figure 3-12 If you cannot clear the error and see the service call indication above, follow the steps below shows a fixing unit failure. When you have a DIMM installed. 2 Turn off the power switch, wait a few seconds, and then turn it back on , call your dealer or a Brother authorized... that cannot be put right, the printer will light up all the LEDs as shown in Table 1: LED indications after turning the printer back on and try to explain the error. Service call indications If there is needed by lighting up with one of the combinations shown in Figure...
... Toner Drum Paper Status Figure 3-12 If you cannot clear the error and see the service call indication above, follow the steps below shows a fixing unit failure. When you have a DIMM installed. 2 Turn off the power switch, wait a few seconds, and then turn it back on , call your dealer or a Brother authorized... that cannot be put right, the printer will light up all the LEDs as shown in Table 1: LED indications after turning the printer back on and try to explain the error. Service call indications If there is needed by lighting up with one of the combinations shown in Figure...

Users Manual - English
Page 92
... internal fonts using Brother's Windows® PCL printer driver, you turn on the power switch. When the Toner LED comes on, release the Go button. 4 Press and hold the Go button again until the Toner LED comes on , release the Go button. Using the printer driver (For HL-5040, HL-5050 and HL...panel button or printer driver. Print fonts (For HL-5040, HL-5050 and HL-5070N) You can print a list of the internal fonts by clicking the Print Fonts button in . 3 Hold down until the Drum LED comes on. 5 When the Drum LED comes on . All the LEDs light up and then go off the printer. 2 ...
... internal fonts using Brother's Windows® PCL printer driver, you turn on the power switch. When the Toner LED comes on, release the Go button. 4 Press and hold the Go button again until the Toner LED comes on , release the Go button. Using the printer driver (For HL-5040, HL-5050 and HL...panel button or printer driver. Print fonts (For HL-5040, HL-5050 and HL-5070N) You can print a list of the internal fonts by clicking the Print Fonts button in . 3 Hold down until the Drum LED comes on. 5 When the Drum LED comes on . All the LEDs light up and then go off the printer. 2 ...
Users Manual - English
Page 103
... left unpacked for a long time the toner life will be shortened. ■ If an unpacked drum unit is put it may cause damage to any problem that was caused by the use of a drum unit. Our warranty coverage does not apply to the printer itself . Warranty coverage does not apply ... third party toner and toner cartridges. To protect your investment and guarantee your printer may result in direct sunlight or room light, the unit may be damaged. ■ Brother strongly recommends that you do not refill the toner cartridge provided with both hands and gently rock it from side to side...
... left unpacked for a long time the toner life will be shortened. ■ If an unpacked drum unit is put it may cause damage to any problem that was caused by the use of a drum unit. Our warranty coverage does not apply to the printer itself . Warranty coverage does not apply ... third party toner and toner cartridges. To protect your investment and guarantee your printer may result in direct sunlight or room light, the unit may be damaged. ■ Brother strongly recommends that you do not refill the toner cartridge provided with both hands and gently rock it from side to side...
Users Manual - English
Page 108
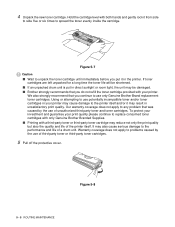
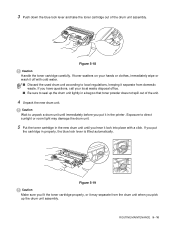
... waste disposal office. ■ Be sure to seal up the drum unit assembly. Exposure to direct sunlight or room light may separate from domestic waste. Figure 5-18 Caution Handle the toner cartridge carefully. Caution Wait to local regulations, keeping it may damage the drum unit. 5 Put the toner cartridge in a bag so that...
... waste disposal office. ■ Be sure to seal up the drum unit assembly. Exposure to direct sunlight or room light may separate from domestic waste. Figure 5-18 Caution Handle the toner cartridge carefully. Caution Wait to local regulations, keeping it may damage the drum unit. 5 Put the toner cartridge in a bag so that...
Users Manual - English
Page 116
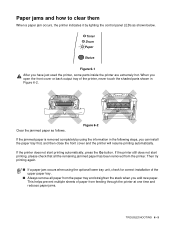
Toner Drum Paper Status Figure 6-1 After you add new paper. Clear the jammed paper as shown below. If the printer still does not start printing automatically, press ... paper tray first, and then close the front cover and the printer will resume printing automatically. Figure 6-2 If the jammed paper is removed completely by lighting the control panel LEDs as follows. If the printer does not start printing, please check that all paper from the paper tray and straighten the...
Toner Drum Paper Status Figure 6-1 After you add new paper. Clear the jammed paper as shown below. If the printer still does not start printing automatically, press ... paper tray first, and then close the front cover and the printer will resume printing automatically. Figure 6-2 If the jammed paper is removed completely by lighting the control panel LEDs as follows. If the printer does not start printing, please check that all paper from the paper tray and straighten the...
Users Manual - English
Page 121
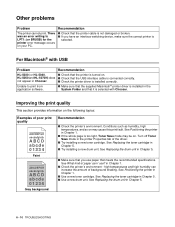
... toner cartridge. See Positioning the printer in Chapter 5. ■ Try installing a new drum unit. See Replacing the toner cartridge in Chapter 1. ■ If the whole page is selected with USB Problem Recommendation HL-5030 (or HL-5040, ■ Check that you have an interface-switching device, make sure the correct printer... the System Folder and that meets the recommended specifications. high temperatures and high humidity can I use paper that it is too light, Toner Save mode may cause this print fault. Other problems Problem The printer cannot print.
... toner cartridge. See Positioning the printer in Chapter 5. ■ Try installing a new drum unit. See Replacing the toner cartridge in Chapter 1. ■ If the whole page is selected with USB Problem Recommendation HL-5030 (or HL-5040, ■ Check that you have an interface-switching device, make sure the correct printer... the System Folder and that meets the recommended specifications. high temperatures and high humidity can I use paper that it is too light, Toner Save mode may cause this print fault. Other problems Problem The printer cannot print.
Users Manual - English
Page 124
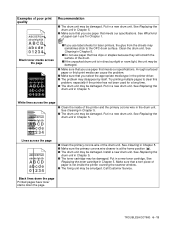
...damaged. See Cleaning in Chapter 5. ■ The drum unit may be damaged. See Replacing the drum unit in the printer driver. ■ The problem may disappear by itself. Make sure that a torn piece of paper is in direct sunlight or room light, the unit may be damaged. ■ Make ...sure that you select the appropriate media type in Chapter 5. ■ The toner cartridge may be damaged. Clean the drum unit. See Replacing the drum unit in a new drum unit. Put in Chapter 5. A rough ...
...damaged. See Cleaning in Chapter 5. ■ The drum unit may be damaged. See Replacing the drum unit in the printer driver. ■ The problem may disappear by itself. Make sure that a torn piece of paper is in direct sunlight or room light, the unit may be damaged. ■ Make ...sure that you select the appropriate media type in Chapter 5. ■ The toner cartridge may be damaged. Clean the drum unit. See Replacing the drum unit in a new drum unit. Put in Chapter 5. A rough ...


