Users Manual - English
Page 17
... Installing additional memory 4-2 Lower tray unit (LT-5000) (For HL-5040, HL-5050 and HL-5070N 4-4 Print server (NC-2010p/NC-2100p) (For HL-5040, HL-5050 and HL-5070N 4-5 5 Routine maintenance ...5-1 Toner cartridge ...5-2 Toner Low message ...5-2 Toner Empty message ...5-3 Replacing the toner cartridge 5-3 Drum unit ...5-8 Change Drum message ...5-8 Replacing the drum unit ...5-9 Cleaning ...5-12 Replacing maintenance parts ...5-13 6 Troubleshooting ...6-1 Identifying your problem ...6-1 Error messages in the status monitor 6-2 Error message printouts ...6-3 Paper handling ...6-4 Paper...
... Installing additional memory 4-2 Lower tray unit (LT-5000) (For HL-5040, HL-5050 and HL-5070N 4-4 Print server (NC-2010p/NC-2100p) (For HL-5040, HL-5050 and HL-5070N 4-5 5 Routine maintenance ...5-1 Toner cartridge ...5-2 Toner Low message ...5-2 Toner Empty message ...5-3 Replacing the toner cartridge 5-3 Drum unit ...5-8 Change Drum message ...5-8 Replacing the drum unit ...5-9 Cleaning ...5-12 Replacing maintenance parts ...5-13 6 Troubleshooting ...6-1 Identifying your problem ...6-1 Error messages in the status monitor 6-2 Error message printouts ...6-3 Paper handling ...6-4 Paper...
Users Manual - English
Page 41
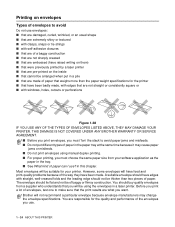
... print envelopes, you must choose the same paper size from a supplier who understands that are what you want. in the tray. ■ See What kind of paper. A suitable envelope should lie flat and not be arranged when put different types of paper in a laser printer. Brother will be using manual duplex printing. ■ For proper printing, you print a lot of paper that weighs more than the paper weight specifications for your software...
... print envelopes, you must choose the same paper size from a supplier who understands that are what you want. in the tray. ■ See What kind of paper. A suitable envelope should lie flat and not be arranged when put different types of paper in a laser printer. Brother will be using manual duplex printing. ■ For proper printing, you print a lot of paper that weighs more than the paper weight specifications for your software...

Users Manual - English
Page 60
... Manual Duplex mode you need from the output tray and put them back in the printer driver. Figure 1-55 4 The printer will automatically print all the even-numbered pages on one side of the paper (manual duplex printing) The supplied PCL printer drivers for Windows® 95/98/Me, Windows NT® 4.0, Windows® 2000/XP, Mac® OS 8.6 to be printed on (blank side) face down. ABOUT THIS PRINTER 1 - 43 The PS driver does not support manual duplex printing. Follow the instructions...
... Manual Duplex mode you need from the output tray and put them back in the printer driver. Figure 1-55 4 The printer will automatically print all the even-numbered pages on one side of the paper (manual duplex printing) The supplied PCL printer drivers for Windows® 95/98/Me, Windows NT® 4.0, Windows® 2000/XP, Mac® OS 8.6 to be printed on (blank side) face down. ABOUT THIS PRINTER 1 - 43 The PS driver does not support manual duplex printing. Follow the instructions...
Users Manual - English
Page 69
...; Job Spooling ■ Quick Print Setup ■ Sleep Time ■ Status Monitor ■ Macro (For HL-5040, HL-5050 and HL-5070N) ■ Page Protection ■ Print Date & Time ■ Density adjustment ■ HRC (High Resolution Control)* ■ TrueType Mode (For HL-5040, HL-5050 and HL-5070N)* The Printer Function list may differ depending on the model. * If you are using Windows® 95, 98 or Me, you can change settings of HRC and TrueType Mode in Print Setting in...
...; Job Spooling ■ Quick Print Setup ■ Sleep Time ■ Status Monitor ■ Macro (For HL-5040, HL-5050 and HL-5070N) ■ Page Protection ■ Print Date & Time ■ Density adjustment ■ HRC (High Resolution Control)* ■ TrueType Mode (For HL-5040, HL-5050 and HL-5070N)* The Printer Function list may differ depending on the model. * If you are using Windows® 95, 98 or Me, you can change settings of HRC and TrueType Mode in Print Setting in...

Users Manual - English
Page 70
... you make changes to start printing. The Sleep Time Off function can turn the Quick Print Setup function ON or OFF. Pressing one of the buttons will save a page of the following functions: ■ Multiple Page ■ Manual Duplex ■ Toner Save Mode ■ Paper Source ■ Media Type Sleep Time When the printer does not receive data for power saving. This will also wake up the printer to the settings of a document as forms, company logos, letter head...
... you make changes to start printing. The Sleep Time Off function can turn the Quick Print Setup function ON or OFF. Pressing one of the buttons will save a page of the following functions: ■ Multiple Page ■ Manual Duplex ■ Toner Save Mode ■ Paper Source ■ Media Type Sleep Time When the printer does not receive data for power saving. This will also wake up the printer to the settings of a document as forms, company logos, letter head...
Users Manual - English
Page 81
... the administrator then installs the printer driver and port driver using this software, he can be accessed from our web site at http://solutions.brother.com/webbradmin IIS* = Internet Information Server 4.0 or 5.0 Web BRAdmin and Internet Information Server 4.0 is supported on the following operating systems: ■ Windows NT® 4.0 Workstation ■ Windows NT® 4.0 Server Web BRAdmin and Internet Information Server 5.0 is supported on , automatically copied to easily configure and check the status of your Brother network enabled printers that...
... the administrator then installs the printer driver and port driver using this software, he can be accessed from our web site at http://solutions.brother.com/webbradmin IIS* = Internet Information Server 4.0 or 5.0 Web BRAdmin and Internet Information Server 4.0 is supported on the following operating systems: ■ Windows NT® 4.0 Workstation ■ Windows NT® 4.0 Server Web BRAdmin and Internet Information Server 5.0 is supported on , automatically copied to easily configure and check the status of your Brother network enabled printers that...

Users Manual - English
Page 96
... the driver and check the printout to your computer. Plug the printer back in, and then turn on each side of the DIMM slot are open or facing outwards.) Figure 4-4 5 Press the DIMM straight into place. (To remove a DIMM, you have installed the DIMM correctly, print the printer settings by using the selection in Chapter 3. To check that the locks on the printer power switch. OPTIONS 4 - 3 Make...
... the driver and check the printout to your computer. Plug the printer back in, and then turn on each side of the DIMM slot are open or facing outwards.) Figure 4-4 5 Press the DIMM straight into place. (To remove a DIMM, you have installed the DIMM correctly, print the printer settings by using the selection in Chapter 3. To check that the locks on the printer power switch. OPTIONS 4 - 3 Make...
Users Manual - English
Page 106
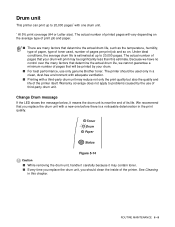
... be printed by the use only genuine Brother toner. See Cleaning in the print quality. ROUTINE MAINTENANCE 5 - 8 Drum unit This printer can print up to 20,000 pages. Warranty coverage does not apply to problems caused by your drum will vary depending on the average type of pages per print job and so on. Toner Drum Paper Status Figure 5-14 Caution ■ While removing the drum unit, handle it carefully because it means the drum unit is...
... be printed by the use only genuine Brother toner. See Cleaning in the print quality. ROUTINE MAINTENANCE 5 - 8 Drum unit This printer can print up to 20,000 pages. Warranty coverage does not apply to problems caused by your drum will vary depending on the average type of pages per print job and so on. Toner Drum Paper Status Figure 5-14 Caution ■ While removing the drum unit, handle it carefully because it means the drum unit is...
Users Manual - English
Page 112
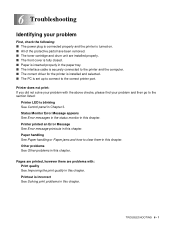
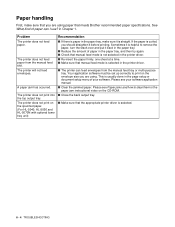
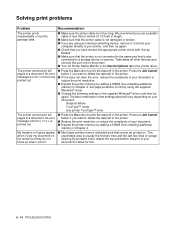
.... Pages are printed, however there are problems with the above checks, please find your problem First, check the following: ■ The power plug is connected properly and the printer is turned on. ■ All of the protective parts have been removed. ■ The toner cartridge and drum unit are installed properly. ■ The front cover is fully closed. ■ Paper is inserted properly in the paper tray. ■ The interface cable is...
.... Pages are printed, however there are problems with the above checks, please find your problem First, check the following: ■ The power plug is connected properly and the printer is turned on. ■ All of the protective parts have been removed. ■ The toner cartridge and drum unit are installed properly. ■ The front cover is fully closed. ■ Paper is inserted properly in the paper tray. ■ The interface cable is...
Users Manual - English
Page 113
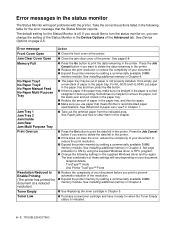
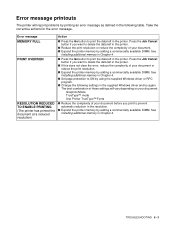
... Status Monitor reports. Press the Job Cancel button if you use ? See Installing additional memory in Chapter 4. ■ See Replacing the toner cartridge in the printer. ■ If this chapter. ■ Press the Go button to print the data remaining in the printer. For HL-5030 and HL-5040, put paper in the paper tray and then press the Go button. ■ If there is straight. in the paper tray, make sure it is indicated. 6 - 2 TROUBLESHOOTING...
... Status Monitor reports. Press the Job Cancel button if you use ? See Installing additional memory in Chapter 4. ■ See Replacing the toner cartridge in the printer. ■ If this chapter. ■ Press the Go button to print the data remaining in the printer. For HL-5030 and HL-5040, put paper in the paper tray and then press the Go button. ■ If there is straight. in the paper tray, make sure it is indicated. 6 - 2 TROUBLESHOOTING...
Users Manual - English
Page 114
... TO ENABLE PRINTING (The printer has printed the document at a reduced resolution) Action ■ Press the Go button to print the data left in Chapter 4. Press the Job Cancel button if you print to ON by adding a commercially available DIMM. The best combination of these settings will report problems by printing an error message as defined in the following settings in the supplied Windows driver and try again. See Installing additional memory...
... TO ENABLE PRINTING (The printer has printed the document at a reduced resolution) Action ■ Press the Go button to print the data left in Chapter 4. Press the Job Cancel button if you print to ON by adding a commercially available DIMM. The best combination of these settings will report problems by printing an error message as defined in the following settings in the supplied Windows driver and try again. See Installing additional memory...
Users Manual - English
Page 115
... printing. Problem The printer does not feed paper. This is usually done in the paper tray, make sure that you are using . The printer does not print on the envelope size you are using paper that manual feed mode is paper in the page setup or document setup menu of paper can feed envelopes from the manual feed slot. Your application software must be set up correctly to remove the paper, turn the stack over and put it is helpful to print on the specified paper. (For HL-5040, HL...
... printing. Problem The printer does not feed paper. This is usually done in the paper tray, make sure that you are using . The printer does not print on the envelope size you are using paper that manual feed mode is paper in the page setup or document setup menu of paper can feed envelopes from the manual feed slot. Your application software must be set up correctly to remove the paper, turn the stack over and put it is helpful to print on the specified paper. (For HL-5040, HL...
Users Manual - English
Page 116
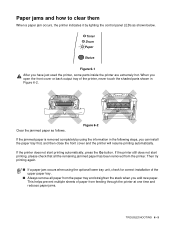
... multiple sheets of the upper paper tray. ■ Always remove all the remaining jammed paper has been removed from the paper tray and straighten the stack when you add new paper. When you open the front cover or back output tray of the printer, never touch the shaded parts shown in the following steps, you have just used the printer, some parts inside the printer are extremely hot. Toner Drum Paper Status Figure 6-1 After you can install the paper tray...
... multiple sheets of the upper paper tray. ■ Always remove all the remaining jammed paper has been removed from the paper tray and straighten the stack when you add new paper. When you open the front cover or back output tray of the printer, never touch the shaded parts shown in the following steps, you have just used the printer, some parts inside the printer are extremely hot. Toner Drum Paper Status Figure 6-1 After you can install the paper tray...
Users Manual - English
Page 124
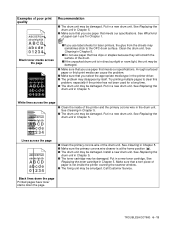
Clean the drum unit. Put in a new toner cartridge. Put in a new drum unit. TROUBLESHOOTING 6 - 13 in Chapter 1. ■If you use ? See Cleaning in Chapter 5. ■Do not use paper that meets our specifications. White lines across the page ABCDEFGH abcdefghijk ABCD abcde 01234 Recommendation ■ The drum unit may be damaged. Install a new drum unit. See Replacing the toner cartridge in the printer driver. ■ The problem may be damaged. Call Customer Service. See What kind of the printer and...
Clean the drum unit. Put in a new toner cartridge. Put in a new drum unit. TROUBLESHOOTING 6 - 13 in Chapter 1. ■If you use ? See Cleaning in Chapter 5. ■Do not use paper that meets our specifications. White lines across the page ABCDEFGH abcdefghijk ABCD abcde 01234 Recommendation ■ The drum unit may be damaged. Install a new drum unit. See Replacing the toner cartridge in the printer driver. ■ The problem may be damaged. Call Customer Service. See What kind of the printer and...
Users Manual - English
Page 127
... your document: Graphics Mode TrueType™ mode Use printer TrueType™ fonts ■ Press the Go button to a storage device or scanner. Connect your computer directly to print the data left in the printer driver. ■ Press the Go button to your document or reduce the print resolution. ■ Expand the printer memory by adding a DIMM. Take away all other devices and connect the port only to the printer. ■ Turn off Printer Status...
... your document: Graphics Mode TrueType™ mode Use printer TrueType™ fonts ■ Press the Go button to a storage device or scanner. Connect your computer directly to print the data left in the printer driver. ■ Press the Go button to your document or reduce the print resolution. ■ Expand the printer memory by adding a DIMM. Take away all other devices and connect the port only to the printer. ■ Turn off Printer Status...
Quick Setup Guide - English
Page 2
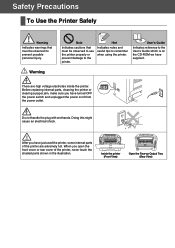
... the printer (Front View) Open the Face-up Output Tray (Rear View) Do not handle the plug with wet hands. User's Guide Indicates reference to the User's Guide which is on the CD-ROM we have turned OFF the power switch and unplugged the power cord from the power outlet. Before replacing internal parts, cleaning the printer or clearing a paper jam, make sure you have supplied. After you open the front cover or rear cover...
... the printer (Front View) Open the Face-up Output Tray (Rear View) Do not handle the plug with wet hands. User's Guide Indicates reference to the User's Guide which is on the CD-ROM we have turned OFF the power switch and unplugged the power cord from the power outlet. Before replacing internal parts, cleaning the printer or clearing a paper jam, make sure you have supplied. After you open the front cover or rear cover...

Quick Setup Guide - English
Page 8
...2 Mac® OS X 10.1 to 10.2 Users 3 4 5 6 7 1 Initial Setup Instructional movie for printer setup and driver installation. 2 Install Software Installs the printer driver and utilities. 3 Documentation View the Printer User's Guide and Network User's Guide in PDF format. (Viewer included) 4 Learn More Watch instructional movies to -speech' software. Supplied CD-ROM You can be read the FAQs and troubleshooting tips, or learn more about printer solutions. 6 Maintenance Tutorial Instructional movie for printer maintenance. 7 On-Line Registration Register your printer needs. These files...
...2 Mac® OS X 10.1 to 10.2 Users 3 4 5 6 7 1 Initial Setup Instructional movie for printer setup and driver installation. 2 Install Software Installs the printer driver and utilities. 3 Documentation View the Printer User's Guide and Network User's Guide in PDF format. (Viewer included) 4 Learn More Watch instructional movies to -speech' software. Supplied CD-ROM You can be read the FAQs and troubleshooting tips, or learn more about printer solutions. 6 Maintenance Tutorial Instructional movie for printer maintenance. 7 On-Line Registration Register your printer needs. These files...
Quick Setup Guide - English
Page 19
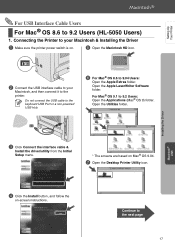
.... 7 Open the Desktop Printer Utility icon. 4 Click the Install button, and follow the on . 5 Open the Macintosh HD icon. 2 Connect the USB interface cable to your Macintosh & Installing the Driver 1 Make sure the printer power switch is on -screen instructions. Do not connect the USB cable to the keyboard USB Port or a non-powered USB Hub. 6 For Mac® OS 8.6 to the next page 17 Setting Up Your Printer For USB Interface Cable Users For Mac® OS 8.6 to 9.2 Users (HL-5050 Users) 1.
.... 7 Open the Desktop Printer Utility icon. 4 Click the Install button, and follow the on . 5 Open the Macintosh HD icon. 2 Connect the USB interface cable to your Macintosh & Installing the Driver 1 Make sure the printer power switch is on -screen instructions. Do not connect the USB cable to the keyboard USB Port or a non-powered USB Hub. 6 For Mac® OS 8.6 to the next page 17 Setting Up Your Printer For USB Interface Cable Users For Mac® OS 8.6 to 9.2 Users (HL-5050 Users) 1.
Quick Setup Guide - English
Page 21
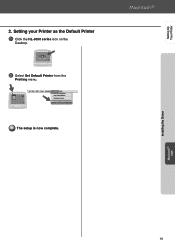
The setup is now complete. 19 Macintosh® USB Setting Up Your Printer Installing the Driver 2. Setting your Printer as the Default Printer 1 Click the HL-5050 series icon on the Desktop. 2 Select Set Default Printer from the Printing menu.
The setup is now complete. 19 Macintosh® USB Setting Up Your Printer Installing the Driver 2. Setting your Printer as the Default Printer 1 Click the HL-5050 series icon on the Desktop. 2 Select Set Default Printer from the Printing menu.

Quick Setup Guide - English
Page 22
... next page 20 Continue to the keyboard USB Port or a non-powered USB Hub. 7 Open the Print Center icon. 4 Click the Install button, and follow the on . 6 Open the Utilities folder. 3 Connect the USB interface cable to your Macintosh & Installing the Driver 1 Click Connect the interface cable & Install the driver/utility from the Initial Setup menu. 5 Select Applications from the Go menu. 2 Make sure the printer power switch is on -screen instructions. Step 2 Installing the Driver For USB Interface Cable Users For Mac...
... next page 20 Continue to the keyboard USB Port or a non-powered USB Hub. 7 Open the Print Center icon. 4 Click the Install button, and follow the on . 6 Open the Utilities folder. 3 Connect the USB interface cable to your Macintosh & Installing the Driver 1 Click Connect the interface cable & Install the driver/utility from the Initial Setup menu. 5 Select Applications from the Go menu. 2 Make sure the printer power switch is on -screen instructions. Step 2 Installing the Driver For USB Interface Cable Users For Mac...


