Users Manual - English
Page 17
... 4 Options ...4-1 DIMM ...4-1 Installing additional memory 4-2 Lower tray unit (LT-5000) (For HL-5040, HL-5050 and HL-5070N 4-4 Print server (NC-2010p/NC-2100p) (For HL-5040, HL-5050 and HL-5070N 4-5 5 Routine maintenance ...5-1 Toner cartridge ...5-2 Toner Low message ...5-2 Toner Empty message ...5-3 Replacing the toner cartridge 5-3 Drum unit ...5-8 Change Drum message ...5-8 Replacing the drum unit ...5-9 Cleaning ...5-12 Replacing maintenance parts ...5-13 6 Troubleshooting ...6-1 Identifying your problem...
... 4 Options ...4-1 DIMM ...4-1 Installing additional memory 4-2 Lower tray unit (LT-5000) (For HL-5040, HL-5050 and HL-5070N 4-4 Print server (NC-2010p/NC-2100p) (For HL-5040, HL-5050 and HL-5070N 4-5 5 Routine maintenance ...5-1 Toner cartridge ...5-2 Toner Low message ...5-2 Toner Empty message ...5-3 Replacing the toner cartridge 5-3 Drum unit ...5-8 Change Drum message ...5-8 Replacing the drum unit ...5-9 Cleaning ...5-12 Replacing maintenance parts ...5-13 6 Troubleshooting ...6-1 Identifying your problem...
Users Manual - English
Page 18
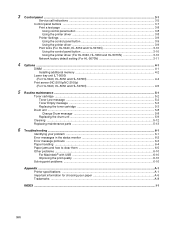
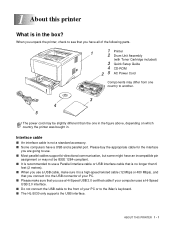
...; Some computers have a USB and a parallel port. When you use a USB cable, make sure that you have all of the following parts. 1 1 Printer 2 Drum Unit Assembly (with Toner Cartridge included) 3 Quick Setup Guide 4 CD-ROM 2 5 AC Power Cord Components may differ from one country to another. 3 4 5 The power cord may not be... you connect it to the USB connector of your PC or to see that you unpack the printer, check to the iMac's keyboard. ■ The HL-5030 only supports the USB interface.
...; Some computers have a USB and a parallel port. When you use a USB cable, make sure that you have all of the following parts. 1 1 Printer 2 Drum Unit Assembly (with Toner Cartridge included) 3 Quick Setup Guide 4 CD-ROM 2 5 AC Power Cord Components may differ from one country to another. 3 4 5 The power cord may not be... you connect it to the USB connector of your PC or to see that you unpack the printer, check to the iMac's keyboard. ■ The HL-5030 only supports the USB interface.
Users Manual - English
Page 29
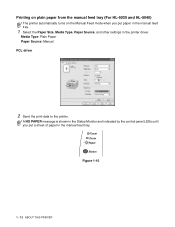
Media Type: Plain Paper Paper Source: Manual PCL driver 2 Send the print data to the printer. A NO PAPER message is shown in the Status Monitor and indicated by the control panel LEDs until you put a sheet of paper in the printer driver. Printing on plain paper from the manual feed tray (For HL-5030 and HL-5040) The printer automatically turns on the Manual Feed mode when you put paper in the manual feed tray. 1 Select the Paper Size, Media Type, Paper Source, and other settings in the manual feed tray. Toner Drum Paper Status Figure 1-10 1 - 12 ABOUT THIS PRINTER
Media Type: Plain Paper Paper Source: Manual PCL driver 2 Send the print data to the printer. A NO PAPER message is shown in the Status Monitor and indicated by the control panel LEDs until you put a sheet of paper in the printer driver. Printing on plain paper from the manual feed tray (For HL-5030 and HL-5040) The printer automatically turns on the Manual Feed mode when you put paper in the manual feed tray. 1 Select the Paper Size, Media Type, Paper Source, and other settings in the manual feed tray. Toner Drum Paper Status Figure 1-10 1 - 12 ABOUT THIS PRINTER
Users Manual - English
Page 35
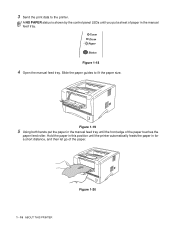
Figure 1-19 5 Using both hands put the paper in the manual feed tray until you put a sheet of paper in for a short distance, and then let go of the paper touches the paper feed roller. A NO PAPER status is shown by the control panel LEDs until the front edge of the paper. 1 - 18 ABOUT THIS PRINTER Figure 1-20 3 Send the print data to fit the paper size. Slide the paper guides to the printer. Toner Drum Paper Status Figure 1-18 4 Open the manual feed tray. Hold the paper in this position until the printer automatically feeds the paper in the manual feed tray.
Figure 1-19 5 Using both hands put the paper in the manual feed tray until you put a sheet of paper in for a short distance, and then let go of the paper touches the paper feed roller. A NO PAPER status is shown by the control panel LEDs until the front edge of the paper. 1 - 18 ABOUT THIS PRINTER Figure 1-20 3 Send the print data to fit the paper size. Slide the paper guides to the printer. Toner Drum Paper Status Figure 1-18 4 Open the manual feed tray. Hold the paper in this position until the printer automatically feeds the paper in the manual feed tray.
Users Manual - English
Page 43
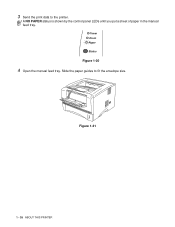
Slide the paper guides to the printer. A NO PAPER status is shown by the control panel LEDs until you put a sheet of paper in the manual feed tray. Figure 1-31 1 - 26 ABOUT THIS PRINTER Toner Drum Paper Status Figure 1-30 4 Open the manual feed tray. 3 Send the print data to fit the envelope size.
Slide the paper guides to the printer. A NO PAPER status is shown by the control panel LEDs until you put a sheet of paper in the manual feed tray. Figure 1-31 1 - 26 ABOUT THIS PRINTER Toner Drum Paper Status Figure 1-30 4 Open the manual feed tray. 3 Send the print data to fit the envelope size.

Users Manual - English
Page 54
Slide the paper guides to the printer A NO PAPER status is shown by the control panel LEDs until you put the transparency in the manual feed tray until the printer automatically feeds it in for a short distance, and then let go of the transparency. Hold the transparency in the manual feed tray. Figure 1-48 ABOUT THIS PRINTER 1 - 37 Toner Drum Paper Status Figure 1-46 4 Open the manual feed tray. Figure 1-47 5 Using both hands put a transparency in this position until its front edge touches the paper feed roller. 3 Send the print data to the transparency size.
Slide the paper guides to the printer A NO PAPER status is shown by the control panel LEDs until you put the transparency in the manual feed tray until the printer automatically feeds it in for a short distance, and then let go of the transparency. Hold the transparency in the manual feed tray. Figure 1-48 ABOUT THIS PRINTER 1 - 37 Toner Drum Paper Status Figure 1-46 4 Open the manual feed tray. Figure 1-47 5 Using both hands put a transparency in this position until its front edge touches the paper feed roller. 3 Send the print data to the transparency size.
Users Manual - English
Page 57
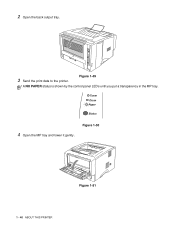
Figure 1-49 A NO PAPER status is shown by the control panel LEDs until you put a transparency in the MP tray. Toner Drum Paper Status 4 Open the MP tray and lower it gently. Figure 1-50 Figure 1-51 1 - 40 ABOUT THIS PRINTER 2 Open the back output tray. 3 Send the print data to the printer.
Figure 1-49 A NO PAPER status is shown by the control panel LEDs until you put a transparency in the MP tray. Toner Drum Paper Status 4 Open the MP tray and lower it gently. Figure 1-50 Figure 1-51 1 - 40 ABOUT THIS PRINTER 2 Open the back output tray. 3 Send the print data to the printer.
Users Manual - English
Page 83
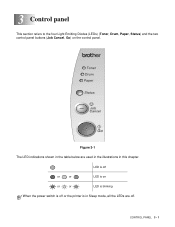
CONTROL PANEL 3 - 1 3 Control panel This section refers to the four Light Emitting Diodes (LEDs) (Toner, Drum, Paper, Status) and the two control panel buttons (Job Cancel, Go) on or or LED is blinking When the power switch is in Sleep mode, all the LEDs are used in the illustrations in the table below are off or the printer is off . Figure 3-1 The LED indications shown in this chapter. LED is off or or LED is on the control panel.
CONTROL PANEL 3 - 1 3 Control panel This section refers to the four Light Emitting Diodes (LEDs) (Toner, Drum, Paper, Status) and the two control panel buttons (Job Cancel, Go) on or or LED is blinking When the power switch is in Sleep mode, all the LEDs are used in the illustrations in the table below are off or the printer is off . Figure 3-1 The LED indications shown in this chapter. LED is off or or LED is on the control panel.

Users Manual - English
Page 84
Receiving data The printer is either receiving data from Sleep mode to print. LED Toner Drum Paper Status Figure 3-2 Toner Drum Paper Status Figure 3-3 Toner Drum Paper Status Figure 3-4 Toner Drum Paper Status Figure 3-5 3 - 2 CONTROL PANEL Printer status Sleep mode The power switch is off or the printer is in memory or printing the data. Pressing the Go button wakes up . Ready to print The printer is warming up the printer from the computer, processing data in Sleep mode. Warming up The printer is ready to Ready mode.
Receiving data The printer is either receiving data from Sleep mode to print. LED Toner Drum Paper Status Figure 3-2 Toner Drum Paper Status Figure 3-3 Toner Drum Paper Status Figure 3-4 Toner Drum Paper Status Figure 3-5 3 - 2 CONTROL PANEL Printer status Sleep mode The power switch is off or the printer is in memory or printing the data. Pressing the Go button wakes up . Ready to print The printer is warming up the printer from the computer, processing data in Sleep mode. Warming up The printer is ready to Ready mode.
Users Manual - English
Page 85
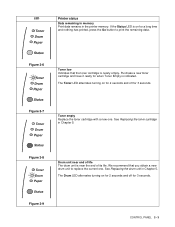
... is near the end of its life. Purchase a new toner cartridge and have it ready for when Toner Empty is on for 3 seconds. If the Status LED is indicated. LED Toner Drum Paper Status Figure 3-6 Toner Drum Paper Status Figure 3-7 Toner Drum Paper Status Figure 3-8 Toner Drum Paper Status Figure 3-9 Printer status Data remaining in memory Print data remains in...
... is near the end of its life. Purchase a new toner cartridge and have it ready for when Toner Empty is on for 3 seconds. If the Status LED is indicated. LED Toner Drum Paper Status Figure 3-6 Toner Drum Paper Status Figure 3-7 Toner Drum Paper Status Figure 3-8 Toner Drum Paper Status Figure 3-9 Printer status Data remaining in memory Print data remains in...
Users Manual - English
Page 86
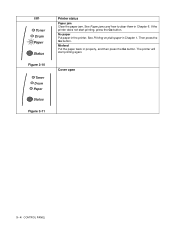
No paper Put paper in Chapter 1. The printer will start printing, press the Go button. Cover open 3 - 4 CONTROL PANEL See Printing on plain paper in the printer. Then press the Go button. Misfeed Put the paper back in Chapter 6. LED Toner Drum Paper Status Figure 3-10 Toner Drum Paper Status Figure 3-11 Printer status Paper jam Clear the paper jam. See Paper jams and how to clear them in properly, and then press the Go button. If the printer does not start printing again.
No paper Put paper in Chapter 1. The printer will start printing, press the Go button. Cover open 3 - 4 CONTROL PANEL See Printing on plain paper in the printer. Then press the Go button. Misfeed Put the paper back in Chapter 6. LED Toner Drum Paper Status Figure 3-10 Toner Drum Paper Status Figure 3-11 Printer status Paper jam Clear the paper jam. See Paper jams and how to clear them in properly, and then press the Go button. If the printer does not start printing again.
Users Manual - English
Page 87
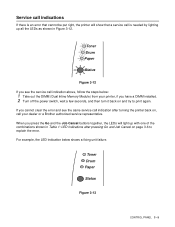
... shown in Table 1: LED indications after turning the printer back on, call is an error that a service call your dealer or a Brother authorized service representative. Toner Drum Paper Status Figure 3-12 If you see the service call indication above, follow the steps below shows a fixing unit failure. For example,..., if you cannot clear the error and see the same service call indication after pressing Go and Job Cancel on page 3-6 to print again. Toner Drum Paper Status Figure 3-13 CONTROL PANEL 3 - 5 When you press the Go and the Job Cancel buttons together, the LEDs will show that...
... shown in Table 1: LED indications after turning the printer back on, call is an error that a service call your dealer or a Brother authorized service representative. Toner Drum Paper Status Figure 3-12 If you see the service call indication above, follow the steps below shows a fixing unit failure. For example,..., if you cannot clear the error and see the same service call indication after pressing Go and Job Cancel on page 3-6 to print again. Toner Drum Paper Status Figure 3-13 CONTROL PANEL 3 - 5 When you press the Go and the Job Cancel buttons together, the LEDs will show that...
Users Manual - English
Page 88
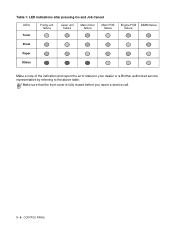
Make sure that the front cover is fully closed before you report a service call. 3 - 6 CONTROL PANEL Table 1: LED indications after pressing Go and Job Cancel LEDs Toner Fixing unit failure Laser unit failure Main motor failure Main PCB failure Engine PCB DIMM failure failure Drum Paper Status Make a note of the indication and report the error status to your dealer or a Brother authorized service representative by referring to the above table.
Make sure that the front cover is fully closed before you report a service call. 3 - 6 CONTROL PANEL Table 1: LED indications after pressing Go and Job Cancel LEDs Toner Fixing unit failure Laser unit failure Main motor failure Main PCB failure Engine PCB DIMM failure failure Drum Paper Status Make a note of the indication and report the error status to your dealer or a Brother authorized service representative by referring to the above table.

Users Manual - English
Page 92
... the Toner LED comes on , release the Go button. Using the printer driver (For HL-5040, HL-5050 and HL-5070N) If you are using the control panel button or printer driver. Keep the Go button pressed down the Go button as you turn on the power switch. The printer will print a list of the internal... the Drum LED comes on . All the LEDs light up and then go off the printer. 2 Make sure that the front cover is closed and the power cord is plugged in the Support tab. 3 - 10 CONTROL PANEL Print fonts (For HL-5040, HL-5050 and HL-5070N) You can print a list of the internal fonts using Brother...
... the Toner LED comes on , release the Go button. Using the printer driver (For HL-5040, HL-5050 and HL-5070N) If you are using the control panel button or printer driver. Keep the Go button pressed down the Go button as you turn on the power switch. The printer will print a list of the internal... the Drum LED comes on . All the LEDs light up and then go off the printer. 2 Make sure that the front cover is closed and the power cord is plugged in the Support tab. 3 - 10 CONTROL PANEL Print fonts (For HL-5040, HL-5050 and HL-5070N) You can print a list of the internal fonts using Brother...
Users Manual - English
Page 99
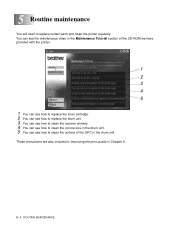
... print quality in the drum unit. 5 You can see how to replace certain parts and clean the printer regularly. You can see the maintenance video in the Maintenance Tutorial section of the CD-ROM we have provided with the printer. 1 2 3 4 5 1 You can see how to replace the toner cartridge. 2 You can see... how to replace the drum unit. 3 You can see how to clean the scanner window. 4 You can see how to clean the corona wire in Chapter...
... print quality in the drum unit. 5 You can see how to replace certain parts and clean the printer regularly. You can see the maintenance video in the Maintenance Tutorial section of the CD-ROM we have provided with the printer. 1 2 3 4 5 1 You can see how to replace the toner cartridge. 2 You can see... how to replace the drum unit. 3 You can see how to clean the scanner window. 4 You can see how to clean the corona wire in Chapter...
Users Manual - English
Page 100
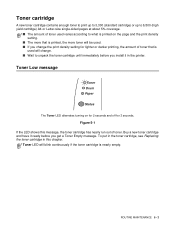
... print density setting. ■ The more that is used . ■ If you get a Toner Empty message. Buy a new toner cartridge and have it in this message, the toner cartridge has nearly run out of toner. Toner Low message Toner Drum Paper Status The Toner LED alternates turning on for 2 seconds and off for lighter or darker printing, the...
... print density setting. ■ The more that is used . ■ If you get a Toner Empty message. Buy a new toner cartridge and have it in this message, the toner cartridge has nearly run out of toner. Toner Low message Toner Drum Paper Status The Toner LED alternates turning on for 2 seconds and off for lighter or darker printing, the...
Users Manual - English
Page 101
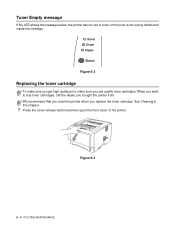
Figure 5-3 5 - 3 ROUTINE MAINTENANCE When you want to buy toner cartridges, call the dealer you replace the toner cartridge. We recommend that you clean the printer when you bought the printer from. Toner Empty message If the LED shows the message below, the printer has run out of the printer... See Cleaning in this chapter. 1 Press the cover release button and then open the front cover of toner or the toner is not evenly distributed inside the cartridge. Toner Drum Paper Status Figure 5-2 Replacing the toner cartridge To make sure you get high quality print, make sure you use quality...
Figure 5-3 5 - 3 ROUTINE MAINTENANCE When you want to buy toner cartridges, call the dealer you replace the toner cartridge. We recommend that you clean the printer when you bought the printer from. Toner Empty message If the LED shows the message below, the printer has run out of the printer... See Cleaning in this chapter. 1 Press the cover release button and then open the front cover of toner or the toner is not evenly distributed inside the cartridge. Toner Drum Paper Status Figure 5-2 Replacing the toner cartridge To make sure you get high quality print, make sure you use quality...
Users Manual - English
Page 102
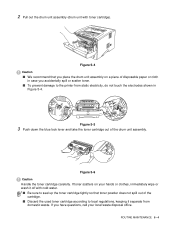
...your hands or clothes, immediately wipe or wash it off with toner cartridge). Figure 5-5 3 Push down the blue lock lever and take the toner cartridge out of disposable paper or cloth in Figure 5-4. 2 Pull out the drum unit assembly (drum unit with cold water. ■ Be sure to seal up... the toner cartridge tightly so that you place the drum unit assembly on your local waste disposal office...
...your hands or clothes, immediately wipe or wash it off with toner cartridge). Figure 5-5 3 Push down the blue lock lever and take the toner cartridge out of disposable paper or cloth in Figure 5-4. 2 Pull out the drum unit assembly (drum unit with cold water. ■ Be sure to seal up... the toner cartridge tightly so that you place the drum unit assembly on your local waste disposal office...
Users Manual - English
Page 103
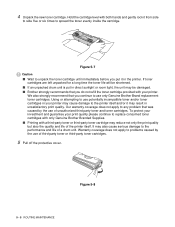
... that was caused by the use of a drum unit. Figure 5-7 Caution ■ Wait to unpack the toner cartridge until immediately before you continue to the printer itself . To protect your investment and guarantee your print quality please continue to replace consumed toner cartridges with only Genuine Brother Branded Supplies. ■ Printing with your printer...
... that was caused by the use of a drum unit. Figure 5-7 Caution ■ Wait to unpack the toner cartridge until immediately before you continue to the printer itself . To protect your investment and guarantee your print quality please continue to replace consumed toner cartridges with only Genuine Brother Branded Supplies. ■ Printing with your printer...
Users Manual - English
Page 104
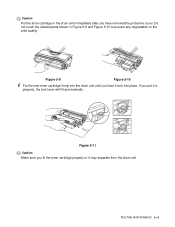
If you fit the toner cartridge properly or it lock into the drum unit until you have removed the protective cover. Do not touch the shaded parts shown in properly, the lock lever will lift automatically. Figure 5-11 Caution Make sure you put it in Figure 5-9 and Figure 5-10 to prevent any degradation to the print quality. ROUTINE MAINTENANCE 5 - 6 Figure 5-9 Figure 5-10 6 Put the new toner cartridge firmly into place. Caution Put the toner cartridge in the drum unit immediately after you hear it may separate from the drum unit.
If you fit the toner cartridge properly or it lock into the drum unit until you have removed the protective cover. Do not touch the shaded parts shown in properly, the lock lever will lift automatically. Figure 5-11 Caution Make sure you put it in Figure 5-9 and Figure 5-10 to prevent any degradation to the print quality. ROUTINE MAINTENANCE 5 - 6 Figure 5-9 Figure 5-10 6 Put the new toner cartridge firmly into place. Caution Put the toner cartridge in the drum unit immediately after you hear it may separate from the drum unit.


