
Users Manual - English
Page 4
... Guidelines for printing on both sides of the paper 18 Automatic duplex printing ...19 Manual duplex printing ...21 Printing data from a USB flash memory drive with direct print 22 Supported file formats ...22 Direct Print default settings...22 Creating a PRN or PostScript® 3™ file for ...direct printing 23 Printing data directly from the USB flash memory drive 24 2 Driver and Software 26 Printer driver ...26 Features in the printer driver (for Windows 28 Using the BR-Script3 printer driver ...
... Guidelines for printing on both sides of the paper 18 Automatic duplex printing ...19 Manual duplex printing ...21 Printing data from a USB flash memory drive with direct print 22 Supported file formats ...22 Direct Print default settings...22 Creating a PRN or PostScript® 3™ file for ...direct printing 23 Printing data directly from the USB flash memory drive 24 2 Driver and Software 26 Printer driver ...26 Features in the printer driver (for Windows 28 Using the BR-Script3 printer driver ...

Users Manual - English
Page 5
... ...82 Auto Registration ...82 Manual Registration...83 Frequency...83 4 Option 84 Lower tray (LT-300CL)...84 SO-DIMM...85 SO-DIMM types ...85 Installing extra memory ...86 5 Routine Maintenance 88 Replacing consumable items...88 Before replacing the consumable items 92 Toner cartridges ...95 Drum unit ...100 Belt unit...105 Waste toner...
... ...82 Auto Registration ...82 Manual Registration...83 Frequency...83 4 Option 84 Lower tray (LT-300CL)...84 SO-DIMM...85 SO-DIMM types ...85 Installing extra memory ...86 5 Routine Maintenance 88 Replacing consumable items...88 Before replacing the consumable items 92 Toner cartridges ...95 Drum unit ...100 Belt unit...105 Waste toner...

Users Manual - English
Page 28
... file formats: PDF version 1.7 1 JPEG Exif+JPEG PRN (created by HL-4150CDN or HL-4570CDW(T) printer driver) TIFF (scanned by all MFC or DCP Brother models) PostScript® 3™ (created by using the control panel. See Direct Print on page 80.... 22 Direct Print default settings 1 You can print by just plugging your 1 USB flash memory drive into...
... file formats: PDF version 1.7 1 JPEG Exif+JPEG PRN (created by HL-4150CDN or HL-4570CDW(T) printer driver) TIFF (scanned by all MFC or DCP Brother models) PostScript® 3™ (created by using the control panel. See Direct Print on page 80.... 22 Direct Print default settings 1 You can print by just plugging your 1 USB flash memory drive into...

Users Manual - English
Page 29
... you can also specify the folder you want to save the file directly to the USB flash memory drive. 23 If you are prompted to. For example: C:\Temp\FileName.prn If you have a USB flash memory drive connected to your machine model name (1) and check the Print to file box (2). Printing Methods...
... you can also specify the folder you want to save the file directly to the USB flash memory drive. 23 If you are prompted to. For example: C:\Temp\FileName.prn If you have a USB flash memory drive connected to your machine model name (1) and check the Print to file box (2). Printing Methods...

Users Manual - English
Page 30
... message. Select ID Public d Enter the four-digit password. Press OK. Checking Device Note • When the machine is in the USB memory. to the USB direct interface connector. Press OK. a Connect your ID has been restricted, the following messages may appear for more information about...amount of 1 the Network User's Guide for only a few seconds. Then go to Step e. Select ID PIN:XXXX Note If your USB flash memory drive to print is restricted. The number of the machine. 1 b Confirm the LCD shows the following message. Press OK. Message Mono Print ...
... message. Select ID Public d Enter the four-digit password. Press OK. Checking Device Note • When the machine is in the USB memory. to the USB direct interface connector. Press OK. a Connect your ID has been restricted, the following messages may appear for more information about...amount of 1 the Network User's Guide for only a few seconds. Then go to Step e. Select ID PIN:XXXX Note If your USB flash memory drive to print is restricted. The number of the machine. 1 b Confirm the LCD shows the following message. Press OK. Message Mono Print ...

Users Manual - English
Page 31
... then press Go. The number of copies you are allowed to the Brother machine. IMPORTANT DO NOT remove the USB flash memory drive from the USB direct interface until you reach the file name you... to Print documents directly from the USB flash memory drive is restricted. Press OK. to the printing options and press Go, then press + or... of pages you want to print. Printing documents directly from the USB flash memory drive to print has been exceeded. Printing Methods e Confirm the LCD shows a folder name or a ...
... then press Go. The number of copies you are allowed to the Brother machine. IMPORTANT DO NOT remove the USB flash memory drive from the USB direct interface until you reach the file name you... to Print documents directly from the USB flash memory drive is restricted. Press OK. to the printing options and press Go, then press + or... of pages you want to print. Printing documents directly from the USB flash memory drive to print has been exceeded. Printing Methods e Confirm the LCD shows a folder name or a ...

Users Manual - English
Page 44
... attempt to get the color calibration data from the machine to ensure consistent print quality. Start Color Calibration... You can set color matching in memory. Driver and Software Other Print Options You can reprint the last job without sending the data again from printing your data using the Direct Print...
... attempt to get the color calibration data from the machine to ensure consistent print quality. Start Color Calibration... You can set color matching in memory. Driver and Software Other Print Options You can reprint the last job without sending the data again from printing your data using the Direct Print...
Users Manual - English
Page 69
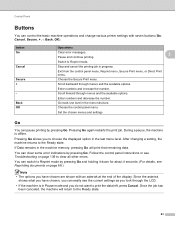
... you have chosen are shown with seven buttons (Go, Cancel, Secure, +, -, Back, OK). Switch to the Ready state. Go back one level in the machine memory, pressing Go will return to clear all other errors. You can control the basic machine operations and change various printer settings with an asterisk at...
... you have chosen are shown with seven buttons (Go, Cancel, Secure, +, -, Back, OK). Switch to the Ready state. Go back one level in the machine memory, pressing Go will return to clear all other errors. You can control the basic machine operations and change various printer settings with an asterisk at...

Users Manual - English
Page 71
There is a problem with the machine. 3 3 3 3 65 Control Panel LEDs The LEDs are lights which show the machine status. Error LED (Orange) LED indication Blinking Off Meaning There is no problem with the machine. Data LED (Green) LED indication On Blinking Off Meaning Data is in the memory. No remaining data in the machine memory. Receiving or processing data.
There is a problem with the machine. 3 3 3 3 65 Control Panel LEDs The LEDs are lights which show the machine status. Error LED (Orange) LED indication Blinking Off Meaning There is no problem with the machine. Data LED (Green) LED indication On Blinking Off Meaning Data is in the memory. No remaining data in the machine memory. Receiving or processing data.

Users Manual - English
Page 74
How to reprint the last job 3 Note If you print with the Windows® printer driver we have enough memory to continue the control panel operation, the LCD leaves the Reprint setting automatically. • For more information, see Use Reprint on page 38.) a Make sure ...
How to reprint the last job 3 Note If you print with the Windows® printer driver we have enough memory to continue the control panel operation, the LCD leaves the Reprint setting automatically. • For more information, see Use Reprint on page 38.) a Make sure ...

Users Manual - English
Page 75
Press OK. to delete the spooled data, you must use the control panel of Memory. The machine will not print the document when you want to enter the number of copies you send it is printed once. 3 When the area ...
Press OK. to delete the spooled data, you must use the control panel of Memory. The machine will not print the document when you want to enter the number of copies you send it is printed once. 3 When the area ...

Users Manual - English
Page 76
.... Prints the font list and samples of wireless LAN connectivity diagnosis. Shows the current total color printed pages. Shows the amount of memory in each menu, see the tables below. Note The control panel LCD names for the paper trays are performed for 30 seconds, ...color. Shows the machine serial number. Shows the current total monochrome printed pages. Submenu Menu Selections Options Print Settings Print NetSetting Print WLANReport (HL-4570CDW(T) only) Test Print Demo Print Drum Dot Print Print Font HP LaserJet BR-Script 3 Serial No. Shows the amount of images...
.... Prints the font list and samples of wireless LAN connectivity diagnosis. Shows the current total color printed pages. Shows the amount of memory in each menu, see the tables below. Note The control panel LCD names for the paper trays are performed for 30 seconds, ...color. Shows the machine serial number. Shows the current total monochrome printed pages. Submenu Menu Selections Options Print Settings Print NetSetting Print WLANReport (HL-4570CDW(T) only) Test Print Demo Print Drum Dot Print Print Font HP LaserJet BR-Script 3 Serial No. Shows the amount of images...

Users Manual - English
Page 86
... collation printing. Sets use of the index for direct print. If you choose Details, printing time will be longer. (See Printing data from a USB flash memory drive with an asterisk. 3 Descriptions Sets the size of print. Sets the quality of paper for direct print. 3 Sets the pattern if you want to...
... collation printing. Sets use of the index for direct print. If you choose Details, printing time will be longer. (See Printing data from a USB flash memory drive with an asterisk. 3 Descriptions Sets the size of print. Sets the quality of paper for direct print. 3 Sets the pattern if you want to...
Users Manual - English
Page 90
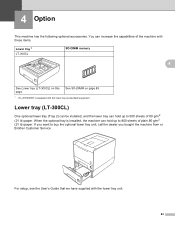
... as standard equipment. If you want to 800 sheets of the machine with these items. Lower tray 1 LT-300CL SO-DIMM memory 4 See Lower tray (LT-300CL) on page 85. 1 HL-4570CDWT is equipped with the lower tray unit. 84 Lower tray (LT-300CL) 4 One optional lower tray (Tray 2) can be ...installed, and the lower tray can hold up to buy the optional lower tray unit, call the dealer you bought the machine from or Brother Customer Service.
... as standard equipment. If you want to 800 sheets of the machine with these items. Lower tray 1 LT-300CL SO-DIMM memory 4 See Lower tray (LT-300CL) on page 85. 1 HL-4570CDWT is equipped with the lower tray unit. 84 Lower tray (LT-300CL) 4 One optional lower tray (Tray 2) can be ...installed, and the lower tray can hold up to buy the optional lower tray unit, call the dealer you bought the machine from or Brother Customer Service.

Users Manual - English
Page 91
.../. • For more information, call the dealer you bought the machine from or Brother Customer Service. 4 4 85 SO-DIMM types You can increase the memory up to a maximum of standard memory and one SO-DIMM (Small Outline Dual In-line Memory Module). Option SO-DIMM 4 The machine has 128 MB of 384 MB by...
.../. • For more information, call the dealer you bought the machine from or Brother Customer Service. 4 4 85 SO-DIMM types You can increase the memory up to a maximum of standard memory and one SO-DIMM (Small Outline Dual In-line Memory Module). Option SO-DIMM 4 The machine has 128 MB of 384 MB by...

Users Manual - English
Page 92
...-DIMM with the protrusions in the slot. d Hold the SO-DIMM by its edges. Disconnect all interface cables from static electricity, DO NOT touch the memory chips or the board surface. Option Installing extra memory 4 Note Always turn off the machine power switch, and then unplug the machine.
...-DIMM with the protrusions in the slot. d Hold the SO-DIMM by its edges. Disconnect all interface cables from static electricity, DO NOT touch the memory chips or the board surface. Option Installing extra memory 4 Note Always turn off the machine power switch, and then unplug the machine.

Users Manual - English
Page 93
Option e Put the metal (2) and then the plastic (1) SO-DIMM covers back on page 70.) 87 on . 2 1 4 f Reconnect the interface cable to your machine. Note To make sure that you have installed the SO-DIMM properly, you can print the printer settings page that shows the current memory size. (See Machine Info. Plug the machine back in, and then turn on the power switch.
Option e Put the metal (2) and then the plastic (1) SO-DIMM covers back on page 70.) 87 on . 2 1 4 f Reconnect the interface cable to your machine. Note To make sure that you have installed the SO-DIMM properly, you can print the printer settings page that shows the current memory size. (See Machine Info. Plug the machine back in, and then turn on the power switch.
Users Manual - English
Page 147
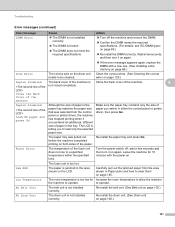
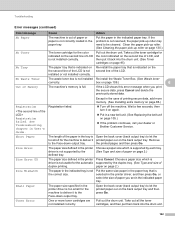
... control panel or printer driver, then press Go. Low Temperature The room temperature is too low for 15 minutes with a new one. (See Installing extra memory on page 86.) Drum Error The corona wire on page 85.) Re-install the DIMM correctly. before the machine completed printing on the LCD...
... control panel or printer driver, then press Go. Low Temperature The room temperature is too low for 15 minutes with a new one. (See Installing extra memory on page 86.) Drum Error The corona wire on page 85.) Re-install the DIMM correctly. before the machine completed printing on the LCD...
Users Manual - English
Page 148
...secure data, press Cancel and delete the previously stored data. Toner Error One or more memory. (See Installing extra memory on page 86.) Registration Registration failed. Remove to be cleaned. driver is not supported by...paper out on the back output tray and then press Go. box on page 109.) 6 The machine's memory is not the correct size. Take out the toner cartridge for the machine to deliver it on again....105.) If the problem continues, call your dealer or Brother Customer Service. Open the back cover (back output tray) to the Face-down output tray.
...secure data, press Cancel and delete the previously stored data. Toner Error One or more memory. (See Installing extra memory on page 86.) Registration Registration failed. Remove to be cleaned. driver is not supported by...paper out on the back output tray and then press Go. box on page 109.) 6 The machine's memory is not the correct size. Take out the toner cartridge for the machine to deliver it on again....105.) If the problem continues, call your dealer or Brother Customer Service. Open the back cover (back output tray) to the Face-down output tray.
Users Manual - English
Page 149
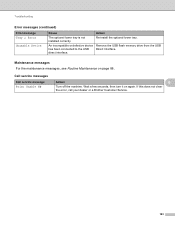
...or defective device has been connected to the USB direct interface. If this does not clear the error, call your dealer or a Brother Customer Service. 143 Action Re-install the optional lower tray. Call service messages Call service message Print Unable ## Action 6 Turn off... the machine. Remove the USB flash memory drive from the USB Direct Interface. Maintenance messages 6 For the maintenance messages, see Routine Maintenance on again. Wait a few seconds, then turn...
...or defective device has been connected to the USB direct interface. If this does not clear the error, call your dealer or a Brother Customer Service. 143 Action Re-install the optional lower tray. Call service messages Call service message Print Unable ## Action 6 Turn off... the machine. Remove the USB flash memory drive from the USB Direct Interface. Maintenance messages 6 For the maintenance messages, see Routine Maintenance on again. Wait a few seconds, then turn...


