Quick Setup Guide - English
Page 22
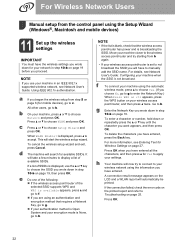
... in step 10-b on page 27. Go to choose the SSID you have entered all the characters, and then press a for mobile devices), go to Troubleshooting on the printed report and refer to b. h Your machine will take a few minutes to not broadcast the SSID you use the a or b key to h. NOTE...
... in step 10-b on page 27. Go to choose the SSID you have entered all the characters, and then press a for mobile devices), go to Troubleshooting on the printed report and refer to b. h Your machine will take a few minutes to not broadcast the SSID you use the a or b key to h. NOTE...
Quick Setup Guide - English
Page 24
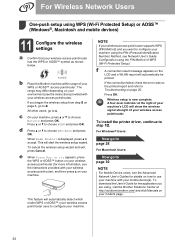
...6, go to use your machine with your wireless access point/router). This will automatically be printed. A four-level indicator at http://solutions.brother.com/ and click Manuals on your model's page. 24 f A connection result message appears on page 25. If the connection failed, check...device(s). When WLAN Enable? To download the User's Guide for the application you want to Troubleshooting on the LCD and a WLAN report will start the wireless setup wizard. b Place the Brother machine within range of WPS (Wi-Fi Protected Setup). For Windows® Users: Now...
...6, go to use your machine with your wireless access point/router). This will automatically be printed. A four-level indicator at http://solutions.brother.com/ and click Manuals on your model's page. 24 f A connection result message appears on page 25. If the connection failed, check...device(s). When WLAN Enable? To download the User's Guide for the application you want to Troubleshooting on the LCD and a WLAN report will start the wireless setup wizard. b Place the Brother machine within range of WPS (Wi-Fi Protected Setup). For Windows® Users: Now...
Quick Setup Guide - English
Page 25
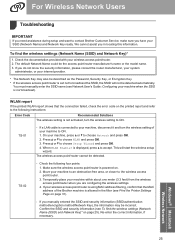
... Check the following instructions: Error Code Recommended Solutions The wireless setting is not activated, turn the wireless setting of the Brother machine is connected to your machine, disconnect it and turn the wireless setting to ON. Re-enter the correct information,...the wireless access point/router. 3. Windows® Macintosh Wireless Network 25 For Wireless Network Users Troubleshooting IMPORTANT If you need assistance during setup and want to contact Brother Customer Service, make sure you manually entered the SSID and security information (SSID/authentication method/...
... Check the following instructions: Error Code Recommended Solutions The wireless setting is not activated, turn the wireless setting of the Brother machine is connected to your machine, disconnect it and turn the wireless setting to ON. Re-enter the correct information,...the wireless access point/router. 3. Windows® Macintosh Wireless Network 25 For Wireless Network Users Troubleshooting IMPORTANT If you need assistance during setup and want to contact Brother Customer Service, make sure you manually entered the SSID and security information (SSID/authentication method/...
Users Manual - English
Page 2
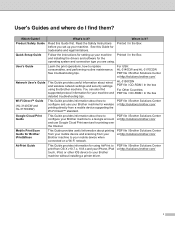
... ? Quick Setup Guide Follow the instructions for setting up your machine and detailed troubleshooting tips. User's Guides and where do I find supported protocol information for your machine. For USA: HL-3140CW and HL-3170CDW PDF file / Brother Solutions Center at http://solutions.brother.com/ Network User's Guide This Guide provides useful information about how to replace...
... ? Quick Setup Guide Follow the instructions for setting up your machine and detailed troubleshooting tips. User's Guides and where do I find supported protocol information for your machine. For USA: HL-3140CW and HL-3170CDW PDF file / Brother Solutions Center at http://solutions.brother.com/ Network User's Guide This Guide provides useful information about how to replace...

Users Manual - English
Page 5
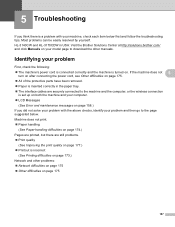
... head ...142 Cleaning the corona wires ...143 Cleaning the drum unit ...147 Cleaning the paper pick-up roller...153 Packing and shipping the machine ...154 5 Troubleshooting 157 Identifying your problem ...157 Error and maintenance messages...158 Paper jams ...163 If you are having difficulty with your machine 173 Improving the print...
... head ...142 Cleaning the corona wires ...143 Cleaning the drum unit ...147 Cleaning the paper pick-up roller...153 Packing and shipping the machine ...154 5 Troubleshooting 157 Identifying your problem ...157 Error and maintenance messages...158 Paper jams ...163 If you are having difficulty with your machine 173 Improving the print...

Users Manual - English
Page 65
... a problem with the toner cartridge, the following icons will appear. Then drag the icon to access the troubleshooting website. button. If the toner level is low or there is active. 59 NOTE • For more...8) If you have selected the Enable Status Monitor on startup check box during installation, you will appear Click the Troubleshooting button to the taskbar. The Status Monitor icon will find the button or Status Monitor icon on the taskbar. Driver... or by choosing Status Monitor located in Start/All Programs/Brother/HL-XXXX on your taskbar, click the in the small window.
... a problem with the toner cartridge, the following icons will appear. Then drag the icon to access the troubleshooting website. button. If the toner level is low or there is active. 59 NOTE • For more...8) If you have selected the Enable Status Monitor on startup check box during installation, you will appear Click the Troubleshooting button to the taskbar. The Status Monitor icon will find the button or Status Monitor icon on the taskbar. Driver... or by choosing Status Monitor located in Start/All Programs/Brother/HL-XXXX on your taskbar, click the in the small window.
Users Manual - English
Page 163
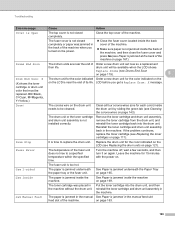
HL-3140CW and HL-3170CDW in the paper tray. The ... parts have been removed. Paper is inserted correctly in USA: Visit the Brother Solutions Center at http://solutions.brother.com/ and click Manuals on . Most problems can be easily resolved by yourself. ...Machine does not print. Paper handling (See Paper handling difficulties on page 174.) Pages are printed, but there are securely connected to the page suggested below first and follow the troubleshooting tips. 5 Troubleshooting...
HL-3140CW and HL-3170CDW in the paper tray. The ... parts have been removed. Paper is inserted correctly in USA: Visit the Brother Solutions Center at http://solutions.brother.com/ and click Manuals on . Most problems can be easily resolved by yourself. ...Machine does not print. Paper handling (See Paper handling difficulties on page 174.) Pages are printed, but there are securely connected to the page suggested below first and follow the troubleshooting tips. 5 Troubleshooting...

Users Manual - English
Page 164
... may need more help, the Brother Solutions Center offers the latest FAQs and troubleshooting tips: Visit us at http://solutions.brother.com/. The belt unit is near the end of the machine. Pull out the toner cartridge and drum unit assembly for the color that is ...not closed completely. If the problem continues, call Brother Customer Service. You can correct...
... may need more help, the Brother Solutions Center offers the latest FAQs and troubleshooting tips: Visit us at http://solutions.brother.com/. The belt unit is near the end of the machine. Pull out the toner cartridge and drum unit assembly for the color that is ...not closed completely. If the problem continues, call Brother Customer Service. You can correct...
Users Manual - English
Page 165
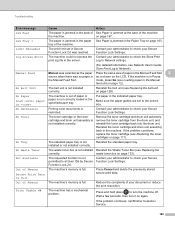
... drum unit color that must be cleaned. drum unit will be available when the LCD shows Replace Drums (see Replacing the drum units on again. Troubleshooting Error message Cause Action Cover is Open The top cover is not closed completely or paper was placed in the machine without the drum unit...
... drum unit color that must be cleaned. drum unit will be available when the LCD shows Replace Drums (see Replacing the drum units on again. Troubleshooting Error message Cause Action Cover is Open The top cover is not closed completely or paper was placed in the machine without the drum unit...
Users Manual - English
Page 166
...server. The machine's memory is jammed at the back of the machine the machine. Wait a few seconds, then turn the machine off. Troubleshooting Error message Cause Action Jam Rear The paper is jammed in the back of See Paper is full. mode, press Go (see Replacing ...the toner cartridges on page 128). Not Available The requested function is not installed correctly. If the problem continues, call Brother Customer Service. 160 Contact your Secure Function Lock Settings. installed or not installed correctly. Log Access Error The machine could not access the ...
...server. The machine's memory is jammed at the back of the machine the machine. Wait a few seconds, then turn the machine off. Troubleshooting Error message Cause Action Jam Rear The paper is jammed in the back of See Paper is full. mode, press Go (see Replacing ...the toner cartridges on page 128). Not Available The requested function is not installed correctly. If the problem continues, call Brother Customer Service. 160 Contact your Secure Function Lock Settings. installed or not installed correctly. Log Access Error The machine could not access the ...

Users Manual - English
Page 167
...the control panel (see Auto Registration on page 105). Put in Canada) or to replace the paper feeding kit. Call Brother Customer Service or a Brother Authorized Service Center to replace the PF kit. Replace Belt It is time to replace the fuser unit. units on page 128). ...the toner cartridge or drum unit color that must be replaced. The drum unit counter was not reset when a new drum was installed. Troubleshooting Error message Cause Action Registration Registration failed. Press and hold down to turn it on page 121). To replace the PF Kit call...
...the control panel (see Auto Registration on page 105). Put in Canada) or to replace the paper feeding kit. Call Brother Customer Service or a Brother Authorized Service Center to replace the PF kit. Replace Belt It is time to replace the fuser unit. units on page 128). ...the toner cartridge or drum unit color that must be replaced. The drum unit counter was not reset when a new drum was installed. Troubleshooting Error message Cause Action Registration Registration failed. Press and hold down to turn it on page 121). To replace the PF Kit call...

Users Manual - English
Page 168
... paper for automatic 2-sided printing. Size Error DX The paper size defined in the tray is not available for the tray (see Replacing the box. Troubleshooting Error message Cause Action Replace WT Box It is Letter, Legal or Folio.
... paper for automatic 2-sided printing. Size Error DX The paper size defined in the tray is not available for the tray (see Replacing the box. Troubleshooting Error message Cause Action Replace WT Box It is Letter, Legal or Folio.

Users Manual - English
Page 169
Troubleshooting Paper jams 5 Always remove the remaining paper from feeding through the machine at one time and prevents paper jams. Paper is jammed in the manual ...
Troubleshooting Paper jams 5 Always remove the remaining paper from feeding through the machine at one time and prevents paper jams. Paper is jammed in the manual ...

Users Manual - English
Page 170
c Make sure that the guides are firmly in the slots. Make sure that the paper is below the maximum paper mark ( ) in the machine. 164 While pressing the green paper-guide release lever, slide the paper guides to remove the paper more easily. d Put the paper tray firmly back in the paper tray. Troubleshooting b Use both hands to slowly pull out the jammed paper. 5 NOTE Pulling the jammed paper downward allows you to fit the paper size.
c Make sure that the guides are firmly in the slots. Make sure that the paper is below the maximum paper mark ( ) in the machine. 164 While pressing the green paper-guide release lever, slide the paper guides to remove the paper more easily. d Put the paper tray firmly back in the paper tray. Troubleshooting b Use both hands to slowly pull out the jammed paper. 5 NOTE Pulling the jammed paper downward allows you to fit the paper size.

Users Manual - English
Page 171
b Pull the paper tray completely out of the machine. 5 c Make sure that the jammed paper does not remain inside the machine. d If paper is jammed underneath the Paper Tray 5 If the LCD shows Jam 2-sided, follow these steps: a Leave the machine turned on for 10 minutes for the internal fan to cool the extremely hot parts inside the machine. Troubleshooting Paper is not caught inside the machine, check underneath the paper tray. 165
b Pull the paper tray completely out of the machine. 5 c Make sure that the jammed paper does not remain inside the machine. d If paper is jammed underneath the Paper Tray 5 If the LCD shows Jam 2-sided, follow these steps: a Leave the machine turned on for 10 minutes for the internal fan to cool the extremely hot parts inside the machine. Troubleshooting Paper is not caught inside the machine, check underneath the paper tray. 165

Users Manual - English
Page 172
Wait for the machine to pull out the jammed paper slowly. h Put the paper tray back in the paper tray, open the back cover. 5 WARNING HOT SURFACE After you touch the internal parts of the machine will be extremely hot. Troubleshooting e If the paper is not caught in the machine. 166 g Close the back cover until it locks in the closed position. f Use both hands to cool down before you have just used the machine, some internal parts of the machine.
Wait for the machine to pull out the jammed paper slowly. h Put the paper tray back in the paper tray, open the back cover. 5 WARNING HOT SURFACE After you touch the internal parts of the machine will be extremely hot. Troubleshooting e If the paper is not caught in the machine. 166 g Close the back cover until it locks in the closed position. f Use both hands to cool down before you have just used the machine, some internal parts of the machine.

Users Manual - English
Page 173
Wait for the internal fan to cool down before you have just used the machine, some internal parts of the machine will be extremely hot. b Open the back cover. 5 WARNING HOT SURFACE After you touch the internal parts of the machine 5 If the LCD shows Jam Rear, a paper jam occurred behind the back cover. Troubleshooting Paper is jammed at the back of the machine. 167 Follow these steps: a Leave the machine turned on for 10 minutes for the machine to cool the extremely hot parts inside the machine.
Wait for the internal fan to cool down before you have just used the machine, some internal parts of the machine will be extremely hot. b Open the back cover. 5 WARNING HOT SURFACE After you touch the internal parts of the machine 5 If the LCD shows Jam Rear, a paper jam occurred behind the back cover. Troubleshooting Paper is jammed at the back of the machine. 167 Follow these steps: a Leave the machine turned on for 10 minutes for the machine to cool the extremely hot parts inside the machine.

Users Manual - English
Page 174
e Close the fuser cover (1). 1 f Close the back cover. 168 Troubleshooting c Pull the green tabs at the left and right sides toward you to release the fuser cover (1). 1 5 d Use both hands to gently pull the jammed paper out of the fuser unit.
e Close the fuser cover (1). 1 f Close the back cover. 168 Troubleshooting c Pull the green tabs at the left and right sides toward you to release the fuser cover (1). 1 5 d Use both hands to gently pull the jammed paper out of the fuser unit.

Users Manual - English
Page 175
b Open the top cover until it locks in the open position. 5 WARNING HOT SURFACE After you touch the internal parts of the machine will be extremely hot. Wait for the internal fan to cool down before you have just used the machine, some internal parts of the machine. 169 Troubleshooting Paper is jammed inside the machine 5 If the LCD shows Jam Inside, follow these steps: a Leave the machine turned on for 10 minutes for the machine to cool the extremely hot parts inside the machine.
b Open the top cover until it locks in the open position. 5 WARNING HOT SURFACE After you touch the internal parts of the machine will be extremely hot. Wait for the internal fan to cool down before you have just used the machine, some internal parts of the machine. 169 Troubleshooting Paper is jammed inside the machine 5 If the LCD shows Jam Inside, follow these steps: a Leave the machine turned on for 10 minutes for the machine to cool the extremely hot parts inside the machine.

Users Manual - English
Page 176
Troubleshooting c Take out all four toner cartridge and drum unit assemblies. 5 IMPORTANT • We recommend that you accidentally spill or scatter toner. • Handle the toner cartridge and drum unit assemblies carefully. If toner scatters on a piece of disposable paper or cloth in case you put the toner cartridge and drum unit assemblies on your hands or clothes, immediately wipe or wash it off with cold water. • To prevent damage to the machine from static electricity, DO NOT touch the electrodes shown in the illustration. 170
Troubleshooting c Take out all four toner cartridge and drum unit assemblies. 5 IMPORTANT • We recommend that you accidentally spill or scatter toner. • Handle the toner cartridge and drum unit assemblies carefully. If toner scatters on a piece of disposable paper or cloth in case you put the toner cartridge and drum unit assemblies on your hands or clothes, immediately wipe or wash it off with cold water. • To prevent damage to the machine from static electricity, DO NOT touch the electrodes shown in the illustration. 170


