
Quick Setup Guide - English
Page 1
...and Toner Cartridge Assemblies (pre-installed) (Black, Cyan, Magenta and Yellow) Belt Unit (pre-installed) AC Power Cord Quick Setup Guide Product Safety Guide ENG Version 0 1 To view the Quick Setup Guide in other languages, please visit http://solutions.brother.com/. (HL-3140CW / HL-3170CDW) ... Setup Guide for this product, visit the Brother Solutions Center at http://solutions.brother.com/ and click Manuals on your business. Quick Setup Guide Start Here HL-3140CW / HL-3150CDN HL-3150CDW / HL-3170CDW Thank you for choosing Brother, your support is engineered and manufactured to the...
...and Toner Cartridge Assemblies (pre-installed) (Black, Cyan, Magenta and Yellow) Belt Unit (pre-installed) AC Power Cord Quick Setup Guide Product Safety Guide ENG Version 0 1 To view the Quick Setup Guide in other languages, please visit http://solutions.brother.com/. (HL-3140CW / HL-3170CDW) ... Setup Guide for this product, visit the Brother Solutions Center at http://solutions.brother.com/ and click Manuals on your business. Quick Setup Guide Start Here HL-3140CW / HL-3150CDN HL-3150CDW / HL-3170CDW Thank you for choosing Brother, your support is engineered and manufactured to the...

Quick Setup Guide - English
Page 3
...shown in the illustration. f Remove the orange packing piece from the belt unit. e Remove the orange packing piece from each drum and toner cartridge assembly. 3 IMPORTANT To avoid print quality problems, DO NOT touch the shaded part shown in the illustration below. c Slide all four drum and ...toner cartridge assemblies. b Fully open the top cover by lifting up on the handle a. d Take out all eight yellow drum locks in the direction of...
...shown in the illustration. f Remove the orange packing piece from the belt unit. e Remove the orange packing piece from each drum and toner cartridge assembly. 3 IMPORTANT To avoid print quality problems, DO NOT touch the shaded part shown in the illustration below. c Slide all four drum and ...toner cartridge assemblies. b Fully open the top cover by lifting up on the handle a. d Take out all eight yellow drum locks in the direction of...
Quick Setup Guide - English
Page 4
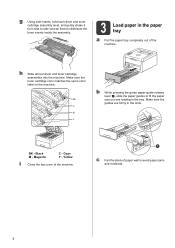
...and misfeeds. 4 c Fan the stack of the machine. Make sure the guides are loading in the tray. Black M - h Slide all four drum and toner cartridge assemblies into the machine. Cyan Y - BK C M Y b While pressing the green paper-guide release lever a, slide the paper guides to distribute the toner evenly... paper in the paper tray a Pull the paper tray completely out of the machine. Magenta C - g Using both hands, hold each drum and toner cartridge assembly level, and gently shake it from side to side several times to fit the paper size you are firmly in the slots. BK -
...and misfeeds. 4 c Fan the stack of the machine. Make sure the guides are loading in the tray. Black M - h Slide all four drum and toner cartridge assemblies into the machine. Cyan Y - BK C M Y b While pressing the green paper-guide release lever a, slide the paper guides to distribute the toner evenly... paper in the paper tray a Pull the paper tray completely out of the machine. Magenta C - g Using both hands, hold each drum and toner cartridge assembly level, and gently shake it from side to side several times to fit the paper size you are firmly in the slots. BK -

Quick Setup Guide - English
Page 33
Toner Cartridges Drum Units Belt Unit BU-220CL Waste Toner Box WT-220CL For more information about the consumables for your machine, visit us at http://www.brother.com/original/ or contact your machine's LCD. Consumables Consumables When the time comes to replace consumable items such as toner or drums, an error message will appear on replacing the consumable items, see User's Guide: Replacing consumable items. 33 For more information on your local Brother reseller. NOTE The drum unit and toner cartridge are two separate parts.
Toner Cartridges Drum Units Belt Unit BU-220CL Waste Toner Box WT-220CL For more information about the consumables for your machine, visit us at http://www.brother.com/original/ or contact your machine's LCD. Consumables Consumables When the time comes to replace consumable items such as toner or drums, an error message will appear on replacing the consumable items, see User's Guide: Replacing consumable items. 33 For more information on your local Brother reseller. NOTE The drum unit and toner cartridge are two separate parts.

Users Manual - English
Page 5
... Auto Power Off ...103 Color Correction...104 Frequency...104 Color Calibration ...104 Auto Registration ...105 4 Routine Maintenance 106 Replacing consumable items...106 Replacing the toner cartridges...110 Replacing the drum units...119 Replacing the belt unit ...128 Replacing the waste toner box ...133 Cleaning and Checking the machine ...140 Cleaning the...
... Auto Power Off ...103 Color Correction...104 Frequency...104 Color Calibration ...104 Auto Registration ...105 4 Routine Maintenance 106 Replacing consumable items...106 Replacing the toner cartridges...110 Replacing the drum units...119 Replacing the belt unit ...128 Replacing the waste toner box ...133 Cleaning and Checking the machine ...140 Cleaning the...

Users Manual - English
Page 65
... or Status Monitor icon on your taskbar, click the in the small window. The toner cartridge is low. button. If the toner level is low or there is a problem with the toner cartridge, the following icons will appear Click the Troubleshooting button to the taskbar. NOTE • ... 2 Check the device status at any time by double-clicking the icon in the tasktray or by choosing Status Monitor located in Start/All Programs/Brother/HL-XXXX on your computer. (Windows® 7 / Windows® 8) If you have selected the Enable Status Monitor on startup check box during installation...
... or Status Monitor icon on your taskbar, click the in the small window. The toner cartridge is low. button. If the toner level is low or there is a problem with the toner cartridge, the following icons will appear Click the Troubleshooting button to the taskbar. NOTE • ... 2 Check the device status at any time by double-clicking the icon in the tasktray or by choosing Status Monitor located in Start/All Programs/Brother/HL-XXXX on your computer. (Windows® 7 / Windows® 8) If you have selected the Enable Status Monitor on startup check box during installation...
Users Manual - English
Page 74
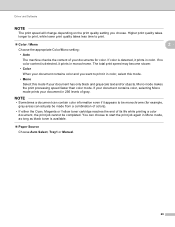
... Choose Auto Select, Tray1 or Manual. 68 You can actually be made from a combination of colors). • If either the Cyan, Magenta or Yellow toner cartridge reaches the end of gray. If your document contains color, selecting Mono mode prints your document in Mono mode, as long as black toner is...
... Choose Auto Select, Tray1 or Manual. 68 You can actually be made from a combination of colors). • If either the Cyan, Magenta or Yellow toner cartridge reaches the end of gray. If your document contains color, selecting Mono mode prints your document in Mono mode, as long as black toner is...
Users Manual - English
Page 80
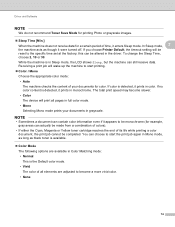
... color. • None 74 NOTE • Sometimes a document can actually be made from a combination of colors). • If either the Cyan, Magenta or Yellow toner cartridge reaches the end of its life while printing a color document, the print job cannot be altered in the driver. If no color content is in...
... color. • None 74 NOTE • Sometimes a document can actually be made from a combination of colors). • If either the Cyan, Magenta or Yellow toner cartridge reaches the end of its life while printing a color document, the print job cannot be altered in the driver. If no color content is in...

Users Manual - English
Page 84
... utility. If the toner level is low or there is a problem with the toner cartridge, the following these steps to the menu bar, Brother Status Monitor and choose Preferences. 78 The toner cartridge is low. Go to Launch the Brother Status Monitor: 2 For Mac OS X v10.6.8 a Run System Preferences, select Print & Fax, then...
... utility. If the toner level is low or there is a problem with the toner cartridge, the following these steps to the menu bar, Brother Status Monitor and choose Preferences. 78 The toner cartridge is low. Go to Launch the Brother Status Monitor: 2 For Mac OS X v10.6.8 a Run System Preferences, select Print & Fax, then...

Users Manual - English
Page 92
Shows the remaining life for the cyan drum unit. Cyan(C) - Shows the remaining life for each toner cartridge. Yellow(Y) - Shows the remaining life for the magenta drum unit. Resets the cyan drum unit life. Resets the yellow drum unit life. Shows the pages ... you replace the belt unit. Yellow(Y) - For example, if the remaining life for the yellow drum unit. Shows the remaining life for the black toner cartridge is 20%, the LCD shows as follow. Shows the remaining life for the black drum unit. Resets the black drum unit life. Appears when you...
Shows the remaining life for the cyan drum unit. Cyan(C) - Shows the remaining life for each toner cartridge. Yellow(Y) - Shows the remaining life for the magenta drum unit. Resets the cyan drum unit life. Resets the yellow drum unit life. Shows the pages ... you replace the belt unit. Yellow(Y) - For example, if the remaining life for the yellow drum unit. Shows the remaining life for the black toner cartridge is 20%, the LCD shows as follow. Shows the remaining life for the black drum unit. Resets the black drum unit life. Appears when you...
Users Manual - English
Page 94
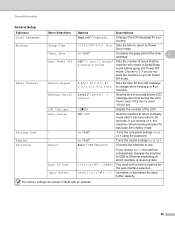
.... 0 / 1 / 2 / 3* / 4 / 5 / ... If you do not want the machine to change when holding a or b at intervals. Off* / 1 hour / 2 hours / 4 hours / 8 hours Sets the number of the toner 3 cartridge. Choose Off if you choose Auto, the machine automatically changes the interface to USB or Ethernet depending on which interface is receiving data. 1 / 2 / 3 / 4 / 5* / ... / 99Sec You...
.... 0 / 1 / 2 / 3* / 4 / 5 / ... If you do not want the machine to change when holding a or b at intervals. Off* / 1 hour / 2 hours / 4 hours / 8 hours Sets the number of the toner 3 cartridge. Choose Off if you choose Auto, the machine automatically changes the interface to USB or Ethernet depending on which interface is receiving data. 1 / 2 / 3 / 4 / 5* / ... / 99Sec You...
Users Manual - English
Page 112
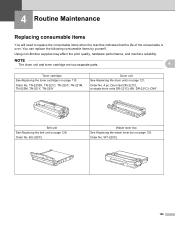
... TN-221Y, TN-225Y Drum unit See Replacing the drum units on page 110. NOTE The drum unit and toner cartridge are two separate parts. 4 Toner cartridge See Replacing the toner cartridges on page 121. Drum Set DR-221CL or single drum units DR-221CL-BK, DR-221CL-CMY Belt unit See ...Replacing the belt unit on page 133. WT-220CL 106 You can replace the following consumable items by yourself. Using non-Brother supplies may affect...
... TN-221Y, TN-225Y Drum unit See Replacing the drum units on page 110. NOTE The drum unit and toner cartridge are two separate parts. 4 Toner cartridge See Replacing the toner cartridges on page 121. Drum Set DR-221CL or single drum units DR-221CL-BK, DR-221CL-CMY Belt unit See ...Replacing the belt unit on page 133. WT-220CL 106 You can replace the following consumable items by yourself. Using non-Brother supplies may affect...
Users Manual - English
Page 113
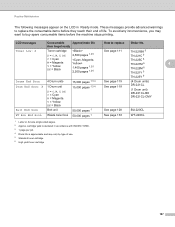
...LCD messages Consumable Approximate life item to get ready How to replace the consumable items before the machine stops printing. cartridge yield is declared in Ready mode. Routine Maintenance The following messages appear on the LCD in accordance with ISO/IEC... and may want to buy spare consumable items before they reach their end of use. 5 Standard toner cartridge 6 High yield toner cartridge 107 These messages provide advanced warnings to replace Order No. Toner Low: X Toner cartridge X = C, M, Y, BK 2,500 pages 1 2 5 See page 111 TN-221BK 5 TN-221C 5 C = Cyan M = ...
...LCD messages Consumable Approximate life item to get ready How to replace the consumable items before the machine stops printing. cartridge yield is declared in Ready mode. Routine Maintenance The following messages appear on the LCD in accordance with ISO/IEC... and may want to buy spare consumable items before they reach their end of use. 5 Standard toner cartridge 6 High yield toner cartridge 107 These messages provide advanced warnings to replace Order No. Toner Low: X Toner cartridge X = C, M, Y, BK 2,500 pages 1 2 5 See page 111 TN-221BK 5 TN-221C 5 C = Cyan M = ...
Users Manual - English
Page 114
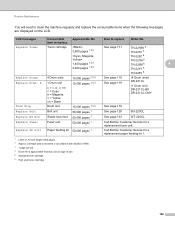
...life item to replace How to clean the machine regularly and replace the consumable items when the following messages are displayed on the LCD. cartridge yield is declared in accordance with ISO/IEC 19798. 3 1 page per job 4 Drum life is approximate and may vary by type ...of use. 5 Standard toner cartridge 6 High yield toner cartridge 108 Replace PF kit1 Paper feeding kit 50,000 pages 1 Call Brother Customer Service for a replacement fuser unit. Replace Toner Toner cartridge 2,500 pages 1 2 5 See page 111 TN-221BK 5 TN-221C 5 1,400 ...
...life item to replace How to clean the machine regularly and replace the consumable items when the following messages are displayed on the LCD. cartridge yield is declared in accordance with ISO/IEC 19798. 3 1 page per job 4 Drum life is approximate and may vary by type ...of use. 5 Standard toner cartridge 6 High yield toner cartridge 108 Replace PF kit1 Paper feeding kit 50,000 pages 1 Call Brother Customer Service for a replacement fuser unit. Replace Toner Toner cartridge 2,500 pages 1 2 5 See page 111 TN-221BK 5 TN-221C 5 1,400 ...
Users Manual - English
Page 115
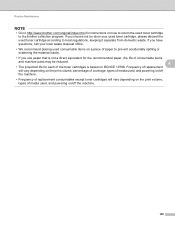
...to prevent accidentally spilling or scattering the material inside. • If you have questions, call your used toner cartridge, please discard the used toner cartridge to the brother collection program. Frequency of replacement will vary depending on the print volume, percentage of coverage, types of media.... • Frequency of replacement consumables except toner cartridges will vary depending on the print volume, types of the toner cartridges is based on ISO/ICE 19798. Routine Maintenance NOTE • Go to http://www.brother.com/original/index.html for each of media used...
...to prevent accidentally spilling or scattering the material inside. • If you have questions, call your used toner cartridge, please discard the used toner cartridge to the brother collection program. Frequency of replacement will vary depending on the print volume, percentage of coverage, types of media.... • Frequency of replacement consumables except toner cartridges will vary depending on the print volume, types of the toner cartridges is based on ISO/ICE 19798. Routine Maintenance NOTE • Go to http://www.brother.com/original/index.html for each of media used...
Users Manual - English
Page 116
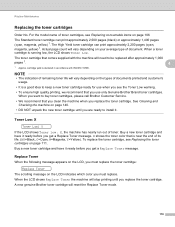
...vary depending on page 140. • DO NOT unpack the new toner cartridge until you replace the toner cartridge. When you want to install it ready before you are ready to buy toner cartridges, please call Brother Customer Service. • We recommend that is a good idea to be...For the model name of toner. NOTE • The indication of remaining toner life will need to keep a new toner cartridge ready for use only Genuine Brother Brand toner cartridges. When the LCD shows Replace Toner the machine will reset the Replace Toner mode. 110 Replace Toner 4 When the following ...
...vary depending on page 140. • DO NOT unpack the new toner cartridge until you replace the toner cartridge. When you want to install it ready before you are ready to buy toner cartridges, please call Brother Customer Service. • We recommend that is a good idea to be...For the model name of toner. NOTE • The indication of remaining toner life will need to keep a new toner cartridge ready for use only Genuine Brother Brand toner cartridges. When the LCD shows Replace Toner the machine will reset the Replace Toner mode. 110 Replace Toner 4 When the following ...
Users Manual - English
Page 117
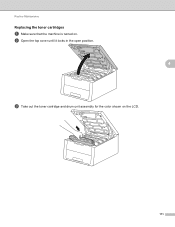
b Open the top cover until it locks in the open position. 4 4 c Take out the toner cartridge and drum unit assembly for the color shown on . Routine Maintenance Replacing the toner cartridges a Make sure that the machine is turned on the LCD. 111
b Open the top cover until it locks in the open position. 4 4 c Take out the toner cartridge and drum unit assembly for the color shown on . Routine Maintenance Replacing the toner cartridges a Make sure that the machine is turned on the LCD. 111
Users Manual - English
Page 118
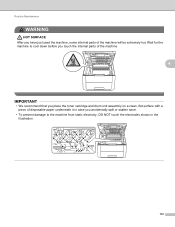
Routine Maintenance WARNING HOT SURFACE After you place the toner cartridge and drum unit assembly on a clean, flat surface with a piece of the machine will be extremely hot. Wait for the machine to the machine from static electricity, DO NOT touch the electrodes shown in case you accidentally spill or scatter toner. • To prevent damage to cool down before you touch the internal parts of the machine. 4 IMPORTANT • We recommend that you have just used the machine, some internal parts of disposable paper underneath it in the illustration. 112
Routine Maintenance WARNING HOT SURFACE After you place the toner cartridge and drum unit assembly on a clean, flat surface with a piece of the machine will be extremely hot. Wait for the machine to the machine from static electricity, DO NOT touch the electrodes shown in case you accidentally spill or scatter toner. • To prevent damage to cool down before you touch the internal parts of the machine. 4 IMPORTANT • We recommend that you have just used the machine, some internal parts of disposable paper underneath it in the illustration. 112
Users Manual - English
Page 119
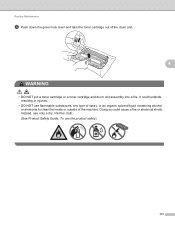
Instead, use only a dry, lint-free cloth. (See Product Safety Guide: To use flammable substances, any type of spray, or an organic solvent/liquid containing alcohol or ammonia to clean the inside or outside of the drum unit. 4 WARNING • DO NOT put a toner cartridge or a toner cartridge and drum unit assembly into a fire. Doing so could explode, resulting in injuries. • DO NOT use the product safely) 113 It could cause a fire or electrical shock. Routine Maintenance d Push down the green lock lever and take the toner cartridge out of the machine.
Instead, use only a dry, lint-free cloth. (See Product Safety Guide: To use flammable substances, any type of spray, or an organic solvent/liquid containing alcohol or ammonia to clean the inside or outside of the drum unit. 4 WARNING • DO NOT put a toner cartridge or a toner cartridge and drum unit assembly into a fire. Doing so could explode, resulting in injuries. • DO NOT use the product safely) 113 It could cause a fire or electrical shock. Routine Maintenance d Push down the green lock lever and take the toner cartridge out of the machine.
Users Manual - English
Page 120
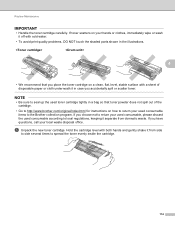
... it from domestic waste. NOTE • Be sure to seal up the used consumable according to the Brother collection program. e Unpack the new toner cartridge. Routine Maintenance IMPORTANT • Handle the toner cartridge carefully. Hold the cartridge level with cold water. • To avoid print quality problems, DO NOT touch the shaded parts shown...
... it from domestic waste. NOTE • Be sure to seal up the used consumable according to the Brother collection program. e Unpack the new toner cartridge. Routine Maintenance IMPORTANT • Handle the toner cartridge carefully. Hold the cartridge level with cold water. • To avoid print quality problems, DO NOT touch the shaded parts shown...


