
Quick Setup Guide - English
Page 1
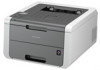
... please visit http://solutions.brother.com/. (HL-3140CW / HL-3170CDW) In USA: To download other guides for this Quick Setup Guide for choosing Brother, your support is engineered and manufactured to the highest standards to us and we value your business. Your Brother product is important to...installed) CD-ROM Drum Unit and Toner Cartridge Assemblies (pre-installed) (Black, Cyan, Magenta and Yellow) Belt Unit (pre-installed) AC Power Cord Quick Setup Guide Product Safety Guide ENG Version 0 1 Quick Setup Guide Start Here HL-3140CW / HL-3150CDN HL-3150CDW / HL-3170CDW Thank you for...
... please visit http://solutions.brother.com/. (HL-3140CW / HL-3170CDW) In USA: To download other guides for this Quick Setup Guide for choosing Brother, your support is engineered and manufactured to the highest standards to us and we value your business. Your Brother product is important to...installed) CD-ROM Drum Unit and Toner Cartridge Assemblies (pre-installed) (Black, Cyan, Magenta and Yellow) Belt Unit (pre-installed) AC Power Cord Quick Setup Guide Product Safety Guide ENG Version 0 1 Quick Setup Guide Start Here HL-3140CW / HL-3150CDN HL-3150CDW / HL-3170CDW Thank you for...

Quick Setup Guide - English
Page 3
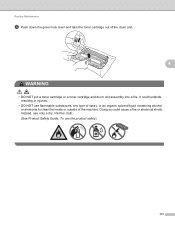
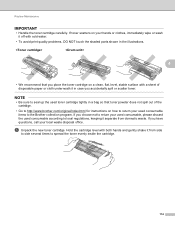
... the orange packing piece from the machine CCAAUUTTIOINON DO NOT eat the silica gel pack, please throw it away. d Take out all eight yellow drum locks in the direction of the machine. f Remove the orange packing piece from the outside of the arrows as shown in the illustration. a ...Remove the packing tape from each drum and toner cartridge assembly. 3 IMPORTANT To avoid print quality problems, DO NOT touch the shaded part shown in the illustration below. If ingested, ...
... the orange packing piece from the machine CCAAUUTTIOINON DO NOT eat the silica gel pack, please throw it away. d Take out all eight yellow drum locks in the direction of the machine. f Remove the orange packing piece from the outside of the arrows as shown in the illustration. a ...Remove the packing tape from each drum and toner cartridge assembly. 3 IMPORTANT To avoid print quality problems, DO NOT touch the shaded part shown in the illustration below. If ingested, ...
Quick Setup Guide - English
Page 4
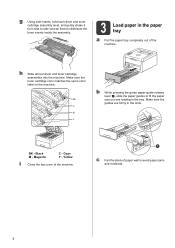
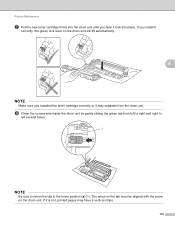
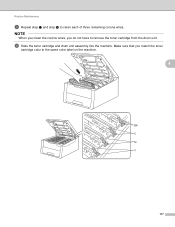
... sure the toner cartridge color matches the same color label on the machine. h Slide all four drum and toner cartridge assemblies into the machine. c Fan the stack of the machine. g Using both hands, hold each drum and toner cartridge assembly level, and gently shake it from side to side several times to...
... sure the toner cartridge color matches the same color label on the machine. h Slide all four drum and toner cartridge assemblies into the machine. c Fan the stack of the machine. g Using both hands, hold each drum and toner cartridge assembly level, and gently shake it from side to side several times to...

Quick Setup Guide - English
Page 33
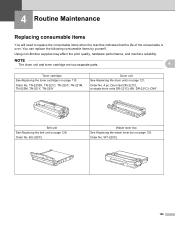
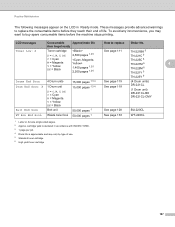
Consumables Consumables When the time comes to replace consumable items such as toner or drums, an error message will appear on replacing the consumable items, see User's Guide: Replacing consumable items. 33 For more information on your local Brother reseller. Toner Cartridges Drum Units Belt Unit BU-220CL Waste Toner Box WT-220CL For more information about the consumables for your machine, visit us at http://www.brother.com/original/ or contact your machine's LCD. NOTE The drum unit and toner cartridge are two separate parts.
Consumables Consumables When the time comes to replace consumable items such as toner or drums, an error message will appear on replacing the consumable items, see User's Guide: Replacing consumable items. 33 For more information on your local Brother reseller. Toner Cartridges Drum Units Belt Unit BU-220CL Waste Toner Box WT-220CL For more information about the consumables for your machine, visit us at http://www.brother.com/original/ or contact your machine's LCD. NOTE The drum unit and toner cartridge are two separate parts.

Users Manual - English
Page 5
...104 Color Calibration ...104 Auto Registration ...105 4 Routine Maintenance 106 Replacing consumable items...106 Replacing the toner cartridges...110 Replacing the drum units...119 Replacing the belt unit ...128 Replacing the waste toner box ...133 Cleaning and Checking the machine ...140 Cleaning the outside... of the machine 140 Cleaning the LED head ...142 Cleaning the corona wires ...143 Cleaning the drum unit ...147 Cleaning the paper pick-up roller...153 Packing and shipping the machine ...154 5 Troubleshooting 157 Identifying your problem ......
...104 Color Calibration ...104 Auto Registration ...105 4 Routine Maintenance 106 Replacing consumable items...106 Replacing the toner cartridges...110 Replacing the drum units...119 Replacing the belt unit ...128 Replacing the waste toner box ...133 Cleaning and Checking the machine ...140 Cleaning the outside... of the machine 140 Cleaning the LED head ...142 Cleaning the corona wires ...143 Cleaning the drum unit ...147 Cleaning the paper pick-up roller...153 Packing and shipping the machine ...154 5 Troubleshooting 157 Identifying your problem ......

Users Manual - English
Page 12
... because your machine will be able to your machine. 6 Labels exceeding this specification may not feed or print correctly and may stick to the drum units or rollers and cause jams and print quality problems. No adhesive should be arranged so that have an adhesive that are missing a few ... been used in this machine must be damaged. Using labels with spaces may damage your machine. Labels 1 Most labels can be covered under any Brother warranty or service agreement. This damage may not be used carrier sheets. • DO NOT reuse or insert labels that they may result in ...
... because your machine will be able to your machine. 6 Labels exceeding this specification may not feed or print correctly and may stick to the drum units or rollers and cause jams and print quality problems. No adhesive should be arranged so that have an adhesive that are missing a few ... been used in this machine must be damaged. Using labels with spaces may damage your machine. Labels 1 Most labels can be covered under any Brother warranty or service agreement. This damage may not be used carrier sheets. • DO NOT reuse or insert labels that they may result in ...
Users Manual - English
Page 91
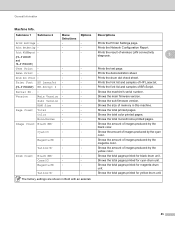
... total color printed pages. Image Count Black(BK) - - Yellow(Y) - - Shows the total pages printed for magenta drum unit. Print WLANReport - (HL-3140CW and HL-3170CDW) - - Drum Dot Print - - - Shows the machine's serial number. Shows the size of HP LaserJet. (HL-3170CDW) BR-Script 3 - - Page Count Total - - The factory settings are shown in this machine. Prints the...
... total color printed pages. Image Count Black(BK) - - Yellow(Y) - - Shows the total pages printed for magenta drum unit. Print WLANReport - (HL-3140CW and HL-3170CDW) - - Drum Dot Print - - - Shows the machine's serial number. Shows the size of HP LaserJet. (HL-3170CDW) BR-Script 3 - - Page Count Total - - The factory settings are shown in this machine. Prints the...

Users Manual - English
Page 92
...Shows the remaining life for the black toner cartridge is 20%, the LCD shows as follow. Yellow(Y) - Resets the cyan drum unit life. Resets the magenta drum unit life. The factory settings are shown in Bold with the PF kit 1. For example, if the remaining life for the... Black(BK) Cyan(C) Magenta(M) - Shows the remaining life for the magenta drum unit. Resets the yellow drum unit life. Shows the remaining life for the cyan drum unit. Appears when you replace the drum unit. General Information Machine Info. (continued) Submenu 1 Submenu 2 Menu Options...
...Shows the remaining life for the black toner cartridge is 20%, the LCD shows as follow. Yellow(Y) - Resets the cyan drum unit life. Resets the magenta drum unit life. The factory settings are shown in Bold with the PF kit 1. For example, if the remaining life for the... Black(BK) Cyan(C) Magenta(M) - Shows the remaining life for the magenta drum unit. Resets the yellow drum unit life. Shows the remaining life for the cyan drum unit. Appears when you replace the drum unit. General Information Machine Info. (continued) Submenu 1 Submenu 2 Menu Options...
Users Manual - English
Page 112
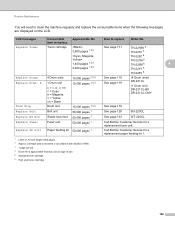
...page 133. BU-220CL Waste toner box See Replacing the waste toner box on page 121. Order No. Order No. 4 pc. Drum Set DR-221CL or single drum units DR-221CL-BK, DR-221CL-CMY Belt unit See Replacing the belt unit on page 110. WT-220CL 106 Order No. ... the life of the consumable is over. You can replace the following consumable items by yourself. Using non-Brother supplies may affect the print quality, hardware performance, and machine reliability. NOTE The drum unit and toner cartridge are two separate parts. 4 Toner cartridge See Replacing the toner cartridges on page 128...
...page 133. BU-220CL Waste toner box See Replacing the waste toner box on page 121. Order No. Order No. 4 pc. Drum Set DR-221CL or single drum units DR-221CL-BK, DR-221CL-CMY Belt unit See Replacing the belt unit on page 110. WT-220CL 106 Order No. ... the life of the consumable is over. You can replace the following consumable items by yourself. Using non-Brother supplies may affect the print quality, hardware performance, and machine reliability. NOTE The drum unit and toner cartridge are two separate parts. 4 Toner cartridge See Replacing the toner cartridges on page 128...
Users Manual - English
Page 113
... TN-221C 5 C = Cyan M = Magenta Y = Yellow BK = Black 1,400 pages 1 2 5 2,200 pages 1 2 6 TN-225C 6 TN-221M 5 4 TN-225M 6 TN-221Y 5 TN-225Y 6 Drums End Soon Drum End Soon: X 4 Drum units 1 Drum unit X = C, M, Y, BK C = Cyan M = Magenta Y = Yellow BK = Black 15,000 pages 1 3 4 15,000 pages 1 3 4 See page 119 See page 119... (4 Drum units) DR-221CL (1 Drum unit) DR-221CL-BK DR-221CL-CMY Belt End Soon Belt unit 50,000 pages 1 See page 128 BU-220CL WT Box End Soon Waste ...
... TN-221C 5 C = Cyan M = Magenta Y = Yellow BK = Black 1,400 pages 1 2 5 2,200 pages 1 2 6 TN-225C 6 TN-221M 5 4 TN-225M 6 TN-221Y 5 TN-225Y 6 Drums End Soon Drum End Soon: X 4 Drum units 1 Drum unit X = C, M, Y, BK C = Cyan M = Magenta Y = Yellow BK = Black 15,000 pages 1 3 4 15,000 pages 1 3 4 See page 119 See page 119... (4 Drum units) DR-221CL (1 Drum unit) DR-221CL-BK DR-221CL-CMY Belt End Soon Belt unit 50,000 pages 1 See page 128 BU-220CL WT Box End Soon Waste ...
Users Manual - English
Page 114
... may vary by type of use. 5 Standard toner cartridge 6 High yield toner cartridge 108 Replace PF kit1 Paper feeding kit 50,000 pages 1 Call Brother Customer Service for a replacement fuser unit. Routine Maintenance You will need to replace Order No. Replace Toner Toner cartridge 2,500 pages 1 2 5 See ...DR-221CL-CMY Drum Stop Drum unit 15,000 pages 1 3 4 See page 119 Replace Belt Belt unit 50,000 pages 1 See page 128 BU-220CL Replace WT Box Waste toner box 50,000 pages 1 See page 133 WT-220CL Replace Fuser Fuser unit 50,000 pages 1 Call Brother Customer Service for...
... may vary by type of use. 5 Standard toner cartridge 6 High yield toner cartridge 108 Replace PF kit1 Paper feeding kit 50,000 pages 1 Call Brother Customer Service for a replacement fuser unit. Routine Maintenance You will need to replace Order No. Replace Toner Toner cartridge 2,500 pages 1 2 5 See ...DR-221CL-CMY Drum Stop Drum unit 15,000 pages 1 3 4 See page 119 Replace Belt Belt unit 50,000 pages 1 See page 128 BU-220CL Replace WT Box Waste toner box 50,000 pages 1 See page 133 WT-220CL Replace Fuser Fuser unit 50,000 pages 1 Call Brother Customer Service for...
Users Manual - English
Page 117
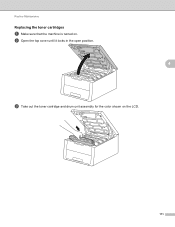
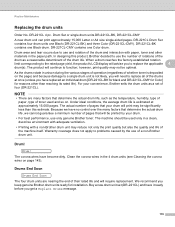
b Open the top cover until it locks in the open position. 4 4 c Take out the toner cartridge and drum unit assembly for the color shown on . Routine Maintenance Replacing the toner cartridges a Make sure that the machine is turned on the LCD. 111
b Open the top cover until it locks in the open position. 4 4 c Take out the toner cartridge and drum unit assembly for the color shown on . Routine Maintenance Replacing the toner cartridges a Make sure that the machine is turned on the LCD. 111
Users Manual - English
Page 118
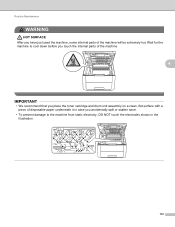
Wait for the machine to the machine from static electricity, DO NOT touch the electrodes shown in case you have just used the machine, some internal parts of disposable paper underneath it in the illustration. 112 Routine Maintenance WARNING HOT SURFACE After you accidentally spill or scatter toner. • To prevent damage to cool down before you touch the internal parts of the machine. 4 IMPORTANT • We recommend that you place the toner cartridge and drum unit assembly on a clean, flat surface with a piece of the machine will be extremely hot.
Wait for the machine to the machine from static electricity, DO NOT touch the electrodes shown in case you have just used the machine, some internal parts of disposable paper underneath it in the illustration. 112 Routine Maintenance WARNING HOT SURFACE After you accidentally spill or scatter toner. • To prevent damage to cool down before you touch the internal parts of the machine. 4 IMPORTANT • We recommend that you place the toner cartridge and drum unit assembly on a clean, flat surface with a piece of the machine will be extremely hot.
Users Manual - English
Page 119
It could cause a fire or electrical shock. Doing so could explode, resulting in injuries. • DO NOT use the product safely) 113 Routine Maintenance d Push down the green lock lever and take the toner cartridge out of the machine. Instead, use only a dry, lint-free cloth. (See Product Safety Guide: To use flammable substances, any type of spray, or an organic solvent/liquid containing alcohol or ammonia to clean the inside or outside of the drum unit. 4 WARNING • DO NOT put a toner cartridge or a toner cartridge and drum unit assembly into a fire.
It could cause a fire or electrical shock. Doing so could explode, resulting in injuries. • DO NOT use the product safely) 113 Routine Maintenance d Push down the green lock lever and take the toner cartridge out of the machine. Instead, use only a dry, lint-free cloth. (See Product Safety Guide: To use flammable substances, any type of spray, or an organic solvent/liquid containing alcohol or ammonia to clean the inside or outside of the drum unit. 4 WARNING • DO NOT put a toner cartridge or a toner cartridge and drum unit assembly into a fire.
Users Manual - English
Page 120
... parts shown in case you place the toner cartridge on how to return your used consumable, please discard the used consumable items to http://www.brother.com/original/index.html for instructions on a clean, flat, level, stable surface with a sheet of the cartridge. • Go to the... Brother collection program. If you have questions, call your hands or clothes, immediately wipe or wash it off with both hands and gently shake it in ...
... parts shown in case you place the toner cartridge on how to return your used consumable, please discard the used consumable items to http://www.brother.com/original/index.html for instructions on a clean, flat, level, stable surface with a sheet of the cartridge. • Go to the... Brother collection program. If you have questions, call your hands or clothes, immediately wipe or wash it off with both hands and gently shake it in ...

Users Manual - English
Page 121
...continue to use of third party toner and/or cartridges in the Brother machine may cause damage to the machine and/or may be shortened. • If an unpacked drum unit is caused by the use only Genuine Brother Brand replacement toner cartridges. If a toner cartridge is left unpacked ...for long periods of Genuine Brother Supplies. We also strongly recommend that you DO NOT refill the toner ...
...continue to use of third party toner and/or cartridges in the Brother machine may cause damage to the machine and/or may be shortened. • If an unpacked drum unit is caused by the use only Genuine Brother Brand replacement toner cartridges. If a toner cartridge is left unpacked ...for long periods of Genuine Brother Supplies. We also strongly recommend that you DO NOT refill the toner ...
Users Manual - English
Page 122
If it may have a vertical stripe. 116 If you install it correctly, the green lock lever on the drum unit. The arrow on the tab must be aligned with the arrow on the drum unit will lift automatically. 4 NOTE Make sure you hear it lock into place. h Clean the corona wire inside ...the drum unit by gently sliding the green tab from the drum unit. Routine Maintenance g Put the new toner cartridge firmly into the drum unit until you installed the toner cartridge correctly or it is not, printed pages may...
If it may have a vertical stripe. 116 If you install it correctly, the green lock lever on the drum unit. The arrow on the tab must be aligned with the arrow on the drum unit will lift automatically. 4 NOTE Make sure you hear it lock into place. h Clean the corona wire inside ...the drum unit by gently sliding the green tab from the drum unit. Routine Maintenance g Put the new toner cartridge firmly into the drum unit until you installed the toner cartridge correctly or it is not, printed pages may...
Users Manual - English
Page 123
j Slide the toner cartridge and drum unit assembly into the machine. Routine Maintenance i Repeat step c and step h to remove the toner cartridge from the drum unit. NOTE When you clean the corona wires, you match the toner cartridge color to the same color label on the machine. 4 BK C M Y 117 Make sure that you do not have to clean each of three remaining corona wires.
j Slide the toner cartridge and drum unit assembly into the machine. Routine Maintenance i Repeat step c and step h to remove the toner cartridge from the drum unit. NOTE When you clean the corona wires, you match the toner cartridge color to the same color label on the machine. 4 BK C M Y 117 Make sure that you do not have to clean each of three remaining corona wires.
Users Manual - English
Page 125
...single-sided pages. DR-221CL Drum Set contains four drum units one Black drum. Because we cannot guarantee a minimum number of pages that your convenience, Brother sells the drum units as a reasonable determinant of the drums at approximately 15,000 pages. Drum! 4 Drum! The machine should be ...environment with adequate ventilation. • Printing with paper, toner and other than this product, Brother decided to use and rotation of the drum and interaction with a non-Brother drum unit may reduce not only the print quality but also the quality and life of pages ...
...single-sided pages. DR-221CL Drum Set contains four drum units one Black drum. Because we cannot guarantee a minimum number of pages that your convenience, Brother sells the drum units as a reasonable determinant of the drums at approximately 15,000 pages. Drum! 4 Drum! The machine should be ...environment with adequate ventilation. • Printing with paper, toner and other than this product, Brother decided to use and rotation of the drum and interaction with a non-Brother drum unit may reduce not only the print quality but also the quality and life of pages ...

Users Manual - English
Page 126
... have it ready before you get a Replace Drums message. Please replace the drum unit with the new drum unit. 120 The X indicates the drum unit color that you keep genuine Brother drum units ready for installation. We recommend Brother Genuine drum units be installed at this time. The X indicates the drum unit color that is near the end of...
... have it ready before you get a Replace Drums message. Please replace the drum unit with the new drum unit. 120 The X indicates the drum unit color that you keep genuine Brother drum units ready for installation. We recommend Brother Genuine drum units be installed at this time. The X indicates the drum unit color that is near the end of...


