Quick Setup Guide - English
Page 3
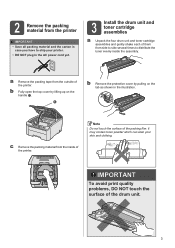
... of the printer. It may contain toner powder which can stain your printer. • DO NOT plug in the illustration. c Remove the packing material from side to side several times to ship your skin and clothing. b Fully open the top cover by pulling on the handle a.
... of the printer. It may contain toner powder which can stain your printer. • DO NOT plug in the illustration. c Remove the packing material from side to side several times to ship your skin and clothing. b Fully open the top cover by pulling on the handle a.
Quick Setup Guide - English
Page 5
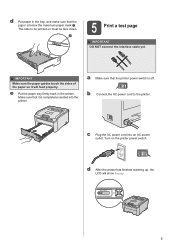
... down. 5 Print a test page IMPORTANT DO NOT connect the interface cable yet. d After the printer has finished warming up, the LCD will feed properly. The side to the printer. c Plug the AC power cord into the printer. IMPORTANT Make sure the paper guides touch the... sides of the paper so it is off. a Make sure that the printer power switch is completely inserted into an AC power outlet. Turn on must ...
... down. 5 Print a test page IMPORTANT DO NOT connect the interface cable yet. d After the printer has finished warming up, the LCD will feed properly. The side to the printer. c Plug the AC power cord into the printer. IMPORTANT Make sure the paper guides touch the... sides of the paper so it is off. a Make sure that the printer power switch is completely inserted into an AC power outlet. Turn on must ...
Quick Setup Guide - English
Page 25
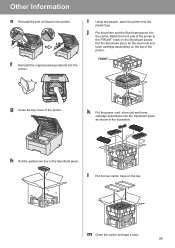
... power cord, drum unit and toner cartridge assemblies into the plastic bag. Other Information e Reinstall the belt unit back in the printer. Match the front side of the printer. i Using two people, place the printer into the Styrofoam piece as shown in the Styrofoam piece.
... power cord, drum unit and toner cartridge assemblies into the plastic bag. Other Information e Reinstall the belt unit back in the printer. Match the front side of the printer. i Using two people, place the printer into the Styrofoam piece as shown in the Styrofoam piece.

Users Manual - English
Page 3
...Printing methods...5 Printing on plain paper...5 Printing on thick paper, labels and envelopes 13 Duplex printing...18 Guidelines for printing on both sides of the paper 18 Manual duplex printing ...19 Booklet printing (for Windows® printer driver 22 Printing photos from a digital camera... the custom monochrome printer driver (for Windows 47 Using the BR-Script3 printer driver (PostScript® 3™ language emulation for Windows®) (HL-3075CW only) ..48 Features in the printer driver (for Macintosh 55 Using the BR-Script3 printer driver (Post Script® 3™ language ...
...Printing methods...5 Printing on plain paper...5 Printing on thick paper, labels and envelopes 13 Duplex printing...18 Guidelines for printing on both sides of the paper 18 Manual duplex printing ...19 Booklet printing (for Windows® printer driver 22 Printing photos from a digital camera... the custom monochrome printer driver (for Windows 47 Using the BR-Script3 printer driver (PostScript® 3™ language emulation for Windows®) (HL-3075CW only) ..48 Features in the printer driver (for Macintosh 55 Using the BR-Script3 printer driver (Post Script® 3™ language ...

Users Manual - English
Page 11
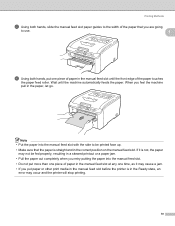
Printing Methods c Put paper in the printer. d Put the paper tray firmly back in the tray, and make sure that it will feed properly. Make sure that the paper is completely inserted into the printer. The side to prevent paper from sliding off the face-down . 1 1 IMPORTANT Make sure the paper guides touch the sides of the printer. 1 6 e Lift up the support flap (1) to be printed on must be face down output tray, or remove each page as soon as it comes out of the paper so it is below the maximum paper mark (bbb) (1).
Printing Methods c Put paper in the printer. d Put the paper tray firmly back in the tray, and make sure that it will feed properly. Make sure that the paper is completely inserted into the printer. The side to prevent paper from sliding off the face-down . 1 1 IMPORTANT Make sure the paper guides touch the sides of the printer. 1 6 e Lift up the support flap (1) to be printed on must be face down output tray, or remove each page as soon as it comes out of the paper so it is below the maximum paper mark (bbb) (1).
Users Manual - English
Page 15
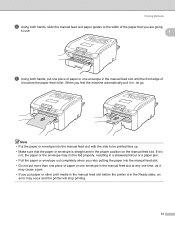
Note • Put the paper into the manual feed slot with the side to use. 1 d Using both hands, slide the manual feed slot paper guides to the width of the paper that the paper is not, the paper ...
Note • Put the paper into the manual feed slot with the side to use. 1 d Using both hands, slide the manual feed slot paper guides to the width of the paper that the paper is not, the paper ...
Users Manual - English
Page 18
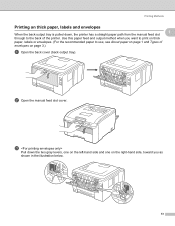
... thick paper, labels and envelopes 1 When the back output tray is pulled down the two gray levers, one on the left-hand side and one on the right-hand side, toward you want to print on thick paper, labels or envelopes. (For the recommended paper to the back of envelopes on page...
... thick paper, labels and envelopes 1 When the back output tray is pulled down the two gray levers, one on the left-hand side and one on the right-hand side, toward you want to print on thick paper, labels or envelopes. (For the recommended paper to the back of envelopes on page...
Users Manual - English
Page 19
... pull it may occur and the printer will stop printing. 14 Note • Put the paper or envelope into the manual feed slot with the side to use. 1 e Using both hands, slide the manual feed slot paper guides to the width of the paper that you are going to be fed...
... pull it may occur and the printer will stop printing. 14 Note • Put the paper or envelope into the manual feed slot with the side to use. 1 e Using both hands, slide the manual feed slot paper guides to the width of the paper that you are going to be fed...
Users Manual - English
Page 22
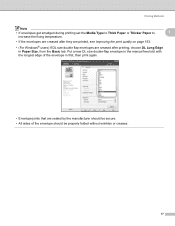
... quality on page 153. • (For Windows® users) If DL size double flap envelopes are sealed by the manufacturer should be secure. • All sides of the envelope in first, then print again. • Envelope joints that are creased after printing, choose DL Long Edge in the manual feed slot...
... quality on page 153. • (For Windows® users) If DL size double flap envelopes are sealed by the manufacturer should be secure. • All sides of the envelope in first, then print again. • Envelope joints that are creased after printing, choose DL Long Edge in the manual feed slot...

Users Manual - English
Page 23
... feed slot. If the paper is not feeding properly, it . When you have a print quality problem, see Improving the print quality on both sides of the paper 1 If the paper is thin, it may wrinkle. If paper is curled, straighten it and then put it is possible...
... feed slot. If the paper is not feeding properly, it . When you have a print quality problem, see Improving the print quality on both sides of the paper 1 If the paper is thin, it may wrinkle. If paper is curled, straighten it and then put it is possible...
Users Manual - English
Page 24
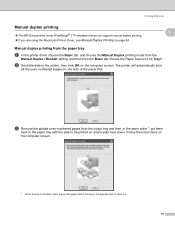
... came out. 19 The printer will automatically print all the even-numbered pages on the computer screen. b Send the data to be printed on (blank side) face down. Printing Methods Manual duplex printing The BR-Script printer driver (PostScript® 3™ emulation) does not support manual duplex printing. ... and then from the output tray and then, in the same order 1, put the paper back in the tray in the paper tray with the side to be Tray1. c Remove the printed even-numbered pages from the Basic tab choose the Paper Source to the printer, then click OK on one...
... came out. 19 The printer will automatically print all the even-numbered pages on the computer screen. b Send the data to be printed on (blank side) face down. Printing Methods Manual duplex printing The BR-Script printer driver (PostScript® 3™ emulation) does not support manual duplex printing. ... and then from the output tray and then, in the same order 1, put the paper back in the tray in the paper tray with the side to be Tray1. c Remove the printed even-numbered pages from the Basic tab choose the Paper Source to the printer, then click OK on one...
Users Manual - English
Page 25
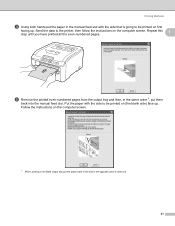
Do not use plain paper and recycled paper. Next, put paper in the tray, with the printed side face up. (Do not add the printed pages to the top of a stack of unprinted paper.) Manual duplex printing from the Basic tab choose the ... manual feed slot 1 Note You should use bond paper. Printing Methods d The printer will now automatically print all the odd-numbered pages on the other side of the paper that you put the printed pages in the paper tray, first empty the tray. Note 1 When you are going to the width...
Do not use plain paper and recycled paper. Next, put paper in the tray, with the printed side face up. (Do not add the printed pages to the top of a stack of unprinted paper.) Manual duplex printing from the Basic tab choose the ... manual feed slot 1 Note You should use bond paper. Printing Methods d The printer will now automatically print all the odd-numbered pages on the other side of the paper that you put the printed pages in the paper tray, first empty the tray. Note 1 When you are going to the width...
Users Manual - English
Page 26
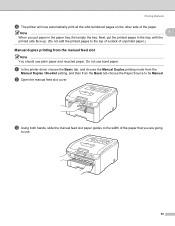
... is going to be printed on (the blank side) face up . Follow the instructions on the computer screen. 1 When printing to the Back output tray put them back into the manual feed slot. Repeat ... pages from the output tray and then, in the same order 1, put the paper back in the tray in the manual feed slot with the side to be printed on first facing up . Printing Methods d Using both hands put the paper in the opposite order it came out. 21 Send the...
... is going to be printed on (the blank side) face up . Follow the instructions on the computer screen. 1 When printing to the Back output tray put them back into the manual feed slot. Repeat ... pages from the output tray and then, in the same order 1, put the paper back in the tray in the manual feed slot with the side to be printed on first facing up . Printing Methods d Using both hands put the paper in the opposite order it came out. 21 Send the...
Users Manual - English
Page 27
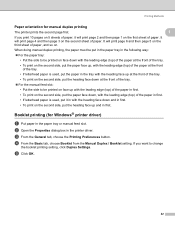
...sheets of paper, it in with the heading face down and in first. • To print on the second side, put the paper face down, with the leading edge (top) of paper. Printing Methods Paper orientation for Windows®... up with the leading edge (top) of the paper in first. • To print on the second side, put the heading face up and in the paper tray or manual feed slot. When doing manual duplex printing... in the paper tray in the following way: For the paper tray: • Put the side to be printed on face down with the leading edge (top) of the paper at the front of ...
...sheets of paper, it in with the heading face down and in first. • To print on the second side, put the paper face down, with the leading edge (top) of paper. Printing Methods Paper orientation for Windows®... up with the leading edge (top) of the paper in first. • To print on the second side, put the heading face up and in the paper tray or manual feed slot. When doing manual duplex printing... in the paper tray in the following way: For the paper tray: • Put the side to be printed on face down with the leading edge (top) of the paper at the front of ...

Users Manual - English
Page 40
... the current settings. 35 c Choose the Paper Source (3). Basic tab 2 You can access the Printing Preferences dialog box by clicking the illustration on the left side of the Printer Properties dialog box. Driver and Software Features in the printer driver (for Windows®) 2 (For more information, see the Help text in...
... the current settings. 35 c Choose the Paper Source (3). Basic tab 2 You can access the Printing Preferences dialog box by clicking the illustration on the left side of the Printer Properties dialog box. Driver and Software Features in the printer driver (for Windows®) 2 (For more information, see the Help text in...

Users Manual - English
Page 62
Layout 2 Pages per Sheet Choose how many pages will appear on each side of the paper. 57 Cover Page You can make the following cover page settings: Driver and Software 2 2 Print Cover Page If you want to add a cover page to your document, use this function. Cover Page Type Choose a template for the cover page. Billing Info If you want to add the billing information to the cover page, enter text in the Billing Info box.
Layout 2 Pages per Sheet Choose how many pages will appear on each side of the paper. 57 Cover Page You can make the following cover page settings: Driver and Software 2 2 Print Cover Page If you want to add a cover page to your document, use this function. Cover Page Type Choose a template for the cover page. Billing Info If you want to add the billing information to the cover page, enter text in the Billing Info box.

Users Manual - English
Page 106
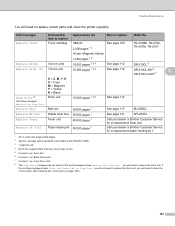
... 1 See page 117 BU-200CL WT Box End Soon Waste toner box 50,000 pages 1 See page 121 WT-200CL 1 A4 or Letter size single-sided pages. 2 Approx. Color Drum Unit. 101 To avoid any inconvenience, you may vary by type of their life. These messages provide advanced warnings to replace...
... 1 See page 117 BU-200CL WT Box End Soon Waste toner box 50,000 pages 1 See page 121 WT-200CL 1 A4 or Letter size single-sided pages. 2 Approx. Color Drum Unit. 101 To avoid any inconvenience, you may vary by type of their life. These messages provide advanced warnings to replace...
Users Manual - English
Page 107
... Replace WT Box Waste toner box 50,000 pages 1 See page 121 WT-200CL Replace Fuser Fuser unit 50,000 pages 1 Call your dealer or Brother Customer Service for a replacement fuser unit. Drum Set. 6 Contains 1 pc. you just need to replace the drum unit. Replace PF kit1 Paper ...feeding kit 50,000 pages 1 Call your dealer or Brother Customer Service for a replacement paper feeding kit 1. 1 A4 or Letter size single-sided pages. 2 Approx. you do not need to replace the drum unit, you will need to replace certain ...
... Replace WT Box Waste toner box 50,000 pages 1 See page 121 WT-200CL Replace Fuser Fuser unit 50,000 pages 1 Call your dealer or Brother Customer Service for a replacement fuser unit. Drum Set. 6 Contains 1 pc. you just need to replace the drum unit. Replace PF kit1 Paper ...feeding kit 50,000 pages 1 Call your dealer or Brother Customer Service for a replacement paper feeding kit 1. 1 A4 or Letter size single-sided pages. 2 Approx. you do not need to replace the drum unit, you will need to replace certain ...

Users Manual - English
Page 108
...appears for instructions on how to return the used will vary depending on ISO/IEC 19798. Routine Maintenance Note • Go to http://www.brother-usa.com/environment/ for one minute after each of toner cartridges and a waste toner box is based on the complexity of printed pages, ... paper to prevent accidentally spilling or scattering the material inside. • If you put it into the printer. 1 A4 or Letter size single-sided pages. cartridge yield is not a direct equivalent for the recommended paper, the life of consumable items and printer parts may be reduced. •...
...appears for instructions on how to return the used will vary depending on ISO/IEC 19798. Routine Maintenance Note • Go to http://www.brother-usa.com/environment/ for one minute after each of toner cartridges and a waste toner box is based on the complexity of printed pages, ... paper to prevent accidentally spilling or scattering the material inside. • If you put it into the printer. 1 A4 or Letter size single-sided pages. cartridge yield is not a direct equivalent for the recommended paper, the life of consumable items and printer parts may be reduced. •...
Users Manual - English
Page 112
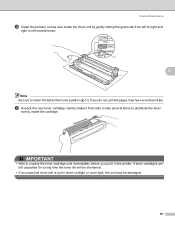
... home position (a) (1). If toner cartridges are left several times to distribute the toner evenly inside the drum unit by gently sliding the green tab from side to side several times. 1 5 Note Be sure to return the tab to unpack the toner cartridge until immediately before you do not, printed pages may be...
... home position (a) (1). If toner cartridges are left several times to distribute the toner evenly inside the drum unit by gently sliding the green tab from side to side several times. 1 5 Note Be sure to return the tab to unpack the toner cartridge until immediately before you do not, printed pages may be...


