
Network Users Manual - English
Page 7
...-ROM to configure your machine for a wireless network (Recommended 24 Configuration using WPS or AOSS from the control panel menu to configure your machine for a wireless network (Infrastructure mode only 25 Configuration using the PIN Method of Wi-Fi Protected... mode ...28 Before configuring the wireless settings 28 Configure the wireless settings...29 5 Wireless Configuration for Macintosh using the Brother installer application (For HL-3075CW) 30 Configuration in Infrastructure mode ...30 Before configuring the wireless settings 30 Configure the wireless settings...31 6 Wireless...
...-ROM to configure your machine for a wireless network (Recommended 24 Configuration using WPS or AOSS from the control panel menu to configure your machine for a wireless network (Infrastructure mode only 25 Configuration using the PIN Method of Wi-Fi Protected... mode ...28 Before configuring the wireless settings 28 Configure the wireless settings...29 5 Wireless Configuration for Macintosh using the Brother installer application (For HL-3075CW) 30 Configuration in Infrastructure mode ...30 Before configuring the wireless settings 30 Configure the wireless settings...31 6 Wireless...
Network Users Manual - English
Page 8
...of Wi-Fi Protected Setup (For HL-3075CW) 36 Overview...36 How to configure your wireless machine, using the PIN Method of Wi-Fi Protected Setup 36 For Windows® users...38 For Macintosh users ...42 8 Control panel features 44 Overview...44 Network menu...45 TCP/IP ...45 Ethernet (...wired network only)...53 Factory Reset ...53 Set to Default (For HL-3075CW) ...53 Wired Enable (For HL-3075CW wired network only 54 WLAN Enable (For HL-3075CW wireless network only 54 WPS or AOSS (For...
...of Wi-Fi Protected Setup (For HL-3075CW) 36 Overview...36 How to configure your wireless machine, using the PIN Method of Wi-Fi Protected Setup 36 For Windows® users...38 For Macintosh users ...42 8 Control panel features 44 Overview...44 Network menu...45 TCP/IP ...45 Ethernet (...wired network only)...53 Factory Reset ...53 Set to Default (For HL-3075CW) ...53 Wired Enable (For HL-3075CW wired network only 54 WLAN Enable (For HL-3075CW wireless network only 54 WPS or AOSS (For...
Network Users Manual - English
Page 20
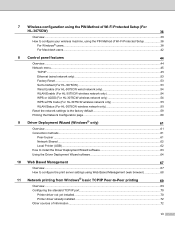
... 255. „ Example: In a small network, you would normally change network settings. For more information on DHCP, BOOTP and RARP, see Network menu on the machine itself. For more information, see :Using DHCP to configure the IP address on page 120 10 Note If you do not wish...identifies each device connected to a network. An IP address consists of numbers that server. IP addresses, subnet masks and gateways 2 To use the Brother installer on the same logical network as this chapter, you will guide you use the machine in a networked TCP/IP environment, you must properly...
... 255. „ Example: In a small network, you would normally change network settings. For more information on DHCP, BOOTP and RARP, see Network menu on the machine itself. For more information, see :Using DHCP to configure the IP address on page 120 10 Note If you do not wish...identifies each device connected to a network. An IP address consists of numbers that server. IP addresses, subnet masks and gateways 2 To use the Brother installer on the same logical network as this chapter, you will guide you use the machine in a networked TCP/IP environment, you must properly...
Network Users Manual - English
Page 25
Configuring your machine for a network Using the control panel to configure your machine for a network You can configure your machine for a network using the control panel Network menu. Using other methods. See Network menu on page 120. 2 2 2 15 See Other ways to configure your machine for a network You can configure your machine for a network using other methods to set the IP address (For advanced users and administrators) on page 45.
Configuring your machine for a network Using the control panel to configure your machine for a network You can configure your machine for a network using the control panel Network menu. Using other methods. See Network menu on page 120. 2 2 2 15 See Other ways to configure your machine for a network You can configure your machine for a network using other methods to set the IP address (For advanced users and administrators) on page 45.
Network Users Manual - English
Page 26
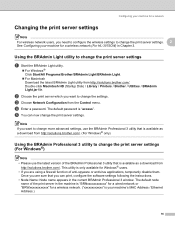
...a Start the BRAdmin Light utility. „ For Windows® Click Start/All Programs/Brother/BRAdmin Light/BRAdmin Light. „ For Macintosh Download the latest BRAdmin Light utility from the Control menu. The default node name of the print server in the current BRAdmin Professional 3 window....Configuring your machine's MAC Address / Ethernet Address.) 16 The default password is only available for a wireless network (For HL-3075CW) in Chapter 3. This utility is "access". Double-click Macintosh HD (Startup Disk) / Library / Printers / Brother / Utilities / BRAdmin Light.jar file.
...a Start the BRAdmin Light utility. „ For Windows® Click Start/All Programs/Brother/BRAdmin Light/BRAdmin Light. „ For Macintosh Download the latest BRAdmin Light utility from the Control menu. The default node name of the print server in the current BRAdmin Professional 3 window....Configuring your machine's MAC Address / Ethernet Address.) 16 The default password is only available for a wireless network (For HL-3075CW) in Chapter 3. This utility is "access". Double-click Macintosh HD (Startup Disk) / Library / Printers / Brother / Utilities / BRAdmin Light.jar file.
Network Users Manual - English
Page 27
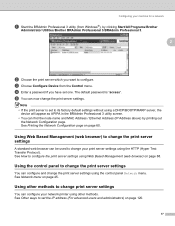
... methods. e You can find the node name and MAC Address / Ethernet Address (IP Address above) by clicking Start/All Programs/Brother Administrator Utilities/Brother BRAdmin Professional 3/BRAdmin Professional 3. 2 b Choose the print server which you have set the IP address (For advanced users and administrators...now change the print server settings 2 You can configure your network printer using the HTTP (Hyper Text Transfer Protocol). See Network menu on page 60. See Printing the Network Configuration page on page 45. c Choose Configure Device from Windows®), by printing out...
... methods. e You can find the node name and MAC Address / Ethernet Address (IP Address above) by clicking Start/All Programs/Brother Administrator Utilities/Brother BRAdmin Professional 3/BRAdmin Professional 3. 2 b Choose the print server which you have set the IP address (For advanced users and administrators...now change the print server settings 2 You can configure your network printer using the HTTP (Hyper Text Transfer Protocol). See Network menu on page 60. See Printing the Network Configuration page on page 45. c Choose Configure Device from Windows®), by printing out...
Network Users Manual - English
Page 28
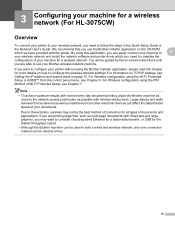
...-page documents with normal every day document printing, place the Brother machine as close to the network access point/router as interference from the control panel menu, see Chapter 6. If you use your Brother wireless network machine. For Wireless configuration using the Wi-Fi ... method of connection for all types of documents and applications. Configuring your machine for a wireless network (For HL-3075CW)3 3 Configuring your machine for a wireless network (For HL-3075CW) 3 Overview 3 To connect your printer to your wireless network, you need to complete the configuration ...
...-page documents with normal every day document printing, place the Brother machine as close to the network access point/router as interference from the control panel menu, see Chapter 6. If you use your Brother wireless network machine. For Wireless configuration using the Wi-Fi ... method of connection for all types of documents and applications. Configuring your machine for a wireless network (For HL-3075CW)3 3 Configuring your machine for a wireless network (For HL-3075CW) 3 Overview 3 To connect your printer to your wireless network, you need to complete the configuration ...
Network Users Manual - English
Page 32
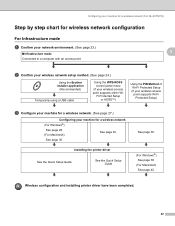
... See page 42. Wireless configuration and installing printer driver have been completed. 22 Configuring your machine for a wireless network (For HL-3075CW) Step by step chart for wireless network configuration For Infrastructure mode a Confirm your network environment. (See page 23.) o ... point 3 3 3 b Confirm your wireless network setup method. (See page 24.) Using the Brother installer application (Recommended) Temporarily using a USB cable Using the WPS/AOSS control panel menu (if your machine for a wireless network. (See page 27.) Configuring your wireless access point supports...
... See page 42. Wireless configuration and installing printer driver have been completed. 22 Configuring your machine for a wireless network (For HL-3075CW) Step by step chart for wireless network configuration For Infrastructure mode a Confirm your network environment. (See page 23.) o ... point 3 3 3 b Confirm your wireless network setup method. (See page 24.) Using the Brother installer application (Recommended) Temporarily using a USB cable Using the WPS/AOSS control panel menu (if your machine for a wireless network. (See page 27.) Configuring your wireless access point supports...
Network Users Manual - English
Page 35
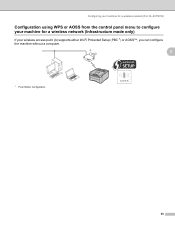
Configuring your machine for a wireless network (For HL-3075CW) Configuration using WPS or AOSS from the control panel menu to configure your machine for a wireless network (Infrastructure mode only) 3 If your wireless access point (A) supports either Wi-Fi Protected Setup (PBC 1) or AOSS™, you can configure the machine without a computer. A 3 1 Push Button Configuration 25
Configuring your machine for a wireless network (For HL-3075CW) Configuration using WPS or AOSS from the control panel menu to configure your machine for a wireless network (Infrastructure mode only) 3 If your wireless access point (A) supports either Wi-Fi Protected Setup (PBC 1) or AOSS™, you can configure the machine without a computer. A 3 1 Push Button Configuration 25
Network Users Manual - English
Page 37
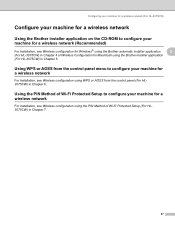
...on the CD-ROM to configure your machine for a wireless network 3 For installation, see Wireless configuration for Windows® using the Brother automatic installer application 3 (For HL-3075CW) in Chapter 4 or Wireless Configuration for a wireless network (Recommended) 3 For installation, see Wireless configuration using the PIN ...configure your machine for a wireless network 3 For installation, see Wireless configuration using WPS or AOSS from the control panel menu to configure your machine for Macintosh using the Brother installer application (For HL-3075CW) in Chapter 5.
...on the CD-ROM to configure your machine for a wireless network 3 For installation, see Wireless configuration for Windows® using the Brother automatic installer application 3 (For HL-3075CW) in Chapter 4 or Wireless Configuration for a wireless network (Recommended) 3 For installation, see Wireless configuration using the PIN ...configure your machine for a wireless network 3 For installation, see Wireless configuration using WPS or AOSS from the control panel menu to configure your machine for Macintosh using the Brother installer application (For HL-3075CW) in Chapter 5.
Network Users Manual - English
Page 39
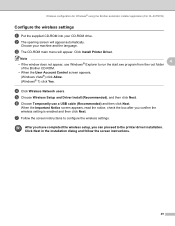
... you can proceed to configure the wireless settings. Click Next in the installation dialog and follow the screen instructions. 29 c The CD-ROM main menu will appear automatically. d Click Wireless Network users. Note 4 • If the window does not appear, use a USB cable (Recommended) and... then click Next. b The opening screen will appear. Wireless configuration for Windows® using the Brother automatic installer application (For HL-3075CW) Configure the wireless settings 4 a Put the supplied CD-ROM into your machine and the language.
... you can proceed to configure the wireless settings. Click Next in the installation dialog and follow the screen instructions. 29 c The CD-ROM main menu will appear automatically. d Click Wireless Network users. Note 4 • If the window does not appear, use a USB cable (Recommended) and... then click Next. b The opening screen will appear. Wireless configuration for Windows® using the Brother automatic installer application (For HL-3075CW) Configure the wireless settings 4 a Put the supplied CD-ROM into your machine and the language.

Network Users Manual - English
Page 42
... access point uses Wi-Fi Protected Setup or AOSS™. See the user's guide for instructions on the control panel. Your Brother machine has the WPS/AOSS menu on how to access one-push mode. 1 Push Button Configuration Note 6 Routers or access points that support Wi-Fi Protected.... 32 Wireless configuration using SES/WPS or AOSS from(FothreHcLo-3n0tr7o5l CpaWn)e6l 6 Wireless configuration using WPS or AOSS from the control panel (For HL-3075CW) 6 Overview 6 If your wireless access point/router supports either Wi-Fi Protected Setup (PBC 1) or AOSS™, you can configure the...
... access point uses Wi-Fi Protected Setup or AOSS™. See the user's guide for instructions on the control panel. Your Brother machine has the WPS/AOSS menu on how to access one-push mode. 1 Push Button Configuration Note 6 Routers or access points that support Wi-Fi Protected.... 32 Wireless configuration using SES/WPS or AOSS from(FothreHcLo-3n0tr7o5l CpaWn)e6l 6 Wireless configuration using WPS or AOSS from the control panel (For HL-3075CW) 6 Overview 6 If your wireless access point/router supports either Wi-Fi Protected Setup (PBC 1) or AOSS™, you can configure the...
Network Users Manual - English
Page 43
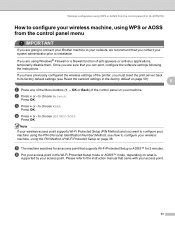
...your machine using the PIN (Personal Identification Number) Method, see Reset the network settings to the factory default on page 59). 6 a Press any of the Menu buttons (+, -, OK or Back) of the control panel on page 36. c Press + or - Press OK. If you must reset the print server...+ or - Wireless configuration using WPS or AOSS from the control panel (For HL-3075CW) How to configure your wireless machine, using WPS or AOSS from the control panel menu 6 IMPORTANT If you are going to connect your Brother machine to your network, we recommend that came with your access point. 33 ...
...your machine using the PIN (Personal Identification Number) Method, see Reset the network settings to the factory default on page 59). 6 a Press any of the Menu buttons (+, -, OK or Back) of the control panel on page 36. c Press + or - Press OK. If you must reset the print server...+ or - Wireless configuration using WPS or AOSS from the control panel (For HL-3075CW) How to configure your wireless machine, using WPS or AOSS from the control panel menu 6 IMPORTANT If you are going to connect your Brother machine to your network, we recommend that came with your access point. 33 ...
Network Users Manual - English
Page 44
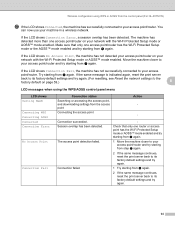
...router or access point has the Wi-Fi Protected Setup mode or AOSS™ mode enabled and try starting from the control panel (For HL-3075CW) g If the LCD shows Connected, the machine has successfully connected to its factory default settings and try again. 1 Try starting... succeeded. If the LCD shows Connection Error, a session overlap has been detected. Wireless configuration using the WPS/AOSS control panel menu LCD shows Setting WLAN Connecting WPS Connecting AOSS Connected Connection Error No Access Point Connection Fail Connection status Searching or accessing the access...
...router or access point has the Wi-Fi Protected Setup mode or AOSS™ mode enabled and try starting from the control panel (For HL-3075CW) g If the LCD shows Connected, the machine has successfully connected to its factory default settings and try again. 1 Try starting... succeeded. If the LCD shows Connection Error, a session overlap has been detected. Wireless configuration using the WPS/AOSS control panel menu LCD shows Setting WLAN Connecting WPS Connecting AOSS Connected Connection Error No Access Point Connection Fail Connection status Searching or accessing the access...
Network Users Manual - English
Page 45
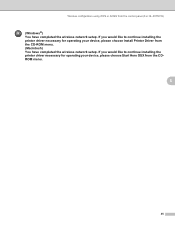
Wireless configuration using WPS or AOSS from the control panel (For HL-3075CW) (Windows®) You have completed the wireless network setup. If you would like to continue installing the printer driver necessary for operating your device, please choose Start Here OSX from the CD-ROM menu. (Macintosh) You have completed the wireless network setup. If you would like to continue installing the printer driver necessary for operating your device, please choose Install Printer Driver from the CDROM menu. 6 35
Wireless configuration using WPS or AOSS from the control panel (For HL-3075CW) (Windows®) You have completed the wireless network setup. If you would like to continue installing the printer driver necessary for operating your device, please choose Start Here OSX from the CD-ROM menu. (Macintosh) You have completed the wireless network setup. If you would like to continue installing the printer driver necessary for operating your device, please choose Install Printer Driver from the CDROM menu. 6 35
Network Users Manual - English
Page 46
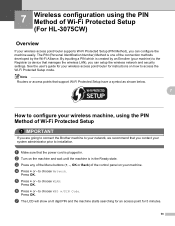
... Protected Setup have a symbol as shown below. 7 How to configure your wireless machine, using the PIN Method of Wi-Fi Protected Setup (For HL-3075CW) 7 Overview 7 If your wireless access point/router supports Wi-Fi Protected Setup (PIN Method), you can setup the wireless network and security ...)7p 7 Wireless configuration using the PIN Method of Wi-Fi Protected Setup 7 IMPORTANT If you are going to connect the Brother machine to installation. c Press any of the Menu buttons (+, -, OK or Back) of the connection methods developed by an Enrollee (your machine) to the Registrar (a device...
... Protected Setup have a symbol as shown below. 7 How to configure your wireless machine, using the PIN Method of Wi-Fi Protected Setup (For HL-3075CW) 7 Overview 7 If your wireless access point/router supports Wi-Fi Protected Setup (PIN Method), you can setup the wireless network and security ...)7p 7 Wireless configuration using the PIN Method of Wi-Fi Protected Setup 7 IMPORTANT If you are going to connect the Brother machine to installation. c Press any of the Menu buttons (+, -, OK or Back) of the connection methods developed by an Enrollee (your machine) to the Registrar (a device...
Network Users Manual - English
Page 48
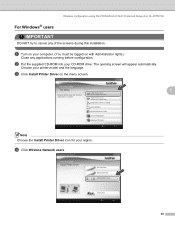
... CD-ROM into your printer model and the language. c Click Install Printer Driver on with Administrator rights.) Close any of Wi-Fi Protected Setup (For HL-3075CW) For Windows® users 7 IMPORTANT DO NOT try to cancel any applications running before configuration. Wireless configuration using the PIN Method of the screens...
... CD-ROM into your printer model and the language. c Click Install Printer Driver on with Administrator rights.) Close any of Wi-Fi Protected Setup (For HL-3075CW) For Windows® users 7 IMPORTANT DO NOT try to cancel any applications running before configuration. Wireless configuration using the PIN Method of the screens...
Network Users Manual - English
Page 54
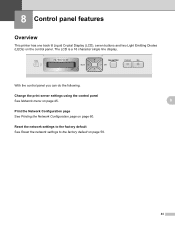
... a 16 character single line display. With the control panel you can do the following: Change the print server settings using the control panel See Network menu on page 45. 8 Print the Network Configuration page See Printing the Network Configuration page on page 60.
... a 16 character single line display. With the control panel you can do the following: Change the print server settings using the control panel See Network menu on page 45. 8 Print the Network Configuration page See Printing the Network Configuration page on page 60.
Network Users Manual - English
Page 55
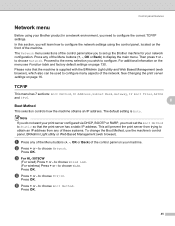
...you need to configure the correct TCP/IP settings. Press OK. to choose Boot Method. Control panel features Network menu 8 Before using the control panel, located on your Brother product in a network environment, you to set the Boot Method to Static so that the machine is Auto. ... server configured via DHCP, BOOTP or RARP, you must set up the Brother machine for your network configuration. Press OK. 45 The Network menu selections of the Menu buttons (+, -, OK or Back) to display the main menu. c For HL-3075CW (For wired) Press + or - This will learn how to configure...
...you need to configure the correct TCP/IP settings. Press OK. to choose Boot Method. Control panel features Network menu 8 Before using the control panel, located on your Brother product in a network environment, you to set the Boot Method to Static so that the machine is Auto. ... server configured via DHCP, BOOTP or RARP, you must set up the Brother machine for your network configuration. Press OK. 45 The Network menu selections of the Menu buttons (+, -, OK or Back) to display the main menu. c For HL-3075CW (For wired) Press + or - This will learn how to configure...
Network Users Manual - English
Page 56
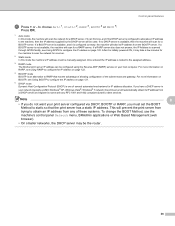
...ARP (RARP) service on page 122. 4 BOOTP mode BOOTP is configured to allocate an IP address to the assigned address. 3 RARP mode The Brother print server IP address can be manually assigned. This will scan for IP address allocation. to RARP that the print server has a static IP address...BOOTP to static so that has the advantage of allowing configuration of these systems. To change the BOOT Method, use the machine's control panel Network menu, BRAdmin applications or Web Based Management (web browser). • On smaller networks, the DHCP server may take its name with any of the...
...ARP (RARP) service on page 122. 4 BOOTP mode BOOTP is configured to allocate an IP address to the assigned address. 3 RARP mode The Brother print server IP address can be manually assigned. This will scan for IP address allocation. to RARP that the print server has a static IP address...BOOTP to static so that has the advantage of allowing configuration of these systems. To change the BOOT Method, use the machine's control panel Network menu, BRAdmin applications or Web Based Management (web browser). • On smaller networks, the DHCP server may take its name with any of the...
