Users Manual - English
Page 9
CHAPTER 5 MAINTENANCE REPLACING THE CONSUMABLES Toner Cartridges Oil Bottle Fuser Cleaner Waste Toner Pack OPC Belt Cartridge Ozone Filter Fusing Unit 120K Kit CLEANING THE PRINTER REPACKING AND RELOCATING THE PRINTER OPTIONS Lower Tray Unit (LT-26CL) Duplex Unit (DX-2600) ...
CHAPTER 5 MAINTENANCE REPLACING THE CONSUMABLES Toner Cartridges Oil Bottle Fuser Cleaner Waste Toner Pack OPC Belt Cartridge Ozone Filter Fusing Unit 120K Kit CLEANING THE PRINTER REPACKING AND RELOCATING THE PRINTER OPTIONS Lower Tray Unit (LT-26CL) Duplex Unit (DX-2600) ...
Users Manual - English
Page 20
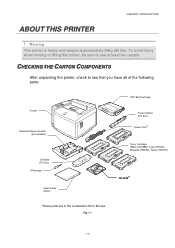
... to see that you have all of the following parts: Printer Standard Paper Cassette (pre-installed) Oil Bottle (FO-2CL) Oil Syringe Quick Setup Guide* OPC Belt Cartridge Fuser Cleaner (CR-3CL) * Power Cord Toner Cartridge (Black (TN03BK), Cyan (TN03C), Magenta (TN03M), Yellow (TN03Y)) CD-ROM* *These parts are in the Localization...
... to see that you have all of the following parts: Printer Standard Paper Cassette (pre-installed) Oil Bottle (FO-2CL) Oil Syringe Quick Setup Guide* OPC Belt Cartridge Fuser Cleaner (CR-3CL) * Power Cord Toner Cartridge (Black (TN03BK), Cyan (TN03C), Magenta (TN03M), Yellow (TN03Y)) CD-ROM* *These parts are in the Localization...
Users Manual - English
Page 21
... install them. Note Depending on the country you live in length. Parallel cables should not exceed 1.8 meters (6 feet) in and the HL-2600CN series model purchased, you purchased the printer, the power cord may have additional parts not listed above . ! CHAPTER 1 INTRODUCTION Note Depending... standard accessory. Please purchase the appropriate cable for any length of the following consumables at all times. Caution The Toner Cartridges, OPC Belt cartridge, Oil Bottle and Fuser Cleaner are exhausted, the printer will be IEEE 1284 compliant and should be damaged. Note We ...
... install them. Note Depending on the country you live in length. Parallel cables should not exceed 1.8 meters (6 feet) in and the HL-2600CN series model purchased, you purchased the printer, the power cord may have additional parts not listed above . ! CHAPTER 1 INTRODUCTION Note Depending... standard accessory. Please purchase the appropriate cable for any length of the following consumables at all times. Caution The Toner Cartridges, OPC Belt cartridge, Oil Bottle and Fuser Cleaner are exhausted, the printer will be IEEE 1284 compliant and should be damaged. Note We ...

Users Manual - English
Page 91
... SShhoowwss PRINT SETTINGS DDeessccrriippttiioonn Print the Configuration page. PRINT TEST Print a test page. VERSION Submenu Description SER.NO=######### Printer serial number. REMAIN FC ROLLER REMAIN OPC BELT REMAIN FUSER REMAIN 120K KIT REMAIN PF KIT1 REMAIN PF KIT2 This is the remaining life for the FC roller..., OPC Belt, Fuser, 120K Kit, PF Kit1 and PF Kit2 4-22 ROM VER=#### ROM firmware version ROM DATE YY/MM/DD ROM date NET VER=#### Network firmware ...
... SShhoowwss PRINT SETTINGS DDeessccrriippttiioonn Print the Configuration page. PRINT TEST Print a test page. VERSION Submenu Description SER.NO=######### Printer serial number. REMAIN FC ROLLER REMAIN OPC BELT REMAIN FUSER REMAIN 120K KIT REMAIN PF KIT1 REMAIN PF KIT2 This is the remaining life for the FC roller..., OPC Belt, Fuser, 120K Kit, PF Kit1 and PF Kit2 4-22 ROM VER=#### ROM firmware version ROM DATE YY/MM/DD ROM date NET VER=#### Network firmware ...
Users Manual - English
Page 102
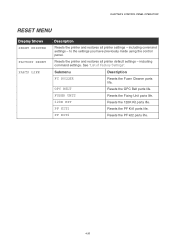
... the printer and restores all printer default settings - to the settings you have previously made using the control panel. See "List of Factory Settings". OPC BELT Resets the OPC Belt parts life. Resets the printer and restores all printer settings - PF KIT2 Resets the PF kit2 parts life. 4-33 Submenu Description FC ROLLER Resets...
... the printer and restores all printer default settings - to the settings you have previously made using the control panel. See "List of Factory Settings". OPC BELT Resets the OPC Belt parts life. Resets the printer and restores all printer settings - PF KIT2 Resets the PF kit2 parts life. 4-33 Submenu Description FC ROLLER Resets...
Users Manual - English
Page 115
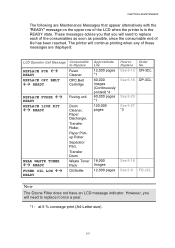
... printed) *4 60,000 pages *1 120,000 pages 18,000 Images 12,000 pages How to Replace Fuser Cleaner OPC Belt Cartridge REPLACE FUSER !" However, you will need to replace it once a year. *1 - READY REPLACE OPC BELT !" These messages advise you that appear alternatively with the "READY" message on the upper row of life has...
... printed) *4 60,000 pages *1 120,000 pages 18,000 Images 12,000 pages How to Replace Fuser Cleaner OPC Belt Cartridge REPLACE FUSER !" However, you will need to replace it once a year. *1 - READY REPLACE OPC BELT !" These messages advise you that appear alternatively with the "READY" message on the upper row of life has...
Users Manual - English
Page 130
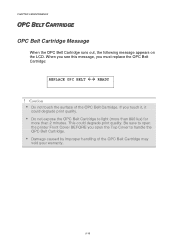
...) for more than 2 minutes. This could degrade print quality. • Do not expose the OPC Belt Cartridge to handle the OPC Belt Cartridge. • Damage caused by improper handling of the OPC Belt Cartridge. READY ! If you must replace the OPC Belt Cartridge: REPLACE OPC BELT !" When you see this message, you touch it, it could degrade print quality. CHAPTER...
...) for more than 2 minutes. This could degrade print quality. • Do not expose the OPC Belt Cartridge to handle the OPC Belt Cartridge. • Damage caused by improper handling of the OPC Belt Cartridge. READY ! If you must replace the OPC Belt Cartridge: REPLACE OPC BELT !" When you see this message, you touch it, it could degrade print quality. CHAPTER...
Users Manual - English
Page 131
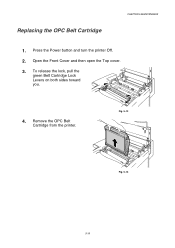
To release the lock, pull the green Belt Cartridge Lock Levers on both sides toward you. 4. Open the Front Cover and then open the Top cover. 3. Remove the OPC Belt Cartridge from the printer. Press the Power button and turn the printer Off. 2. Fig. 5-13 Fig. 5-14 5-19 Replacing the OPC Belt Cartridge CHAPTER 5 MAINTENANCE 1.
To release the lock, pull the green Belt Cartridge Lock Levers on both sides toward you. 4. Open the Front Cover and then open the Top cover. 3. Remove the OPC Belt Cartridge from the printer. Press the Power button and turn the printer Off. 2. Fig. 5-13 Fig. 5-14 5-19 Replacing the OPC Belt Cartridge CHAPTER 5 MAINTENANCE 1.
Users Manual - English
Page 132
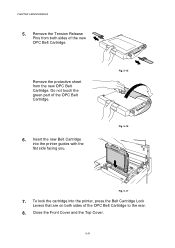
Remove the protective sheet from both sides of the OPC Belt Cartridge to the rear. 8. To lock the cartridge into the printer guides with the flat side facing you. Insert the new Belt Cartridge into the printer, press the Belt Cartridge Lock Levers that are on both sides of the OPC Belt Cartridge. 6. CHAPTER 5 MAINTENANCE 5. Fig. 5-15 Fig. 5-16 Fig. 5-17 7. Do not touch the green part of the new OPC Belt Cartridge. Close the Front Cover and the Top Cover. 5-20 Remove the Tension Release Pins from the new OPC Belt Cartridge.
Remove the protective sheet from both sides of the OPC Belt Cartridge to the rear. 8. To lock the cartridge into the printer guides with the flat side facing you. Insert the new Belt Cartridge into the printer, press the Belt Cartridge Lock Levers that are on both sides of the OPC Belt Cartridge. 6. CHAPTER 5 MAINTENANCE 5. Fig. 5-15 Fig. 5-16 Fig. 5-17 7. Do not touch the green part of the new OPC Belt Cartridge. Close the Front Cover and the Top Cover. 5-20 Remove the Tension Release Pins from the new OPC Belt Cartridge.

Users Manual - English
Page 133
until "OPC BELT" appears. 14. Press Set, and then press + until "PARTS LIFE" appears. 13. until "RESET MENU" appears. 12. The printer is now in the READY state. 5-21 Press Set to proceed to take the printer Off Line. 11. Press Set, and then press Go. Press any of the Menu buttons (+, - , Set or Back) to the next menu level, and then press + or - Press the Power button to turn the printer On. 10. CHAPTER 5 MAINTENANCE 9. Press + or -
until "OPC BELT" appears. 14. Press Set, and then press + until "PARTS LIFE" appears. 13. until "RESET MENU" appears. 12. The printer is now in the READY state. 5-21 Press Set to proceed to take the printer Off Line. 11. Press Set, and then press Go. Press any of the Menu buttons (+, - , Set or Back) to the next menu level, and then press + or - Press the Power button to turn the printer On. 10. CHAPTER 5 MAINTENANCE 9. Press + or -
Users Manual - English
Page 151
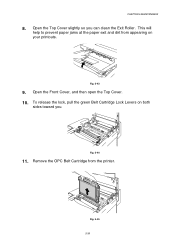
Open the Top Cover slightly so you . Open the Front Cover, and then open the Top Cover. 10. Fig. 5-43 9. Fig. 5-44 11. Fig. 5-45 5-39 To release the lock, pull the green Belt Cartridge Lock Levers on your printouts. This will help to prevent paper jams at the paper exit and dirt from the printer. CHAPTER 5 MAINTENANCE 8. Remove the OPC Belt Cartridge from appearing on both sides toward you can clean the Exit Roller.
Open the Top Cover slightly so you . Open the Front Cover, and then open the Top Cover. 10. Fig. 5-43 9. Fig. 5-44 11. Fig. 5-45 5-39 To release the lock, pull the green Belt Cartridge Lock Levers on your printouts. This will help to prevent paper jams at the paper exit and dirt from the printer. CHAPTER 5 MAINTENANCE 8. Remove the OPC Belt Cartridge from appearing on both sides toward you can clean the Exit Roller.
Users Manual - English
Page 152
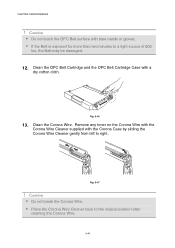
Clean the OPC Belt Cartridge and the OPC Belt Cartridge Case with bare hands or gloves. • If the Belt is exposed for more than two minutes to a light source of 800 lux, the Belt may be damaged. 12. CHAPTER 5 MAINTENANCE ! Clean the Corona Wire. Fig. 5-47 ! Caution • Do not break the Corona... Wire. • Place the Corona Wire Cleaner back to right. Caution • Do not touch the OPC Belt surface with a dry cotton cloth. Fig. 5-46 13. Remove any toner on the Corona Wire with the Corona Wire Cleaner supplied with the Corona Case...
Clean the OPC Belt Cartridge and the OPC Belt Cartridge Case with bare hands or gloves. • If the Belt is exposed for more than two minutes to a light source of 800 lux, the Belt may be damaged. 12. CHAPTER 5 MAINTENANCE ! Clean the Corona Wire. Fig. 5-47 ! Caution • Do not break the Corona... Wire. • Place the Corona Wire Cleaner back to right. Caution • Do not touch the OPC Belt surface with a dry cotton cloth. Fig. 5-46 13. Remove any toner on the Corona Wire with the Corona Wire Cleaner supplied with the Corona Case...
Users Manual - English
Page 154
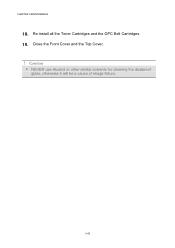
CHAPTER 5 MAINTENANCE 18. Close the Front Cover and the Top Cover. ! Re-install all the Toner Cartridges and the OPC Belt Cartridges. 19. Caution • NEVER use Alcohol or other similar solvents for cleaning the dustproof glass, otherwise it will be a cause of image failure. 5-42
CHAPTER 5 MAINTENANCE 18. Close the Front Cover and the Top Cover. ! Re-install all the Toner Cartridges and the OPC Belt Cartridges. 19. Caution • NEVER use Alcohol or other similar solvents for cleaning the dustproof glass, otherwise it will be a cause of image failure. 5-42
Users Manual - English
Page 155
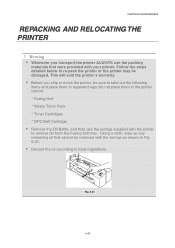
... you transport the printer ALWAYS use the syringe supplied with the syringe as shown in the printer carton): * Fusing Unit * Waste Toner Pack * Toner Cartridges * OPC Belt Cartridge • Remove the Oil Bottle, and then use the packing materials that cannot be removed with the printer to local regulations. Fig. 5-51 5-43...
... you transport the printer ALWAYS use the syringe supplied with the syringe as shown in the printer carton): * Fusing Unit * Waste Toner Pack * Toner Cartridges * OPC Belt Cartridge • Remove the Oil Bottle, and then use the packing materials that cannot be removed with the printer to local regulations. Fig. 5-51 5-43...
Users Manual - English
Page 156
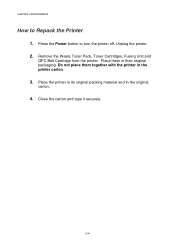
Remove the Waste Toner Pack, Toner Cartridges, Fusing Unit and OPC Belt Cartridge from the printer. Do not place them in their original packaging. Place them together with the printer in the original carton. 4. Press the Power button to Repack the Printer 1. Place the printer in its original packing material and in the printer carton. 3. Unplug the printer. 2. CHAPTER 5 MAINTENANCE How to turn the printer off. Close the carton and tape it securely. 5-44
Remove the Waste Toner Pack, Toner Cartridges, Fusing Unit and OPC Belt Cartridge from the printer. Do not place them in their original packaging. Place them together with the printer in the original carton. 4. Press the Power button to Repack the Printer 1. Place the printer in its original packing material and in the printer carton. 3. Unplug the printer. 2. CHAPTER 5 MAINTENANCE How to turn the printer off. Close the carton and tape it securely. 5-44

Users Manual - English
Page 180
... XX = Plain Paper, Transparencies, Thick Paper XX = T1, T2 or DX 6-2 NO TR ROLLER Install the transfer roller. ILLEGAL TONER Use only Brother genuine toner cartridge. SIZE ERROR T1/2 Specify the correct paper size for the indicated tray. Install it is inserted correctly. MEDIATYPE ERROR Specify the correct... the Printer Driver setting. Please install one. Remarks When the Duplex Unit is formatted and not in the sizes specified. NO OPC BELT Install the OPC belt. STACKER FULL Remove the paper from the output tray. NO TRAY 1/2 The indicated paper tray was not detected.
... XX = Plain Paper, Transparencies, Thick Paper XX = T1, T2 or DX 6-2 NO TR ROLLER Install the transfer roller. ILLEGAL TONER Use only Brother genuine toner cartridge. SIZE ERROR T1/2 Specify the correct paper size for the indicated tray. Install it is inserted correctly. MEDIATYPE ERROR Specify the correct... the Printer Driver setting. Please install one. Remarks When the Duplex Unit is formatted and not in the sizes specified. NO OPC BELT Install the OPC belt. STACKER FULL Remove the paper from the output tray. NO TRAY 1/2 The indicated paper tray was not detected.
Users Manual - English
Page 182
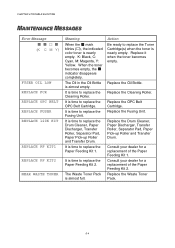
... the Paper Feeding Kit 2. It is almost empty. It is almost full. The Waste Toner Pack is time to replace the OPC Belt Cartridge. Action Be ready to replace the Toner Cartridge(s) when the toner is time to replace the Fusing Unit. Replace it when...the Drum Cleaner, Paper Discharger, Transfer Roller, Separator Pad, Paper Pick-up Roller and Transfer Drum. Replace the Waste Toner Pack. 6-4 Replace the OPC Belt Cartridge. When the toner becomes empty, the ! CHAPTER 6 TROUBLE SHOOTING MAAIINNTTEENNAANNCCEE MEESSSSAAGGEESS Error Message ! ! Replace the Fusing Unit. Consult your dealer ...
... the Paper Feeding Kit 2. It is almost empty. It is almost full. The Waste Toner Pack is time to replace the OPC Belt Cartridge. Action Be ready to replace the Toner Cartridge(s) when the toner is time to replace the Fusing Unit. Replace it when...the Drum Cleaner, Paper Discharger, Transfer Roller, Separator Pad, Paper Pick-up Roller and Transfer Drum. Replace the Waste Toner Pack. 6-4 Replace the OPC Belt Cartridge. When the toner becomes empty, the ! CHAPTER 6 TROUBLE SHOOTING MAAIINNTTEENNAANNCCEE MEESSSSAAGGEESS Error Message ! ! Replace the Fusing Unit. Consult your dealer ...
Users Manual - English
Page 201
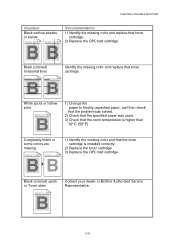
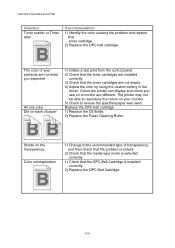
.... abcdefghijklmnopqrstuvwxyz. 1) Identify the missing color and that the room temperature is installed correctly. 2) Replace the toner cartridge 3) Replace the OPC belt cartridge Black (colored) spots or Toner stain ABCDEFGHIJKLMNOPQRSTUVWXYZ. 0123456789. Contact your dealer or Brother Authorized Service Representative. 6-23 abcdefghijklmnopqrstuvwxyz. Recommendation 1) Identify the missing color and replace that toner cartridge. abcdefghijklmnopqrstuvwxyz. abcdefghijklmnopqrstuvwxyz. ABCDEFGHIJKLMNOPQRSTUVWXYZ...
.... abcdefghijklmnopqrstuvwxyz. 1) Identify the missing color and that the room temperature is installed correctly. 2) Replace the toner cartridge 3) Replace the OPC belt cartridge Black (colored) spots or Toner stain ABCDEFGHIJKLMNOPQRSTUVWXYZ. 0123456789. Contact your dealer or Brother Authorized Service Representative. 6-23 abcdefghijklmnopqrstuvwxyz. Recommendation 1) Identify the missing color and replace that toner cartridge. abcdefghijklmnopqrstuvwxyz. abcdefghijklmnopqrstuvwxyz. ABCDEFGHIJKLMNOPQRSTUVWXYZ...
Users Manual - English
Page 202
... then check that the problem is solved. 2) Check that the media type mode is selected correctly 1) Check that the OPC Belt Cartridge is installed correctly. 2) Replace the OPC Belt Cartridge. 6-24 abcdefghijklmnopqrstuvwxyz. abcdefghijklmnopqrstuvwxyz. Replace the OPC belt cartridge 1) Replace the Oil Bottle. 2) Replace the Fuser Cleaning Roller. CHAPTER 6 TROUBLE SHOOTING Question Toner scatter or Toner.... 5) Check to reproduce the colors on your printouts are not what you see on a monitor are installed correctly. 3) Check that toner cartridge. 2) Replace the OPC belt cartridge.
... then check that the problem is solved. 2) Check that the media type mode is selected correctly 1) Check that the OPC Belt Cartridge is installed correctly. 2) Replace the OPC Belt Cartridge. 6-24 abcdefghijklmnopqrstuvwxyz. abcdefghijklmnopqrstuvwxyz. Replace the OPC belt cartridge 1) Replace the Oil Bottle. 2) Replace the Fuser Cleaning Roller. CHAPTER 6 TROUBLE SHOOTING Question Toner scatter or Toner.... 5) Check to reproduce the colors on your printouts are not what you see on a monitor are installed correctly. 3) Check that toner cartridge. 2) Replace the OPC belt cartridge.

Users Manual - English
Page 203
...the Fuser Cleaning Roller. 3) Check that the toner cartridges are installed correctly. 2) Check that the OPC Belt Cartridge is being used. 6-25 CHAPTER 6 TROUBLE SHOOTING Question Uneven density appears periodically in the ... 0123456789. Wrinkle ABCDEFGHIJKLMNOPQRSTUVWXYZ. 0123456789. ABCDEFGHIJKLMNOPQRSTUVWXYZ. 0123456789. abcdefghijklmnopqrstuvwxyz. 1) Replace the toner cartridge. 2) Replace the OPC Belt Cartridge. ABCDEFGHIJKLMNOPQRSTUVWXYZ. 0123456789. abcdefghijklmnopqrstuvwxyz. abcdefghijklmnopqrstuvwxyz. 1) Change to a recommended type of paper, and then check...
...the Fuser Cleaning Roller. 3) Check that the toner cartridges are installed correctly. 2) Check that the OPC Belt Cartridge is being used. 6-25 CHAPTER 6 TROUBLE SHOOTING Question Uneven density appears periodically in the ... 0123456789. Wrinkle ABCDEFGHIJKLMNOPQRSTUVWXYZ. 0123456789. ABCDEFGHIJKLMNOPQRSTUVWXYZ. 0123456789. abcdefghijklmnopqrstuvwxyz. 1) Replace the toner cartridge. 2) Replace the OPC Belt Cartridge. ABCDEFGHIJKLMNOPQRSTUVWXYZ. 0123456789. abcdefghijklmnopqrstuvwxyz. abcdefghijklmnopqrstuvwxyz. 1) Change to a recommended type of paper, and then check...


