
Users Manual - English
Page 3
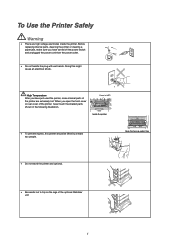
...8226; Be careful not to trip on the legs of the printer are high voltage electrodes inside the printer. Before replacing internal parts, cleaning the printer or clearing a paper jam, make sure you open the front cover or rear cover of the printer, never touch the shaded parts shown in ...the following illustration. When you have just used the printer, some internal parts of the optional Stabilizer unit. Inside the printer •...
...8226; Be careful not to trip on the legs of the printer are high voltage electrodes inside the printer. Before replacing internal parts, cleaning the printer or clearing a paper jam, make sure you open the front cover or rear cover of the printer, never touch the shaded parts shown in ...the following illustration. When you have just used the printer, some internal parts of the optional Stabilizer unit. Inside the printer •...

Users Manual - English
Page 35
... print methods (output tray) for each media type: Jump to the page for each printing method by using A6 size paper, remove the jammed paper, turn over the stack of the paper in the paper cassette. For more than 150 g/m2 (40 lbs.), use face up printing. • We recommend that weighs more information, see...
... print methods (output tray) for each media type: Jump to the page for each printing method by using A6 size paper, remove the jammed paper, turn over the stack of the paper in the paper cassette. For more than 150 g/m2 (40 lbs.), use face up printing. • We recommend that weighs more information, see...

Users Manual - English
Page 44
☛ 3. Fig. 1-13 ✒ Note Make sure that the neatly stacked paper is correctly seated on special paper such as envelopes, thick paper, labels, etc., open the face up output tray to print face up. " in the multi-purpose tray, make sure it touches the ... tray and remains below the limit M mark. Fig. 1-14 When you print on the multipurpose tray, otherwise paper may not be fed correctly, resulting in a skewed printout or a paper jam ☛ 4. While pressing the paper guide release lever, slide the adjuster to M mark. See "Printing on envelopes" or "Printing on Labels, ...
☛ 3. Fig. 1-13 ✒ Note Make sure that the neatly stacked paper is correctly seated on special paper such as envelopes, thick paper, labels, etc., open the face up output tray to print face up. " in the multi-purpose tray, make sure it touches the ... tray and remains below the limit M mark. Fig. 1-14 When you print on the multipurpose tray, otherwise paper may not be fed correctly, resulting in a skewed printout or a paper jam ☛ 4. While pressing the paper guide release lever, slide the adjuster to M mark. See "Printing on envelopes" or "Printing on Labels, ...

Users Manual - English
Page 48
...Open the multi-purpose tray and lower it may cause paper jams or misfeeds. • Do not print envelopes using duplex printing. • For correct printing, you must select the same paper size from within your software application as the paper in the tray. • If your application software ...does not support paper size selection on the printer's control panel under the PAPER menu. ✒ Note • Before printing envelopes, you can change the paper size on its print menu, you must fan the stack well to avoid paper jams and misfeeds. • Do not ...
...Open the multi-purpose tray and lower it may cause paper jams or misfeeds. • Do not print envelopes using duplex printing. • For correct printing, you must select the same paper size from within your software application as the paper in the tray. • If your application software ...does not support paper size selection on the printer's control panel under the PAPER menu. ✒ Note • Before printing envelopes, you can change the paper size on its print menu, you must fan the stack well to avoid paper jams and misfeeds. • Do not ...

Users Manual - English
Page 50
.... 1-20 ✒ Note When you place paper on both sides of the tray and remain below the limit M mark. Press and slide the paper width adjuster to M mark. Up to fit the envelope size. ☛ 4. Place the envelopes in a skewed printout or a paper jam ☛ 5. Fig. 1-19 ✒... Note Make sure that the neatly stacked paper is correctly seated on the multipurpose tray, otherwise paper may not be under the guides that are on the multi-purpose tray, note the ...
.... 1-20 ✒ Note When you place paper on both sides of the tray and remain below the limit M mark. Press and slide the paper width adjuster to M mark. Up to fit the envelope size. ☛ 4. Place the envelopes in a skewed printout or a paper jam ☛ 5. Fig. 1-19 ✒... Note Make sure that the neatly stacked paper is correctly seated on the multipurpose tray, otherwise paper may not be under the guides that are on the multi-purpose tray, note the ...

Users Manual - English
Page 53
...that is used might cause damage to avoid paper jams and misfeeds. • Do not use organizer sheets that are stuck together. Special paper Types to Avoid • Damaged, curled, wrinkled, or irregularly shaped paper Fig. 1-21 ✒ Note • Before using paper with holes, such as organizer sheets, ... • Do not load different types of paper at the edges. • Do not place the punch hole near the actuator (paper sensor). • Do not use paper with perforations at the same time in the paper tray because it may cause paper jams or misfeeds. • For correct printing, ...
...that is used might cause damage to avoid paper jams and misfeeds. • Do not use organizer sheets that are stuck together. Special paper Types to Avoid • Damaged, curled, wrinkled, or irregularly shaped paper Fig. 1-21 ✒ Note • Before using paper with holes, such as organizer sheets, ... • Do not load different types of paper at the edges. • Do not place the punch hole near the actuator (paper sensor). • Do not use paper with perforations at the same time in the paper tray because it may cause paper jams or misfeeds. • For correct printing, ...

Users Manual - English
Page 56
... transparencies that are on the multipurpose tray, otherwise paper may not be fed correctly, resulting in a skewed printout or a paper jam ☛ 5. ✒ Note Make sure that the neatly stacked paper is correctly seated on both sides of the paper stack must be under the guides that have just... been printed because they are very hot! ✒ Note When you place paper in the multi-purpose tray...
... transparencies that are on the multipurpose tray, otherwise paper may not be fed correctly, resulting in a skewed printout or a paper jam ☛ 5. ✒ Note Make sure that the neatly stacked paper is correctly seated on both sides of the paper stack must be under the guides that have just... been printed because they are very hot! ✒ Note When you place paper in the multi-purpose tray...
Users Manual - English
Page 166
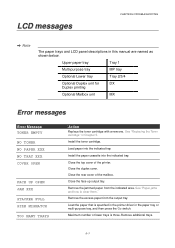
... MMeessssaaggee TONER EMPTY NO TONER NO PAPER XXX NO TRAY XXX COVER OPEN FACE UP OPEN JAM XXX STACKER FULL SIZE MISMATCH TOO MANY TRAYS AAccttiioonn Replace the toner cartridge with a new one. Install the paper cassette into the indicated tray. See "Paper jams and how to clear them." Maximum... number of lower trays is specified in the printer driver in the paper tray or multi-purpose tray, and then press the Go switch....
... MMeessssaaggee TONER EMPTY NO TONER NO PAPER XXX NO TRAY XXX COVER OPEN FACE UP OPEN JAM XXX STACKER FULL SIZE MISMATCH TOO MANY TRAYS AAccttiioonn Replace the toner cartridge with a new one. Install the paper cassette into the indicated tray. See "Paper jams and how to clear them." Maximum... number of lower trays is specified in the printer driver in the paper tray or multi-purpose tray, and then press the Go switch....

Users Manual - English
Page 171
... connected to the face down output tray cannot hold the prescribed number of paper in the paper cassette, and then try again. • Check that manual feed mode is straight. A paper jam has occurred. The printer does not print to the printer. •...selected. 6-6 See your software. If the paper is paper in Chapter 1. Troubleshooting Paper Handling First, ensure that you are using paper that meets Brother recommended paper specifications. Recommendation • If there is curled, you should straighten it in the paper cassette. • Reduce the amount of ...
... connected to the face down output tray cannot hold the prescribed number of paper in the paper cassette, and then try again. • Check that manual feed mode is straight. A paper jam has occurred. The printer does not print to the printer. •...selected. 6-6 See your software. If the paper is paper in Chapter 1. Troubleshooting Paper Handling First, ensure that you are using paper that meets Brother recommended paper specifications. Recommendation • If there is curled, you should straighten it in the paper cassette. • Reduce the amount of ...
Users Manual - English
Page 172
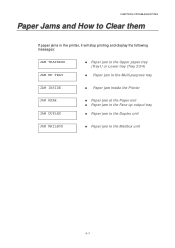
CHAPTER 6 TROUBLESHOOTING Paper Jams and How to Clear them If paper jams in the printer, it will stop printing and display the following messages: JAM TRAYXXXX JAM MP TRAY ♦ Paper jam in the Upper paper tray (Tray1) or Lower tray (Tray 2/3/4) ♦ Paper jam in the Multi-purpose tray JAM INSIDE ♦ Paper jam inside the Printer JAM REAR JAM DUPLEX ♦ Paper jam at the Paper exit ♦ Paper jam in the Face up output tray ♦ Paper jam in the Duplex unit JAM MAILBOX ♦ Paper jam in the Mailbox unit 6-7
CHAPTER 6 TROUBLESHOOTING Paper Jams and How to Clear them If paper jams in the printer, it will stop printing and display the following messages: JAM TRAYXXXX JAM MP TRAY ♦ Paper jam in the Upper paper tray (Tray1) or Lower tray (Tray 2/3/4) ♦ Paper jam in the Multi-purpose tray JAM INSIDE ♦ Paper jam inside the Printer JAM REAR JAM DUPLEX ♦ Paper jam at the Paper exit ♦ Paper jam in the Face up output tray ♦ Paper jam in the Duplex unit JAM MAILBOX ♦ Paper jam in the Mailbox unit 6-7

Users Manual - English
Page 173
... been removed, open the top cover, and then close the top cover again to remove the jammed paper. Paper may be an additional paper jammed in the face up output tray or at the paper exit. A6 Switch 1: OFF Switch 2: OFF A4 100 g/m2 (27 lbs) Switch 1: ON Letter 105 g/m2 ...m2 (28 lbs) Executive, A5, B6 Switch 1: OFF Switch 2: ON Do not use the following paper: • Bent paper • Moist paper • Paper that you remove the jammed paper, there may jam in the paper cassette, inside the printer, in another position. If the error message still appears on small-sized or ...
... been removed, open the top cover, and then close the top cover again to remove the jammed paper. Paper may be an additional paper jammed in the face up output tray or at the paper exit. A6 Switch 1: OFF Switch 2: OFF A4 100 g/m2 (27 lbs) Switch 1: ON Letter 105 g/m2 ...m2 (28 lbs) Executive, A5, B6 Switch 1: OFF Switch 2: ON Do not use the following paper: • Bent paper • Moist paper • Paper that you remove the jammed paper, there may jam in the paper cassette, inside the printer, in another position. If the error message still appears on small-sized or ...

Users Manual - English
Page 174
CHAPTER 6 TROUBLESHOOTING JAM TRAY (inside the Paper tray) JAM TRAYXXX Fig. 6-1 Tray 1 Tray 2 Tray 3 Tray 4 XXXX indicates the tray number that contains jammed paper. ✒ Note The paper trays and LCD panel descriptions in this manual are named as shown below. Upper paper tray Tray 1 Optional Lower tray Tray 2/3/4 6-9
CHAPTER 6 TROUBLESHOOTING JAM TRAY (inside the Paper tray) JAM TRAYXXX Fig. 6-1 Tray 1 Tray 2 Tray 3 Tray 4 XXXX indicates the tray number that contains jammed paper. ✒ Note The paper trays and LCD panel descriptions in this manual are named as shown below. Upper paper tray Tray 1 Optional Lower tray Tray 2/3/4 6-9

Users Manual - English
Page 175
... piece of jammed paper, it is loaded below . • If a paper jam occurs when using A6 size paper, remove the jammed paper, turn over the stack of the printer. ☛ 2. ☛ 1. Make sure that the paper guide release lever is set to the paper size in the paper cassette, and print it again. ☛ 3. If a paper jam occurs inside the paper tray, follow...
... piece of jammed paper, it is loaded below . • If a paper jam occurs when using A6 size paper, remove the jammed paper, turn over the stack of the printer. ☛ 2. ☛ 1. Make sure that the paper guide release lever is set to the paper size in the paper cassette, and print it again. ☛ 3. If a paper jam occurs inside the paper tray, follow...

Users Manual - English
Page 176
Caution Do not pull out the upper paper cassette while paper is being fed from the lower paper cassette because it will cause a paper jam. 6-11 Install the paper cassette into the printer. ! CHAPTER 6 TROUBLESHOOTING ☛ 4.
Caution Do not pull out the upper paper cassette while paper is being fed from the lower paper cassette because it will cause a paper jam. 6-11 Install the paper cassette into the printer. ! CHAPTER 6 TROUBLESHOOTING ☛ 4.

Users Manual - English
Page 177
Fan the paper stack, and then reload it , or press the Go switch to start printing. 6-12 Fig. 6-4 ☛ 3. Open the top cover of the tray and remains below the limit M mark. ☛ 4. Make sure that the paper is inserted fully into the multi-purpose tray and touches the back of the printer and close it in the multi-purpose tray, follow these steps: ☛ 1. Remove the paper from the multi-purpose tray. ☛ 2. JAM TRAY (in the Multi-purpose tray) JAM MP TRAY Fig. 6-3 If a paper jam occurs in the multi-purpose tray.
Fan the paper stack, and then reload it , or press the Go switch to start printing. 6-12 Fig. 6-4 ☛ 3. Open the top cover of the tray and remains below the limit M mark. ☛ 4. Make sure that the paper is inserted fully into the multi-purpose tray and touches the back of the printer and close it in the multi-purpose tray, follow these steps: ☛ 1. Remove the paper from the multi-purpose tray. ☛ 2. JAM TRAY (in the Multi-purpose tray) JAM MP TRAY Fig. 6-3 If a paper jam occurs in the multi-purpose tray.

Users Manual - English
Page 180
CHAPTER 6 TROUBLESHOOTING ☛ 6. Push the metal plate down. Install the toner cartridge firmly into the printer. ☛ 7. Close the top cover of the printer. ✒ Note If a paper jam occurs when using A6 size paper, remove the jammed paper, turn over the stack of the paper in the paper cassette, and print it again. 6-15 ☛ 5.
CHAPTER 6 TROUBLESHOOTING ☛ 6. Push the metal plate down. Install the toner cartridge firmly into the printer. ☛ 7. Close the top cover of the printer. ✒ Note If a paper jam occurs when using A6 size paper, remove the jammed paper, turn over the stack of the paper in the paper cassette, and print it again. 6-15 ☛ 5.

Users Manual - English
Page 183
Open the top cover of the printer. ✒ Note If a duplex unit is installed on the printer, remove it from the printer. After removing the jammed paper, re-install the duplex unit onto the printer. ☛ 2. Open the face up output tray before the paper exits, remove the jammed paper as follows: ☛ 1. JAM REAR (at Face up output tray) JAM REAR Fig. 6-12 When a paper jam occurs behind the face up output tray. Fig. 6-13 6-18
Open the top cover of the printer. ✒ Note If a duplex unit is installed on the printer, remove it from the printer. After removing the jammed paper, re-install the duplex unit onto the printer. ☛ 2. Open the face up output tray before the paper exits, remove the jammed paper as follows: ☛ 1. JAM REAR (at Face up output tray) JAM REAR Fig. 6-12 When a paper jam occurs behind the face up output tray. Fig. 6-13 6-18

Users Manual - English
Page 189
Fig. 6-24 6-24 Open the rear cover of the mailbox unit. JAM MAILBOX (inside the Mailbox unit) JAM MAILBOX Fig. 6-23 If a paper jam occurs in the mailbox unit, follow these steps: ☛ 1.
Fig. 6-24 6-24 Open the rear cover of the mailbox unit. JAM MAILBOX (inside the Mailbox unit) JAM MAILBOX Fig. 6-23 If a paper jam occurs in the mailbox unit, follow these steps: ☛ 1.

Users Manual - English
Page 206
...at once when you print on thick paper that weighs more information, see Chapter 3. ✒ Note • If you print on transparencies. • If a paper jam occurs when using A6 size paper, remove the jammed paper, turn over the stack of the paper source in the following print methods (output... tray) for each printing method by clicking the check mark in the PAPER mode by using the control panel. For...
...at once when you print on thick paper that weighs more information, see Chapter 3. ✒ Note • If you print on transparencies. • If a paper jam occurs when using A6 size paper, remove the jammed paper, turn over the stack of the paper source in the following print methods (output... tray) for each printing method by clicking the check mark in the PAPER mode by using the control panel. For...

Users Manual - English
Page 244
... LaserJet mode HP-GL mode HQ1200 I IBM Proprinter XL mode information mode interface interface mode IP address IR-1000 Ir-DA J jam duplex jam inside jam mailbox jam rear jam tray Job Cancel switch 1-7 1-18 1-8, 1-38 1-38 2-24 4-21, A-9 1-7 3-2, 3-3 4-16 4-16, 6-33 ...Mailbox Maintenance message manual feed media type multi-purpose tray N Network network board slot Network interface connector network mode O Option P panel setting paper paper jam paper mode paper size paper spec parallel interface connector PCL6 power supply power switch INDEX-2 INDEX 1-33 3-18, 6-1 3-20 3-17 4-3 2-18 4-5 6-4 1-...
... LaserJet mode HP-GL mode HQ1200 I IBM Proprinter XL mode information mode interface interface mode IP address IR-1000 Ir-DA J jam duplex jam inside jam mailbox jam rear jam tray Job Cancel switch 1-7 1-18 1-8, 1-38 1-38 2-24 4-21, A-9 1-7 3-2, 3-3 4-16 4-16, 6-33 ...Mailbox Maintenance message manual feed media type multi-purpose tray N Network network board slot Network interface connector network mode O Option P panel setting paper paper jam paper mode paper size paper spec parallel interface connector PCL6 power supply power switch INDEX-2 INDEX 1-33 3-18, 6-1 3-20 3-17 4-3 2-18 4-5 6-4 1-...


