Users Manual - English
Page 49
... pressing Go will be improved. Before you buy a lot of paper. If you want to a thin setting. • Improve Toner Fixing If you choose this setting, the toner fixing on paper may be reset to improve a print quality problem. • Reduce Paper Curl If you choose this setting may increase. While the machine...
... pressing Go will be improved. Before you buy a lot of paper. If you want to a thin setting. • Improve Toner Fixing If you choose this setting, the toner fixing on paper may be reset to improve a print quality problem. • Reduce Paper Curl If you choose this setting may increase. While the machine...
Users Manual - English
Page 75
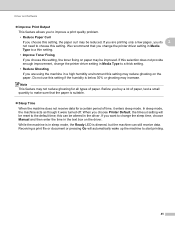
c Take out the drum unit and toner cartridge assembly. 71 A new and unused genuine Brother toner cartridge will stop printing until you replace the toner cartridges, see Before replacing the consumable items on . a Make sure that the machine is turned on page 67. Leave the machine for at least 10 minutes to cool down. b Open the front cover. Routine Maintenance REPLACE TONER 4 The machine will reset the REPLACE TONER mode. 4 Replacing the toner cartridge 4 Before you replace the toner cartridge.
c Take out the drum unit and toner cartridge assembly. 71 A new and unused genuine Brother toner cartridge will stop printing until you replace the toner cartridges, see Before replacing the consumable items on . a Make sure that the machine is turned on page 67. Leave the machine for at least 10 minutes to cool down. b Open the front cover. Routine Maintenance REPLACE TONER 4 The machine will reset the REPLACE TONER mode. 4 Replacing the toner cartridge 4 Before you replace the toner cartridge.

Users Manual - English
Page 82
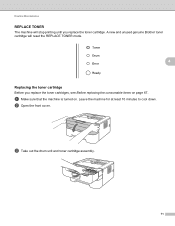
Leave the machine for at least 10 minutes to reset the drum counter by completing the following steps: a Make sure that the machine is flashing. Routine Maintenance Replacing the drum unit 4 Before you need to cool down. When you replace the drum unit with a new one, you replace the drum unit, see Before replacing the consumable items on and the Drum LED is turned on page 67. b Open the front cover. 4 c Take out the drum unit and toner cartridge assembly. 78
Leave the machine for at least 10 minutes to reset the drum counter by completing the following steps: a Make sure that the machine is flashing. Routine Maintenance Replacing the drum unit 4 Before you need to cool down. When you replace the drum unit with a new one, you replace the drum unit, see Before replacing the consumable items on and the Drum LED is turned on page 67. b Open the front cover. 4 c Take out the drum unit and toner cartridge assembly. 78
Users Manual - English
Page 85
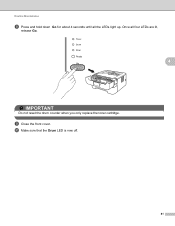
Once all the LEDs light up. Routine Maintenance h Press and hold down Go for about 4 seconds until all four LEDs are lit, release Go. 4 IMPORTANT Do not reset the drum counter when you only replace the toner cartridge. j Make sure that the Drum LED is now off. 81 i Close the front cover.
Once all the LEDs light up. Routine Maintenance h Press and hold down Go for about 4 seconds until all four LEDs are lit, release Go. 4 IMPORTANT Do not reset the drum counter when you only replace the toner cartridge. j Make sure that the Drum LED is now off. 81 i Close the front cover.

Network Users Manual - English
Page 21
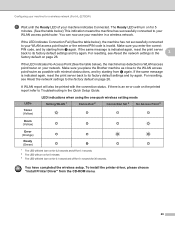
...5 minutes. (See the table below ), the machine has detected no WLAN access point/router on page 26. Make sure you place the Brother machine as close to the WLAN access point/router as possible with the connection status. If the LED indicates Connection Error (See the table below...then turn on for a wireless network (For HL-2270DW) f Wait until the Ready LED of your WLAN access point/router. If there is indicated again, reset the print server back to the factory default on your network that only one -push wireless setting mode LEDs Toner (Yellow) Drum (Yellow) Error (Orange) Ready...
...5 minutes. (See the table below ), the machine has detected no WLAN access point/router on page 26. Make sure you place the Brother machine as close to the WLAN access point/router as possible with the connection status. If the LED indicates Connection Error (See the table below...then turn on for a wireless network (For HL-2270DW) f Wait until the Ready LED of your WLAN access point/router. If there is indicated again, reset the print server back to the factory default on your network that only one -push wireless setting mode LEDs Toner (Yellow) Drum (Yellow) Error (Orange) Ready...
Network Users Manual - English
Page 24
...HL-2270DW) f Wait until the Ready LED of your machine indicates Connected. If the LED indicates Connection Fail (See the table below ), the machine has detected no WLAN access point/router on the printed report refer to its factory default settings and try starting from the CD-ROM menu. 20 For resetting, see Reset...is an error code on your WLAN access point/router. For resetting, see Reset the network settings to the WLAN access point/router as possible with the connection status. Make sure you place the Brother machine as close to the 3 factory default on page 26...
...HL-2270DW) f Wait until the Ready LED of your machine indicates Connected. If the LED indicates Connection Fail (See the table below ), the machine has detected no WLAN access point/router on the printed report refer to its factory default settings and try starting from the CD-ROM menu. 20 For resetting, see Reset...is an error code on your WLAN access point/router. For resetting, see Reset the network settings to the WLAN access point/router as possible with the connection status. Make sure you place the Brother machine as close to the 3 factory default on page 26...


