
Users Manual - English
Page 57
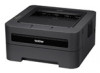
...) The LED indications shown in the table below are used in the illustrations in this chapter. 3 Control Panel 3 LEDs (Light Emitting Diodes) 3 This section refers to four LEDs Toner, Drum, Error, Ready and Go button on the control panel. 1 Toner LED 3 1 The Toner LED indicates that the Toner is low.... 2 Drum LED 2 The Drum LED indicates that the Drum will need to be replaced soon. 3 3 Error LED The Error LED indicates when the machine is in one of the following states: 4 No paper / Paper jam / Cover open 4 Ready LED The Ready LED will...
...) The LED indications shown in the table below are used in the illustrations in this chapter. 3 Control Panel 3 LEDs (Light Emitting Diodes) 3 This section refers to four LEDs Toner, Drum, Error, Ready and Go button on the control panel. 1 Toner LED 3 1 The Toner LED indicates that the Toner is low.... 2 Drum LED 2 The Drum LED indicates that the Drum will need to be replaced soon. 3 3 Error LED The Error LED indicates when the machine is in one of the following states: 4 No paper / Paper jam / Cover open 4 Ready LED The Ready LED will...
Users Manual - English
Page 62
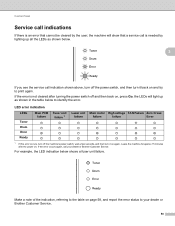
...the power on again. If the error occurs again, call your dealer or Brother Customer Service. 58 Make a note of the indication, referring to the table on and try to identify the error. Control Panel Service call indications 3 If there is an error that cannot be cleared by lighting up as shown below. 3 ...the power switch off and then back on, press Go, the LEDs will light up all the LEDs as shown in the table below shows a fuser unit failure. LED error indication LEDs Main PCB failure Toner Drum Error Ready Fuser unit failure 1 Laser unit Main motor High voltage FAN Failure Zero...
...the power on again. If the error occurs again, call your dealer or Brother Customer Service. 58 Make a note of the indication, referring to the table on and try to identify the error. Control Panel Service call indications 3 If there is an error that cannot be cleared by lighting up as shown below. 3 ...the power switch off and then back on, press Go, the LEDs will light up all the LEDs as shown in the table below shows a fuser unit failure. LED error indication LEDs Main PCB failure Toner Drum Error Ready Fuser unit failure 1 Laser unit Main motor High voltage FAN Failure Zero...
Users Manual - English
Page 64
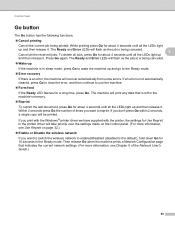
... Cancel printing Cancel the current job being printed: While printing press Go for about 4 seconds until all the LEDs light up and then release it. The Ready and Error LEDs will take priority over the settings made on the control panel. (For more information, see Use Reprint on page 32....) Enable or Disable the wireless network If you want to the Ready mode. Error recovery If there is the default), hold down Go for about 4 seconds until all the LEDs light up and then release it. If you want to switch the wireless network to enabled/disabled (disabled...
... Cancel printing Cancel the current job being printed: While printing press Go for about 4 seconds until all the LEDs light up and then release it. The Ready and Error LEDs will take priority over the settings made on the control panel. (For more information, see Use Reprint on page 32....) Enable or Disable the wireless network If you want to the Ready mode. Error recovery If there is the default), hold down Go for about 4 seconds until all the LEDs light up and then release it. If you want to switch the wireless network to enabled/disabled (disabled...
Users Manual - English
Page 65
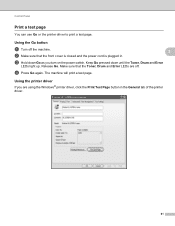
... can use Go or the printer driver to print a test page. The machine will print a test page. c Hold down until the Toner, Drum and Error LEDs light up. Using the printer driver 3 If you turn on the power switch. Release Go. d Press Go again. Keep Go pressed down Go as you are... off the machine. 3 b Make sure that the Toner, Drum and Error LEDs are using the Windows® printer driver, click the Print Test Page button in...
... can use Go or the printer driver to print a test page. The machine will print a test page. c Hold down until the Toner, Drum and Error LEDs light up. Using the printer driver 3 If you turn on the power switch. Release Go. d Press Go again. Keep Go pressed down Go as you are... off the machine. 3 b Make sure that the Toner, Drum and Error LEDs are using the Windows® printer driver, click the Print Test Page button in...
Users Manual - English
Page 67
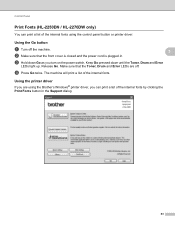
... Support dialog. 63 c Hold down until the Toner, Drum and Error LEDs light up. d Press Go twice. Control Panel Print Fonts (HL-2250DN / HL-2270DW only) 3 You can print a list of the internal fonts using the Brother's Windows® printer driver, you can print a list of the internal fonts. Keep Go pressed down Go as you are off...
... Support dialog. 63 c Hold down until the Toner, Drum and Error LEDs light up. d Press Go twice. Control Panel Print Fonts (HL-2250DN / HL-2270DW only) 3 You can print a list of the internal fonts using the Brother's Windows® printer driver, you can print a list of the internal fonts. Keep Go pressed down Go as you are off...
Users Manual - English
Page 103
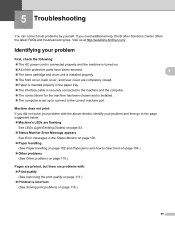
.../. Machine does not print: If you need additional help, the Brother Solutions Center offers the latest FAQs and troubleshooting tips. If you did not solve your problem with : Print quality (See Improving the print quality ... port. Identifying your problem and then go to the page suggested below. Machine's LEDs are flashing See LEDs (Light Emitting Diodes) on page 53. Status Monitor Error Message appears See Error messages in the paper tray. The interface cable is securely connected to the machine and the computer. The...
.../. Machine does not print: If you need additional help, the Brother Solutions Center offers the latest FAQs and troubleshooting tips. If you did not solve your problem with : Print quality (See Improving the print quality ... port. Identifying your problem and then go to the page suggested below. Machine's LEDs are flashing See LEDs (Light Emitting Diodes) on page 53. Status Monitor Error Message appears See Error messages in the paper tray. The interface cable is securely connected to the machine and the computer. The...
Users Manual - English
Page 114
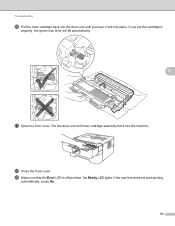
If you hear it lock into place. Put the drum unit and toner cartridge assembly back into the machine. r Close the front cover. s Make sure that the Error LED is off and then, the Ready LED lights. If the machine does not start printing automatically, press Go. 110 Troubleshooting p Put the toner cartridge back into the drum unit until you put the cartridge in properly, the green lock lever will lift automatically. 5 q Open the front cover.
If you hear it lock into place. Put the drum unit and toner cartridge assembly back into the machine. r Close the front cover. s Make sure that the Error LED is off and then, the Ready LED lights. If the machine does not start printing automatically, press Go. 110 Troubleshooting p Put the toner cartridge back into the drum unit until you put the cartridge in properly, the green lock lever will lift automatically. 5 q Open the front cover.
Network Users Manual - English
Page 44
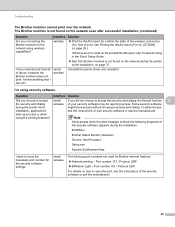
... Process f... Setup.exe Spooler SubSysytem App I can do? wireless Print the WLAN report for Brother network features: Network printing i Port number 137 / Protocol UDP BRAdmin Light i Port number 161 / Protocol UDP For details on the network even after successful installation. (continued) ... The Brother machine is not found on page 37. Is there anything else I want to the network using the printing features? Note Allow access when the alert message to print, see Printing the WLAN report (For HL-2270DW) on page 29.) If there is an error code ...
... Process f... Setup.exe Spooler SubSysytem App I can do? wireless Print the WLAN report for Brother network features: Network printing i Port number 137 / Protocol UDP BRAdmin Light i Port number 161 / Protocol UDP For details on the network even after successful installation. (continued) ... The Brother machine is not found on page 37. Is there anything else I want to the network using the printing features? Note Allow access when the alert message to print, see Printing the WLAN report (For HL-2270DW) on page 29.) If there is an error code ...
Quick Setup Guide - English
Page 17
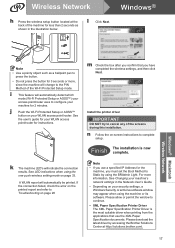
If the connection failed, check the error on the printed report and refer to Troubleshooting on page 28...you have completed the wireless settings, and then click Next. Please download the latest driver by using the BRAdmin Light. Windows® Windows® Macintosh Wireless Network Note • Use a pointy object such as shown in ...If you use the XML Paper Specification documents. Wireless Network h Press the wireless setup button located at http://solutions.brother.com/. 17 A WLAN report will indicate the connection results. Install the printer driver IMPORTANT DO NOT try to...
If the connection failed, check the error on the printed report and refer to Troubleshooting on page 28...you have completed the wireless settings, and then click Next. Please download the latest driver by using the BRAdmin Light. Windows® Windows® Macintosh Wireless Network Note • Use a pointy object such as shown in ...If you use the XML Paper Specification documents. Wireless Network h Press the wireless setup button located at http://solutions.brother.com/. 17 A WLAN report will indicate the connection results. Install the printer driver IMPORTANT DO NOT try to...
Quick Setup Guide - English
Page 21
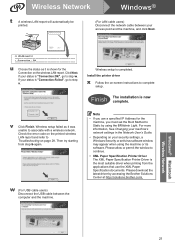
Wireless Network Windows® t A wireless LAN report will automatically be printed. (For LAN cable users) Disconnect the network cable between your access point and the machine, and click Next.
Wireless Network Windows® t A wireless LAN report will automatically be printed. (For LAN cable users) Disconnect the network cable between your access point and the machine, and click Next.
Quick Setup Guide - English
Page 23
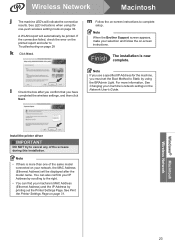
...You can find your selection and follow the on page 28 k Click Next. If the connection failed, check the error on the printed report and refer to Static by printing out the Printer Settings Page. Finish The installation is more ...use a specified IP Address for the machine, you have completed the wireless settings, and then click Next. Note When the Brother Support screen appears, make your machine's MAC Address (Ethernet Address) and the IP Address by using the one of the...33. Windows® Macintosh Wireless Network 23 See LED indications when using the BRAdmin Light.
...You can find your selection and follow the on page 28 k Click Next. If the connection failed, check the error on the printed report and refer to Static by printing out the Printer Settings Page. Finish The installation is more ...use a specified IP Address for the machine, you have completed the wireless settings, and then click Next. Note When the Brother Support screen appears, make your machine's MAC Address (Ethernet Address) and the IP Address by using the one of the...33. Windows® Macintosh Wireless Network 23 See LED indications when using the BRAdmin Light.


