Quick Setup Guide - English
Page 1
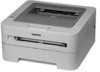
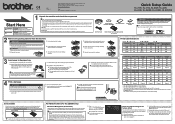
....brother.com/. The machine should be indicated by the LED's on the machine power switch. How to use a web browser, you are not available in the tray. Lift the elastic band off the machine. CAUTION DO NOT eat the Silica Pack. Take out the drum unit and toner cartridge ... or change the toner setting to know the IP Address of your computer. Release Go. Make sure that JavaScript and Cookies are not toys. To view the Quick Setup Guide in death or serious injuries. Quick Setup Guide HL-2130, HL-2132, HL-2220, HL-2230, HL-2240, HL-2240D, HL-2242D, HL-2250DN Start Here...
....brother.com/. The machine should be indicated by the LED's on the machine power switch. How to use a web browser, you are not available in the tray. Lift the elastic band off the machine. CAUTION DO NOT eat the Silica Pack. Take out the drum unit and toner cartridge ... or change the toner setting to know the IP Address of your computer. Release Go. Make sure that JavaScript and Cookies are not toys. To view the Quick Setup Guide in death or serious injuries. Quick Setup Guide HL-2130, HL-2132, HL-2220, HL-2230, HL-2240, HL-2240D, HL-2242D, HL-2250DN Start Here...
User Guide
Page 3
... or envelopes ...15 Duplex printing...20 Guidelines for printing on both sides of the paper 20 Automatic duplex printing (HL-2240D / HL-2242D / HL-2250DN / HL-2270DW only 21 Manual duplex printing ...22 2 Driver and Software 23 Printer driver ...23 Features in the printer driver... page ...61 Print a Printer Settings page...62 Print Fonts (HL-2250DN / HL-2270DW only 63 Print a WLAN report (HL-2270DW only 64 Default settings...64 4 Routine Maintenance 66 Replacing consumable items...66 Consumables...66 Before replacing the consumable items 67 Toner cartridge ...70 Drum unit ...77 ii
... or envelopes ...15 Duplex printing...20 Guidelines for printing on both sides of the paper 20 Automatic duplex printing (HL-2240D / HL-2242D / HL-2250DN / HL-2270DW only 21 Manual duplex printing ...22 2 Driver and Software 23 Printer driver ...23 Features in the printer driver... page ...61 Print a Printer Settings page...62 Print Fonts (HL-2250DN / HL-2270DW only 63 Print a WLAN report (HL-2270DW only 64 Default settings...64 4 Routine Maintenance 66 Replacing consumable items...66 Consumables...66 Before replacing the consumable items 67 Toner cartridge ...70 Drum unit ...77 ii
User Guide
Page 59
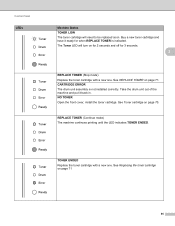
... printing until the LED indicates TONER ENDED. TONER ENDED Replace the toner cartridge with a new one . See REPLACE TONER on page 71 55 Control Panel LEDs Machine Status TONER LOW The toner cartridge will turn on page 70. CARTRIDGE ERROR The drum unit assembly is indicated. NO TONER Open the front cover, install the toner cartridge. Buy a new toner cartridge and have it back...
... printing until the LED indicates TONER ENDED. TONER ENDED Replace the toner cartridge with a new one . See REPLACE TONER on page 71 55 Control Panel LEDs Machine Status TONER LOW The toner cartridge will turn on page 70. CARTRIDGE ERROR The drum unit assembly is indicated. NO TONER Open the front cover, install the toner cartridge. Buy a new toner cartridge and have it back...
User Guide
Page 70
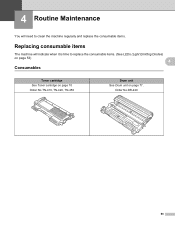
Order No.DR-420 66 4 Routine Maintenance 4 You will need to clean the machine regularly and replace the consumable items. Replacing consumable items 4 The machine will indicate when it is time to replace the consumable items. (See LEDs (Light Emitting Diodes) on page 53) 4 Consumables 4 Toner cartridge See Toner cartridge on page 70 Order No.TN-410, TN-420, TN-450 Drum unit See Drum unit on page 77.
Order No.DR-420 66 4 Routine Maintenance 4 You will need to clean the machine regularly and replace the consumable items. Replacing consumable items 4 The machine will indicate when it is time to replace the consumable items. (See LEDs (Light Emitting Diodes) on page 53) 4 Consumables 4 Toner cartridge See Toner cartridge on page 70 Order No.TN-410, TN-420, TN-450 Drum unit See Drum unit on page 77.
User Guide
Page 71
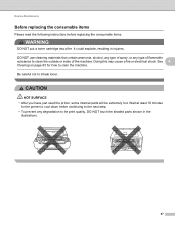
...page 83 for the printer to cool down before replacing the consumable items. WARNING DO NOT put a toner cartridge into a fire. CAUTION HOT SURFACE • After you have just used the printer, some internal parts will be extremely hot. Wait at least 10 minutes for how to the print quality, DO...the consumable items 4 Please read the following instructions before continuing to the next step. • To prevent any type of flammable substance to inhale toner. Doing this may cause a fire or electrical shock. Be careful not to clean the outside or inside of the machine. DO NOT use ...
...page 83 for the printer to cool down before replacing the consumable items. WARNING DO NOT put a toner cartridge into a fire. CAUTION HOT SURFACE • After you have just used the printer, some internal parts will be extremely hot. Wait at least 10 minutes for how to the print quality, DO...the consumable items 4 Please read the following instructions before continuing to the next step. • To prevent any type of flammable substance to inhale toner. Doing this may cause a fire or electrical shock. Be careful not to clean the outside or inside of the machine. DO NOT use ...
User Guide
Page 72
... recommends that you continue to use only genuine Brother brand replacement toner cartridges. Use or attempted use of disposable paper underneath it off with a 4 piece of potentially incompatible toner and/or cartridges in the Brother machine may cause damage to the machine and/or may result in the...recommend the use of unauthorized third party toner and/or cartridges. We also strongly recommend that is caused by the use of genuine Brother supplies. • We recommend that you clean the machine when you place the drum unit and toner cartridge assembly on a clean, flat surface ...
... recommends that you continue to use only genuine Brother brand replacement toner cartridges. Use or attempted use of disposable paper underneath it off with a 4 piece of potentially incompatible toner and/or cartridges in the Brother machine may cause damage to the machine and/or may result in the...recommend the use of unauthorized third party toner and/or cartridges. We also strongly recommend that is caused by the use of genuine Brother supplies. • We recommend that you clean the machine when you place the drum unit and toner cartridge assembly on a clean, flat surface ...
User Guide
Page 73
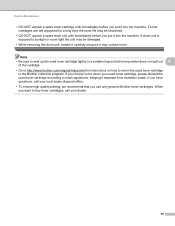
... your used toner cartridge, please discard the used toner cartridge to sunlight or room light the unit may contain toner. Routine Maintenance • DO NOT unpack a spare toner cartridge until immediately before you put it into the machine. Note • Be sure to seal up the used toner cartridge tightly in a suitable bag so that you use only genuine Brother toner cartridges.
... your used toner cartridge, please discard the used toner cartridge to sunlight or room light the unit may contain toner. Routine Maintenance • DO NOT unpack a spare toner cartridge until immediately before you put it into the machine. Note • Be sure to seal up the used toner cartridge tightly in a suitable bag so that you use only genuine Brother toner cartridges.
User Guide
Page 74
... 2 seconds and off for 3 seconds and repeats this indication, the toner is printed on page 71. To replace the toner cartridge, see Replacing the toner cartridge on the page and the print density setting. 4 • If you get a Replace Toner indication. Routine Maintenance Toner cartridge 4 The original toner cartridge that came with the machine may be either a starter, standard or...
... 2 seconds and off for 3 seconds and repeats this indication, the toner is printed on page 71. To replace the toner cartridge, see Replacing the toner cartridge on the page and the print density setting. 4 • If you get a Replace Toner indication. Routine Maintenance Toner cartridge 4 The original toner cartridge that came with the machine may be either a starter, standard or...
User Guide
Page 75
A new and unused genuine Brother toner cartridge will stop printing until you replace the toner cartridges, see Before replacing the consumable items on . b Open the front cover. 71 Routine Maintenance REPLACE TONER 4 The machine will reset the REPLACE TONER mode. 4 Replacing the toner cartridge 4 Before you replace the toner cartridge. Leave the machine for at least 10 minutes to cool down. a Make sure that the machine is turned on page 67.
A new and unused genuine Brother toner cartridge will stop printing until you replace the toner cartridges, see Before replacing the consumable items on . b Open the front cover. 71 Routine Maintenance REPLACE TONER 4 The machine will reset the REPLACE TONER mode. 4 Replacing the toner cartridge 4 Before you replace the toner cartridge. Leave the machine for at least 10 minutes to cool down. a Make sure that the machine is turned on page 67.
User Guide
Page 76
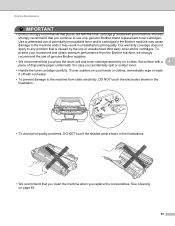
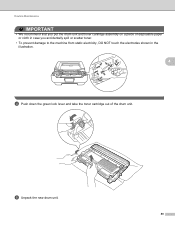
Routine Maintenance c Take out the drum unit and toner cartridge assembly. 4 IMPORTANT • We recommend that you put the drum unit and toner cartridge assembly on a piece of disposable paper or cloth in case you accidentally spill or scatter toner. • To prevent damage to the machine from static electricity, DO NOT touch the electrodes shown in the illustration. 72
Routine Maintenance c Take out the drum unit and toner cartridge assembly. 4 IMPORTANT • We recommend that you put the drum unit and toner cartridge assembly on a piece of disposable paper or cloth in case you accidentally spill or scatter toner. • To prevent damage to the machine from static electricity, DO NOT touch the electrodes shown in the illustration. 72
User Guide
Page 77
Routine Maintenance d Push down the green lock lever and take the toner cartridge out of the drum unit. 4 e Unpack the new toner cartridge. Hold the cartridge level with both hands and gently shake it from side to side several times to spread the toner evenly inside the cartridge. 73
Routine Maintenance d Push down the green lock lever and take the toner cartridge out of the drum unit. 4 e Unpack the new toner cartridge. Hold the cartridge level with both hands and gently shake it from side to side several times to spread the toner evenly inside the cartridge. 73
User Guide
Page 78
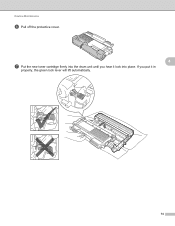
If you hear it in properly, the green lock lever will lift automatically. 74 Routine Maintenance f Pull off the protective cover. 4 g Put the new toner cartridge firmly into the drum unit until you put it lock into place.
If you hear it in properly, the green lock lever will lift automatically. 74 Routine Maintenance f Pull off the protective cover. 4 g Put the new toner cartridge firmly into the drum unit until you put it lock into place.
User Guide
Page 79
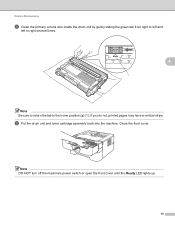
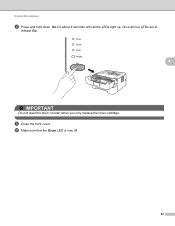
Note DO NOT turn off the machine's power switch or open the front cover until the Ready LED lights up. 75 Close the front cover. Routine Maintenance h Clean the primary corona wire inside the drum unit by gently sliding the green tab from right to left and left to right several times. 4 1 Note Be sure to return the tab to the home position (a) (1). i Put the drum unit and toner cartridge assembly back into the machine. If you do not, printed pages may have a vertical stripe.
Note DO NOT turn off the machine's power switch or open the front cover until the Ready LED lights up. 75 Close the front cover. Routine Maintenance h Clean the primary corona wire inside the drum unit by gently sliding the green tab from right to left and left to right several times. 4 1 Note Be sure to return the tab to the home position (a) (1). i Put the drum unit and toner cartridge assembly back into the machine. If you do not, printed pages may have a vertical stripe.
User Guide
Page 80
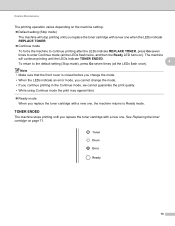
...; Default setting (Stop mode) The machine will continue printing until you replace the toner cartridge with a new one when the LEDs indicate REPLACE TONER. Continue mode To force the machine to continue printing after the LEDs indicate REPLACE TONER, press Go seven times to enter Continue mode (all the LEDs flash once). 4 Note... Continue mode, we cannot guarantee the print quality. • While using Continue mode the print may appear faint. Ready mode When you replace the toner cartridge with a new one . The machine will stop printing until the LEDs indicate...
...; Default setting (Stop mode) The machine will continue printing until you replace the toner cartridge with a new one when the LEDs indicate REPLACE TONER. Continue mode To force the machine to continue printing after the LEDs indicate REPLACE TONER, press Go seven times to enter Continue mode (all the LEDs flash once). 4 Note... Continue mode, we cannot guarantee the print quality. • While using Continue mode the print may appear faint. Ready mode When you replace the toner cartridge with a new one . The machine will stop printing until the LEDs indicate...
User Guide
Page 83
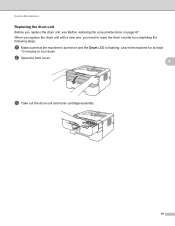
When you replace the drum unit with a new one, you replace the drum unit, see Before replacing the consumable items on and the Drum LED is turned on page 67. Leave the machine for at least 10 minutes to reset the drum counter by completing the following steps: a Make sure that the machine is flashing. b Open the front cover. 4 c Take out the drum unit and toner cartridge assembly. 79 Routine Maintenance Replacing the drum unit 4 Before you need to cool down.
When you replace the drum unit with a new one, you replace the drum unit, see Before replacing the consumable items on and the Drum LED is turned on page 67. Leave the machine for at least 10 minutes to reset the drum counter by completing the following steps: a Make sure that the machine is flashing. b Open the front cover. 4 c Take out the drum unit and toner cartridge assembly. 79 Routine Maintenance Replacing the drum unit 4 Before you need to cool down.
User Guide
Page 84
Routine Maintenance IMPORTANT • We recommend that you put the drum unit and toner cartridge assembly on a piece of disposable paper or cloth in case you accidentally spill or scatter toner. • To prevent damage to the machine from static electricity, DO NOT touch the electrodes shown in the illustration. 4 d Push down the green lock lever and take the toner cartridge out of the drum unit. e Unpack the new drum unit. 80
Routine Maintenance IMPORTANT • We recommend that you put the drum unit and toner cartridge assembly on a piece of disposable paper or cloth in case you accidentally spill or scatter toner. • To prevent damage to the machine from static electricity, DO NOT touch the electrodes shown in the illustration. 4 d Push down the green lock lever and take the toner cartridge out of the drum unit. e Unpack the new drum unit. 80

User Guide
Page 85
Do not close the front cover yet. 81 If you hear it lock into the machine. Routine Maintenance f Put the toner cartridge firmly into the new drum unit until you put the cartridge in properly, the green lock lever will lift automatically. 4 g Put the drum unit and toner cartridge assembly back into place.
Do not close the front cover yet. 81 If you hear it lock into the machine. Routine Maintenance f Put the toner cartridge firmly into the new drum unit until you put the cartridge in properly, the green lock lever will lift automatically. 4 g Put the drum unit and toner cartridge assembly back into place.
User Guide
Page 86
i Close the front cover. Once all the LEDs light up. Routine Maintenance h Press and hold down Go for about 4 seconds until all four LEDs are lit, release Go. 4 IMPORTANT Do not reset the drum counter when you only replace the toner cartridge. j Make sure that the Drum LED is now off. 82
i Close the front cover. Once all the LEDs light up. Routine Maintenance h Press and hold down Go for about 4 seconds until all four LEDs are lit, release Go. 4 IMPORTANT Do not reset the drum counter when you only replace the toner cartridge. j Make sure that the Drum LED is now off. 82

User Guide
Page 87
... volatile liquids such as thinner or benzine will damage the surface of the machine. 83 WARNING DO NOT use cleaning materials that you replace the toner cartridge or the drum unit, make sure that contain ammonia, alcohol, any type of spray, or any type of flammable substance to inhale...
... volatile liquids such as thinner or benzine will damage the surface of the machine. 83 WARNING DO NOT use cleaning materials that you replace the toner cartridge or the drum unit, make sure that contain ammonia, alcohol, any type of spray, or any type of flammable substance to inhale...
User Guide
Page 89
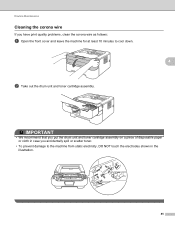
Routine Maintenance Cleaning the corona wire If you accidentally spill or scatter toner. • To prevent damage to cool down. b Take out the drum unit and toner cartridge assembly. 4 4 IMPORTANT • We recommend that you put the drum unit and toner cartridge assembly on a piece of disposable paper or cloth in case you have print quality problems, clean the corona wire as follows: a Open the front cover and leave the machine for at least 10 minutes to the machine from static electricity, DO NOT touch the electrodes shown in the illustration. 85
Routine Maintenance Cleaning the corona wire If you accidentally spill or scatter toner. • To prevent damage to cool down. b Take out the drum unit and toner cartridge assembly. 4 4 IMPORTANT • We recommend that you put the drum unit and toner cartridge assembly on a piece of disposable paper or cloth in case you have print quality problems, clean the corona wire as follows: a Open the front cover and leave the machine for at least 10 minutes to the machine from static electricity, DO NOT touch the electrodes shown in the illustration. 85


