User Guide
Page 72
...accidentally spill or scatter toner. • Handle the toner cartridge carefully. Our warranty coverage does not apply to any problem that is caused by the use of genuine Brother supplies. • We recommend that you place the drum unit and toner cartridge assembly on your investment.... • To avoid print quality problems, DO NOT touch the shaded parts shown in case you replace the consumables. Routine Maintenance IMPORTANT • Brother strongly recommends that you continue to use only genuine Brother brand replacement toner cartridges. See Cleaning on page 83. 68...
...accidentally spill or scatter toner. • Handle the toner cartridge carefully. Our warranty coverage does not apply to any problem that is caused by the use of genuine Brother supplies. • We recommend that you place the drum unit and toner cartridge assembly on your investment.... • To avoid print quality problems, DO NOT touch the shaded parts shown in case you replace the consumables. Routine Maintenance IMPORTANT • Brother strongly recommends that you continue to use only genuine Brother brand replacement toner cartridges. See Cleaning on page 83. 68...
User Guide
Page 89
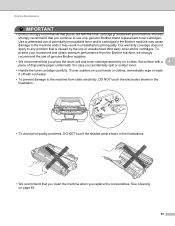
b Take out the drum unit and toner cartridge assembly. 4 4 IMPORTANT • We recommend that you put the drum unit and toner cartridge assembly on a piece of disposable paper or cloth in case you have print quality problems, clean the corona wire as follows: a Open the front cover and leave the machine for at least 10 minutes to the machine from static electricity, DO NOT touch the electrodes shown in the illustration. 85 Routine Maintenance Cleaning the corona wire If you accidentally spill or scatter toner. • To prevent damage to cool down.
b Take out the drum unit and toner cartridge assembly. 4 4 IMPORTANT • We recommend that you put the drum unit and toner cartridge assembly on a piece of disposable paper or cloth in case you have print quality problems, clean the corona wire as follows: a Open the front cover and leave the machine for at least 10 minutes to the machine from static electricity, DO NOT touch the electrodes shown in the illustration. 85 Routine Maintenance Cleaning the corona wire If you accidentally spill or scatter toner. • To prevent damage to cool down.

User Guide
Page 94
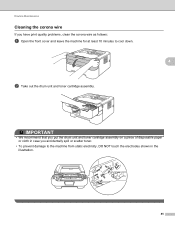
Upon completion please discard the used paper. j Repeat steps c to cool down. If the problem is not solved yet, follow the steps below: a Turn off for at least 10 minutes to i two more times using a new blank sheet of paper each time. Leave the machine turned off the machine's power switch. Disconnect all the cables, and then unplug the power cord from the AC power outlet. Routine Maintenance i When the machine has finished cleaning it returns to Ready mode. b Open the front cover. 4 c Take out the drum unit and toner cartridge assembly. 90
Upon completion please discard the used paper. j Repeat steps c to cool down. If the problem is not solved yet, follow the steps below: a Turn off for at least 10 minutes to i two more times using a new blank sheet of paper each time. Leave the machine turned off the machine's power switch. Disconnect all the cables, and then unplug the power cord from the AC power outlet. Routine Maintenance i When the machine has finished cleaning it returns to Ready mode. b Open the front cover. 4 c Take out the drum unit and toner cartridge assembly. 90
User Guide
Page 104
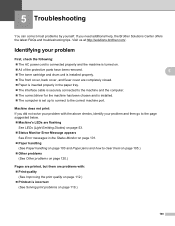
...Brother Solutions Center offers the latest FAQs and troubleshooting tips. If you did not solve your problem with the above checks, identify your problem First, check the following: The AC power cord is connected properly and the machine is turned on. All of the protective parts have been removed. The toner cartridge... and drum unit is installed properly. The front cover, back cover, and fuser cover are problems with: Print quality (See Improving the print quality on page...
...Brother Solutions Center offers the latest FAQs and troubleshooting tips. If you did not solve your problem with the above checks, identify your problem First, check the following: The AC power cord is connected properly and the machine is turned on. All of the protective parts have been removed. The toner cartridge... and drum unit is installed properly. The front cover, back cover, and fuser cover are problems with: Print quality (See Improving the print quality on page...
User Guide
Page 105
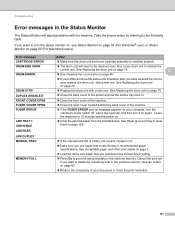
... REAR JAM DUPLEX 1 MANUAL FEED MEMORY FULL Action Make sure the drum unit and toner cartridge assembly is empty, put the duplex tray back in. Close the front cover of the... If the manual feed slot is installed properly. The drum unit will report problems with a new one. See Acceptable paper and other print media on again. See Replacing the ...the complexity of paper in it on page 3. Load the same size paper that meets Brother's recommended paper specifications. If you selected in the current driver setting. Press Go to...
... REAR JAM DUPLEX 1 MANUAL FEED MEMORY FULL Action Make sure the drum unit and toner cartridge assembly is empty, put the duplex tray back in. Close the front cover of the... If the manual feed slot is installed properly. The drum unit will report problems with a new one. See Acceptable paper and other print media on again. See Replacing the ...the complexity of paper in it on page 3. Load the same size paper that meets Brother's recommended paper specifications. If you selected in the current driver setting. Press Go to...
User Guide
Page 106
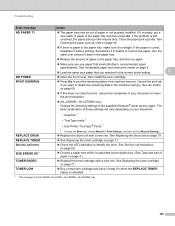
... paper and other print media on page 71. See Replacing the drum unit on page 79 REPLACE TONER See Replacing the toner cartridge on page 3. Load the same size paper that meets Brother's recommended paper specifications. See Service call error Check the LED indication to remove the paper... / HL-2270DW only) Change the following settings in the supplied Windows® driver and try again. Make sure you use paper that you want to print the remaining data in the machine memory. If the problem is supported by the duplex tray. (See Type and size of...
... paper and other print media on page 71. See Replacing the drum unit on page 79 REPLACE TONER See Replacing the toner cartridge on page 3. Load the same size paper that meets Brother's recommended paper specifications. See Service call error Check the LED indication to remove the paper... / HL-2270DW only) Change the following settings in the supplied Windows® driver and try again. Make sure you use paper that you want to print the remaining data in the machine memory. If the problem is supported by the duplex tray. (See Type and size of...

User Guide
Page 114
Clear the jammed paper if there is any inside the drum unit. 5 IMPORTANT • Handle the toner cartridge carefully. o If you could not remove the drum unit and toner cartridge assembly in the machine. Troubleshooting n Put the paper tray firmly back in step b, you must do step b now before you can go to...step p p Push down the green lock lever and take the toner cartridge out of the drum unit. If toner scatters on your hands or clothes, immediately wipe or wash it off with cold water. • To avoid print quality problems, DO NOT touch the shaded parts shown in the illustrations. 110...
Clear the jammed paper if there is any inside the drum unit. 5 IMPORTANT • Handle the toner cartridge carefully. o If you could not remove the drum unit and toner cartridge assembly in the machine. Troubleshooting n Put the paper tray firmly back in step b, you must do step b now before you can go to...step p p Push down the green lock lever and take the toner cartridge out of the drum unit. If toner scatters on your hands or clothes, immediately wipe or wash it off with cold water. • To avoid print quality problems, DO NOT touch the shaded parts shown in the illustrations. 110...
User Guide
Page 116
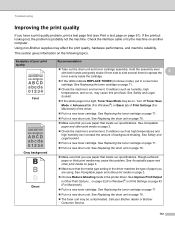
...If you have a print quality problem, print a test page first (see Print a test page on . Using non-Brother supplies may cause this problem. See Safety and Legal booklet. If the whole page is probably not the machine. See Replacing the toner cartridge on page 79. ... unit. See Replacing the drum unit on page 71. Put in the printer driver. Call your Brother dealer or Brother Customer Service. 112 See Replacing the toner cartridge on , may affect the print quality, hardware performance, and machine reliability. Conditions such as high temperatures and...
...If you have a print quality problem, print a test page first (see Print a test page on . Using non-Brother supplies may cause this problem. See Safety and Legal booklet. If the whole page is probably not the machine. See Replacing the toner cartridge on page 79. ... unit. See Replacing the drum unit on page 71. Put in the printer driver. Call your Brother dealer or Brother Customer Service. 112 See Replacing the toner cartridge on , may affect the print quality, hardware performance, and machine reliability. Conditions such as high temperatures and...
User Guide
Page 118
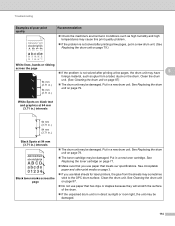
Clean the drum 94 mm (3.71 in .) intervals ABCDEFGH abcdefghijk ABCD abcde 01234 Black toner marks across the page If the problem is in a new toner cartridge. See Replacing the drum 94 mm unit on page 79. (3.71 in.) White Spots on black text and graphics at 94 mm (3....high humidity and high temperatures may cause this print quality problem. If the problem is not solved after printing a few pages, the drum unit may have 5 foreign material, such as glue from the sheets may be damaged. See Replacing the toner cartridge on page 87. Do not use paper...
Clean the drum 94 mm (3.71 in .) intervals ABCDEFGH abcdefghijk ABCD abcde 01234 Black toner marks across the page If the problem is in a new toner cartridge. See Replacing the drum 94 mm unit on page 79. (3.71 in.) White Spots on black text and graphics at 94 mm (3....high humidity and high temperatures may cause this print quality problem. If the problem is not solved after printing a few pages, the drum unit may have 5 foreign material, such as glue from the sheets may be damaged. See Replacing the toner cartridge on page 87. Do not use paper...


