
Users Manual - English
Page 4
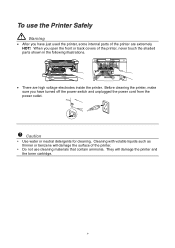
... cartridge. When you have just used the printer, some internal parts of the printer are high voltage electrodes inside the printer. y Do not use the Printer Safely Warning • After you have turned off the power switch and unplugged the power cord from the power outlet. ! Caution y Use water or neutral detergents for cleaning...
... cartridge. When you have just used the printer, some internal parts of the printer are high voltage electrodes inside the printer. y Do not use the Printer Safely Warning • After you have turned off the power switch and unplugged the power cord from the power outlet. ! Caution y Use water or neutral detergents for cleaning...
Users Manual - English
Page 10
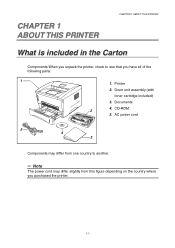
Printer 2. Documents 2 4. AC power cord 5 4 3 Components may differ from one country to see that you purchased the printer. 1-1 Drum unit assembly (with toner cartridge included) 3. CD-ROM 5. CHAPTER 1 1 ABOUT THIS PRINTER CHAPTER 1 ABOUT THIS PRINTER What is included in the Carton Components When you unpack the printer, check to another. ✏ Note The power cord may differ slightly from this figure depending on the country where 0 you have all of the following parts: 1 1.
Printer 2. Documents 2 4. AC power cord 5 4 3 Components may differ from one country to see that you purchased the printer. 1-1 Drum unit assembly (with toner cartridge included) 3. CD-ROM 5. CHAPTER 1 1 ABOUT THIS PRINTER CHAPTER 1 ABOUT THIS PRINTER What is included in the Carton Components When you unpack the printer, check to another. ✏ Note The power cord may differ slightly from this figure depending on the country where 0 you have all of the following parts: 1 1.
Users Manual - English
Page 12
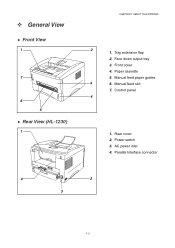
Manual feed paper guides 3 6. Control panel 4 1. Parallel Interface connector 4 2 3 1-3 Paper cassette 5. AC power inlet 4. Power switch 3. Manual feed slot 7. Rear cover 2. Face down output tray 3. Front cover 4. ™ General View ♦ Front View 1 7 6 5 ♦ Rear View (HL-1230) 1 CHAPTER 1 ABOUT THIS PRINTER 2 1. Tray extension flap 2.
Manual feed paper guides 3 6. Control panel 4 1. Parallel Interface connector 4 2 3 1-3 Paper cassette 5. AC power inlet 4. Power switch 3. Manual feed slot 7. Rear cover 2. Face down output tray 3. Front cover 4. ™ General View ♦ Front View 1 7 6 5 ♦ Rear View (HL-1230) 1 CHAPTER 1 ABOUT THIS PRINTER 2 1. Tray extension flap 2.

Users Manual - English
Page 13
AC power inlet 4. Parallel Interface connector 5. Power switch 3. Rear cover 2. USB Interface connector 6. Parallel Interface connector 5. AC power inlet 4. Mini Din connector for lower tray unit 2 1-4 Rear cover 2. Power switch 3. ♦ Rear View (HL-1440) 1 5 4 3 ♦ Rear View (HL-1450) 1 6 5 4 3 CHAPTER 1 ABOUT THIS PRINTER 1. USB connector 2 1.
AC power inlet 4. Parallel Interface connector 5. Power switch 3. Rear cover 2. USB Interface connector 6. Parallel Interface connector 5. AC power inlet 4. Mini Din connector for lower tray unit 2 1-4 Rear cover 2. Power switch 3. ♦ Rear View (HL-1440) 1 5 4 3 ♦ Rear View (HL-1450) 1 6 5 4 3 CHAPTER 1 ABOUT THIS PRINTER 1. USB connector 2 1.
Users Manual - English
Page 14
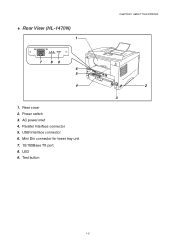
Mini Din connector for lower tray unit 7. 10/100Base TX port 8. LED 9. Power switch 3. Parallel Interface connector 5. AC power inlet 4. USB Interface connector 6. ♦ Rear View (HL-1470N) 1 10/100BASE TX L F A TEST 7 89 6 5 4 1. Test button CHAPTER 1 ABOUT THIS PRINTER 2 3 1-5 Rear cover 2.
Mini Din connector for lower tray unit 7. 10/100Base TX port 8. LED 9. Power switch 3. Parallel Interface connector 5. AC power inlet 4. USB Interface connector 6. ♦ Rear View (HL-1470N) 1 10/100BASE TX L F A TEST 7 89 6 5 4 1. Test button CHAPTER 1 ABOUT THIS PRINTER 2 3 1-5 Rear cover 2.

Users Manual - English
Page 15
... 1 ABOUT THIS PRINTER Please take note of the following before using the printer with other high-power appliances such as an air conditioner, copier, shredder and so on. If you cannot avoid using the printer. AC power: AC 220 - 240V or AC 110 - 120V Frequency: 50 Hz (220 V- 240 V) or 50/60... Hz (110-120 V) The power cord, including extensions, should not exceed 5 metres (16.5 feet). Do not share the same...
... 1 ABOUT THIS PRINTER Please take note of the following before using the printer with other high-power appliances such as an air conditioner, copier, shredder and so on. If you cannot avoid using the printer. AC power: AC 220 - 240V or AC 110 - 120V Frequency: 50 Hz (220 V- 240 V) or 50/60... Hz (110-120 V) The power cord, including extensions, should not exceed 5 metres (16.5 feet). Do not share the same...
Users Manual - English
Page 16
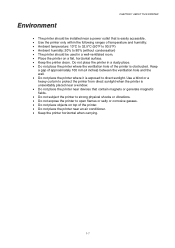
... and the wall. • Do not place the printer where it is obstructed. Environment CHAPTER 1 ABOUT THIS PRINTER • The printer should be installed near a power outlet that is easily accessible. • Use the printer only within the following ranges of temperature and humidity: • Ambient temperature: 10°C to 32...
... and the wall. • Do not place the printer where it is obstructed. Environment CHAPTER 1 ABOUT THIS PRINTER • The printer should be installed near a power outlet that is easily accessible. • Use the printer only within the following ranges of temperature and humidity: • Ambient temperature: 10°C to 32...
Users Manual - English
Page 51
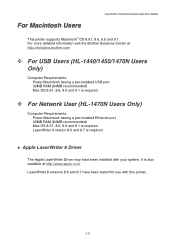
... 8.7 is also available at http://solutions.brother.com ™ For USB Users (HL-1440/1450/1470N Users Only) Computer Requirements: Power Macintosh having a pre-installed USB port 32MB RAM (64MB recommended) Mac OS 8.51, 8.6, 9.0 and 9.1 is required. ™ For Network User (HL-1470N Users Only) Computer Requirements: Power Macintosh having a pre-installed Ethernet port ...system. For Macintosh Users CHAPTER 2 PRINTER DRIVER AND SOFTWARE This printer supports Macintosh® OS 8.51, 8.6, 9.0 and 9.1. For more detailed information visit the Brother Solutions Center at http://www.apple.com.
... 8.7 is also available at http://solutions.brother.com ™ For USB Users (HL-1440/1450/1470N Users Only) Computer Requirements: Power Macintosh having a pre-installed USB port 32MB RAM (64MB recommended) Mac OS 8.51, 8.6, 9.0 and 9.1 is required. ™ For Network User (HL-1470N Users Only) Computer Requirements: Power Macintosh having a pre-installed Ethernet port ...system. For Macintosh Users CHAPTER 2 PRINTER DRIVER AND SOFTWARE This printer supports Macintosh® OS 8.51, 8.6, 9.0 and 9.1. For more detailed information visit the Brother Solutions Center at http://www.apple.com.
Users Manual - English
Page 55
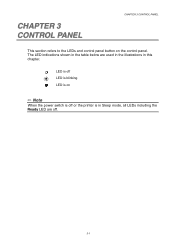
The LED indications shown in the table below are used in the illustrations in Sleep mode, all LEDs including the 0 Ready LED are off LED is blinking G LED is off . 3-1 CHAPTER 3 3 CONTROL PANEL CHAPTER 3 CONTROL PANEL This section refers to the LEDs and control panel button on ✏ Note When the power switch is off or the printer is in this chapter. ❍ LED is on the control panel.
The LED indications shown in the table below are used in the illustrations in Sleep mode, all LEDs including the 0 Ready LED are off LED is blinking G LED is off . 3-1 CHAPTER 3 3 CONTROL PANEL CHAPTER 3 CONTROL PANEL This section refers to the LEDs and control panel button on ✏ Note When the power switch is off or the printer is in this chapter. ❍ LED is on the control panel.
Users Manual - English
Page 56
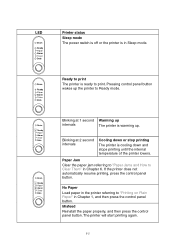
... Toner Data Drum Ready Paper Alarm Toner Data Drum Ready Paper Alarm Toner Data Drum Ready Paper Alarm Toner Data Printer status Sleep mode The power switch is off or the printer is warming up. Ready to Ready mode. No Paper Load paper in the printer referring to Clear Them" in... on Plain Paper" in Sleep mode. Blinking at 1 second Warming up the printer to print The printer is cooling down and stops printing until the internal temperature of the printer lowers. Misfeed Reinstall the paper properly, and then press the control panel button.
... Toner Data Drum Ready Paper Alarm Toner Data Drum Ready Paper Alarm Toner Data Drum Ready Paper Alarm Toner Data Printer status Sleep mode The power switch is off or the printer is warming up. Ready to Ready mode. No Paper Load paper in the printer referring to Clear Them" in... on Plain Paper" in Sleep mode. Blinking at 1 second Warming up the printer to print The printer is cooling down and stops printing until the internal temperature of the printer lowers. Misfeed Reinstall the paper properly, and then press the control panel button.

Users Manual - English
Page 59
Please note the indication and report the error status and problem by referring to print again. If you see the same service call indication after turning on and try to the above table. ✏ Note Ensure that the front cover is fully closed before reporting a service call. 1 3-5 CHAPTER 3 CONTROL PANEL If you cannot clear the error and see any of these service call indications, turn off the power switch, wait a few seconds, and then turn it on the printer, consult your dealer or a Brother authorized service representative.
Please note the indication and report the error status and problem by referring to print again. If you see the same service call indication after turning on and try to the above table. ✏ Note Ensure that the front cover is fully closed before reporting a service call. 1 3-5 CHAPTER 3 CONTROL PANEL If you cannot clear the error and see any of these service call indications, turn off the power switch, wait a few seconds, and then turn it on the printer, consult your dealer or a Brother authorized service representative.
Users Manual - English
Page 61
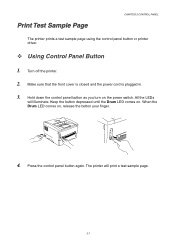
When the Drum LED comes on the power switch. All the LEDs will print a test sample page. 3-7 Press the control panel button again. Drum Ready Alarm Data 4. Turn off the printer. 2. Hold down ... sample page using the control panel button or printer driver. ™ Using Control Panel Button 1. Make sure that the front cover is closed and the power cord is plugged in. 3.
When the Drum LED comes on the power switch. All the LEDs will print a test sample page. 3-7 Press the control panel button again. Drum Ready Alarm Data 4. Turn off the printer. 2. Hold down ... sample page using the control panel button or printer driver. ™ Using Control Panel Button 1. Make sure that the front cover is closed and the power cord is plugged in. 3.
Users Manual - English
Page 63
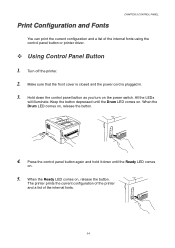
... the Ready LED comes on , release the button. Drum Ready Alarm Data 3-9 The printer prints the current configuration of the printer and a list of the internal fonts using the control panel button or printer driver. ™ Using Control Panel Button 1. Hold down until the Drum LED comes on the.... When the Drum LED comes on , release the button. Drum Ready Alarm Data 4. Make sure that the front cover is closed and the power cord is plugged in. 3. All the LEDs will illuminate. Keep the button depressed until the Ready LED comes on. 5. Press the control panel button again ...
... the Ready LED comes on , release the button. Drum Ready Alarm Data 3-9 The printer prints the current configuration of the printer and a list of the internal fonts using the control panel button or printer driver. ™ Using Control Panel Button 1. Hold down until the Drum LED comes on the.... When the Drum LED comes on , release the button. Drum Ready Alarm Data 4. Make sure that the front cover is closed and the power cord is plugged in. 3. All the LEDs will illuminate. Keep the button depressed until the Ready LED comes on. 5. Press the control panel button again ...

Users Manual - English
Page 68
Unpack the SIMM and hold it . 3. If you install or remove SIMM. 2. Caution Be sure to turn off the printer and unplug the power cord from the printer. ! Caution SIMM boards can be damaged by the edges. ! Unscrew the two screws that secure the access cover and remove it ...
Unpack the SIMM and hold it . 3. If you install or remove SIMM. 2. Caution Be sure to turn off the printer and unplug the power cord from the printer. ! Caution SIMM boards can be damaged by the edges. ! Unscrew the two screws that secure the access cover and remove it ...

Users Manual - English
Page 69
CHAPTER 4 OPTIONS 5. 4. Plug the power cord into place. Re-install the access cover and secure the access cover with the two screws. 6. Close the rear cover. 7. Install the SIMM into ...the slot at an angle, and then push it gently toward the vertical until it clicks into the AC outlet, and then turn on the power switch. ✏ Note To check that you installed the SIMM correctly, print the configuration sheet by using the selection in Chapter 3. 4-5 Reconnect the interface cable...
CHAPTER 4 OPTIONS 5. 4. Plug the power cord into place. Re-install the access cover and secure the access cover with the two screws. 6. Close the rear cover. 7. Install the SIMM into ...the slot at an angle, and then push it gently toward the vertical until it clicks into the AC outlet, and then turn on the power switch. ✏ Note To check that you installed the SIMM correctly, print the configuration sheet by using the selection in Chapter 3. 4-5 Reconnect the interface cable...
Users Manual - English
Page 87
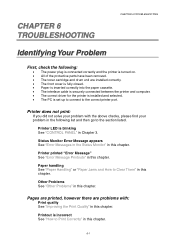
... chapter. Printer does not print: If you did not solve your problem with the above checks, please find your problem in the following : • The power plug is connected correctly and the printer is turned on. • All of the protective parts have been removed. • The toner cartridge and drum...
... chapter. Printer does not print: If you did not solve your problem with the above checks, please find your problem in the following : • The power plug is connected correctly and the printer is turned on. • All of the protective parts have been removed. • The toner cartridge and drum...
Users Manual - English
Page 89
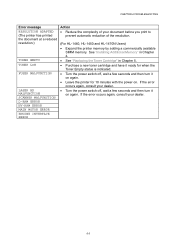
...prevent automatic reduction of your dealer. 6-3 If the error occurs again, consult your dealer. • Turn the power switch off , wait a few seconds and then turn it on . See "Installing Additional Memory" in Chapter ...power on again. CHAPTER 6 TROUBLESHOOTING Error message RESOLUTION ADAPTED (The printer has printed the document at a reduced resolution.) TONER EMPTY TONER LOW FUSER MALFUNCTION LASER BD MALFUNCTION SCANNER MALFUNCTION D-RAM ERROR NV-RAM ERROR MAIN MOTOR ERROR ENGINE INTERFACE ERROR Action • Reduce the complexity of the resolution. (For HL-1440, HL-1450 and HL...
...prevent automatic reduction of your dealer. 6-3 If the error occurs again, consult your dealer. • Turn the power switch off , wait a few seconds and then turn it on . See "Installing Additional Memory" in Chapter ...power on again. CHAPTER 6 TROUBLESHOOTING Error message RESOLUTION ADAPTED (The printer has printed the document at a reduced resolution.) TONER EMPTY TONER LOW FUSER MALFUNCTION LASER BD MALFUNCTION SCANNER MALFUNCTION D-RAM ERROR NV-RAM ERROR MAIN MOTOR ERROR ENGINE INTERFACE ERROR Action • Reduce the complexity of the resolution. (For HL-1440, HL-1450 and HL...
Users Manual - English
Page 109
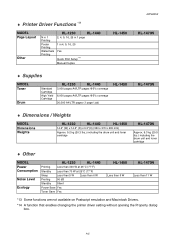
....6" (D) x 9.3"(H) (360 x 370 x 235 mm) Approx. 9.2 kg (20.3 lbs.) including the drum unit and toner cartridge HL-1470N Approx. 9.3 kg (20.5 lbs.) including the drum unit and toner cartridge ♦ Other MODEL Power Consumption Noise Level Ecology HL-1230 HL-1440 Printing Less than 340 W at 25°C (77°F) Standby Less than 70 W at 25...
....6" (D) x 9.3"(H) (360 x 370 x 235 mm) Approx. 9.2 kg (20.3 lbs.) including the drum unit and toner cartridge HL-1470N Approx. 9.3 kg (20.5 lbs.) including the drum unit and toner cartridge ♦ Other MODEL Power Consumption Noise Level Ecology HL-1230 HL-1440 Printing Less than 340 W at 25°C (77°F) Standby Less than 70 W at 25...

Users Manual - English
Page 116
P paper 1-8, A-6 jam 3-2 paper handling 6-5, A-4 paper jam 6-6 parallel cable 1-2 PCL printer driver 2-2 pick up roller 5-14 plain paper 1-11 power supply 1-6 print configuration 3-9 print media 1-8 print quality 2-4, 6-12 print server 4-7 print test sample page 3-7 printable area 1-10 printer driver 2-1, 2-8, A-3 processor A-2 R resolution A-1 S separator pad holder 5-14 ...
P paper 1-8, A-6 jam 3-2 paper handling 6-5, A-4 paper jam 6-6 parallel cable 1-2 PCL printer driver 2-2 pick up roller 5-14 plain paper 1-11 power supply 1-6 print configuration 3-9 print media 1-8 print quality 2-4, 6-12 print server 4-7 print test sample page 3-7 printable area 1-10 printer driver 2-1, 2-8, A-3 processor A-2 R resolution A-1 S separator pad holder 5-14 ...
Quick Setup Guide - English
Page 1
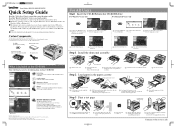
...toner evenly inside the assembly. 4 Install the drum unit assembly in PDF format. (Viewer included) Brother Solutions Center The Brother Solutions Center (http://solutions.brother.com) is not available on the HL-1440/1450 printers. ROM drive. Windows® Manual View the User's Guide and Network User's Guide in...Check that the test page printed correctly. Select the language you want . 1 Insert the CD-ROM into the AC outlet. 3 Turn the power switch on. 4 After the printer has finished warming up, the Ready LED stops blinking and stays lit. 5 Press the control panel button....
...toner evenly inside the assembly. 4 Install the drum unit assembly in PDF format. (Viewer included) Brother Solutions Center The Brother Solutions Center (http://solutions.brother.com) is not available on the HL-1440/1450 printers. ROM drive. Windows® Manual View the User's Guide and Network User's Guide in...Check that the test page printed correctly. Select the language you want . 1 Insert the CD-ROM into the AC outlet. 3 Turn the power switch on. 4 After the printer has finished warming up, the Ready LED stops blinking and stays lit. 5 Press the control panel button....


