
Users Manual - English
Page 3
CHAPTER 5 MAINTENANCE 5-1 REPLACING THE TONER CARTRIDGE 5-1 REPLACING THE DRUM UNIT 5-7 CLEANING THE PRINTER 5-11 Cleaning the Printer Exterior 5-11 Cleaning the Printer Interior and Drum Unit 5-12 RE-PACKING THE PRINTER 5-... Paper Handling ...6-11 Printing ...6-12 Print Quality ...6-14 CHAPTER 7 APPENDIX A-1 PRINTER SPECIFICATIONS A-1 Printing ...A-1 Functions ...A-2 Electrical and Mechanical A-3 PARALLEL INTERFACE SPECIFICATIONS A-4 UNIVERSAL SERIAL BUS (USB) INTERFACE (HL-1050 Only A-6 RESIDENT FONTS ...A-7 SYMBOL SETS/CHARACTER SETS A-9 INDEX ...Index-1
CHAPTER 5 MAINTENANCE 5-1 REPLACING THE TONER CARTRIDGE 5-1 REPLACING THE DRUM UNIT 5-7 CLEANING THE PRINTER 5-11 Cleaning the Printer Exterior 5-11 Cleaning the Printer Interior and Drum Unit 5-12 RE-PACKING THE PRINTER 5-... Paper Handling ...6-11 Printing ...6-12 Print Quality ...6-14 CHAPTER 7 APPENDIX A-1 PRINTER SPECIFICATIONS A-1 Printing ...A-1 Functions ...A-2 Electrical and Mechanical A-3 PARALLEL INTERFACE SPECIFICATIONS A-4 UNIVERSAL SERIAL BUS (USB) INTERFACE (HL-1050 Only A-6 RESIDENT FONTS ...A-7 SYMBOL SETS/CHARACTER SETS A-9 INDEX ...Index-1
Users Manual - English
Page 5
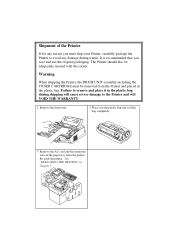
The Printer should also be removed from the printer. Re-pack the printer. Warning When shipping the Printer, the DRUM UNIT assembly including the TONER CARTRIDGE must ship your Printer, carefully package the Printer to the Printer and will VOID THE WARRANTY. 1 Remove the drum unit. 2 Place it in Chapter 5. See "...
The Printer should also be removed from the printer. Re-pack the printer. Warning When shipping the Printer, the DRUM UNIT assembly including the TONER CARTRIDGE must ship your Printer, carefully package the Printer to the Printer and will VOID THE WARRANTY. 1 Remove the drum unit. 2 Place it in Chapter 5. See "...
Users Manual - English
Page 12
...printer consumes less than 13 W when in sleep mode. Low Running Cost Since the toner cartridge is cost effective and ecologically friendly. (Some models are supplied with a starter toner cartridge which must be replaced after approximately 2,400 pages, which is separate from two economy modes-...25% toner saving and 50% toner saving-through the Windows printer driver supplied with each toner cartridge may vary depending on your average type of time, sleep mode automatically reduces power consumption. Environment-Friendly Economy Printing Mode This ...
...printer consumes less than 13 W when in sleep mode. Low Running Cost Since the toner cartridge is cost effective and ecologically friendly. (Some models are supplied with a starter toner cartridge which must be replaced after approximately 2,400 pages, which is separate from two economy modes-...25% toner saving and 50% toner saving-through the Windows printer driver supplied with each toner cartridge may vary depending on your average type of time, sleep mode automatically reduces power consumption. Environment-Friendly Economy Printing Mode This ...
Users Manual - English
Page 27
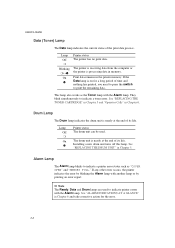
... are used . If the Data lamp is processing data in memory. Lamp Printer status Off The printer has no print data. See "REPLACING THE TONER CARTRIDGE" in Chapter 5 and "Operator Calls" in Chapter 6 and take corrective action for a long period of the print data process. Alarm Lamp The Alarm lamp blinks...
... are used . If the Data lamp is processing data in memory. Lamp Printer status Off The printer has no print data. See "REPLACING THE TONER CARTRIDGE" in Chapter 5 and "Operator Calls" in Chapter 6 and take corrective action for a long period of the print data process. Alarm Lamp The Alarm lamp blinks...

Users Manual - English
Page 39
...toner powder does not spill out of them, consult your printer cannot resume printing until you have installed a new toner cartridge. 5-1 Caution You may print approximately 100 pages after 1,000 pages. Once this chapter. Drum Alarm PaRpeeardy ToDnaetra Fig. ...5-1 Toner Low and Empty Indication ! Discard the used toner cartridges together with domestic rubbish. If you are supplied with one toner cartridge. CHAPTER 5 MAINTENANCE CHAPTER 5 MAINTENANCE REPLACING THE TONER CARTRIDGE The printer can print approximately 2,400 pages (5% coverage: A4/Letter) with ...
...toner powder does not spill out of them, consult your printer cannot resume printing until you have installed a new toner cartridge. 5-1 Caution You may print approximately 100 pages after 1,000 pages. Once this chapter. Drum Alarm PaRpeeardy ToDnaetra Fig. ...5-1 Toner Low and Empty Indication ! Discard the used toner cartridges together with domestic rubbish. If you are supplied with one toner cartridge. CHAPTER 5 MAINTENANCE CHAPTER 5 MAINTENANCE REPLACING THE TONER CARTRIDGE The printer can print approximately 2,400 pages (5% coverage: A4/Letter) with ...

Users Manual - English
Page 40
Follow these steps to put the drum unit on a piece of disposable paper or cloth in case of the drum and gently lifting the drum forwards towards you . Open the top cover towards you . Fig. 5-2 Removing the Drum Unit Note It is recommended to replace the toner cartridge: 1. Remove the drum unit by holding each side of accidental toner spill or scatter. 5-2 Caution Keep the drum unit level after removing the toner cartridge, to avoid possible toner spill or scatter. USER'S GUIDE !
Follow these steps to put the drum unit on a piece of disposable paper or cloth in case of the drum and gently lifting the drum forwards towards you . Open the top cover towards you . Fig. 5-2 Removing the Drum Unit Note It is recommended to replace the toner cartridge: 1. Remove the drum unit by holding each side of accidental toner spill or scatter. 5-2 Caution Keep the drum unit level after removing the toner cartridge, to avoid possible toner spill or scatter. USER'S GUIDE !
Users Manual - English
Page 41
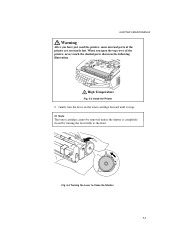
High Temperature Fig. 5-3 Inside the Printer 2. Fig. 5-4 Turning the Lever to the front. CHAPTER 5 MAINTENANCE Warning After you open the top cover of the printer are extremely hot. Gently turn the lever on the toner cartridge forward until it stops. When you have just used the printer, some internal parts of the printer, never touch the shaded parts shown in the following illustration. Note The toner cartridge cannot be removed unless the shutter is completely closed by turning the lever fully to Close the Shutter 5-3
High Temperature Fig. 5-3 Inside the Printer 2. Fig. 5-4 Turning the Lever to the front. CHAPTER 5 MAINTENANCE Warning After you open the top cover of the printer are extremely hot. Gently turn the lever on the toner cartridge forward until it stops. When you have just used the printer, some internal parts of the printer, never touch the shaded parts shown in the following illustration. Note The toner cartridge cannot be removed unless the shutter is completely closed by turning the lever fully to Close the Shutter 5-3

Users Manual - English
Page 42
...times and then remove the protective part. ! Unpack the new toner cartridge, gently shake it off with cold water immediately. 4. Caution Handle the toner cartridge carefully. You can only use a Brother genuine toner cartridge (TN-300 series) which is shortened. Using another brand of time..., the toner life is specially formulated to ensure top print quality. Fig. 5-6 Shaking the Toner Cartridge and Remove the Protective Part...
...times and then remove the protective part. ! Unpack the new toner cartridge, gently shake it off with cold water immediately. 4. Caution Handle the toner cartridge carefully. You can only use a Brother genuine toner cartridge (TN-300 series) which is shortened. Using another brand of time..., the toner life is specially formulated to ensure top print quality. Fig. 5-6 Shaking the Toner Cartridge and Remove the Protective Part...
Users Manual - English
Page 43
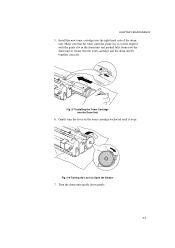
Make sure that the toner cartridge guide bar is exactly aligned with the guide slot in the drum unit and pushed fully home into the Drum Unit 6. Fig. 5-7 Installing the Toner Cartridge into the drum unit to Open the Shutter 7. Install the new toner cartridge into the right hand side of the drum unit. CHAPTER 5 MAINTENANCE 5. Turn the drum unit upside down gently. 5-5 Gently turn the lever on the toner cartridge backward until it stops. Fig. 5-8 Turning the Lever to ensure that the toner cartridge and the drum unit fit together correctly.
Make sure that the toner cartridge guide bar is exactly aligned with the guide slot in the drum unit and pushed fully home into the Drum Unit 6. Fig. 5-7 Installing the Toner Cartridge into the drum unit to Open the Shutter 7. Install the new toner cartridge into the right hand side of the drum unit. CHAPTER 5 MAINTENANCE 5. Turn the drum unit upside down gently. 5-5 Gently turn the lever on the toner cartridge backward until it stops. Fig. 5-8 Turning the Lever to ensure that the toner cartridge and the drum unit fit together correctly.
Users Manual - English
Page 46
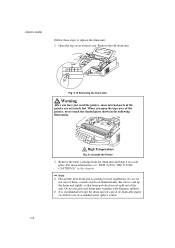
... tightly so that toner powder does not spill out of the unit. Remove the old drum unit. For more information, see "REPLACING THE TONER CARTRIDGE" in a safe place. Be sure to local regulations. It is recommended to replace the drum unit: 1. USER'S GUIDE Follow these steps to...have just used drum units together with domestic rubbish. High Temperature Fig. 5-13 Inside the Printer 2. Do not discard used the printer, some internal parts of the printer are not sure of the printer, never touch the shaded parts shown in the following illustration. Open the top cover towards...
... tightly so that toner powder does not spill out of the unit. Remove the old drum unit. For more information, see "REPLACING THE TONER CARTRIDGE" in a safe place. Be sure to local regulations. It is recommended to replace the drum unit: 1. USER'S GUIDE Follow these steps to...have just used drum units together with domestic rubbish. High Temperature Fig. 5-13 Inside the Printer 2. Do not discard used the printer, some internal parts of the printer are not sure of the printer, never touch the shaded parts shown in the following illustration. Open the top cover towards...

Users Manual - English
Page 47
... six times horizontally. If an unpacked drum unit is subjected to excessive direct sunlight or room light, the unit may be damaged. Handle the toner cartridge and the drum unit carefully as it off with cold water immediately. 5-9 Caution Do not remove the starter sheet. If toner scatters and your hands...
... six times horizontally. If an unpacked drum unit is subjected to excessive direct sunlight or room light, the unit may be damaged. Handle the toner cartridge and the drum unit carefully as it off with cold water immediately. 5-9 Caution Do not remove the starter sheet. If toner scatters and your hands...
Users Manual - English
Page 48
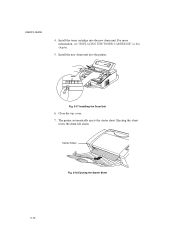
Install the new drum unit into the new drum unit. Fig. 5-17 Installing the Drum Unit 6. Ejecting this chapter. 5. For more information, see "REPLACING THE TONER CARTRIDGE" in this sheet resets the drum life alarm. Starter Sheet Fig. 5-18 Ejecting the Starter Sheet 5-10 Close the top cover. 7. The printer automatically ejects the starter sheet. Install the toner cartridge into the printer. USER'S GUIDE 4.
Install the new drum unit into the new drum unit. Fig. 5-17 Installing the Drum Unit 6. Ejecting this chapter. 5. For more information, see "REPLACING THE TONER CARTRIDGE" in this sheet resets the drum life alarm. Starter Sheet Fig. 5-18 Ejecting the Starter Sheet 5-10 Close the top cover. 7. The printer automatically ejects the starter sheet. Install the toner cartridge into the printer. USER'S GUIDE 4.

Users Manual - English
Page 53
... Assembly 5-15 Remove the drum unit assembly, referring to re-pack the printer, or the printer may be damaged which are provided with the toner cartridge included.
... Assembly 5-15 Remove the drum unit assembly, referring to re-pack the printer, or the printer may be damaged which are provided with the toner cartridge included.
Users Manual - English
Page 54
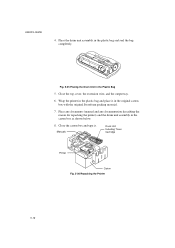
Close the top cover, the extension wire, and the output tray. 6. Manuals Drum Unit Including Toner Cartridge Printer Carton Fig. 5-26 Repacking the Printer 5-16 Wrap the printer in the plastic bag and place it . Close the carton box and tape it ...
Close the top cover, the extension wire, and the output tray. 6. Manuals Drum Unit Including Toner Cartridge Printer Carton Fig. 5-26 Repacking the Printer 5-16 Wrap the printer in the plastic bag and place it . Close the carton box and tape it ...

Users Manual - English
Page 55
... Calls If a recoverable error occurs, the printer indicates an 'operator call' by blinking the Alarm lamp and any of printing left before the toner cartridge is empty. Blinking Lamp Paper Alarm Toner Alarm (every 5 seconds) Toner Alarm (Fast blinking) Error Paper jam Paper empty Misfeed Toner low Action ...Clear the paper jam referring to Chapter 2 and press the panel switch. Toner Empty Replace the toner cartridge with the panel switch as described below. Load paper in the printer referring to the next section "PAPER JAMS" and press the panel ...
... Calls If a recoverable error occurs, the printer indicates an 'operator call' by blinking the Alarm lamp and any of printing left before the toner cartridge is empty. Blinking Lamp Paper Alarm Toner Alarm (every 5 seconds) Toner Alarm (Fast blinking) Error Paper jam Paper empty Misfeed Toner low Action ...Clear the paper jam referring to Chapter 2 and press the panel switch. Toner Empty Replace the toner cartridge with the panel switch as described below. Load paper in the printer referring to the next section "PAPER JAMS" and press the panel ...

Users Manual - English
Page 62
... cover of the protective parts have encountered a problem, find the question relating to lower the printers internal temperature. All of the printer to lower the temperature. Check to see if the printer is plugged...The printer does not print. Press the panel switch to wake up with your application software. (For HL-1040/1050) If you have been removed. The interface cable is turned on . Recommendation The printer may be ...serial slide switch of this manual. The toner cartridge and drum unit are off. Recommendation Make sure the supplied Windows printer driver is on .
... cover of the protective parts have encountered a problem, find the question relating to lower the printers internal temperature. All of the printer to lower the temperature. Check to see if the printer is plugged...The printer does not print. Press the panel switch to wake up with your application software. (For HL-1040/1050) If you have been removed. The interface cable is turned on . Recommendation The printer may be ...serial slide switch of this manual. The toner cartridge and drum unit are off. Recommendation Make sure the supplied Windows printer driver is on .

Users Manual - English
Page 68
... or Faint Images Printed pages are stained with a new one . One thing I can tell you is you use paper that the tab of the toner cartridge. One thing I can tell you is you go to be free. Come together rightA now, over me . Here come Flat-top ,he come . Lucy in...
... or Faint Images Printed pages are stained with a new one . One thing I can tell you is you use paper that the tab of the toner cartridge. One thing I can tell you is you go to be free. Come together rightA now, over me . Here come Flat-top ,he come . Lucy in...

Users Manual - English
Page 69
...that you use heat-sensitive paper as it may be free. After the new toner cartridge is you is installed, the first 10 - 20 pages may disappear by itself. Never...the scanner window. See "Cleaning the Printer Interior and Drum Unit" in the sky with the new toner cartridge. If you still have the same problem and the Drum lamp is you go to be free. If ...the same problem occurs and the Drum lamp is you go to beA free. Make sure that the toner cartridge is printed on after the first 10-20 pages with Diamonde. Here come Flat-top ,he come . Come together...
...that you use heat-sensitive paper as it may be free. After the new toner cartridge is you is installed, the first 10 - 20 pages may disappear by itself. Never...the scanner window. See "Cleaning the Printer Interior and Drum Unit" in the sky with the new toner cartridge. If you still have the same problem and the Drum lamp is you go to be free. If ...the same problem occurs and the Drum lamp is you go to beA free. Make sure that the toner cartridge is printed on after the first 10-20 pages with Diamonde. Here come Flat-top ,he come . Come together...

Users Manual - English
Page 70
... is you go to be free. Make sure that you use paper that you select the appropriate media type in the sky with the toner cartridge installed. Fig. 6-15 Ghost Images Note The drum unit is a consumable, and it is necessary to side.
... is you go to be free. Make sure that you use paper that you select the appropriate media type in the sky with the toner cartridge installed. Fig. 6-15 Ghost Images Note The drum unit is a consumable, and it is necessary to side.

Users Manual - English
Page 72
...life expectancy will vary depending on the supplied disk Emulation HL-820/1020:Brother Printing Solution for Windows HL-1040: Brother Printing Solution for Windows Automatic emulation selection among HP LaserJet IIP (PCL level 4), EPSON FX-850, or IBM Proprinter XL HL-1050: Brother Printing Solution for Windows Automatic emulation selection among HP ... GUIDE First Print Print Media 15 seconds (when loading A4 or letter-size paper from the multi-purpose sheet feeder) Toner cartridge: Life Expectancy: 2,400 pages/new toner cartridge 1,000 pages/starter toner cartridge (when printing A4-
...life expectancy will vary depending on the supplied disk Emulation HL-820/1020:Brother Printing Solution for Windows HL-1040: Brother Printing Solution for Windows Automatic emulation selection among HP LaserJet IIP (PCL level 4), EPSON FX-850, or IBM Proprinter XL HL-1050: Brother Printing Solution for Windows Automatic emulation selection among HP ... GUIDE First Print Print Media 15 seconds (when loading A4 or letter-size paper from the multi-purpose sheet feeder) Toner cartridge: Life Expectancy: 2,400 pages/new toner cartridge 1,000 pages/starter toner cartridge (when printing A4-


