
Users Manual - English
Page 7
... Accessory Items); 4 Consumable and Accessory Items that this Product was used outside the United States). What to do : After contacting Brother or a Brother Authorized Service Center, you may be free from defects in materials and workmanship, when used under normal conditions. „ This warranty...United States or if the product was purchased within the U.S. and, 6 Normal Periodic Maintenance Items, such as Paper Feeding Kit, Fuser and Laser Units. Brother® Color Laser One-Year On-Site Limited Warranty (USA only) Who is covered: „ This limited warranty ("warranty") ...
... Accessory Items); 4 Consumable and Accessory Items that this Product was used outside the United States). What to do : After contacting Brother or a Brother Authorized Service Center, you may be free from defects in materials and workmanship, when used under normal conditions. „ This warranty...United States or if the product was purchased within the U.S. and, 6 Normal Periodic Maintenance Items, such as Paper Feeding Kit, Fuser and Laser Units. Brother® Color Laser One-Year On-Site Limited Warranty (USA only) Who is covered: „ This limited warranty ("warranty") ...

Users Manual - English
Page 29
... serious jams or print problems. All labels used in 1 copy using Letter size paper. Labels should not exceed the paper weight specifications described in the fuser unit. Using labels with the carrier sheet exposed because your machine will print on most types of your machine. Adhesives should be exposed between the...
... serious jams or print problems. All labels used in 1 copy using Letter size paper. Labels should not exceed the paper weight specifications described in the fuser unit. Using labels with the carrier sheet exposed because your machine will print on most types of your machine. Adhesives should be exposed between the...

Users Manual - English
Page 38
... the machine is in sleep mode, there will be a short delay while the fuser warms up. LCD contrast 3 You can change the contrast to 240 minutes) before it goes into sleep mode. Press OK. While the machine is idle. a ...
... the machine is in sleep mode, there will be a short delay while the fuser warms up. LCD contrast 3 You can change the contrast to 240 minutes) before it goes into sleep mode. Press OK. While the machine is idle. a ...

Users Manual - English
Page 65
... cover of the machine under the document cover. 51 Please DO NOT remove or damage the label. When you have just used the machine, some internal parts of the machine will be careful not to put your hands on the edge of the machine, DO NOT touch the shaded parts shown... electrical shock. Safety and legal To use the machine safely A Please keep these instructions for later reference and read them before attempting any maintenance. The fuser unit is fully inserted. DO NOT handle the plug with a caution label.
... cover of the machine under the document cover. 51 Please DO NOT remove or damage the label. When you have just used the machine, some internal parts of the machine will be careful not to put your hands on the edge of the machine, DO NOT touch the shaded parts shown... electrical shock. Safety and legal To use the machine safely A Please keep these instructions for later reference and read them before attempting any maintenance. The fuser unit is fully inserted. DO NOT handle the plug with a caution label.
Users Manual - English
Page 85
... Put in a new drum unit. (See Replacing the drum unit on page 123.) „ The fuser unit may be damaged. ABCDEFGHIJKLMNOPQRSTUVWXYZ. 0123456789. ABCDEFGHIJKLMNOPQRSTUVWXYZ. 0123456789. abcdefghijklmnopqrstuvwxyz. abcdefghijklmnopqrstuvwxyz. abcdefghijklmnopqrstuvwxyz. Conditions such as high.... Recommendation „ One of the toner cartridges may have a smudge mark. ABCDEFGHIJKLMNOPQRSTUVWXYZ. 0123456789. Call Brother Customer Service at the home position (b). „ The drum unit may be damaged. abcdefghijklmnopqrstuvwxyz. abcdefghijklmnopqrstuvwxyz....
... Put in a new drum unit. (See Replacing the drum unit on page 123.) „ The fuser unit may be damaged. ABCDEFGHIJKLMNOPQRSTUVWXYZ. 0123456789. ABCDEFGHIJKLMNOPQRSTUVWXYZ. 0123456789. abcdefghijklmnopqrstuvwxyz. abcdefghijklmnopqrstuvwxyz. abcdefghijklmnopqrstuvwxyz. Conditions such as high.... Recommendation „ One of the toner cartridges may have a smudge mark. ABCDEFGHIJKLMNOPQRSTUVWXYZ. 0123456789. Call Brother Customer Service at the home position (b). „ The drum unit may be damaged. abcdefghijklmnopqrstuvwxyz. abcdefghijklmnopqrstuvwxyz....

Users Manual - English
Page 87
... belt unit on page 118.) ABCDEFGHIJKLMNOPQRSTUVWXYZ. 0123456789. Put in a new drum unit. (See Replacing the drum unit on page 123.) „ Make sure that the fuser unit is uneven and put in a new toner cartridge for the color causing the problem. (See Cleaning the corona wires on page 104.) If the...
... belt unit on page 118.) ABCDEFGHIJKLMNOPQRSTUVWXYZ. 0123456789. Put in a new drum unit. (See Replacing the drum unit on page 123.) „ Make sure that the fuser unit is uneven and put in a new toner cartridge for the color causing the problem. (See Cleaning the corona wires on page 104.) If the...

Users Manual - English
Page 89
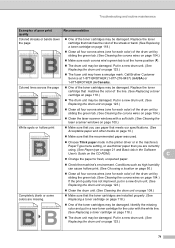
... „ Make sure that the back cover is closed properly. „ Make sure that paper is installed properly. „ Replace the fuser unit. ABCDEFGHIJKLMNOPQRSTUVWXYZ. 0123456789. Choose the Advanced tab, Device Options, Print Setting, and then check the Improve pattern printing or Imporve Thin Line ...with the white line. (See Replacing a toner cartridge on page 118.) „ The drum unit may be damaged. ABCDEFGHIJKLMNOPQRSTUVWXYZ. 0123456789. Call Brother Customer Service. „ Change to the recommended type of paper in the tray or rotate the paper 180° in a new drum ...
... „ Make sure that the back cover is closed properly. „ Make sure that paper is installed properly. „ Replace the fuser unit. ABCDEFGHIJKLMNOPQRSTUVWXYZ. 0123456789. Choose the Advanced tab, Device Options, Print Setting, and then check the Improve pattern printing or Imporve Thin Line ...with the white line. (See Replacing a toner cartridge on page 118.) „ The drum unit may be damaged. ABCDEFGHIJKLMNOPQRSTUVWXYZ. 0123456789. Call Brother Customer Service. „ Change to the recommended type of paper in the tray or rotate the paper 180° in a new drum ...

Users Manual - English
Page 90
...132; Make sure that you choose the proper media type in the printer driver or in the closed position. „ Call Brother Customer Service to the recommended type of poor print quality Offset image ABCDEFGHIJKLMNOPQRSTUVWXYZ. 0123456789. ABCDEFGHIJKLMNOPQRSTUVWXYZ. 0123456789. abcdefghijklmnopqrstuvwxyz. abcdefghijklmnopqrstuvwxyz. ABCDEFGHIJKLMNOPQRSTUVWXYZ. ...paper and other media on page 10.) „ Make sure that you use paper that the release lever of the fuser unit is in the machine's Paper Type menu setting. (See Acceptable paper and other media on page 10.) 76...
...132; Make sure that you choose the proper media type in the printer driver or in the closed position. „ Call Brother Customer Service to the recommended type of poor print quality Offset image ABCDEFGHIJKLMNOPQRSTUVWXYZ. 0123456789. ABCDEFGHIJKLMNOPQRSTUVWXYZ. 0123456789. abcdefghijklmnopqrstuvwxyz. abcdefghijklmnopqrstuvwxyz. ABCDEFGHIJKLMNOPQRSTUVWXYZ. ...paper and other media on page 10.) „ Make sure that you use paper that the release lever of the fuser unit is in the machine's Paper Type menu setting. (See Acceptable paper and other media on page 10.) 76...

Users Manual - English
Page 95
...purchase the laser unit. 81 Replace the belt unit. (See Replacing the belt unit on page 134.) „ If the problem continues, call your Brother dealer. then replace the drum unit with direct print or PictBridge. Press Menu, 6, 6, and then a or b to replace the belt unit. Reinsert... Use the drum unit until you have a print quality problem; Press OK and press 1 to replace the laser unit. Call your Brother dealer to replace the fuser unit. Calibrate Calibration failed. It is time to reset the drum unit counter. Wait a few seconds, then turn it back into the...
...purchase the laser unit. 81 Replace the belt unit. (See Replacing the belt unit on page 134.) „ If the problem continues, call your Brother dealer. then replace the drum unit with direct print or PictBridge. Press Menu, 6, 6, and then a or b to replace the belt unit. Reinsert... Use the drum unit until you have a print quality problem; Press OK and press 1 to replace the laser unit. Call your Brother dealer to replace the fuser unit. Calibrate Calibration failed. It is time to reset the drum unit counter. Wait a few seconds, then turn it back into the...
Users Manual - English
Page 96
...Clean the four corona wires on the drum unit. (See Cleaning the corona wires on again. Leave the machine temperature within specified time. Call your Brother dealer Service to purchase the PF Kit 2. Be ready to replace the waste toner box. (See Waste Toner Box Replacing the waste toner box on...you can hear the fan in the tray is not the correct size. The corona wires on again. Fuser Error The temperature of the drum unit or toner cartridge is too hot. Call your Brother dealer Service to purchase the PF Kit 1. Close the back cover of the machine. Change Parts PF...
...Clean the four corona wires on the drum unit. (See Cleaning the corona wires on again. Leave the machine temperature within specified time. Call your Brother dealer Service to purchase the PF Kit 2. Be ready to replace the waste toner box. (See Waste Toner Box Replacing the waste toner box on...you can hear the fan in the tray is not the correct size. The corona wires on again. Fuser Error The temperature of the drum unit or toner cartridge is too hot. Call your Brother dealer Service to purchase the PF Kit 1. Close the back cover of the machine. Change Parts PF...

Users Manual - English
Page 108
d Pull down the two green levers, one on the left-hand-side and one on the righthand-side, as shown in the illustration. 94 When you have just used the machine, some internal parts of the machine will be extremely hot. b Hold the green handle of the machine, DO NOT touch the shaded parts shown in the illustration below, and then fold down the fuser cover (1). c Open the back cover. 1 HOT SURFACE After you open the front or back cover of the drum unit. Lift the drum unit up and then pull it out until it stops.
d Pull down the two green levers, one on the left-hand-side and one on the righthand-side, as shown in the illustration. 94 When you have just used the machine, some internal parts of the machine will be extremely hot. b Hold the green handle of the machine, DO NOT touch the shaded parts shown in the illustration below, and then fold down the fuser cover (1). c Open the back cover. 1 HOT SURFACE After you open the front or back cover of the drum unit. Lift the drum unit up and then pull it out until it stops.

Users Manual - English
Page 109
h Put the drum unit and toner cartridge assembly back in the machine. C 1 95 f Close the fuser cover (1) and lift the two green levers at the left and right hand sides. Troubleshooting and routine maintenance g Close the back cover. e Using both hands, gently pull the jammed paper out of the fuser unit.
h Put the drum unit and toner cartridge assembly back in the machine. C 1 95 f Close the fuser cover (1) and lift the two green levers at the left and right hand sides. Troubleshooting and routine maintenance g Close the back cover. e Using both hands, gently pull the jammed paper out of the fuser unit.

Users Manual - English
Page 110
a Pull the paper tray completely out of the machine. Paper is not caught in at this point. c If the paper is jammed underneath Paper Tray 1 or in the fuser unit C If the LCD shows Jam Duplex, follow these steps: Jam Duplex Note DO NOT put the paper tray back in the paper tray, open the back cover. d Push the gray lever on the left hand side (1) to the right. 1 96 i Close the front cover of the machine and check inside the machine, check underneath the paper tray. b If paper is not caught inside the machine.
a Pull the paper tray completely out of the machine. Paper is not caught in at this point. c If the paper is jammed underneath Paper Tray 1 or in the fuser unit C If the LCD shows Jam Duplex, follow these steps: Jam Duplex Note DO NOT put the paper tray back in the paper tray, open the back cover. d Push the gray lever on the left hand side (1) to the right. 1 96 i Close the front cover of the machine and check inside the machine, check underneath the paper tray. b If paper is not caught inside the machine.

Users Manual - English
Page 131
.... These messages advise you that you will vary depending on Letter or A4 size paper. BU-100CL Change Parts Fuser Unit Fuser unit 80,000 pages 3 Call Brother Customer - Change Parts PF Kit MP Paper feeding kit MP (Paper pick-up roller and Separator pad for toner cartridges and a ...the LCD when the machine is installed) Paper feeding kit 2 (Paper pick-up roller and Separator pad for Tray 1) 100,000 pages 3 Call Brother Customer - If you have questions, call your local waste disposal office. Service to replace each of the consumable items as soon as possible, since...
.... These messages advise you that you will vary depending on Letter or A4 size paper. BU-100CL Change Parts Fuser Unit Fuser unit 80,000 pages 3 Call Brother Customer - Change Parts PF Kit MP Paper feeding kit MP (Paper pick-up roller and Separator pad for toner cartridges and a ...the LCD when the machine is installed) Paper feeding kit 2 (Paper pick-up roller and Separator pad for Tray 1) 100,000 pages 3 Call Brother Customer - If you have questions, call your local waste disposal office. Service to replace each of the consumable items as soon as possible, since...

Users Manual - English
Page 163
... ab or OK c Press a or b to choose the option for which you want to choose 1.Drum, 2.Belt Unit, 3.PF Kit MP, 4.PF Kit 1, 5.PF Kit 2 1, 6.Fuser or 7.Laser. c Press Stop/Exit. Checking the remaining life of parts C You can view the remaining life of a part will not be accurate only if...
... ab or OK c Press a or b to choose the option for which you want to choose 1.Drum, 2.Belt Unit, 3.PF Kit MP, 4.PF Kit 1, 5.PF Kit 2 1, 6.Fuser or 7.Laser. c Press Stop/Exit. Checking the remaining life of parts C You can view the remaining life of a part will not be accurate only if...

Users Manual - English
Page 174
... is installed.) 160 Main Menu 6.Machine Info. (continued) Submenu Menu Selections 4.User Settings - 5.Parts Life 1.Drum 2.Belt Unit 3.PF Kit MP 4.PF Kit 1 5.PF Kit 2 6.Fuser 7.Laser 6.Reset Menu - Page 24 You can print a list of a machine part's life that remains available. Resets the machine part's 123 life counter. Options - -
... is installed.) 160 Main Menu 6.Machine Info. (continued) Submenu Menu Selections 4.User Settings - 5.Parts Life 1.Drum 2.Belt Unit 3.PF Kit MP 4.PF Kit 1 5.PF Kit 2 6.Fuser 7.Laser 6.Reset Menu - Page 24 You can print a list of a machine part's life that remains available. Resets the machine part's 123 life counter. Options - -


