
Users Manual - English
Page 7
...not the Original Purchaser and the product that expired in accordance with a rated life; 5 Problems arising from other than an authorized Brother reseller in the United States or if the product was used (including but not limited to floor models or refurbished product), prior to your purchase you are... not limited to Toner Cartridges, Drum Unit, Belt Unit, and Waste Toner Box. „ Except as Paper Feeding Kit, Fuser and Laser Units. This limited warranty is VOID if this Product has been altered or modified in any way (...
...not the Original Purchaser and the product that expired in accordance with a rated life; 5 Problems arising from other than an authorized Brother reseller in the United States or if the product was used (including but not limited to floor models or refurbished product), prior to your purchase you are... not limited to Toner Cartridges, Drum Unit, Belt Unit, and Waste Toner Box. „ Except as Paper Feeding Kit, Fuser and Laser Units. This limited warranty is VOID if this Product has been altered or modified in any way (...

Users Manual - English
Page 29
... Fahrenheit (200 degrees centigrade) for a period of 0.1 seconds. Types of labels to the belt unit or rollers and cause jams and print quality problems. No adhesive should have an adhesive that is for a single copy or a 1 in the fuser unit. Loading paper and documents Labels 2 The machine will be able to your machine.
... Fahrenheit (200 degrees centigrade) for a period of 0.1 seconds. Types of labels to the belt unit or rollers and cause jams and print quality problems. No adhesive should have an adhesive that is for a single copy or a 1 in the fuser unit. Loading paper and documents Labels 2 The machine will be able to your machine.

Users Manual - English
Page 65
Always make sure you clean the inside the machine. Doing this might cause an electrical shock. The fuser unit is fully inserted. Before you have just used the machine, some internal parts of the machine, make sure the plug is marked with wet hands. Please DO NOT remove or damage the label. Safety and...
Always make sure you clean the inside the machine. Doing this might cause an electrical shock. The fuser unit is fully inserted. Before you have just used the machine, some internal parts of the machine, make sure the plug is marked with wet hands. Please DO NOT remove or damage the label. Safety and...
Users Manual - English
Page 85
... ABCDEFGHIJKLMNOPQRSTUVWXYZ. 0123456789. Put in a new drum unit. (See Replacing the drum unit on page 123.) „ The fuser unit may be damaged. abcdefghijklmnopqrstuvwxyz. abcdefghijklmnopqrstuvwxyz. abcdefghijklmnopqrstuvwxyz. ... a toner cartridge on page 118.) „ The drum unit may be damaged. ABCDEFGHIJKLMNOPQRSTUVWXYZ. 0123456789. ABCDEFGHIJKLMNOPQRSTUVWXYZ. 0123456789. Call Brother Customer Service at the home position (b). „ The drum unit may be damaged. ABCDEFGHIJKLMNOPQRSTUVWXYZ. 0123456789. abcdefghijklmnopqrstuvwxyz. Put in the...
... ABCDEFGHIJKLMNOPQRSTUVWXYZ. 0123456789. Put in a new drum unit. (See Replacing the drum unit on page 123.) „ The fuser unit may be damaged. abcdefghijklmnopqrstuvwxyz. abcdefghijklmnopqrstuvwxyz. abcdefghijklmnopqrstuvwxyz. ... a toner cartridge on page 118.) „ The drum unit may be damaged. ABCDEFGHIJKLMNOPQRSTUVWXYZ. 0123456789. ABCDEFGHIJKLMNOPQRSTUVWXYZ. 0123456789. Call Brother Customer Service at the home position (b). „ The drum unit may be damaged. ABCDEFGHIJKLMNOPQRSTUVWXYZ. 0123456789. abcdefghijklmnopqrstuvwxyz. Put in the...

Users Manual - English
Page 87
... quality has not improved, put in a new drum unit. (See Replacing the drum unit on page 123.) „ Make sure that the fuser unit is installed properly. (See Replacing the belt unit on page 123.) „ Make sure that the drum unit is installed properly. (See Replacing the drum unit on page 129.) „ Perform the calibration...
... quality has not improved, put in a new drum unit. (See Replacing the drum unit on page 123.) „ Make sure that the fuser unit is installed properly. (See Replacing the belt unit on page 123.) „ Make sure that the drum unit is installed properly. (See Replacing the drum unit on page 129.) „ Perform the calibration...

Users Manual - English
Page 89
... in the input tray. „ Make sure that the drum unit is installed properly. (See Replacing the drum unit on page 123.) C „ Make sure that the fuser unit is installed properly. (See Replacing the drum unit on page 123.) „ One of paper. (See Recommended paper... Imporve Thin Line boxes. „ Change to the recommended type of the toner cartridges may be damaged. ABCDEFGHIJKLMNOPQRSTUVWXYZ. 0123456789. abcdefghijklmnopqrstuvwxyz. Call Brother Customer Service. „ Change to the recommended type of paper. (See Recommended paper on page 10.) „ Check the paper type...
... in the input tray. „ Make sure that the drum unit is installed properly. (See Replacing the drum unit on page 123.) C „ Make sure that the fuser unit is installed properly. (See Replacing the drum unit on page 123.) „ One of paper. (See Recommended paper... Imporve Thin Line boxes. „ Change to the recommended type of the toner cartridges may be damaged. ABCDEFGHIJKLMNOPQRSTUVWXYZ. 0123456789. abcdefghijklmnopqrstuvwxyz. Call Brother Customer Service. „ Change to the recommended type of paper. (See Recommended paper on page 10.) „ Check the paper type...

Users Manual - English
Page 90
... page 123.) „ Make sure that you use paper that the release lever of the fuser unit is in the closed position. „ Call Brother Customer Service to replace the fuser unit. „ Choose Thick paper mode in the printer driver or in the machine's Paper Type menu setting. (See Paper type on page 21... paper and other media on thick paper Recommendation „ Check the machine's environment. Examples of paper. (See Recommended paper on page 10.) „ The drum unit may be damaged. abcdefghijklmnopqrstuvwxyz.
... page 123.) „ Make sure that you use paper that the release lever of the fuser unit is in the closed position. „ Call Brother Customer Service to replace the fuser unit. „ Choose Thick paper mode in the printer driver or in the machine's Paper Type menu setting. (See Paper type on page 21... paper and other media on thick paper Recommendation „ Check the machine's environment. Examples of paper. (See Recommended paper on page 10.) „ The drum unit may be damaged. abcdefghijklmnopqrstuvwxyz.

Users Manual - English
Page 95
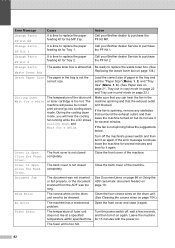
...box. (See Replacing the waste toner box on page 123.) The drum unit counter was not reset when a new drum was installed. Press Menu, 6, 6, and then a or b to purchase the fuser unit. Call your Brother dealer to choose Drum. Troubleshooting and routine maintenance Error and maintenance messages C... new one of its life. Call your Brother dealer. Calibrate Calibration failed. Press Black Start or Color Start and try to replace the fuser unit. Press OK and press 1 to purchase the laser unit. 81 Do one . (See Replacing the drum unit on page 134.) „ If the ...
...box. (See Replacing the waste toner box on page 123.) The drum unit counter was not reset when a new drum was installed. Press Menu, 6, 6, and then a or b to purchase the fuser unit. Call your Brother dealer to choose Drum. Troubleshooting and routine maintenance Error and maintenance messages C... new one of its life. Call your Brother dealer. Calibrate Calibration failed. Press Black Start or Color Start and try to replace the fuser unit. Press OK and press 1 to purchase the laser unit. 81 Do one . (See Replacing the drum unit on page 134.) „ If the ...
Users Manual - English
Page 96
... Service to purchase the PF Kit 2. Call your Brother dealer to replace the paper feeding kit for Tray 1. Load the correct size of paper in the tray and set the "...is not closed completely. for 15 minutes with the power on page 22.) Cooling Down Wait for a while The temperature of fuser unit Turn the power switch off the machine's power switch and then turn it again. Make sure that you will pause its ... temperature within specified time. During the cooling down mode. If the fan is almost full. Call your Brother dealer Service to purchase the PF Kit 1.
... Service to purchase the PF Kit 2. Call your Brother dealer to replace the paper feeding kit for Tray 1. Load the correct size of paper in the tray and set the "...is not closed completely. for 15 minutes with the power on page 22.) Cooling Down Wait for a while The temperature of fuser unit Turn the power switch off the machine's power switch and then turn it again. Make sure that you will pause its ... temperature within specified time. During the cooling down mode. If the fan is almost full. Call your Brother dealer Service to purchase the PF Kit 1.

Users Manual - English
Page 108
When you have just used the machine, some internal parts of the machine will be extremely hot. c Open the back cover. 1 HOT SURFACE After you open the front or back cover of the drum unit. d Pull down the fuser cover (1). b Hold the green handle of the machine, DO NOT touch the shaded parts shown in the illustration below, and then fold down the two green levers, one on the left-hand-side and one on the righthand-side, as shown in the illustration. 94 Lift the drum unit up and then pull it out until it stops.
When you have just used the machine, some internal parts of the machine will be extremely hot. c Open the back cover. 1 HOT SURFACE After you open the front or back cover of the drum unit. d Pull down the fuser cover (1). b Hold the green handle of the machine, DO NOT touch the shaded parts shown in the illustration below, and then fold down the two green levers, one on the left-hand-side and one on the righthand-side, as shown in the illustration. 94 Lift the drum unit up and then pull it out until it stops.

Users Manual - English
Page 109
Troubleshooting and routine maintenance g Close the back cover. h Put the drum unit and toner cartridge assembly back in the machine. e Using both hands, gently pull the jammed paper out of the fuser unit. f Close the fuser cover (1) and lift the two green levers at the left and right hand sides. C 1 95
Troubleshooting and routine maintenance g Close the back cover. h Put the drum unit and toner cartridge assembly back in the machine. e Using both hands, gently pull the jammed paper out of the fuser unit. f Close the fuser cover (1) and lift the two green levers at the left and right hand sides. C 1 95

Users Manual - English
Page 110
c If the paper is not caught inside the machine. b If paper is not caught in at this point. a Pull the paper tray completely out of the machine. Paper is jammed underneath Paper Tray 1 or in the fuser unit C If the LCD shows Jam Duplex, follow these steps: Jam Duplex Note DO NOT put the paper tray back in the paper tray, open the back cover. d Push the gray lever on the left hand side (1) to the right. 1 96 i Close the front cover of the machine and check inside the machine, check underneath the paper tray.
c If the paper is not caught inside the machine. b If paper is not caught in at this point. a Pull the paper tray completely out of the machine. Paper is jammed underneath Paper Tray 1 or in the fuser unit C If the LCD shows Jam Duplex, follow these steps: Jam Duplex Note DO NOT put the paper tray back in the paper tray, open the back cover. d Push the gray lever on the left hand side (1) to the right. 1 96 i Close the front cover of the machine and check inside the machine, check underneath the paper tray.

Users Manual - English
Page 131
... Paper feeding kit MP (Paper pick-up roller and Separator pad for 50,000 pages 3 Call Brother Customer - BU-100CL Change Parts Fuser Unit Fuser unit 80,000 pages 3 Call Brother Customer - Change Parts Laser Unit Laser unit 100,000 pages 3 Call Brother Customer - Change Parts PF Kit 2 (when the optional lower tray is based on an average 5% coverage...
... Paper feeding kit MP (Paper pick-up roller and Separator pad for 50,000 pages 3 Call Brother Customer - BU-100CL Change Parts Fuser Unit Fuser unit 80,000 pages 3 Call Brother Customer - Change Parts Laser Unit Laser unit 100,000 pages 3 Call Brother Customer - Change Parts PF Kit 2 (when the optional lower tray is based on an average 5% coverage...

Users Manual - English
Page 163
... b Print :XXXXXX Select ab or OK c Press a or b to choose the option for which you want to choose 1.Drum, 2.Belt Unit, 3.PF Kit MP, 4.PF Kit 1, 5.PF Kit 2 1, 6.Fuser or 7.Laser. Checking the remaining life of parts C You can view the remaining life of the used part. 149 c Press Stop/Exit... C Checking the serial number C You can see the machine's page counters for color and black & white. a Press Menu, 6, 5. 65.Parts Life 1.Drum 2.Belt Unit 3.PF Kit MP Select ab or OK b Press a or b to see the machine's page counters for printed pages, copies, reports and lists or a summary total...
... b Print :XXXXXX Select ab or OK c Press a or b to choose the option for which you want to choose 1.Drum, 2.Belt Unit, 3.PF Kit MP, 4.PF Kit 1, 5.PF Kit 2 1, 6.Fuser or 7.Laser. Checking the remaining life of parts C You can view the remaining life of the used part. 149 c Press Stop/Exit... C Checking the serial number C You can see the machine's page counters for color and black & white. a Press Menu, 6, 5. 65.Parts Life 1.Drum 2.Belt Unit 3.PF Kit MP Select ab or OK b Press a or b to see the machine's page counters for printed pages, copies, reports and lists or a summary total...

Users Manual - English
Page 174
... part's 123 life counter. Main Menu 6.Machine Info. (continued) Submenu Menu Selections 4.User Settings - 5.Parts Life 1.Drum 2.Belt Unit 3.PF Kit MP 4.PF Kit 1 5.PF Kit 2 6.Fuser 7.Laser 6.Reset Menu - Options - - Drum Belt Unit PF Kit MP PF Kit 1 PF Kit 2 Descriptions You can check the 149 percentage of your settings including the...
... part's 123 life counter. Main Menu 6.Machine Info. (continued) Submenu Menu Selections 4.User Settings - 5.Parts Life 1.Drum 2.Belt Unit 3.PF Kit MP 4.PF Kit 1 5.PF Kit 2 6.Fuser 7.Laser 6.Reset Menu - Options - - Drum Belt Unit PF Kit MP PF Kit 1 PF Kit 2 Descriptions You can check the 149 percentage of your settings including the...


