
Users Manual - English
Page 9
...WARRANTY (Canada only) For a limited on-site warranty of 1 year labour and parts from the date of purchase, Brother International Corporation (Canada) Ltd. ("Brother"), or its Authorized Service Centres, Distributors, Dealers, Agents or employees, shall create another warranty or modify this Laser Printer/...lost profits, arising from the use of or inability to use of your nearest Authorized Service Centre call 1-877-Brother. This limited Warranty does not include cleaning, consumables (including, without limitation, toner cartridges and drum units, OPC belts, fixing units, print heads, paper...
...WARRANTY (Canada only) For a limited on-site warranty of 1 year labour and parts from the date of purchase, Brother International Corporation (Canada) Ltd. ("Brother"), or its Authorized Service Centres, Distributors, Dealers, Agents or employees, shall create another warranty or modify this Laser Printer/...lost profits, arising from the use of or inability to use of your nearest Authorized Service Centre call 1-877-Brother. This limited Warranty does not include cleaning, consumables (including, without limitation, toner cartridges and drum units, OPC belts, fixing units, print heads, paper...

Users Manual - English
Page 12
... quality 70 Error and maintenance messages 81 Document jams 86 Paper jams ...87 Routine maintenance 98 Cleaning the outside of the machine 98 Cleaning the scanner 99 Cleaning the laser scanner windows 100 Cleaning the corona wires 104 Cleaning the drum unit 108 Replacing the consumable items 115 Replacing a toner cartridge 118 Replacing the drum...
... quality 70 Error and maintenance messages 81 Document jams 86 Paper jams ...87 Routine maintenance 98 Cleaning the outside of the machine 98 Cleaning the scanner 99 Cleaning the laser scanner windows 100 Cleaning the corona wires 104 Cleaning the drum unit 108 Replacing the consumable items 115 Replacing a toner cartridge 118 Replacing the drum...

Users Manual - English
Page 44
... Black Start or Color Start. 5 Making copies 5 How to copy 5 LCD display for 30 to 40 seconds until the machine finishes the color registration and cleaning process of copies (up to 99). b Press Black Start or Color Start.
... Black Start or Color Start. 5 Making copies 5 How to copy 5 LCD display for 30 to 40 seconds until the machine finishes the color registration and cleaning process of copies (up to 99). b Press Black Start or Color Start.

Users Manual - English
Page 65
Safety and legal To use the machine safely A Please keep these instructions for later reference and read them before attempting any maintenance. Before you clean the inside the machine. Doing this might cause an electrical shock. When you open the front or back cover of the machine, make sure the ... high voltage electrodes inside of the machine, DO NOT touch the shaded parts shown in the illustration. A After you have just used the machine, some internal parts of the machine under the document cover. 51
Safety and legal To use the machine safely A Please keep these instructions for later reference and read them before attempting any maintenance. Before you clean the inside the machine. Doing this might cause an electrical shock. When you open the front or back cover of the machine, make sure the ... high voltage electrodes inside of the machine, DO NOT touch the shaded parts shown in the illustration. A After you have just used the machine, some internal parts of the machine under the document cover. 51

Users Manual - English
Page 66
... you move the machine, grasp the side hand holds that is easily accessible. In case of an emergency, you use a vacuum cleaner to clean the machine. DO NOT use at the bottom of the machine. DO NOT carry the machine by holding scanner unit. Doing this might cause ...the toner dust to ignite inside or outside of it according to clean the inside the vacuum cleaner, potentially starting a fire. Please carefully clean the toner dust with a dry, lint-free cloth and dispose of the machine. To prevent injuries when moving...
... you move the machine, grasp the side hand holds that is easily accessible. In case of an emergency, you use a vacuum cleaner to clean the machine. DO NOT use at the bottom of the machine. DO NOT carry the machine by holding scanner unit. Doing this might cause ...the toner dust to ignite inside or outside of it according to clean the inside the vacuum cleaner, potentially starting a fire. Please carefully clean the toner dust with a dry, lint-free cloth and dispose of the machine. To prevent injuries when moving...

Users Manual - English
Page 70
...all warnings and instructions marked on the product. 4 Unplug this product on an unstable cart, stand, or table. Manufactured: BROTHER TECHNOLOGY (SHENZHEN) LTD. Internal laser radiation Max. Food and Drug Administration (FDA) has implemented regulations for later reference. 3 Follow all of these openings ... reliable operation of procedures other similar surface. DO NOT connect it to protect it from the wall outlet before cleaning inside of the machine indicates compliance with FDA performance standards for laser products except for ventilation. If you are provided...
...all warnings and instructions marked on the product. 4 Unplug this product on an unstable cart, stand, or table. Manufactured: BROTHER TECHNOLOGY (SHENZHEN) LTD. Internal laser radiation Max. Food and Drug Administration (FDA) has implemented regulations for later reference. 3 Follow all of these openings ... reliable operation of procedures other similar surface. DO NOT connect it to protect it from the wall outlet before cleaning inside of the machine indicates compliance with FDA performance standards for laser products except for ventilation. If you are provided...

Users Manual - English
Page 78
... you must be made from within that country. Visit us at http://solutions.brother.com. C Troubleshooting and routine maintenance C Troubleshooting C IMPORTANT For technical help , the Brother Solutions Center offers the latest FAQs and troubleshooting tips. Calls must call the country... where you bought the machine. Suggestions Black vertical lines on copies are having difficulty with your machine C If you are typically caused by yourself. If you think there is dirty. (See Cleaning...
... you must be made from within that country. Visit us at http://solutions.brother.com. C Troubleshooting and routine maintenance C Troubleshooting C IMPORTANT For technical help , the Brother Solutions Center offers the latest FAQs and troubleshooting tips. Calls must call the country... where you bought the machine. Suggestions Black vertical lines on copies are having difficulty with your machine C If you are typically caused by yourself. If you think there is dirty. (See Cleaning...
Users Manual - English
Page 84
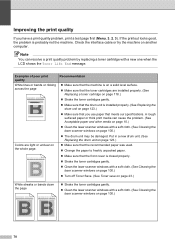
... rough surfaced paper or thick print media can resolve a print quality problem by replacing a toner cartridge with a soft cloth. (See Cleaning the laser scanner windows on page 123.) „ Make sure that you have a print quality problem, print a test page first (...Replacing the drum unit on the whole page. ABCDEFGHIJKLMNOPQRSTUVWXYZ. 0123456789. abcdefghijklmnopqrstuvwxyz. „ Shake the toner cartridges gently. „ Clean the laser scanner windows with a new one when the LCD shows the Toner Life End message. ABCDEFGHIJKLMNOPQRSTUVWXYZ. 0123456789. ABCDEFGHIJKLMNOPQRSTUVWXYZ. ...
... rough surfaced paper or thick print media can resolve a print quality problem by replacing a toner cartridge with a soft cloth. (See Cleaning the laser scanner windows on page 123.) „ Make sure that you have a print quality problem, print a test page first (...Replacing the drum unit on the whole page. ABCDEFGHIJKLMNOPQRSTUVWXYZ. 0123456789. abcdefghijklmnopqrstuvwxyz. „ Shake the toner cartridges gently. „ Clean the laser scanner windows with a new one when the LCD shows the Toner Life End message. ABCDEFGHIJKLMNOPQRSTUVWXYZ. 0123456789. ABCDEFGHIJKLMNOPQRSTUVWXYZ. ...
Users Manual - English
Page 85
... color of the streak or band. (See Replacing a toner cartridge on page 118.) „ Clean all four corona wires (one for each corona wire's green tab is at 1-877-BROTHER (1-877-276-8437) (in USA) or 1-877-BROTHER (in the Software User's Guide on page 118.) „ The drum unit may be damaged...
... color of the streak or band. (See Replacing a toner cartridge on page 118.) „ Clean all four corona wires (one for each corona wire's green tab is at 1-877-BROTHER (1-877-276-8437) (in USA) or 1-877-BROTHER (in the Software User's Guide on page 118.) „ The drum unit may be damaged...

Users Manual - English
Page 86
... (See Making multiple copies on page 30.) c If you still see the spots on printed documents after making multiple copies, clean the drum unit (See Cleaning the drum unit on page 50.) „ Make sure that you use paper that meets our specifications. (See Acceptable paper and...toner cartridge for the color causing the problem. (See Replacing a toner cartridge on page 118.) „ Clean the corona wires and the drum unit for the color causing the problem. (See Cleaning the corona wires on page 104.) If the print quality has not improved, put in . abcdefghijklmnopqrstuvwxyz. ...
... (See Making multiple copies on page 30.) c If you still see the spots on printed documents after making multiple copies, clean the drum unit (See Cleaning the drum unit on page 50.) „ Make sure that you use paper that meets our specifications. (See Acceptable paper and...toner cartridge for the color causing the problem. (See Replacing a toner cartridge on page 118.) „ Clean the corona wires and the drum unit for the color causing the problem. (See Cleaning the corona wires on page 104.) If the print quality has not improved, put in . abcdefghijklmnopqrstuvwxyz. ...

Users Manual - English
Page 87
... 10 and Basic tab in the Software User's Guide on page 123.) The color of the drum unit for the color causing the problem. (See Cleaning the corona wires on page 104.) If the print quality has not improved, put in a new toner cartridge for that color. (See Replacing a toner ...; Perform the calibration by using the control panel. Put in a new belt unit. (See Replacing the belt unit on page 129.) All one color „ Clean the corona wires of your monitor. „ Make sure that you use paper that the toner cartridges are different. Press Menu, 3, 6. b Press 1 to select Calibrate...
... 10 and Basic tab in the Software User's Guide on page 123.) The color of the drum unit for the color causing the problem. (See Cleaning the corona wires on page 104.) If the print quality has not improved, put in a new toner cartridge for that color. (See Replacing a toner ...; Perform the calibration by using the control panel. Put in a new belt unit. (See Replacing the belt unit on page 129.) All one color „ Clean the corona wires of your monitor. „ Make sure that you use paper that the toner cartridges are different. Press Menu, 3, 6. b Press 1 to select Calibrate...

Users Manual - English
Page 94
... spill or scatter toner. ABCDEFGHIJKLMNOPQRSTUVWXYZ. 0123456789. DO NOT touch the surface of the drum unit and turn the drum unit over. Wipe the toner on a clean, flat surface with a piece of disposable paper underneath them in case you place the drum unit and toner cartridges on the edge of duplex pages...
... spill or scatter toner. ABCDEFGHIJKLMNOPQRSTUVWXYZ. 0123456789. DO NOT touch the surface of the drum unit and turn the drum unit over. Wipe the toner on a clean, flat surface with a piece of disposable paper underneath them in case you place the drum unit and toner cartridges on the edge of duplex pages...
Users Manual - English
Page 96
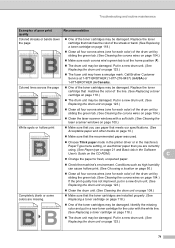
...properly, or the document scanned from the ADF was too long. The corona wires on again. Leave the machine temperature within specified time. Call your Brother dealer to replace the paper feeding kit for Tray 1. Change Parts The waste toner box is not spinning follow the suggestions below. Turn off ,... several minutes. Error Message Cause Action Change Parts PF Kit MP It is time to purchase the PF Kit MP. Call your Brother dealer Service to be cleaned. The machine will pause its current print job and go into cooling down mode, you can hear the fan in print mode ...
...properly, or the document scanned from the ADF was too long. The corona wires on again. Leave the machine temperature within specified time. Call your Brother dealer to replace the paper feeding kit for Tray 1. Change Parts The waste toner box is not spinning follow the suggestions below. Turn off ,... several minutes. Error Message Cause Action Change Parts PF Kit MP It is time to purchase the PF Kit MP. Call your Brother dealer Service to be cleaned. The machine will pause its current print job and go into cooling down mode, you can hear the fan in print mode ...

Users Manual - English
Page 105
CAUTION Hold the handles of disposable paper underneath it in the illustration. We recommend that you place the drum unit on a clean, flat surface with the toner cartridge and drum unit assembly, or this may release the paper so you carry it out of the drum unit. C ...
CAUTION Hold the handles of disposable paper underneath it in the illustration. We recommend that you place the drum unit on a clean, flat surface with the toner cartridge and drum unit assembly, or this may release the paper so you carry it out of the drum unit. C ...

Users Manual - English
Page 112
... that is stuck inside or outside of the machine. Clean the outside of the machine C CAUTION Use neutral detergents. Cleaning the outside of spray to clean the inside the paper tray. 98 DO NOT use isopropyl alcohol to remove dust. b Pull the paper tray completely out of the machine with a dry, ... machine as thinner or benzine will damage the outside of the machine. If toner scatters on page 56.) c Wipe the outside surface of the machine. Cleaning with volatile liquids such as follows: C a Turn off with cold water at once.
... that is stuck inside or outside of the machine. Clean the outside of the machine C CAUTION Use neutral detergents. Cleaning the outside of spray to clean the inside the paper tray. 98 DO NOT use isopropyl alcohol to remove dust. b Pull the paper tray completely out of the machine with a dry, ... machine as thinner or benzine will damage the outside of the machine. If toner scatters on page 56.) c Wipe the outside surface of the machine. Cleaning with volatile liquids such as follows: C a Turn off with cold water at once.

Users Manual - English
Page 113
... a non-flammable glass cleaner. 1 f Re-load the paper and put the paper tray firmly back in the machine. Note In addition to cleaning the scanner glass and glass strip with a non-flammable glass cleaner, run your finger tip over the glass to see if you feel anything on... scanner glass strip (2) underneath it . g Plug the machine's power cord back into the AC power outlet first, and reconnect all cables.Turn on that area. Clean the white plastic surface (2) and scanner glass (3) underneath it with a soft lint-free cloth moistened with a non-flammable glass cleaner. 1 2 3 2 d Plug the ...
... a non-flammable glass cleaner. 1 f Re-load the paper and put the paper tray firmly back in the machine. Note In addition to cleaning the scanner glass and glass strip with a non-flammable glass cleaner, run your finger tip over the glass to see if you feel anything on... scanner glass strip (2) underneath it . g Plug the machine's power cord back into the AC power outlet first, and reconnect all cables.Turn on that area. Clean the white plastic surface (2) and scanner glass (3) underneath it with a soft lint-free cloth moistened with a non-flammable glass cleaner. 1 2 3 2 d Plug the ...

Users Manual - English
Page 114
Cleaning the laser scanner windows C CAUTION DO NOT use isopropyl alcohol to clean the laser scanner windows. Disconnect all cables, and then unplug the power cord from the AC power outlet. b Press the front cover release button and then open the front cover. 100 Lift the drum unit up and then pull it out until it stops. a Turn off the machine's power switch. DO NOT touch the laser scanner windows with your fingers. c Hold the green handle of the drum unit.
Cleaning the laser scanner windows C CAUTION DO NOT use isopropyl alcohol to clean the laser scanner windows. Disconnect all cables, and then unplug the power cord from the AC power outlet. b Press the front cover release button and then open the front cover. 100 Lift the drum unit up and then pull it out until it stops. a Turn off the machine's power switch. DO NOT touch the laser scanner windows with your fingers. c Hold the green handle of the drum unit.

Users Manual - English
Page 116
To prevent damage to the machine from static electricity, DO NOT touch the 1 electrodes shown in case you place the drum unit on a clean, flat surface with a dry, lint-free cloth. e Wipe the scanner windows (1) with a piece of disposable paper underneath it . We recommend that you accidentally spill or scatter toner. CAUTION Hold the handles of drum unit when you carry it in the illustration. 102 DO NOT hold the sides of the drum unit.
To prevent damage to the machine from static electricity, DO NOT touch the 1 electrodes shown in case you place the drum unit on a clean, flat surface with a dry, lint-free cloth. e Wipe the scanner windows (1) with a piece of disposable paper underneath it . We recommend that you accidentally spill or scatter toner. CAUTION Hold the handles of drum unit when you carry it in the illustration. 102 DO NOT hold the sides of the drum unit.

Users Manual - English
Page 118
Disconnect all cables.Turn on the machine's power switch. 104 Cleaning the corona wires C If you have print quality problems, clean the corona wires as follows: a Turn off the machine's power switch. b Press the front cover release button and then open the front cover. g Close the front cover of the machine. h Plug the machine's power cord back into the AC power outlet first, and reconnect all cables, and then unplug the power cord from the AC power outlet. 2 Push the drum unit in until it stops.
Disconnect all cables.Turn on the machine's power switch. 104 Cleaning the corona wires C If you have print quality problems, clean the corona wires as follows: a Turn off the machine's power switch. b Press the front cover release button and then open the front cover. g Close the front cover of the machine. h Plug the machine's power cord back into the AC power outlet first, and reconnect all cables, and then unplug the power cord from the AC power outlet. 2 Push the drum unit in until it stops.

Users Manual - English
Page 119
... then pull it out until it in case you accidentally spill or scatter toner. It could explode, resulting in the illustrations. If toner scatters on a clean, flat surface with cold water at once. To avoid print quality problems, DO NOT touch the shaded parts shown in injuries. C 105 d Hold the handle...
... then pull it out until it in case you accidentally spill or scatter toner. It could explode, resulting in the illustrations. If toner scatters on a clean, flat surface with cold water at once. To avoid print quality problems, DO NOT touch the shaded parts shown in injuries. C 105 d Hold the handle...


