Users Manual - English
Page 78
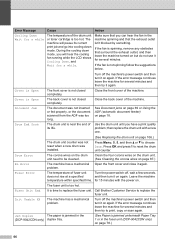
...(automatic document feeder) on page 78.) 66 Press Menu, 5, 5, and then a or b to reset the drum unit counter. If the fan is too hot. Close the front cover of the machine. Document Jam The... it for several minutes and then try it again. Jam Duplex The paper is jammed in the (DCP-9042CDN only) duplex tray. (See Paper is time to be cleaned. Error Message Cause Action Cooling...not rise at a specified and then turn it on again. Call Brother Customer Service to print, copy or scan again. then replace the drum unit with the power on. The fuser unit is not spinning follow...
...(automatic document feeder) on page 78.) 66 Press Menu, 5, 5, and then a or b to reset the drum unit counter. If the fan is too hot. Close the front cover of the machine. Document Jam The... it for several minutes and then try it again. Jam Duplex The paper is jammed in the (DCP-9042CDN only) duplex tray. (See Paper is time to be cleaned. Error Message Cause Action Cooling...not rise at a specified and then turn it on again. Call Brother Customer Service to print, copy or scan again. then replace the drum unit with the power on. The fuser unit is not spinning follow...
Users Manual - English
Page 124
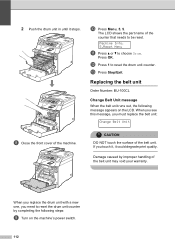
...stops. Press OK. The LCD shows the part name of the belt unit. l Press 1 to choose Drum. CAUTION DO NOT touch the surface of the counter that needs to reset the drum unit counter by improper handling of the machine. m Press Stop/Exit. Replacing the belt unit C Order ...i Turn on the LCD. Damage caused by completing the following message appears on the machine's power switch. 112 Machine Info. 5.Reset Menu k Press a or b to reset the drum unit counter. 2 Push the drum unit in until it could degrade print quality. When you see this message, you need to be...
...stops. Press OK. The LCD shows the part name of the belt unit. l Press 1 to choose Drum. CAUTION DO NOT touch the surface of the counter that needs to reset the drum unit counter by improper handling of the machine. m Press Stop/Exit. Replacing the belt unit C Order ...i Turn on the LCD. Damage caused by completing the following message appears on the machine's power switch. 112 Machine Info. 5.Reset Menu k Press a or b to reset the drum unit counter. 2 Push the drum unit in until it could degrade print quality. When you see this message, you need to be...
Users Manual - English
Page 129
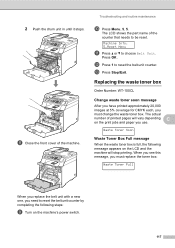
2 Push the drum unit in until it stops. Machine Info. 5.Reset Menu k Press a or b to reset the belt unit counter. l Press 1 to choose Belt Unit. Replacing the... the toner box: Waste Toner Full When you replace the belt unit with a new one, you need to be reset. Troubleshooting and routine maintenance j Press Menu, 5, 5. Press OK. The actual number of the machine. h Close...of printed pages will stop printing. The LCD shows the part name of the counter that needs to reset the belt unit counter by completing the following message appears on the LCD and the machine will vary ...
2 Push the drum unit in until it stops. Machine Info. 5.Reset Menu k Press a or b to reset the belt unit counter. l Press 1 to choose Belt Unit. Replacing the... the toner box: Waste Toner Full When you replace the belt unit with a new one, you need to be reset. Troubleshooting and routine maintenance j Press Menu, 5, 5. Press OK. The actual number of the machine. h Close...of printed pages will stop printing. The LCD shows the part name of the counter that needs to reset the belt unit counter by completing the following message appears on the LCD and the machine will vary ...

Users Manual - English
Page 143
Drum Remaining: XX% c Press Stop/Exit. a Press Menu, 5, 4. Machine Info. 4.Parts Life b Press a or b to choose 1.Drum, 2.Belt Unit, 3.PF Kit MP, 4.PF Kit 1, 5.Fuser or 6.Laser. Troubleshooting and routine maintenance C 131 Note The life check of a part will not be accurate only if that part's life counter was installed. It will be accurate if that part's life counter was reset when the new part was reset during the life of these parts on the LCD. Press OK. Checking the remaining life of parts C You can view the remaining life of the used part.
Drum Remaining: XX% c Press Stop/Exit. a Press Menu, 5, 4. Machine Info. 4.Parts Life b Press a or b to choose 1.Drum, 2.Belt Unit, 3.PF Kit MP, 4.PF Kit 1, 5.Fuser or 6.Laser. Troubleshooting and routine maintenance C 131 Note The life check of a part will not be accurate only if that part's life counter was installed. It will be accurate if that part's life counter was reset when the new part was reset during the life of these parts on the LCD. Press OK. Checking the remaining life of parts C You can view the remaining life of the used part.
Users Manual - English
Page 151
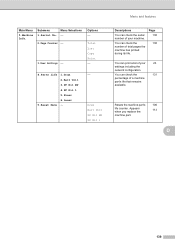
Total List Copy Print - 4.Parts Life 1.Drum 2.Belt Unit 3.PF Kit MP 4.PF Kit 1 5.Fuser 6.Laser 5.Reset Menu - - D 139 Main Menu 5.Machine Info. Submenu Menu Selections 1.Serial No. - 2.Page Counter - 3.User Settings - Options - Page 130 130 You can check the serial... total pages the machine has printed during its life. You can check the number of your 23 settings including the network configuration. Resets the machine part's 106 life counter. Drum Belt Unit PF Kit MP PF Kit 1 Menu and features Descriptions You can print a list of a machine part's life that ...
Total List Copy Print - 4.Parts Life 1.Drum 2.Belt Unit 3.PF Kit MP 4.PF Kit 1 5.Fuser 6.Laser 5.Reset Menu - - D 139 Main Menu 5.Machine Info. Submenu Menu Selections 1.Serial No. - 2.Page Counter - 3.User Settings - Options - Page 130 130 You can check the serial... total pages the machine has printed during its life. You can check the number of your 23 settings including the network configuration. Resets the machine part's 106 life counter. Drum Belt Unit PF Kit MP PF Kit 1 Menu and features Descriptions You can print a list of a machine part's life that ...


