Software Users Manual - English
Page 14
... The HP LaserJet mode (or HP mode) is the emulation mode in which this type of a Hewlett-Packard LaserJet laser printer. Addison-Wesley Professional, 1988. For DCP models, press Menu, 3, 1. c Press Stop/Exit. When the machine receives data from those applications. „ ...default setting is an original Brother page description language and a PostScript® language emulation interpreter. You can receive print commands in a printer job language or emulation. Some applications support these emulation modes so your printer will allow your printer to choose Auto(EPSON), ...
... The HP LaserJet mode (or HP mode) is the emulation mode in which this type of a Hewlett-Packard LaserJet laser printer. Addison-Wesley Professional, 1988. For DCP models, press Menu, 3, 1. c Press Stop/Exit. When the machine receives data from those applications. „ ...default setting is an original Brother page description language and a PostScript® language emulation interpreter. You can receive print commands in a printer job language or emulation. Some applications support these emulation modes so your printer will allow your printer to choose Auto(EPSON), ...
Software Users Manual - English
Page 136
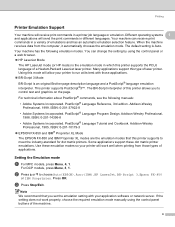
... an original Brother page description language and a PostScript® language emulation interpreter. This printer supports PostScript®3™. The default setting is the emulation mode in a variety of a Hewlett-Packard LaserJet laser printer. You can receive print commands in which this printer supports to... support these emulation modes so your printer will work properly, choose the required emulation mode manually using the control panel or a web browser. „ HP LaserJet Mode The HP LaserJet mode (or HP mode) is Auto. For DCP models, press Menu, 3, 1. ...
... an original Brother page description language and a PostScript® language emulation interpreter. This printer supports PostScript®3™. The default setting is the emulation mode in a variety of a Hewlett-Packard LaserJet laser printer. You can receive print commands in which this printer supports to... support these emulation modes so your printer will work properly, choose the required emulation mode manually using the control panel or a web browser. „ HP LaserJet Mode The HP LaserJet mode (or HP mode) is Auto. For DCP models, press Menu, 3, 1. ...
Software Users Manual - English
Page 151
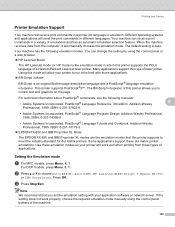
... Support on page 142. „ (Mac OS X 10.3.9 to remove it and then install the BR-Script3 printer driver. If a Brother Laser driver is already listed in System Preferences (Mac OS X 10.5.x). You need to 10.4.x) 8 a Choose Applications from the Go menu. Printing and Faxing Using the ...
... Support on page 142. „ (Mac OS X 10.3.9 to remove it and then install the BR-Script3 printer driver. If a Brother Laser driver is already listed in System Preferences (Mac OS X 10.5.x). You need to 10.4.x) 8 a Choose Applications from the Go menu. Printing and Faxing Using the ...

Users Manual - English
Page 83
... Document Setup menu of paper in the paper tray, and then try again. „ Check that the MP tray mode is not chosen in the printer driver. „ If the LCD shows Paper Jam message and you still have a problem, see Acceptable paper and other print media on page 14.) (See... paper into the paper tray. „ Reduce the amount of your application. (See your application's manual for laser machines. (For details, see Paper jams on page 86.) 70 Sometimes it back in the printer driver. Your application must be set up to remove the paper, turn the stack over and put it...
... Document Setup menu of paper in the paper tray, and then try again. „ Check that the MP tray mode is not chosen in the printer driver. „ If the LCD shows Paper Jam message and you still have a problem, see Acceptable paper and other print media on page 14.) (See... paper into the paper tray. „ Reduce the amount of your application. (See your application's manual for laser machines. (For details, see Paper jams on page 86.) 70 Sometimes it back in the printer driver. Your application must be set up to remove the paper, turn the stack over and put it...
Users Manual - English
Page 87
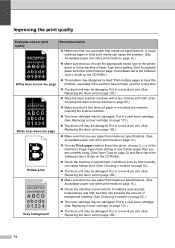
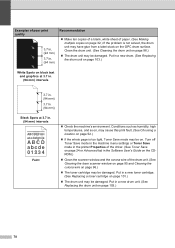
...unit. (See Replacing the drum unit on page 103.) „ Wipe the laser scanner windows with a dry, lint-free soft cloth. (See Cleaning the laser scanner window on page 101.) „ The drum unit may be damaged.....) „ Make sure that you use paper that you choose the appropriate media type in the printer driver or in the machine's Paper Type menu setting. (See Acceptable paper and other print media... Acceptable paper and other print media on page 14.) „ Choose Thick paper mode in the printer driver, choose Thick in the machine's Paper Type menu setting or use thinner paper than you are...
...unit. (See Replacing the drum unit on page 103.) „ Wipe the laser scanner windows with a dry, lint-free soft cloth. (See Cleaning the laser scanner window on page 101.) „ The drum unit may be damaged.....) „ Make sure that you use paper that you choose the appropriate media type in the printer driver or in the machine's Paper Type menu setting. (See Acceptable paper and other print media... Acceptable paper and other print media on page 14.) „ Choose Thick paper mode in the printer driver, choose Thick in the machine's Paper Type menu setting or use thinner paper than you are...
Users Manual - English
Page 91
... at 3.7 in the Software User's Guide on the CDROM.) „ Clean the scanner window and the corona wire of the drum unit. (See Cleaning the laser scanner window on page 95 and Cleaning the corona wire on page 96.) „ The toner cartridge may be damaged. Conditions such as humidity, high... glue from a label stuck on the OPC drum surface. Turn off Toner Save mode in the machine menu settings or Toner Save mode in the printer Properties of the driver. (See Toner Save on page 24 or Advanced tab in . (94 mm) intervals ABCDEFGH abcdefghijk ABCD abcde 01234 Faint „ Check...
... at 3.7 in the Software User's Guide on the CDROM.) „ Clean the scanner window and the corona wire of the drum unit. (See Cleaning the laser scanner window on page 95 and Cleaning the corona wire on page 96.) „ The toner cartridge may be damaged. Conditions such as humidity, high... glue from a label stuck on the OPC drum surface. Turn off Toner Save mode in the machine menu settings or Toner Save mode in the printer Properties of the driver. (See Toner Save on page 24 or Advanced tab in . (94 mm) intervals ABCDEFGH abcdefghijk ABCD abcde 01234 Faint „ Check...

Users Manual - English
Page 137
E Specifications E General E Printer Type Laser Print Method Electrophotography by semiconductor laser beam scanning Memory Capacity 64 MB LCD (liquid crystal display) 22 characters × 5 lines Power Source 110-120 V AC 50/60 Hz Power Consumption Peak: ... 18.7 in. (475 mm) Weight Noise level 20.9 in. (531 mm) 17.8 in. (451 mm) With Drum/Toner Unit: 39.9 lb (18.1 kg) (DCP-8080DN) 40.6 lb (18.4 kg) (DCP-8085DN) Sound power Operating (Copying): Standby: Sound pressure Operating (Copying): Standby: LWAd = 6.95 Bell LWAd = 4.6 Bell LpAm = 56 dBA LpAm = 30 dBA 124
E Specifications E General E Printer Type Laser Print Method Electrophotography by semiconductor laser beam scanning Memory Capacity 64 MB LCD (liquid crystal display) 22 characters × 5 lines Power Source 110-120 V AC 50/60 Hz Power Consumption Peak: ... 18.7 in. (475 mm) Weight Noise level 20.9 in. (531 mm) 17.8 in. (451 mm) With Drum/Toner Unit: 39.9 lb (18.1 kg) (DCP-8080DN) 40.6 lb (18.4 kg) (DCP-8085DN) Sound power Operating (Copying): Standby: Sound pressure Operating (Copying): Standby: LWAd = 6.95 Bell LWAd = 4.6 Bell LpAm = 56 dBA LpAm = 30 dBA 124
Service Manual
Page 7
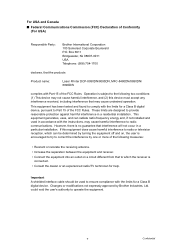
... Connect the equipment into an outlet on , the user is encouraged to try to correct the interference by Brother Industries, Ltd. Operation is no guarantee that the products Product name: Laser Printer DCP-8080DN/8085DN, MFC-8480DN/8880DN/ 8890DW complies with the instructions, may cause undesired operation. These limits are designed to which..., including interference that to provide reasonable protection against harmful interference in accordance with Part 15 of Conformity (For USA) Responsible Party: Brother International Corporation 100 Somerset Corporate Boulevard P.O.
... Connect the equipment into an outlet on , the user is encouraged to try to correct the interference by Brother Industries, Ltd. Operation is no guarantee that the products Product name: Laser Printer DCP-8080DN/8085DN, MFC-8480DN/8880DN/ 8890DW complies with the instructions, may cause undesired operation. These limits are designed to which..., including interference that to provide reasonable protection against harmful interference in accordance with Part 15 of Conformity (For USA) Responsible Party: Brother International Corporation 100 Somerset Corporate Boulevard P.O.

Service Manual
Page 9
...nnen. ■ ADDITIONAL INFORMATION Additional Information When servicing the optical system of the printer, be careful not to open , the regulations of the laser beam. To prevent direct exposure to the laser beam, do not try to place a screwdriver or other reflective object in the... path of VBG 93 and the performance instructions for Laser Product (WARNHINWEIS fur Laser drucker) CAUTION: When the machine during servicing is attached on the printer. A reflected beam, though invisible, can permanently damage the eyes. Since the beam is ...
...nnen. ■ ADDITIONAL INFORMATION Additional Information When servicing the optical system of the printer, be careful not to open , the regulations of the laser beam. To prevent direct exposure to the laser beam, do not try to place a screwdriver or other reflective object in the... path of VBG 93 and the performance instructions for Laser Product (WARNHINWEIS fur Laser drucker) CAUTION: When the machine during servicing is attached on the printer. A reflected beam, though invisible, can permanently damage the eyes. Since the beam is ...

Service Manual
Page 39
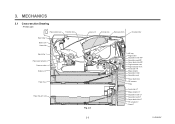
.... 2-1 Confidential Laser-sensitive drum - 1. MECHANICS Host Computer WLAN (For the model with the wireless LAN only) Digital camera (PICT bridge) LAN (For the models with the LAN only) Control panel Centronics parallel interface USB interface WLAN PCB LAN interface USB interface Line Control Section Fax data Printer data NCU* ...Speaker ADF unit Scanner unit Laser printing unit Paper Low-
.... 2-1 Confidential Laser-sensitive drum - 1. MECHANICS Host Computer WLAN (For the model with the wireless LAN only) Digital camera (PICT bridge) LAN (For the models with the LAN only) Control panel Centronics parallel interface USB interface WLAN PCB LAN interface USB interface Line Control Section Fax data Printer data NCU* ...Speaker ADF unit Scanner unit Laser printing unit Paper Low-
Service Manual
Page 41
3. Printer part Paper stack lever Transfer roller Eject roller 2 Back cover Heat roller Eject roller 1 Paper eject actuator Pressure roller Duplex unit Paper tray Paper tray (LT unit) Laser unit Corona wire Exposure drum Develop roller Fig. 2-3 2-3 MP tray Regist roller Separation rollerMMPP Separation pad MP Paper feed roller MP Regist actuator rear...
3. Printer part Paper stack lever Transfer roller Eject roller 2 Back cover Heat roller Eject roller 1 Paper eject actuator Pressure roller Duplex unit Paper tray Paper tray (LT unit) Laser unit Corona wire Exposure drum Develop roller Fig. 2-3 2-3 MP tray Regist roller Separation rollerMMPP Separation pad MP Paper feed roller MP Regist actuator rear...
Service Manual
Page 125
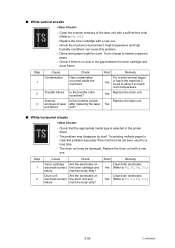
...Yes (Refer to clear this problem. - Step 1 2 3 Cause Condensation Transfer failure Scanner windows of the laser unit with a soft lint-free cloth. (Refer to Fig. 3-2, Fig. 3-3.) 3-53 Confidential Try printing ... Yes ■ White horizontal streaks - Is the problem solved after replacing the laser unit? Replace the laser unit. The drum unit may disappear by itself. High temperature and high humidity conditions... cartridge and failure machine body dirty? Clean the scanner windows of laser unit failure Check Has condensation occurred inside the machine? ■ White ...
...Yes (Refer to clear this problem. - Step 1 2 3 Cause Condensation Transfer failure Scanner windows of the laser unit with a soft lint-free cloth. (Refer to Fig. 3-2, Fig. 3-3.) 3-53 Confidential Try printing ... Yes ■ White horizontal streaks - Is the problem solved after replacing the laser unit? Replace the laser unit. The drum unit may disappear by itself. High temperature and high humidity conditions... cartridge and failure machine body dirty? Clean the scanner windows of laser unit failure Check Has condensation occurred inside the machine? ■ White ...
Service Manual
Page 157
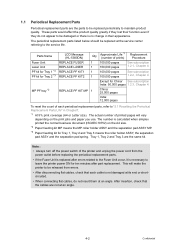
...the Fuser Unit is replaced after errors related to the Fuser Unit occur, it is necessary to leave the printer power ON for China/ See subscription India: 50,000 pages 1.2.3, Chapter 4 China: 25,000 pages ...India: 12,000 pages To reset the count of the printer and unplug the power cord from errors. • After disconnecting flat cables, check that the cables are ... *3 PF kit for Tray 2 *3 MP PF tray *2 LCD Message (HL-5380DN) REPLACE FUSER REPLACE LASER REPLACE PF KIT1 REPLACE PF KIT2 Qty 1 1 1 1 REPLACE PF KIT MP 1 Approximate Life *1 ...
...the Fuser Unit is replaced after errors related to the Fuser Unit occur, it is necessary to leave the printer power ON for China/ See subscription India: 50,000 pages 1.2.3, Chapter 4 China: 25,000 pages ...India: 12,000 pages To reset the count of the printer and unplug the power cord from errors. • After disconnecting flat cables, check that the cables are ... *3 PF kit for Tray 2 *3 MP PF tray *2 LCD Message (HL-5380DN) REPLACE FUSER REPLACE LASER REPLACE PF KIT1 REPLACE PF KIT2 Qty 1 1 1 1 REPLACE PF KIT MP 1 Approximate Life *1 ...
Service Manual
Page 158
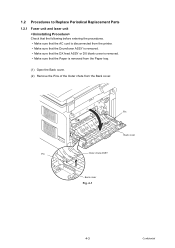
Pin Back cover Pin Outer chute ASSY Back cover Fig. 4-1 4-3 Confidential 1.2 Procedures to Replace Periodical Replacement Parts 1.2.1 Fuser unit and laser unit Check that the following before entering the procedures. • Make sure that the AC cord is disconnected from the printer. • Make sure that the Drum/toner ASSY is removed. • Make sure that the DX feed ASSY or DX blank cover is removed. • Make sure that the Paper is removed from the Paper tray. (1) Open the Back cover. (2) Remove the Pins of the Outer chute from the Back cover.
Pin Back cover Pin Outer chute ASSY Back cover Fig. 4-1 4-3 Confidential 1.2 Procedures to Replace Periodical Replacement Parts 1.2.1 Fuser unit and laser unit Check that the following before entering the procedures. • Make sure that the AC cord is disconnected from the printer. • Make sure that the Drum/toner ASSY is removed. • Make sure that the DX feed ASSY or DX blank cover is removed. • Make sure that the Paper is removed from the Paper tray. (1) Open the Back cover. (2) Remove the Pins of the Outer chute from the Back cover.

Service Manual
Page 184
(30) Catch the Pins of the Outer chute onto the Back cover, and close the Back cover. 30b Pin Back cover Pin Outer chute ASSY 30a Back cover Fig. 4-44 Set the following parts after assembling. • Set the DX feed ASSY or DX blank cover. • Install the Drum/toner ASSY into the Printer. • Put the Paper into the Paper tray. • Reset the count of the Fuser unit and Laser unit after part replacement. (Refer to "5.1 Resetting the Periodical Replacement Parts Life" in Chapter7.) 4-29 Confidential
(30) Catch the Pins of the Outer chute onto the Back cover, and close the Back cover. 30b Pin Back cover Pin Outer chute ASSY 30a Back cover Fig. 4-44 Set the following parts after assembling. • Set the DX feed ASSY or DX blank cover. • Install the Drum/toner ASSY into the Printer. • Put the Paper into the Paper tray. • Reset the count of the Fuser unit and Laser unit after part replacement. (Refer to "5.1 Resetting the Periodical Replacement Parts Life" in Chapter7.) 4-29 Confidential


