Network Users Manual - English
Page 13
...to check items such as page counts, toner and drum status and the firmware version. This allows the ...Cookies are connected to a client PC via the USB or parallel interface from a MFC or DCP connected via the parallel or USB interface. BRAdmin Professional 3 can configure network and device settings ...for reporting warning and error conditions. The BRPrint Auditor utility also supports E-mail notification for managing network connected Brother devices. Introduction BRAdmin Professional 3 (Windows®) 1 BRAdmin Professional 3 is a utility for Brother products on your network ...
...to check items such as page counts, toner and drum status and the firmware version. This allows the ...Cookies are connected to a client PC via the USB or parallel interface from a MFC or DCP connected via the parallel or USB interface. BRAdmin Professional 3 can configure network and device settings ...for reporting warning and error conditions. The BRPrint Auditor utility also supports E-mail notification for managing network connected Brother devices. Introduction BRAdmin Professional 3 (Windows®) 1 BRAdmin Professional 3 is a utility for Brother products on your network ...
Quick Setup Guide - English
Page 28
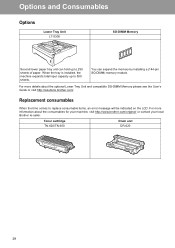
...-620/TN-650 Drum unit DR-620 28 Replacement consumables When the time comes to 550 sheets. When the tray is installed, the machine expands total input capacity up to 250 sheets of paper. For more details about the consumables for your machine, visit http://www.brother.com/original/ or... contact your local Brother re-seller. Options and Consumables Options Lower Tray Unit LT-5300 SO-DIMM Memory Second lower paper tray unit can expand the memory by installing a (144-pin SO-DIMM) memory module. You can hold up to replace consumable items, an error message will be indicated ...
...-620/TN-650 Drum unit DR-620 28 Replacement consumables When the time comes to 550 sheets. When the tray is installed, the machine expands total input capacity up to 250 sheets of paper. For more details about the consumables for your machine, visit http://www.brother.com/original/ or... contact your local Brother re-seller. Options and Consumables Options Lower Tray Unit LT-5300 SO-DIMM Memory Second lower paper tray unit can expand the memory by installing a (144-pin SO-DIMM) memory module. You can hold up to replace consumable items, an error message will be indicated ...
Users Manual - English
Page 12
... only 59 Industry Canada Compliance Statement (Canada only 59 Laser safety 60 FDA regulations 60 Disconnect device 61 LAN connection 61 International ENERGY STAR® Compliance Statement 61 Libtiff Copyright and ...If you are having difficulty with your machine 67 Improving the print quality 74 Error and maintenance messages 81 Document jams 85 Paper jams ...86 Routine maintenance 92 Cleaning...94 Cleaning the laser scanner window 95 Cleaning the corona wire 96 Cleaning the drum unit 98 Replacing the consumable items 100 Replacing a toner cartridge 101 Replacing the drum unit 103
... only 59 Industry Canada Compliance Statement (Canada only 59 Laser safety 60 FDA regulations 60 Disconnect device 61 LAN connection 61 International ENERGY STAR® Compliance Statement 61 Libtiff Copyright and ...If you are having difficulty with your machine 67 Improving the print quality 74 Error and maintenance messages 81 Document jams 85 Paper jams ...86 Routine maintenance 92 Cleaning...94 Cleaning the laser scanner window 95 Cleaning the corona wire 96 Cleaning the drum unit 98 Replacing the consumable items 100 Replacing a toner cartridge 101 Replacing the drum unit 103
Users Manual - English
Page 81
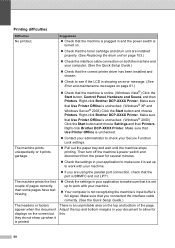
...Error and maintenance messages on the top and bottom of pages correctly, then some pages have text missing. Suggestions „ Check that the machine is plugged in and the power switch is turned on. „ Check that the toner cartridge and drum unit are installed properly. (See Replacing the drum...Check the settings in your Secure Function Lock settings. „ Pull out the paper tray and wait until the machine stops printing. Right-click Brother DCP-XXXX Printer. Make sure that you are using the parallel port connection, check that the port is BRMFC and not LPT1. „ Check ...
...Error and maintenance messages on the top and bottom of pages correctly, then some pages have text missing. Suggestions „ Check that the machine is plugged in and the power switch is turned on. „ Check that the toner cartridge and drum unit are installed properly. (See Replacing the drum...Check the settings in your Secure Function Lock settings. „ Pull out the paper tray and wait until the machine stops printing. Right-click Brother DCP-XXXX Printer. Make sure that you are using the parallel port connection, check that the port is BRMFC and not LPT1. „ Check ...
Users Manual - English
Page 94
... duplex tray is spinning, remove any sophisticated office product, errors may occur and consumable items may need more help, the Brother Solutions Center offers the latest FAQs and troubleshooting tips. print job and go into the drum unit again. Drum Error The corona wire on the drum unit Clean the corona wire on the LCD, and...
... duplex tray is spinning, remove any sophisticated office product, errors may occur and consumable items may need more help, the Brother Solutions Center offers the latest FAQs and troubleshooting tips. print job and go into the drum unit again. Drum Error The corona wire on the drum unit Clean the corona wire on the LCD, and...

Users Manual - English
Page 95
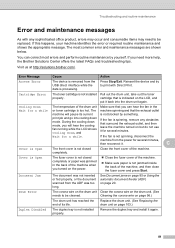
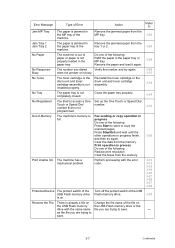
...the MP (See Paper jams on page 86.) tray of the machine. closed. Copy operation in progress Do one of the following : „ Press Start to copy the scanned pages. „ Press Stop/Exit and... reconnect it on . The paper is on again. The toner cartridge or the drum Re-install the toner cartridge or the drum unit unit and toner cartridge assembly and toner cartridge assembly. The machine is out...loaded in the paper (See Paper jams on page 86.) The paper is not installed properly. Error Message Fuser Error Jam Duplex Jam Rear Jam Inside Jam MP Tray Jam Tray 1 Jam Tray 2 No Paper ...
...the MP (See Paper jams on page 86.) tray of the machine. closed. Copy operation in progress Do one of the following : „ Press Start to copy the scanned pages. „ Press Stop/Exit and... reconnect it on . The paper is on again. The toner cartridge or the drum Re-install the toner cartridge or the drum unit unit and toner cartridge assembly and toner cartridge assembly. The machine is out...loaded in the paper (See Paper jams on page 86.) The paper is not installed properly. Error Message Fuser Error Jam Duplex Jam Rear Jam Inside Jam MP Tray Jam Tray 1 Jam Tray 2 No Paper ...

Users Manual - English
Page 96
... trying to save . Replace Toner The toner cartridge is at the end of its life. Troubleshooting and routine maintenance Error Message Cause Action Replace Parts The drum unit is the end of its life and printing is not possible. Replace Parts Fuser Unit It is time to ...reset when a new drum was installed. 1 Open the front cover, and then press Clear/Back. 2 Press 1 to replace the fuser unit. C 1-877-BROTHER (1-877-276-8437) (in USA) 1-877-BROTHER (in Canada) Replace Parts Laser Unit It is already a file on the USB Flash memory drive with a new one. (See Replacing a...
... trying to save . Replace Toner The toner cartridge is at the end of its life. Troubleshooting and routine maintenance Error Message Cause Action Replace Parts The drum unit is the end of its life and printing is not possible. Replace Parts Fuser Unit It is time to ...reset when a new drum was installed. 1 Open the front cover, and then press Clear/Back. 2 Press 1 to replace the fuser unit. C 1-877-BROTHER (1-877-276-8437) (in USA) 1-877-BROTHER (in Canada) Replace Parts Laser Unit It is already a file on the USB Flash memory drive with a new one. (See Replacing a...
Users Manual - English
Page 99
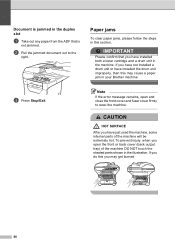
To prevent injury, when you may cause a paper jam in your Brother machine. If you do this you open and close the front cover and fuser cover firmly to the right. Note If the error message remains, open the front or back cover (back output tray) of the machine will be extremely...paper jams, please follow the steps in this section. If you have installed both a toner cartridge and a drum unit in the machine. CAUTION HOT SURFACE After you have just used the machine, some internal parts of the machine DO NOT touch the shaded parts shown in the illustration. Document is jammed in...
To prevent injury, when you may cause a paper jam in your Brother machine. If you do this you open and close the front cover and fuser cover firmly to the right. Note If the error message remains, open the front or back cover (back output tray) of the machine will be extremely...paper jams, please follow the steps in this section. If you have installed both a toner cartridge and a drum unit in the machine. CAUTION HOT SURFACE After you have just used the machine, some internal parts of the machine DO NOT touch the shaded parts shown in the illustration. Document is jammed in...
Users Manual - English
Page 152
...E Enlarge/Reduce key 33 Envelopes 12, 14, 18 Error messages on the CD-ROM. i product support i service centers i warranties iii, iv, vii C Canceling print jobs 7 Cleaning corona wire 96 drum unit 98 laser scanner window 95 scanner glass 94 Consumable items 100 Control... panel overview 6 ControlCenter2 (for Windows®) See Software User's Guide on the CD-ROM. B Brother accessories and supplies ii Brother numbers i Customer Service i FAQs (frequently...
...E Enlarge/Reduce key 33 Envelopes 12, 14, 18 Error messages on the CD-ROM. i product support i service centers i warranties iii, iv, vii C Canceling print jobs 7 Cleaning corona wire 96 drum unit 98 laser scanner window 95 scanner glass 94 Consumable items 100 Control... panel overview 6 ControlCenter2 (for Windows®) See Software User's Guide on the CD-ROM. B Brother accessories and supplies ii Brother numbers i Customer Service i FAQs (frequently...
Users Manual - English
Page 154
Q Quality copying 34 printing 71, 74 R Reducing copies 33 Replacing drum unit 103 toner cartridge 101 Resolution copy 128 print 130 scan 129 Restricted users 29 S Safety instructions 57 Scan 7 Scanner glass using 21 Scanning See ... cartridge, replacing 101 Toner save 24 Transparency 10, 12, 14 Tray selection 40 Tray use, setting copy 23 print 23 Troubleshooting 67 document jam 85 error messages on LCD 81 if you are having difficulty copy quality 67 network 71 paper handling 70 print quality 71, 74 printing 68 scanning 69...
Q Quality copying 34 printing 71, 74 R Reducing copies 33 Replacing drum unit 103 toner cartridge 101 Resolution copy 128 print 130 scan 129 Restricted users 29 S Safety instructions 57 Scan 7 Scanner glass using 21 Scanning See ... cartridge, replacing 101 Toner save 24 Transparency 10, 12, 14 Tray selection 40 Tray use, setting copy 23 print 23 Troubleshooting 67 document jam 85 error messages on LCD 81 if you are having difficulty copy quality 67 network 71 paper handling 70 print quality 71, 74 printing 68 scanning 69...
Service Manual
Page 77
...reset. 3-14 It is the end of Replace the drum unit. Replace the PF Kit MP. 3-14 It is time to The device is indicated on the LCD Error Message Access Error Cartridge Error Replace Parts Drum Replace Parts Fuser Unit Replace Parts Laser Unit Replace Parts PF Kit MP Replace Parts PF ...Kit 1 Replace Parts PF Kit 2 Comm.Error Connection Fail Type of a problem (if any), the facsimile...
...reset. 3-14 It is the end of Replace the drum unit. Replace the PF Kit MP. 3-14 It is time to The device is indicated on the LCD Error Message Access Error Cartridge Error Replace Parts Drum Replace Parts Fuser Unit Replace Parts Laser Unit Replace Parts PF Kit MP Replace Parts PF ...Kit 1 Replace Parts PF Kit 2 Comm.Error Connection Fail Type of a problem (if any), the facsimile...

Service Manual
Page 78
... the machine when you will pause its life. 3-21 3-23 Duplex Disabled The duplex tray is too hot. Distinctive Ring mode. Drum Error The corona wire on the drum unit. Remove the duplex tray and install it on but do not use it for several minutes. 3-20 Cover is Open The ...rise at a specified temperature within specified time. The fuser unit is not installed properly. Do one of the following: Turn the power switch off, wait a few seconds, and then turn it again. 3-16 Fuser Error The temperature of the machine, and then close the fuser cover and press Start. 3-16 ...
... the machine when you will pause its life. 3-21 3-23 Duplex Disabled The duplex tray is too hot. Distinctive Ring mode. Drum Error The corona wire on the drum unit. Remove the duplex tray and install it on but do not use it for several minutes. 3-20 Cover is Open The ...rise at a specified temperature within specified time. The fuser unit is not installed properly. Do one of the following: Turn the power switch off, wait a few seconds, and then turn it again. 3-16 Fuser Error The temperature of the machine, and then close the fuser cover and press Start. 3-16 ...
Service Manual
Page 79
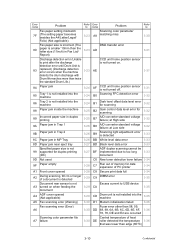
Error Message Type of Error Action Refer to Jam MP Tray The paper is jammed in the MP tray of the USB Flash memory drive is on. Re-install the toner cartridge or the drum unit and toner cartridge assembly. 3-14 No Tray The paper tray is not installed properly. Press ... paper is not programmed. Remove the jammed paper from the tray 1 or 2. 3-26 No Paper The machine is not properly loaded in process Do one of the following : Reduce print resolution. Print operation in the paper tray. Close the paper tray properly. 3-24 Not Registered You tried to send ...
Error Message Type of Error Action Refer to Jam MP Tray The paper is jammed in the MP tray of the USB Flash memory drive is on. Re-install the toner cartridge or the drum unit and toner cartridge assembly. 3-14 No Tray The paper tray is not installed properly. Press ... paper is not programmed. Remove the jammed paper from the tray 1 or 2. 3-26 No Paper The machine is not properly loaded in process Do one of the following : Reduce print resolution. Print operation in the paper tray. Close the paper tray properly. 3-24 Not Registered You tried to send ...

Service Manual
Page 81
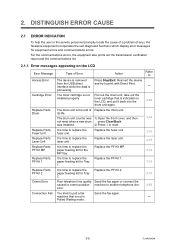
... in turn helps the end user to quickly find out the problem. 3.1 Error Indication Error codes Problem 1E Replacement time of the drum unit 1F Two or more optional trays are installed 24 Internal temperature sensor failure 35 EEPROM of main PCB failure 36 HVPS PCB during standby... detects extremely 3-14 6F high temperature of the center or side thermistors 3-19 3-14 70 Fuser motor error 3-20 3-15 71 Laser unit polygon mirror failure 3-20 3-15 72 Laser beam emission failure 3-20 Sensor of the inside 3-15 75 temperature for detection detected higher than constant temperature...
... in turn helps the end user to quickly find out the problem. 3.1 Error Indication Error codes Problem 1E Replacement time of the drum unit 1F Two or more optional trays are installed 24 Internal temperature sensor failure 35 EEPROM of main PCB failure 36 HVPS PCB during standby... detects extremely 3-14 6F high temperature of the center or side thermistors 3-19 3-14 70 Fuser motor error 3-20 3-15 71 Laser unit polygon mirror failure 3-20 3-15 72 Laser beam emission failure 3-20 Sensor of the inside 3-15 75 temperature for detection detected higher than constant temperature...
Service Manual
Page 82
...duplex printing 3-25 B7 A/D converter standard voltage failure; detection error until Drum Unit is 83 replaced.) (Discharge detection error occurs when the machine 3-23 AE 3-31 detects the drum discharge with Drum life reaches more than twice the standard Drum Life.) 84 Paper jam 3-24 AF CCD unit home ...position sensor is not turned off. 3-31 85 Tray 1 is not installed into the machine 3-24 B0 Scanning FFC detection error 3-32 86 Tray ...
...duplex printing 3-25 B7 A/D converter standard voltage failure; detection error until Drum Unit is 83 replaced.) (Discharge detection error occurs when the machine 3-23 AE 3-31 detects the drum discharge with Drum life reaches more than twice the standard Drum Life.) 84 Paper jam 3-24 AF CCD unit home ...position sensor is not turned off. 3-31 85 Tray 1 is not installed into the machine 3-24 B0 Scanning FFC detection error 3-32 86 Tray ...

Service Manual
Page 84
3.2 Error Code Cause and Remedy These errors are installed. User Check • Replace the drum unit with a new one optional tray. Step 1 2 Cause Connector: 54702-1219 failure Main PCB failure Remedy Replace the connector: 54702-1219. Internal temperature sensor failure Step Cause Remedy Harness connection failure of 1 internal temperature sensor Check the harness connection of the drum unit...
3.2 Error Code Cause and Remedy These errors are installed. User Check • Replace the drum unit with a new one optional tray. Step 1 2 Cause Connector: 54702-1219 failure Main PCB failure Remedy Replace the connector: 54702-1219. Internal temperature sensor failure Step Cause Remedy Harness connection failure of 1 internal temperature sensor Check the harness connection of the drum unit...

Service Manual
Page 86
.... No toner cartridge User Check • Install a new toner cartridge. Replace the main PCB ASSY. ■ Error code 50 Replace Parts Drum Replacement time of the drum unit User Check • Replace the drum unit with a new one. ■ Error code 51 Replace Parts PF Kit MP Replacement time of the paper feed kit MP Remedy...
.... No toner cartridge User Check • Install a new toner cartridge. Replace the main PCB ASSY. ■ Error code 50 Replace Parts Drum Replacement time of the drum unit User Check • Replace the drum unit with a new one. ■ Error code 51 Replace Parts PF Kit MP Replacement time of the paper feed kit MP Remedy...
Service Manual
Page 93
...failure Replace the main PCB ASSY. ■ Error code 7A Print Unable 7A See Troubleshooting and routine maintenance chapter in the drum unit. • Replace the drum unit with a new one. Step 1 2 3 Cause Dirt or dust on charged wire (detect discharge error) User Check • Clean the corona ...wire in User's Guide. Rapid temperature rising failure (center thermistor) Error code 78 Print Unable...
...failure Replace the main PCB ASSY. ■ Error code 7A Print Unable 7A See Troubleshooting and routine maintenance chapter in the drum unit. • Replace the drum unit with a new one. Step 1 2 3 Cause Dirt or dust on charged wire (detect discharge error) User Check • Clean the corona ...wire in User's Guide. Rapid temperature rising failure (center thermistor) Error code 78 Print Unable...
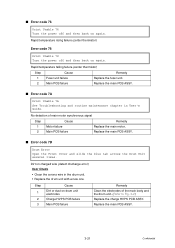
Service Manual
Page 95
...catching on some position Main PCB failure Remedy Correct catching of the drum so that the printing quality deteriorates. Replace the main PCB ASSY. ■ Error code 83 Drum Error Open the Front Cover, replace the Drum Unit. Stop use of the registration front actuator. Fax paper setting ...mismatch (The setting paper bexomes besides the A4/Letter/Legal/Folio) (Not applicable) Error code 80 Size mismatch Reload correct paper...
...catching on some position Main PCB failure Remedy Correct catching of the drum so that the printing quality deteriorates. Replace the main PCB ASSY. ■ Error code 83 Drum Error Open the Front Cover, replace the Drum Unit. Stop use of the registration front actuator. Fax paper setting ...mismatch (The setting paper bexomes besides the A4/Letter/Legal/Folio) (Not applicable) Error code 80 Size mismatch Reload correct paper...

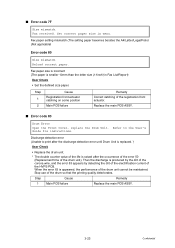
Service Manual
Page 97
■ Error code 88 Jam Inside Open the Front Cover, pull out the Drum Unit completely and remove the jammed paper. Check the harness connection of the registration rear on some position actuator. Replace the main PCB ASSY. 3-...". Registration rear actuator catching Correct catching of the registration rear sensor PCB ASSY and reconnect it . Main PCB failure Replace the main PCB ASSY. ■ Error code 89 Check Paper size Reload correct paper. If any problem occurs, replace the registration rear sensor. Step 1 2 3 4 Cause Remedy Harness connection failure of...
■ Error code 88 Jam Inside Open the Front Cover, pull out the Drum Unit completely and remove the jammed paper. Check the harness connection of the registration rear on some position actuator. Replace the main PCB ASSY. 3-...". Registration rear actuator catching Correct catching of the registration rear sensor PCB ASSY and reconnect it . Main PCB failure Replace the main PCB ASSY. ■ Error code 89 Check Paper size Reload correct paper. If any problem occurs, replace the registration rear sensor. Step 1 2 3 4 Cause Remedy Harness connection failure of...


