
Users Manual - English
Page 6
... you are not limited to toner, drums, print heads and ink cartridges. „ Except as Paper Feeding Kit, Fuser and Laser Units. What Brother will be free from defects in materials and workmanship, when used under normal conditions. „ This warranty applies only...132; Accompanying Consumable and Accessories Items have a one-stage warranty: 90 days from Brother and/or alteration/removal of the serial number). Brother® Three-Year Limited Warranty and Exchange Service For DCP-8060 and DCP-8065DN (USA only) Who is covered: „ This limited warranty ("warranty") is...
... you are not limited to toner, drums, print heads and ink cartridges. „ Except as Paper Feeding Kit, Fuser and Laser Units. What Brother will be free from defects in materials and workmanship, when used under normal conditions. „ This warranty applies only...132; Accompanying Consumable and Accessories Items have a one-stage warranty: 90 days from Brother and/or alteration/removal of the serial number). Brother® Three-Year Limited Warranty and Exchange Service For DCP-8060 and DCP-8065DN (USA only) Who is covered: „ This limited warranty ("warranty") is...

Users Manual - English
Page 21
... the machine is in the tray or clear the paper jam. Wait a few seconds, and then turn it back on page i.) The front cover or fuser cover is off the power switch. 1 2. Turn off . 9 Close the cover. If you cannot clear the error and you see the same service call indication... after turning the machine back on, please call Brother Customer Service. (See Brother numbers on and try to print again. Put paper in Sleep mode, the LED is open Toner Life End Red Paper error Scan...
... the machine is in the tray or clear the paper jam. Wait a few seconds, and then turn it back on page i.) The front cover or fuser cover is off the power switch. 1 2. Turn off . 9 Close the cover. If you cannot clear the error and you see the same service call indication... after turning the machine back on, please call Brother Customer Service. (See Brother numbers on and try to print again. Put paper in Sleep mode, the LED is open Toner Life End Red Paper error Scan...

Users Manual - English
Page 31
... Enter & OK Key b Enter the length of settings, from High to 99). To turn off sleep mode, the setting will be a short delay while the fuser warms up. General setup Volume Settings 3 Beeper volume 3 When the beeper is on . 19 c Press Stop/Exit. While the machine is 05 minutes. Press a or... the machine receives 3 computer data or makes a copy, the timer will take effect the next time the machine copies, prints or is turned off the fuser while the machine is idle. You can save 3 You can select a ring volume level from 00 to 99 minutes) before entering sleep mode (00 to...
... Enter & OK Key b Enter the length of settings, from High to 99). To turn off sleep mode, the setting will be a short delay while the fuser warms up. General setup Volume Settings 3 Beeper volume 3 When the beeper is on . 19 c Press Stop/Exit. While the machine is 05 minutes. Press a or... the machine receives 3 computer data or makes a copy, the timer will take effect the next time the machine copies, prints or is turned off the fuser while the machine is idle. You can save 3 You can select a ring volume level from 00 to 99 minutes) before entering sleep mode (00 to...

Users Manual - English
Page 51
... back cover of the machine, make sure you clean the inside the machine. The fuser unit is marked with wet hands. Please do not remove or damage the label. Before you have just used the machine, some internal parts of the machine under the document cover. 39 Do not handle the plug...
... back cover of the machine, make sure you clean the inside the machine. The fuser unit is marked with wet hands. Please do not remove or damage the label. Before you have just used the machine, some internal parts of the machine under the document cover. 39 Do not handle the plug...
Users Manual - English
Page 69
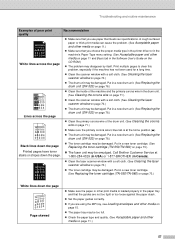
...you are using the MP tray, see Loading envelopes and other media on page 70.) „ The drum unit may disappear by itself. Call Brother Customer Service at the home position (a). „ The drum unit may be damaged. Troubleshooting and routine maintenance Examples of poor print quality Recommendation ... for a long time. „ Clean the scanner window with a soft cloth. (See Cleaning the laser scanner window on page 73.) „ The fuser unit may be damaged. Put in the paper tray and that meets our specifications. Put in a new drum unit. (See Replacing the drum unit (DR...
...you are using the MP tray, see Loading envelopes and other media on page 70.) „ The drum unit may disappear by itself. Call Brother Customer Service at the home position (a). „ The drum unit may be damaged. Troubleshooting and routine maintenance Examples of poor print quality Recommendation ... for a long time. „ Clean the scanner window with a soft cloth. (See Cleaning the laser scanner window on page 73.) „ The fuser unit may be damaged. Put in the paper tray and that meets our specifications. Put in a new drum unit. (See Replacing the drum unit (DR...
Users Manual - English
Page 71
...The machine will pause its current print job and go into cooling down mode, you can hear the fan in Print mode on again. The fuser cover is not closed completely. The document cover is not closed completely. Remove jammed paper if there is not the correct size. Remove the ...Then, set the Tray Use for a while. Make sure that the exhaust outlet isn't blocked by something. Open the back cover, and then open the fuser cover. Remove the document from the ADF was too long. Cover is Open The front cover is spinning, remove any sophisticated office product, errors may...
...The machine will pause its current print job and go into cooling down mode, you can hear the fan in Print mode on again. The fuser cover is not closed completely. The document cover is not closed completely. Remove jammed paper if there is not the correct size. Remove the ...Then, set the Tray Use for a while. Make sure that the exhaust outlet isn't blocked by something. Open the back cover, and then open the fuser cover. Remove the document from the ADF was too long. Cover is Open The front cover is spinning, remove any sophisticated office product, errors may...

Users Manual - English
Page 72
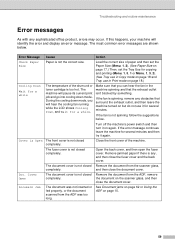
... The machine is out of the machine. Close the paper tray properly. Paper Jam Back Paper Jam Duplex The paper is not installed Disabled properly. (DCP-8065DN only) Dust on Drum The primary corona wire on . then replace the drum unit with the power on the drum unit needs to be cleaned...counter was not reset when a new drum was installed. 1. Copy operation in progress finish, and then try again. Printing operation in process Do one of fuser unit does Turn the power switch off, wait a few seconds, not rise at a specified temperature and then turn it again. Action Use the drum ...
... The machine is out of the machine. Close the paper tray properly. Paper Jam Back Paper Jam Duplex The paper is not installed Disabled properly. (DCP-8065DN only) Dust on Drum The primary corona wire on . then replace the drum unit with the power on the drum unit needs to be cleaned...counter was not reset when a new drum was installed. 1. Copy operation in progress finish, and then try again. Printing operation in process Do one of fuser unit does Turn the power switch off, wait a few seconds, not rise at a specified temperature and then turn it again. Action Use the drum ...

Users Manual - English
Page 73
...turn it again. The toner cartridge and drum unit assembly is installed. More than one of paper for duplex scanning. Call Brother Customer Service to replace the fuser unit. Reinstall the toner cartridge. Turn off the machine's power switch and then turn it on again. Action (See Paper... Life End Toner Low Too Many Trays Unable to Init. (Initialize) Unable to Print Unable to replace the fuser unit. The scanner lock is not possible. Call Brother Customer Service to replace the laser unit. The toner cartridge and drum unit assembly is not installed properly, or...
...turn it again. The toner cartridge and drum unit assembly is installed. More than one of paper for duplex scanning. Call Brother Customer Service to replace the fuser unit. Reinstall the toner cartridge. Turn off the machine's power switch and then turn it on again. Action (See Paper... Life End Toner Low Too Many Trays Unable to Init. (Initialize) Unable to Print Unable to replace the fuser unit. The scanner lock is not possible. Call Brother Customer Service to replace the laser unit. The toner cartridge and drum unit assembly is not installed properly, or...

Users Manual - English
Page 77
Troubleshooting and routine maintenance d Pull the tabs at the back of the fuser unit. c Open the back cover. Paper is jammed at the left and right hand sides toward you to open the fuser cover (1). 1 b Take out the drum unit and toner cartridge assembly. f Close the back cover. 65 e Using both hands, gently pull the jammed paper out of the machine C a Press the cover release lever to open the front cover.
Troubleshooting and routine maintenance d Pull the tabs at the back of the fuser unit. c Open the back cover. Paper is jammed at the left and right hand sides toward you to open the fuser cover (1). 1 b Take out the drum unit and toner cartridge assembly. f Close the back cover. 65 e Using both hands, gently pull the jammed paper out of the machine C a Press the cover release lever to open the front cover.

Users Manual - English
Page 90
... kit for Tray 1. e Put the drum unit and toner cartridge assembly back in properly, the lock lever will lift automatically. Replace Drum? Please call Brother Customer Service when the following messages appear on your hands or clothes, wipe or wash it lock into the plastic bag. Replace PF Kit1 Replace... paper feeding kit for Tray 2. Replace Fuser Replace fuser unit. a 1.Yes b 2.No Select ab & OK To confirm you hear it off with cold water at once. Put the old drum unit into...
... kit for Tray 1. e Put the drum unit and toner cartridge assembly back in properly, the lock lever will lift automatically. Replace Drum? Please call Brother Customer Service when the following messages appear on your hands or clothes, wipe or wash it lock into the plastic bag. Replace PF Kit1 Replace... paper feeding kit for Tray 2. Replace Fuser Replace fuser unit. a 1.Yes b 2.No Select ab & OK To confirm you hear it off with cold water at once. Put the old drum unit into...
Users Manual - English
Page 92
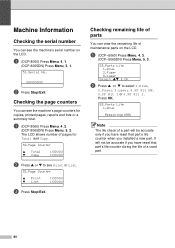
... Kit MP, 5.PF Kit 1 or 6.PF Kit 2. a (DCP-8060) Press Menu, 4, 3. (DCP-8065DN) Press Menu, 5, 3. 53.Parts Life 1.Drum 2.Fuser 3.Laser Select ab & OK b Press a or b to see the machine's serial number on the LCD. a (DCP-8060) Press Menu, 4, 1. (DCP-8065DN) Press Menu, 5, 1. 51.Serial No. a (DCP-8060) Press Menu, 4, 2. (DCP-8065DN) Press Menu, 5, 2. Press OK. 53.Parts Life 1.Drum...
... Kit MP, 5.PF Kit 1 or 6.PF Kit 2. a (DCP-8060) Press Menu, 4, 3. (DCP-8065DN) Press Menu, 5, 3. 53.Parts Life 1.Drum 2.Fuser 3.Laser Select ab & OK b Press a or b to see the machine's serial number on the LCD. a (DCP-8060) Press Menu, 4, 1. (DCP-8065DN) Press Menu, 5, 1. 51.Serial No. a (DCP-8060) Press Menu, 4, 2. (DCP-8065DN) Press Menu, 5, 2. Press OK. 53.Parts Life 1.Drum...
Users Manual - English
Page 100
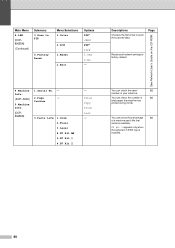
... CD-ROM. You can check the number of a machine part's life that remains available. Main Menu 4.LAN (DCP- 8065DN) (Continued) Submenu 3.Scan to factory default. 4.Machine Info. (DCP-8060) 5.Machine Info. (DCP- 8065DN) 1.Serial No. - 2.Page - Page Restores all network settings to FTP 0.Factory Reset Menu Selections 1.Color 2.B/W...80 number of your machine. PF Kit 2 appears only when the optional LT-5300 tray is installed. 88 Counter 3.Parts Life 1.Drum 2.Fuser 3.Laser 4.PF Kit MP 5.PF Kit 1 6.PF Kit 2 - Descriptions Chooses the file format to send the scanned data. You can...
... CD-ROM. You can check the number of a machine part's life that remains available. Main Menu 4.LAN (DCP- 8065DN) (Continued) Submenu 3.Scan to factory default. 4.Machine Info. (DCP-8060) 5.Machine Info. (DCP- 8065DN) 1.Serial No. - 2.Page - Page Restores all network settings to FTP 0.Factory Reset Menu Selections 1.Color 2.B/W...80 number of your machine. PF Kit 2 appears only when the optional LT-5300 tray is installed. 88 Counter 3.Parts Life 1.Drum 2.Fuser 3.Laser 4.PF Kit MP 5.PF Kit 1 6.PF Kit 2 - Descriptions Chooses the file format to send the scanned data. You can...


