Users Manual - English
Page 5
... IN CANADA. NOTICE - The contents of this manual and the specifications of this manual has been compiled and published, covering the latest product descriptions and specifications. Brother reserves the right to the publication. BROTHER'S LICENSOR(S) DOES NOT WARRANT, GUARANTEE OR MAKE ...INCLUDING WITHOUT LIMITATION THE IMPLIED WARRANTIES OF MERCHANTABILITY AND FITNESS FOR A PARTICULAR PURPOSE, REGARDING THE SOFTWARE. IN NO EVENT WILL BROTHER'S LICENSOR(S) BE LIABLE TO YOU FOR ANY CONSEQUENTIAL, INCIDENTAL OR INDIRECT DAMAGES (INCLUDING DAMAGES FOR LOSS OF BUSINESS PROFITS, ...
... IN CANADA. NOTICE - The contents of this manual and the specifications of this manual has been compiled and published, covering the latest product descriptions and specifications. Brother reserves the right to the publication. BROTHER'S LICENSOR(S) DOES NOT WARRANT, GUARANTEE OR MAKE ...INCLUDING WITHOUT LIMITATION THE IMPLIED WARRANTIES OF MERCHANTABILITY AND FITNESS FOR A PARTICULAR PURPOSE, REGARDING THE SOFTWARE. IN NO EVENT WILL BROTHER'S LICENSOR(S) BE LIABLE TO YOU FOR ANY CONSEQUENTIAL, INCIDENTAL OR INDIRECT DAMAGES (INCLUDING DAMAGES FOR LOSS OF BUSINESS PROFITS, ...

Users Manual - English
Page 13
... Introduction 1-1 Using this Guide 1-1 Finding information 1-1 Symbols used in this Guide 1-1 On-line Registration (USA and Canada 1-2 DCP part names and operations 1-3 Control panel overview 1-6 Status LED indications 1-8 Inserting originals for copying (and scanning 1-10 Using the...2-5 To load paper or other media in the manual feed tray (For DCP-8040 2-7 To load paper or other media in the multi-purpose tray (MP tray) (For DCP-8045D 2-9 To use Automatic Duplexing for copy and print operations (For DCP-8045D 2-11 3 On-screen programming 3-1 User-friendly ...
... Introduction 1-1 Using this Guide 1-1 Finding information 1-1 Symbols used in this Guide 1-1 On-line Registration (USA and Canada 1-2 DCP part names and operations 1-3 Control panel overview 1-6 Status LED indications 1-8 Inserting originals for copying (and scanning 1-10 Using the...2-5 To load paper or other media in the manual feed tray (For DCP-8040 2-7 To load paper or other media in the multi-purpose tray (MP tray) (For DCP-8045D 2-9 To use Automatic Duplexing for copy and print operations (For DCP-8045D 2-11 3 On-screen programming 3-1 User-friendly ...

Users Manual - English
Page 14
... 5-17 6 Using the DCP as a printer 6-1 Using the Brother DCP-8040, DCP-8045D printer driver ... 6-1 How to print your document 6-2 Simultaneous printing and scanning 6-3 Two-sided printing (Duplex Printing 6-3 Automatic Duplex Printing (For DCP-8045D) ......... 6-3 Manual Duplex Printing 6-4 Face-down output tray 6-4 Printing on plain paper 6-5 The manual feed tray (For DCP-8040 6-5 The MP tray (For DCP-8045D 6-6 Printing on thicker...
... 5-17 6 Using the DCP as a printer 6-1 Using the Brother DCP-8040, DCP-8045D printer driver ... 6-1 How to print your document 6-2 Simultaneous printing and scanning 6-3 Two-sided printing (Duplex Printing 6-3 Automatic Duplex Printing (For DCP-8045D) ......... 6-3 Manual Duplex Printing 6-4 Face-down output tray 6-4 Printing on plain paper 6-5 The manual feed tray (For DCP-8040 6-5 The MP tray (For DCP-8045D 6-6 Printing on thicker...
Users Manual - English
Page 23
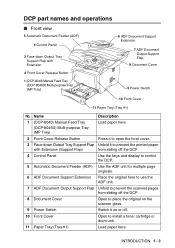
... Output Tray Support Flap Unfold it on or off. 10 Front Cover Open to prevent the printed paper with Extension 2 Front Cover Release Button 1 (DCP-8040) Manual Feed Tray (DCP-8045D) Multi-purpose Tray (MP Tray) 6 ADF Document Support Extension 7 ADF Document Output Support Flap 8 Document Cover 9 Power Switch 10 Front Cover 11 Paper...
... Output Tray Support Flap Unfold it on or off. 10 Front Cover Open to prevent the printed paper with Extension 2 Front Cover Release Button 1 (DCP-8040) Manual Feed Tray (DCP-8045D) Multi-purpose Tray (MP Tray) 6 ADF Document Support Extension 7 ADF Document Output Support Flap 8 Document Cover 9 Power Switch 10 Front Cover 11 Paper...

Users Manual - English
Page 24
...Manual feed tray. ■ Back view 16 ADF Cover 15 Face-up Output Tray (Back Output Tray) 16 ADF Cover 17 USB Interface Connector 18 Parallel Interface Connector 17 USB Interface Connector 18 Parallel Interface Connector Description Use to match your paper size for Duplex Printing (DCP-8045D... Connect the USB Cable here. Slide out to remove paper jammed inside the DCP. Connect the Parallel Cable here. 1 - 4 INTRODUCTION Name 12 Paper Adjustment Lever for Duplex Printing (DCP-8045D) 13 Duplex Tray (DCP-8045D) 14 AC Power Connector 15 Face-up Output Tray (Back Output Tray) 14...
...Manual feed tray. ■ Back view 16 ADF Cover 15 Face-up Output Tray (Back Output Tray) 16 ADF Cover 17 USB Interface Connector 18 Parallel Interface Connector 17 USB Interface Connector 18 Parallel Interface Connector Description Use to match your paper size for Duplex Printing (DCP-8045D... Connect the USB Cable here. Slide out to remove paper jammed inside the DCP. Connect the Parallel Cable here. 1 - 4 INTRODUCTION Name 12 Paper Adjustment Lever for Duplex Printing (DCP-8045D) 13 Duplex Tray (DCP-8045D) 14 AC Power Connector 15 Face-up Output Tray (Back Output Tray) 14...
Users Manual - English
Page 33
... lower tray. Tray Type Paper tray (Tray #1) Manual feed tray Multi-purpose tray (MP tray) Optional lower tray (Tray #2) Recommended paper Model name DCP-8040, DCP-8045D DCP-8040 DCP-8045D Option for DCP-8040, DCP-8045D Plain Paper: Transparency: Labels: Xerox 4200DP 20 lb Hammermill Laser Paper 24 lb 3M CG 3300 Avery laser label #5160 ■ Before you buy a large...
... lower tray. Tray Type Paper tray (Tray #1) Manual feed tray Multi-purpose tray (MP tray) Optional lower tray (Tray #2) Recommended paper Model name DCP-8040, DCP-8045D DCP-8040 DCP-8045D Option for DCP-8040, DCP-8045D Plain Paper: Transparency: Labels: Xerox 4200DP 20 lb Hammermill Laser Paper 24 lb 3M CG 3300 Avery laser label #5160 ■ Before you buy a large...

Users Manual - English
Page 34
...DCP-8040 and DCP-8045D. Caution Do not use a recommended type of paper) on the DCP before purchasing large quantities. ■ Avoid feeding label sheets that are partly used or your DCP will be damaged. ■ Avoid using coated paper, such as vinyl coated paper. ■ Avoid using the manual... feed tray or multi-purpose tray. ■ You can be used with an embossed letterhead. For more information on the paper type and paper brand. Visit us at http://solutions.brother.com and check the latest recommendations for use recycled paper in laser printers. &#...
...DCP-8040 and DCP-8045D. Caution Do not use a recommended type of paper) on the DCP before purchasing large quantities. ■ Avoid feeding label sheets that are partly used or your DCP will be damaged. ■ Avoid using coated paper, such as vinyl coated paper. ■ Avoid using the manual... feed tray or multi-purpose tray. ■ You can be used with an embossed letterhead. For more information on the paper type and paper brand. Visit us at http://solutions.brother.com and check the latest recommendations for use recycled paper in laser printers. &#...
Users Manual - English
Page 35
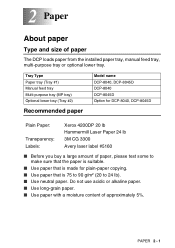
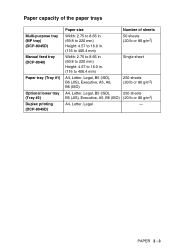
PAPER 2 - 3 Paper capacity of the paper trays Multi-purpose tray (MP tray) (DCP-8045D) Manual feed tray (DCP-8040) Paper tray (Tray #1) Optional lower tray (Tray #2) Duplex printing (DCP-8045D) Paper size Number of sheets Width: 2.75 to 8.66 in. (69.8 to 220 mm) Height: 4.57 to 16.0 in. (116 to 406.4 mm) 50 sheets (...
PAPER 2 - 3 Paper capacity of the paper trays Multi-purpose tray (MP tray) (DCP-8045D) Manual feed tray (DCP-8040) Paper tray (Tray #1) Optional lower tray (Tray #2) Duplex printing (DCP-8045D) Paper size Number of sheets Width: 2.75 to 8.66 in. (69.8 to 220 mm) Height: 4.57 to 16.0 in. (116 to 406.4 mm) 50 sheets (...
Users Manual - English
Page 36
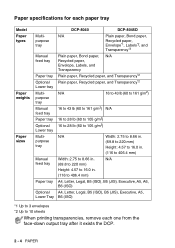
... purpose tray Width: 2.75 to 8.66 in. (69.8 to 220 mm) Height: 4.57 to 16.0 in. (116 to 406.4 mm) Manual Width: 2.75 to 8.66 in . (116 to 406.4 mm) Paper tray A4, Letter, Legal, B5 (ISO), B5 (JIS), Executive, ...) Lower tray Multi- Paper specifications for each one from the face-down output tray after it exists the DCP. 2 - 4 PAPER N/A purpose tray Plain paper, Bond paper, Recycled paper, Envelope*1, Labels*2, and Transparency*2 Manual feed tray Paper tray Optional Lower tray Plain ...remove each paper tray Model Paper types Paper weights Paper sizes DCP-8040 DCP-8045D Multi-
... purpose tray Width: 2.75 to 8.66 in. (69.8 to 220 mm) Height: 4.57 to 16.0 in. (116 to 406.4 mm) Manual Width: 2.75 to 8.66 in . (116 to 406.4 mm) Paper tray A4, Letter, Legal, B5 (ISO), B5 (JIS), Executive, ...) Lower tray Multi- Paper specifications for each one from the face-down output tray after it exists the DCP. 2 - 4 PAPER N/A purpose tray Plain paper, Bond paper, Recycled paper, Envelope*1, Labels*2, and Transparency*2 Manual feed tray Paper tray Optional Lower tray Plain ...remove each paper tray Model Paper types Paper weights Paper sizes DCP-8040 DCP-8045D Multi-

Users Manual - English
Page 39
Slide the paper guides to fit the paper size. 2 Using both hands put paper in the manual feed tray (For DCP-8040) When printing envelopes and labels you should only use the manual feed tray. 1 Open the manual feed tray. PAPER 2 - 7 To load paper or other media in the manual feed tray until the DCP automatically feeds the paper in for a short distance, and then let go of the paper touches the paper feed roller. Hold the paper in this position until the front edge of the paper.
Slide the paper guides to fit the paper size. 2 Using both hands put paper in the manual feed tray (For DCP-8040) When printing envelopes and labels you should only use the manual feed tray. 1 Open the manual feed tray. PAPER 2 - 7 To load paper or other media in the manual feed tray until the DCP automatically feeds the paper in for a short distance, and then let go of the paper touches the paper feed roller. Hold the paper in this position until the front edge of the paper.
Users Manual - English
Page 40
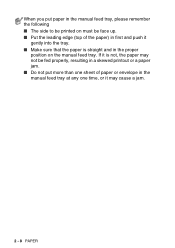
When you put paper in first and push it gently into the tray. ■ Make sure that the paper is not, the paper may cause a jam. 2 - 8 PAPER If it is straight and in the proper position on must be fed properly, resulting in a skewed printout or a paper jam. ■ Do not put more than one sheet of paper or envelope in the manual feed tray at any one time, or it may not be face up. ■ Put the leading edge (top of the paper) in the manual feed tray, please remember the following ■ The side to be printed on the manual feed tray.
When you put paper in first and push it gently into the tray. ■ Make sure that the paper is not, the paper may cause a jam. 2 - 8 PAPER If it is straight and in the proper position on must be fed properly, resulting in a skewed printout or a paper jam. ■ Do not put more than one sheet of paper or envelope in the manual feed tray at any one time, or it may not be face up. ■ Put the leading edge (top of the paper) in the manual feed tray, please remember the following ■ The side to be printed on the manual feed tray.
Users Manual - English
Page 58
...hours before automatically switching off the scanner lamp will take effect the next time the DCP copies or prints is 05 minutes. Turning off the Scanner Lamp The scanner lamp... prefer to turn the lamp off the scanner lamp manually if you wish by turning off , press Secure and Job Cancel simultaneously in Step 2. ■ If the DCP is in sleep mode, there will reduce the lamp... length of the lamp. The factory setting is restarted. You can choose how long the DCP is automatically reset when the DCP receives PC data, or makes a copy. The scanner lamp will remain turned off regularly ...
...hours before automatically switching off the scanner lamp will take effect the next time the DCP copies or prints is 05 minutes. Turning off the Scanner Lamp The scanner lamp... prefer to turn the lamp off the scanner lamp manually if you wish by turning off , press Secure and Job Cancel simultaneously in Step 2. ■ If the DCP is in sleep mode, there will reduce the lamp... length of the lamp. The factory setting is restarted. You can choose how long the DCP is automatically reset when the DCP receives PC data, or makes a copy. The scanner lamp will remain turned off regularly ...

Users Manual - English
Page 81
...flap to 90 g/m2) paper. Face-down output tray The DCP ejects paper with printed surfaces face down into the output tray in the front of the paper first. Manual Duplex Printing The DCP prints all the even-numbered pages on one from the support flap after it well, or you (with ...Extension USING THE DCP AS A PRINTER 6 - 4 Before reinserting the paper, straighten it exits the...
...flap to 90 g/m2) paper. Face-down output tray The DCP ejects paper with printed surfaces face down into the output tray in the front of the paper first. Manual Duplex Printing The DCP prints all the even-numbered pages on one from the support flap after it well, or you (with ...Extension USING THE DCP AS A PRINTER 6 - 4 Before reinserting the paper, straighten it exits the...

Users Manual - English
Page 82
... the paper is not, the paper may not be fed properly, resulting in a skewed printout or a paper jam. ■ Do not put more than one piece of the DCP, put paper in the manual feed tray. 1 Select the Paper Size, Media Type, Paper Source, and other settings in the proper position on the... Manual Feed mode when you want to the DCP. 3 Open the manual feed tray. If it may cause a jam. 5 After the printed page comes out of paper in the manual feed tray at any one time, or it is straight and in the printer driver...
... the paper is not, the paper may not be fed properly, resulting in a skewed printout or a paper jam. ■ Do not put more than one piece of the DCP, put paper in the manual feed tray. 1 Select the Paper Size, Media Type, Paper Source, and other settings in the proper position on the... Manual Feed mode when you want to the DCP. 3 Open the manual feed tray. If it may cause a jam. 5 After the printed page comes out of paper in the manual feed tray at any one time, or it is straight and in the printer driver...

Users Manual - English
Page 84
...paper is not, the paper may cause a jam. 6 - 7 USING THE DCP AS A PRINTER The manual feed tray (For DCP-8040) 1 Select the Paper Size, Media Type, Paper Source, and other settings in the manual feed tray at any one piece of paper in the printer driver. Media Type: Thick paper or Thicker... paper Paper Source: Manual 2 Open the back output tray. 3 Open the manual feed tray...
...paper is not, the paper may cause a jam. 6 - 7 USING THE DCP AS A PRINTER The manual feed tray (For DCP-8040) 1 Select the Paper Size, Media Type, Paper Source, and other settings in the manual feed tray at any one piece of paper in the printer driver. Media Type: Thick paper or Thicker... paper Paper Source: Manual 2 Open the back output tray. 3 Open the manual feed tray...

Users Manual - English
Page 88
Printing on envelopes To print on envelopes use manual feed tray or multi-purpose tray. ■ The DCP automatically turns on the Manual Feed mode when you put paper in the manual feed tray. ■ All sides should be properly folded without any wrinkles or creases. 1 Select the Paper Size, Media Type, Paper Source, and other settings in the printer driver. Media Type: Envelope, Env.thin or Env.thick For DCP-8040: 2 Open the back output tray. 6 - 11 USING THE DCP AS A PRINTER
Printing on envelopes To print on envelopes use manual feed tray or multi-purpose tray. ■ The DCP automatically turns on the Manual Feed mode when you put paper in the manual feed tray. ■ All sides should be properly folded without any wrinkles or creases. 1 Select the Paper Size, Media Type, Paper Source, and other settings in the printer driver. Media Type: Envelope, Env.thin or Env.thick For DCP-8040: 2 Open the back output tray. 6 - 11 USING THE DCP AS A PRINTER
Users Manual - English
Page 89
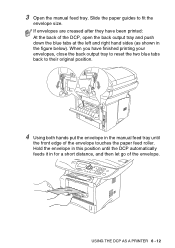
... for a short distance, and then let go of the envelope touches the paper feed roller. When you have been printed: At the back of the DCP, open the back output tray and push down the blue tabs at the left and right hand sides (as shown in the figure below). Hold... the envelope in this position until the DCP automatically feeds it in the manual feed tray until the front edge of the envelope. 3 Open the manual feed tray. USING THE DCP AS A PRINTER 6 - 12 If envelopes are creased after they have finished printing your envelopes, close...
... for a short distance, and then let go of the envelope touches the paper feed roller. When you have been printed: At the back of the DCP, open the back output tray and push down the blue tabs at the left and right hand sides (as shown in the figure below). Hold... the envelope in this position until the DCP automatically feeds it in the manual feed tray until the front edge of the envelope. 3 Open the manual feed tray. USING THE DCP AS A PRINTER 6 - 12 If envelopes are creased after they have finished printing your envelopes, close...
Users Manual - English
Page 90
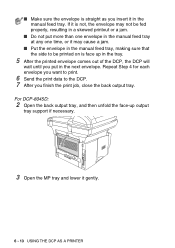
For DCP-8045D: 2 Open the back output tray, and then unfold the face-up in the tray. 5 After the printed envelope comes out of the DCP, the DCP will wait until you put more than one envelope in the manual feed tray at any one time, or it may cause a jam. ■ Put the envelope in the manual feed... tray, making sure that the side to the DCP. 7 After you finish the print job, close...
For DCP-8045D: 2 Open the back output tray, and then unfold the face-up in the tray. 5 After the printed envelope comes out of the DCP, the DCP will wait until you put more than one envelope in the manual feed tray at any one time, or it may cause a jam. ■ Put the envelope in the manual feed... tray, making sure that the side to the DCP. 7 After you finish the print job, close...

Users Manual - English
Page 94
... switch off, the secured data saved in your application software or network server. You can change the default emulation mode manually by using the numeric keys. When the DCP receives information from the PC, it will be cleared from memory. Select ▲▼ & Set 3 Press Stop/Exit...; Auto HP LaserJet ▼ BS-Script 3 Press Set. If the function does not work properly, either select the required emulation mode manually using the DCP panel buttons or use the emulation selection commands in memory will be cleared. ■ After you want to delete the secured data press ...
... switch off, the secured data saved in your application software or network server. You can change the default emulation mode manually by using the numeric keys. When the DCP receives information from the PC, it will be cleared from memory. Select ▲▼ & Set 3 Press Stop/Exit...; Auto HP LaserJet ▼ BS-Script 3 Press Set. If the function does not work properly, either select the required emulation mode manually using the DCP panel buttons or use the emulation selection commands in memory will be cleared. ■ After you want to delete the secured data press ...

Users Manual - English
Page 101
... Images). PRINTER DRIVER SETTINGS 7 - 6 With the Print Setting set to print using Halftone. ■ Check Use System Halftone to Manual, you choose Auto (Recommended), the printer automatically prints with the most suitable print settings. To change the Brightness, Contrast and Graphics Quality options... manually. Print Setting For Windows® 98/98SE/Me Print Setting is used for optimizing your print quality for the type of...
... Images). PRINTER DRIVER SETTINGS 7 - 6 With the Print Setting set to print using Halftone. ■ Check Use System Halftone to Manual, you choose Auto (Recommended), the printer automatically prints with the most suitable print settings. To change the Brightness, Contrast and Graphics Quality options... manually. Print Setting For Windows® 98/98SE/Me Print Setting is used for optimizing your print quality for the type of...


