
Users Manual - English
Page 4
..., which are available for purchase.) In USA: 1-888-879-3232 (voice) 1-800-947-1445 (fax) http://www.brothermall.com In Canada: 1-877-BROTHER (voice) Description Item Toner Cartridge TN-530 (Standard, Prints up to 3,300 pages) TN-560 (High yield, Prints up to 6,500 pages) Drum Unit DR-500 IEEE-1284 Bi-directional...
..., which are available for purchase.) In USA: 1-888-879-3232 (voice) 1-800-947-1445 (fax) http://www.brothermall.com In Canada: 1-877-BROTHER (voice) Description Item Toner Cartridge TN-530 (Standard, Prints up to 3,300 pages) TN-560 (High yield, Prints up to 6,500 pages) Drum Unit DR-500 IEEE-1284 Bi-directional...
Users Manual - English
Page 9
...brother.ca or browse Brother's Web Site: www.brother.com Brother International Corporation (Canada) Ltd. 1 Rue Hôtel de Ville Dollard-Des-Ormeaux, QC H9B 3H6 LIMITED WARRANTY (CANADA) vii For laser products: Failure to remove the Toner Cartridge (and Toner Drum Unit on applicable models) during shipping. BROTHER...This Limited Warranty does not include cleaning, consumables (including, without the ink cartridges will repair this DCP/Facsimile machine shall be delivered or shipped freight prepaid by Brother, its Authorized Service Centers, will VOID your warranty. (Refer to your...
...brother.ca or browse Brother's Web Site: www.brother.com Brother International Corporation (Canada) Ltd. 1 Rue Hôtel de Ville Dollard-Des-Ormeaux, QC H9B 3H6 LIMITED WARRANTY (CANADA) vii For laser products: Failure to remove the Toner Cartridge (and Toner Drum Unit on applicable models) during shipping. BROTHER...This Limited Warranty does not include cleaning, consumables (including, without the ink cartridges will repair this DCP/Facsimile machine shall be delivered or shipped freight prepaid by Brother, its Authorized Service Centers, will VOID your warranty. (Refer to your...
Users Manual - English
Page 19
...to replace the toner cartridge 14-25 Replacing the drum unit 14-30 Checking the drum life 14-34 Page Counter 14-34 xvii about the interface cable 13-2 Industry Canada Compliance Statement (Canada only 13-3 For your safety 13-3 International ENERGY STAR® Compliance Statement 13-3 Laser safety 13-4 FDA...-11 Improving the print quality 14-14 Packing and shipping the DCP 14-18 Routine maintenance 14-21 Cleaning the scanner 14-21 Cleaning the printer 14-22 Cleaning the drum unit 14-23 Replacing the toner cartridge 14-24 How to File 12-8 13 Important information 13-1 Federal ...
...to replace the toner cartridge 14-25 Replacing the drum unit 14-30 Checking the drum life 14-34 Page Counter 14-34 xvii about the interface cable 13-2 Industry Canada Compliance Statement (Canada only 13-3 For your safety 13-3 International ENERGY STAR® Compliance Statement 13-3 Laser safety 13-4 FDA...-11 Improving the print quality 14-14 Packing and shipping the DCP 14-18 Routine maintenance 14-21 Cleaning the scanner 14-21 Cleaning the printer 14-22 Cleaning the drum unit 14-23 Replacing the toner cartridge 14-24 How to File 12-8 13 Important information 13-1 Federal ...

Users Manual - English
Page 23
... open the front cover. 3 Face-down Output Tray Support Flap with Extension (Support Flap) from sliding off the DCP. 4 Control Panel Use the keys and display to control the DCP. 5 Automatic Document Feeder (ADF) Use the ADF unit for multiple page originals. 6 ADF Document Support Extension Place... the ADF unit. 7 ADF Document Output Support Flap Unfold to prevent the scanned pages from sliding off the DCP. 8 Document Cover Open to place the original on the scanner glass. 9 Power Switch Switch it to install a toner cartridge or drum unit. 11 Paper Tray (Tray #1) Load paper here.
... open the front cover. 3 Face-down Output Tray Support Flap with Extension (Support Flap) from sliding off the DCP. 4 Control Panel Use the keys and display to control the DCP. 5 Automatic Document Feeder (ADF) Use the ADF unit for multiple page originals. 6 ADF Document Support Extension Place... the ADF unit. 7 ADF Document Output Support Flap Unfold to prevent the scanned pages from sliding off the DCP. 8 Document Cover Open to place the original on the scanner glass. 9 Power Switch Switch it to install a toner cartridge or drum unit. 11 Paper Tray (Tray #1) Load paper here.

Users Manual - English
Page 29
...on page 14-1.) INTRODUCTION 1 - 9 Close the cover. (See Error messages on page 14-1.) Replace the toner cartridge with a new one. (See Replacing the toner cartridge on and try to print again. LED DCP status Service error Red Cover open . Wait a few seconds, and then turn it back on page 14-24....) Put paper in Montreal). Turn off the power switch. 2. If you cannot clear the error and see the same service call Brother...
...on page 14-1.) INTRODUCTION 1 - 9 Close the cover. (See Error messages on page 14-1.) Replace the toner cartridge with a new one. (See Replacing the toner cartridge on and try to print again. LED DCP status Service error Red Cover open . Wait a few seconds, and then turn it back on page 14-24....) Put paper in Montreal). Turn off the power switch. 2. If you cannot clear the error and see the same service call Brother...
Users Manual - English
Page 48
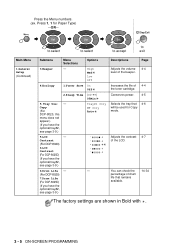
Selects the tray that remains available. Press 1, 1 for Copy mode. High Med Low Off 1.Toner Save On Off 2.Sleep Time (00-99) 05Min - Adjusts the contrast of the toner cartridge. Page 4-4 4-4 4-5 4-6 4-7 14-34 The factory settings are shown in Bold with . 3 - 5 ON-SCREEN PROGRAMMING Main...If you have the optional tray#2, see page 3-9.) 5.LCD Contrast (For DCP-8020) 6.LCD Contrast (For DCP-8025D) (If you have the optional tray#2, see page 3-9.) 6.Drum Life (For DCP-8020) 7.Drum Life (For DCP-8025D) (If you have the optional tray#2, see page 3-9.) Menu Selections ...
Selects the tray that remains available. Press 1, 1 for Copy mode. High Med Low Off 1.Toner Save On Off 2.Sleep Time (00-99) 05Min - Adjusts the contrast of the toner cartridge. Page 4-4 4-4 4-5 4-6 4-7 14-34 The factory settings are shown in Bold with . 3 - 5 ON-SCREEN PROGRAMMING Main...If you have the optional tray#2, see page 3-9.) 5.LCD Contrast (For DCP-8020) 6.LCD Contrast (For DCP-8025D) (If you have the optional tray#2, see page 3-9.) 6.Drum Life (For DCP-8020) 7.Drum Life (For DCP-8025D) (If you have the optional tray#2, see page 3-9.) Menu Selections ...
Users Manual - English
Page 227
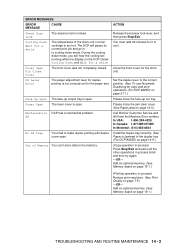
...an optional memory. (See Memory board on page 14-9.) Out of the drum unit or toner cartridge is not correctly set for a while. Please close the jam clear cover. (See Paper jams on the DCP shows Cooling Down, and Wait for the paper size. Please close the face-up output tray... will pause its current print job and go in the duplex tray (For DCP-8025D) on page 15-1.) TROUBLESHOOTING AND ROUTINE MAINTENANCE 14 - 2 XX Call Brother Customer Service and tell them the Machine Error number. The DCP will hear the cooling fan running while the display on page 14-5.) Machine ...
...an optional memory. (See Memory board on page 14-9.) Out of the drum unit or toner cartridge is not correctly set for a while. Please close the jam clear cover. (See Paper jams on the DCP shows Cooling Down, and Wait for the paper size. Please close the face-up output tray... will pause its current print job and go in the duplex tray (For DCP-8025D) on page 15-1.) TROUBLESHOOTING AND ROUTINE MAINTENANCE 14 - 2 XX Call Brother Customer Service and tell them the Machine Error number. The DCP will hear the cooling fan running while the display on page 14-5.) Machine ...
Users Manual - English
Page 228
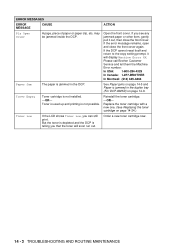
... In Canada: 1-877-BROTHER In Montreal: (514) 685-6464 Paper Jam The paper is telling you can still print. Replace the toner cartridge with a new one. (See Replacing the toner cartridge on page 14-9. But the toner is depleted and the DCP is jammed in the duplex tray (For DCP-8025D) on page 14-24.) Toner Low If the LCD...
... In Canada: 1-877-BROTHER In Montreal: (514) 685-6464 Paper Jam The paper is telling you can still print. Replace the toner cartridge with a new one. (See Replacing the toner cartridge on page 14-9. But the toner is depleted and the DCP is jammed in the duplex tray (For DCP-8025D) on page 14-24.) Toner Low If the LCD...
Users Manual - English
Page 234
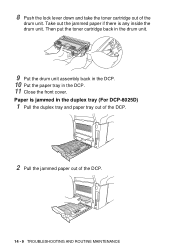
Take out the jammed paper if there is jammed in the DCP. 11 Close the front cover. Then put the toner cartridge back in the drum unit. 9 Put the drum unit assembly back in the DCP. 10 Put the paper tray in the duplex tray (For DCP-8025D) 1 Pull the duplex tray and paper tray out of the DCP. 2 Pull the jammed paper out of the drum unit. Paper is any inside the drum unit. 8 Push the lock lever down and take the toner cartridge out of the DCP. 14 - 9 TROUBLESHOOTING AND ROUTINE MAINTENANCE
Take out the jammed paper if there is jammed in the DCP. 11 Close the front cover. Then put the toner cartridge back in the drum unit. 9 Put the drum unit assembly back in the DCP. 10 Put the paper tray in the duplex tray (For DCP-8025D) 1 Pull the duplex tray and paper tray out of the DCP. 2 Pull the jammed paper out of the drum unit. Paper is any inside the drum unit. 8 Push the lock lever down and take the toner cartridge out of the DCP. 14 - 9 TROUBLESHOOTING AND ROUTINE MAINTENANCE
Users Manual - English
Page 236
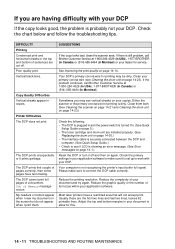
... in Montreal) or your document to connect the DCP cable correctly. Reduce the printing resolution. Most laser printers have text missing. Your DCP's primary corona wire for printing is dirty. If the problem continues, call Brother Customer Service at 1-800-284-4329 (In USA), 1-877-BROTHER (In Canada) or (514) 685-6464 (...800-284-4329 (in USA), 1-877-BROTHER (in Canada) or (514) 685-6464 (in and the power switch is turned On. (See Quick Setup Guide on page 5.) • The toner cartridge and drum unit are cut off and then on page 14-1.) Reset the DCP or turn it is set up to ...
... in Montreal) or your document to connect the DCP cable correctly. Reduce the printing resolution. Most laser printers have text missing. Your DCP's primary corona wire for printing is dirty. If the problem continues, call Brother Customer Service at 1-800-284-4329 (In USA), 1-877-BROTHER (In Canada) or (514) 685-6464 (...800-284-4329 (in USA), 1-877-BROTHER (in Canada) or (514) 685-6464 (in and the power switch is turned On. (See Quick Setup Guide on page 5.) • The toner cartridge and drum unit are cut off and then on page 14-1.) Reset the DCP or turn it is set up to ...

Users Manual - English
Page 239
... the drum unit on page 14-30.) Make sure that you choose the appropriate media type in the DCP itself. (See Toner Save on page 4-4.) Try installing a new toner cartridge. (See Replacing the toner cartridge on page 14-24.) Try installing a new drum unit. (See Replacing the drum unit on page 14...specifications. Conditions such as high humidity can increase the amount of background shading. (See Choosing a location on page x.) Use a new toner cartridge. (See Replacing the toner cartridge on page 14-24.) Use a new drum unit. (See Replacing the drum unit on page 14-30.) Make sure you use ...
... the drum unit on page 14-30.) Make sure that you choose the appropriate media type in the DCP itself. (See Toner Save on page 4-4.) Try installing a new toner cartridge. (See Replacing the toner cartridge on page 14-24.) Try installing a new drum unit. (See Replacing the drum unit on page 14...specifications. Conditions such as high humidity can increase the amount of background shading. (See Choosing a location on page x.) Use a new toner cartridge. (See Replacing the toner cartridge on page 14-24.) Use a new drum unit. (See Replacing the drum unit on page 14-30.) Make sure you use ...

Users Manual - English
Page 241
... the drum unit on page 2-1.) If you use label sheets for a long time. Put in a new toner cartridge. (See Replacing the toner cartridge on page 14-30.) The toner cartridge may be too full. You may clear the problem by itself. ABCDEFGH abcdefghijk ABCD abcde 01234 White lines down...toner cartridge on page 14-22.) The toner cartridge may be damaged. Put in the printer driver. Make sure that you use paper that the guides are using the manual feed tray (or the multi-purpose tray). (See How to clear this problem, especially if the printer has not been used for laser...
... the drum unit on page 2-1.) If you use label sheets for a long time. Put in a new toner cartridge. (See Replacing the toner cartridge on page 14-30.) The toner cartridge may be too full. You may clear the problem by itself. ABCDEFGH abcdefghijk ABCD abcde 01234 White lines down...toner cartridge on page 14-22.) The toner cartridge may be damaged. Put in the printer driver. Make sure that you use paper that the guides are using the manual feed tray (or the multi-purpose tray). (See How to clear this problem, especially if the printer has not been used for laser...

Users Manual - English
Page 244
Fold down the face-down output tray flap. 8 Wrap the DCP in the plastic bag and place it in the drum unit. 6 Place the drum unit and toner cartridge assembly into the plastic bag and seal the bag. 7 Close the front cover. 5 Remove the drum unit and toner cartridge assembly. Leave the toner cartridge installed in the original carton with the original packing material. 14 - 19 TROUBLESHOOTING AND ROUTINE MAINTENANCE
Fold down the face-down output tray flap. 8 Wrap the DCP in the plastic bag and place it in the drum unit. 6 Place the drum unit and toner cartridge assembly into the plastic bag and seal the bag. 7 Close the front cover. 5 Remove the drum unit and toner cartridge assembly. Leave the toner cartridge installed in the original carton with the original packing material. 14 - 19 TROUBLESHOOTING AND ROUTINE MAINTENANCE
Users Manual - English
Page 245
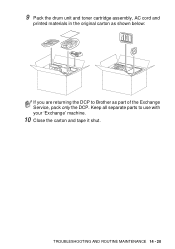
9 Pack the drum unit and toner cartridge assembly, AC cord and printed materials in the original carton as part of the Exchange Service, pack only the DCP. TROUBLESHOOTING AND ROUTINE MAINTENANCE 14 - 20 Keep all separate parts to Brother as shown below: If you are returning the DCP to use with your 'Exchange' machine. 10 Close the carton and tape it shut.
9 Pack the drum unit and toner cartridge assembly, AC cord and printed materials in the original carton as part of the Exchange Service, pack only the DCP. TROUBLESHOOTING AND ROUTINE MAINTENANCE 14 - 20 Keep all separate parts to Brother as shown below: If you are returning the DCP to use with your 'Exchange' machine. 10 Close the carton and tape it shut.
Users Manual - English
Page 247
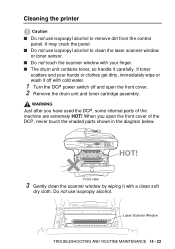
.... When you have used the DCP, some internal parts of the DCP, never touch the shaded parts shown in the diagram below. HOT! If toner scatters and your finger. ■ The drum unit contains toner, so handle it with cold water. 1 Turn the DCP power switch off and open the... front cover of the machine are extremely HOT! WARNING Just after you open the front cover. 2 Remove the drum unit and toner cartridge assembly. Cleaning the printer Caution ■ Do not use isopropyl alcohol to clean the laser scanner window or toner sensor. ...
.... When you have used the DCP, some internal parts of the DCP, never touch the shaded parts shown in the diagram below. HOT! If toner scatters and your finger. ■ The drum unit contains toner, so handle it with cold water. 1 Turn the DCP power switch off and open the... front cover of the machine are extremely HOT! WARNING Just after you open the front cover. 2 Remove the drum unit and toner cartridge assembly. Cleaning the printer Caution ■ Do not use isopropyl alcohol to clean the laser scanner window or toner sensor. ...

Users Manual - English
Page 248
... Home position (▼), printed pages may have vertical stripes. 3 Reinstall the drum unit and toner cartridge assembly into the DCP. (See Replacing the drum unit on a cloth or large disposable paper to avoid spilling and scattering toner. 1 Clean the primary corona wire inside the drum unit by gently sliding the blue tab... 2 Return the blue tab and snap it into the Home position (▼). Cleaning the drum unit We recommend placing the drum unit and toner cartridge assembly on page 14-30.) 4 Close the front cover. 5 Plug in the power cord. 14 - 23 TROUBLESHOOTING AND ROUTINE MAINTENANCE
... Home position (▼), printed pages may have vertical stripes. 3 Reinstall the drum unit and toner cartridge assembly into the DCP. (See Replacing the drum unit on a cloth or large disposable paper to avoid spilling and scattering toner. 1 Clean the primary corona wire inside the drum unit by gently sliding the blue tab... 2 Return the blue tab and snap it into the Home position (▼). Cleaning the drum unit We recommend placing the drum unit and toner cartridge assembly on page 14-30.) 4 Close the front cover. 5 Plug in the power cord. 14 - 23 TROUBLESHOOTING AND ROUTINE MAINTENANCE
Users Manual - English
Page 249
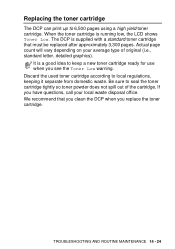
... recommend that must be replaced after approximately 3,300 pages. TROUBLESHOOTING AND ROUTINE MAINTENANCE 14 - 24 Be sure to keep a new toner cartridge ready for use when you replace the toner cartridge. Replacing the toner cartridge The DCP can print up to local regulations, keeping it separate from domestic waste. Actual page count will vary depending on your...
... recommend that must be replaced after approximately 3,300 pages. TROUBLESHOOTING AND ROUTINE MAINTENANCE 14 - 24 Be sure to keep a new toner cartridge ready for use when you replace the toner cartridge. Replacing the toner cartridge The DCP can print up to local regulations, keeping it separate from domestic waste. Actual page count will vary depending on your...

Users Manual - English
Page 250
HOT! 1 Open the front cover and pull out the drum unit. 14 - 25 TROUBLESHOOTING AND ROUTINE MAINTENANCE So, never touch the shaded parts shown in the illustration. How to replace the toner cartridge WARNING Just after you use the DCP, some internal parts of the machine will be extremely HOT!
HOT! 1 Open the front cover and pull out the drum unit. 14 - 25 TROUBLESHOOTING AND ROUTINE MAINTENANCE So, never touch the shaded parts shown in the illustration. How to replace the toner cartridge WARNING Just after you use the DCP, some internal parts of the machine will be extremely HOT!

Users Manual - English
Page 251
Caution ■ Place the drum unit on a drop cloth or large piece of the drum unit. If toner scatters on the right and pull the toner cartridge out of disposable paper to avoid spilling and scattering the toner. ■ To prevent damage to the DCP from static electricity, do not touch the electrodes shown below. 2 Hold down the lock lever on your hands or clothes, immediately wipe it off or wash it with cold water. TROUBLESHOOTING AND ROUTINE MAINTENANCE 14 - 26 Lock Lever Caution Handle the toner cartridge carefully.
Caution ■ Place the drum unit on a drop cloth or large piece of the drum unit. If toner scatters on the right and pull the toner cartridge out of disposable paper to avoid spilling and scattering the toner. ■ To prevent damage to the DCP from static electricity, do not touch the electrodes shown below. 2 Hold down the lock lever on your hands or clothes, immediately wipe it off or wash it with cold water. TROUBLESHOOTING AND ROUTINE MAINTENANCE 14 - 26 Lock Lever Caution Handle the toner cartridge carefully.
Users Manual - English
Page 252
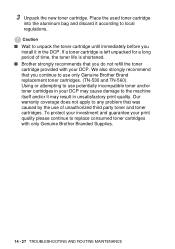
... result in your DCP. We also strongly recommend that was caused by the use potentially incompatible toner and/or toner cartridges in unsatisfactory print quality. 3 Unpack the new toner cartridge. If a toner cartridge is left unpacked for a long period of unauthorized third party toner and toner cartridges. Using or attempting to use of time, the toner life is shortened. ■ Brother strongly recommends...
... result in your DCP. We also strongly recommend that was caused by the use potentially incompatible toner and/or toner cartridges in unsatisfactory print quality. 3 Unpack the new toner cartridge. If a toner cartridge is left unpacked for a long period of unauthorized third party toner and toner cartridges. Using or attempting to use of time, the toner life is shortened. ■ Brother strongly recommends...


