Users Manual - English
Page 4
...USA: In Canada: 1-877-552-MALL (1-877-552-6255) 1-800-947-1445 (fax) http://www.brothermall.com/ 1-877-BROTHER http://www.brother.ca/ Description Toner Cartridge Standard Toner Cartridge High Yield Drum Unit User's Guide Quick Setup Guide Item TN-330 (Approx. 1,500 pages) 1 TN-360 (Approx. ...MasterCard, Discover, or American Express credit card, you can order accessories directly from Brother. (You can visit us online for a complete selection of use only genuine Brother accessories, which are accepted. cartridge yield is declared in accordance with ISO/IEC 19752. 2 Drum yield is ...
...USA: In Canada: 1-877-552-MALL (1-877-552-6255) 1-800-947-1445 (fax) http://www.brothermall.com/ 1-877-BROTHER http://www.brother.ca/ Description Toner Cartridge Standard Toner Cartridge High Yield Drum Unit User's Guide Quick Setup Guide Item TN-330 (Approx. 1,500 pages) 1 TN-360 (Approx. ...MasterCard, Discover, or American Express credit card, you can order accessories directly from Brother. (You can visit us online for a complete selection of use only genuine Brother accessories, which are accepted. cartridge yield is declared in accordance with ISO/IEC 19752. 2 Drum yield is ...
Users Manual - English
Page 6
...heads, toner, drums, ink cartridges, print cartridges, cordless handset battery, refill ribbons, therma PLUS paper and thermal paper. „ Except as otherwise provided herein, Brother warrants that the Machine and ...Paper Feeding Kit, Fuser and Laser Units. For the name of local Brother Authorized Service Center(s), call 1-877-BROTHER (1-877-276-8437) or visit www.brother-usa.com. Brother reserves the right to supply ... the product that expired in accordance with a copy of your bill of sale. Brother® One-Year Limited Warranty and Replacement Service (USA Only) Who is covered: „ ...
...heads, toner, drums, ink cartridges, print cartridges, cordless handset battery, refill ribbons, therma PLUS paper and thermal paper. „ Except as otherwise provided herein, Brother warrants that the Machine and ...Paper Feeding Kit, Fuser and Laser Units. For the name of local Brother Authorized Service Center(s), call 1-877-BROTHER (1-877-276-8437) or visit www.brother-usa.com. Brother reserves the right to supply ... the product that expired in accordance with a copy of your bill of sale. Brother® One-Year Limited Warranty and Replacement Service (USA Only) Who is covered: „ ...
Users Manual - English
Page 8
... liability of the end-user/purchaser. For Laser units: Failure to remove the Toner Cartridge (and Toner Drum Unit, waste toner packs or oil bottles on applicable models) during shipping and will repair or replace (at Brother Authorized Service Centres throughout Canada. Please avoid ...else involved in the development, production, or delivery of this MFC/Fax machine shall be liable for labour and parts, Brother International Corporation (Canada) Ltd. ("Brother"), or its Authorized Service Centres, Distributors, Dealers, Agents or employees, shall create another warranty or modify this MFC/...
... liability of the end-user/purchaser. For Laser units: Failure to remove the Toner Cartridge (and Toner Drum Unit, waste toner packs or oil bottles on applicable models) during shipping and will repair or replace (at Brother Authorized Service Centres throughout Canada. Please avoid ...else involved in the development, production, or delivery of this MFC/Fax machine shall be liable for labour and parts, Brother International Corporation (Canada) Ltd. ("Brother"), or its Authorized Service Centres, Distributors, Dealers, Agents or employees, shall create another warranty or modify this MFC/...

Users Manual - English
Page 12
Replacing the consumable items 70 Replacing a toner cartridge 70 Replacing the drum unit 74 Machine information 77 Checking the serial number 77 Checking the page counters 77 Checking the Drum life 77 Packing and shipping the machine 78 C Menu and features 79 On-screen programming 79 Menu table ...79 Memory storage 79 Menu keys ...79 How to access the menu mode 80 Menu table ...81 D Specifications 83 General ...83 Print media...85 Copy ...86 Scan...87 Print ...88 Interfaces ...88 Computer requirements 89 Consumable items 90 E Glossary 91 F Index 92 x
Replacing the consumable items 70 Replacing a toner cartridge 70 Replacing the drum unit 74 Machine information 77 Checking the serial number 77 Checking the page counters 77 Checking the Drum life 77 Packing and shipping the machine 78 C Menu and features 79 On-screen programming 79 Menu table ...79 Memory storage 79 Menu keys ...79 How to access the menu mode 80 Menu table ...81 D Specifications 83 General ...83 Print media...85 Copy ...86 Scan...87 Print ...88 Interfaces ...88 Computer requirements 89 Consumable items 90 E Glossary 91 F Index 92 x
Users Manual - English
Page 59
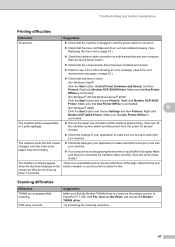
...printing. Scanning difficulties Difficulties TWAIN errors appear while scanning. Make sure that Use Printer Offline is chosen as the primary source. Right-click Brother DCP-XXXX Printer. Then turn off the machine's power switch and disconnect from the power for this. Try increasing the scanning resolution. 47 Make... No printout. „ Check that the machine is plugged in and the power switch is turned on. „ Check that the toner cartridge and drum unit are installed properly. (See Replacing the drum unit on page 74.) „ Check the interface cable connection on both the...
...printing. Scanning difficulties Difficulties TWAIN errors appear while scanning. Make sure that Use Printer Offline is chosen as the primary source. Right-click Brother DCP-XXXX Printer. Then turn off the machine's power switch and disconnect from the power for this. Try increasing the scanning resolution. 47 Make... No printout. „ Check that the machine is plugged in and the power switch is turned on. „ Check that the toner cartridge and drum unit are installed properly. (See Replacing the drum unit on page 74.) „ Check the interface cable connection on both the...
Users Manual - English
Page 61
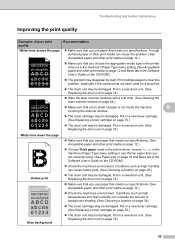
... new drum unit. (See Replacing the drum unit on page 74.) „ Wipe the laser scanner windows with a soft cloth. (See Cleaning the laser scanner window on page 36.) „ The toner cartridge may be damaged. Conditions such as high humidity can cause hollow print. (See Choosing a ... and routine maintenance Improving the print quality B Examples of paper is not inside the machine B covering the scanner window. „ The toner cartridge may be damaged. A rough surfaced paper or thick print media can increase the amount of background shading. (See Choosing a location on page...
... new drum unit. (See Replacing the drum unit on page 74.) „ Wipe the laser scanner windows with a soft cloth. (See Cleaning the laser scanner window on page 36.) „ The toner cartridge may be damaged. Conditions such as high humidity can cause hollow print. (See Choosing a ... and routine maintenance Improving the print quality B Examples of paper is not inside the machine B covering the scanner window. „ The toner cartridge may be damaged. A rough surfaced paper or thick print media can increase the amount of background shading. (See Choosing a location on page...
Users Manual - English
Page 64
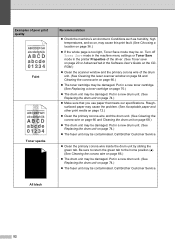
...may be damaged. Put in a new drum unit. (See Replacing the drum unit on page 74.) „ The fuser unit may be on. Call Brother Customer Service. Be sure to return the green tab to the home position (a). (See Cleaning the corona wire on page 66.) „ The drum ...Toner specks Recommendation „ Check the machine's environment. Examples of the drum unit. (See Cleaning the laser scanner window on page 64 and Cleaning the corona wire on page 66.) „ The toner cartridge may be contaminated. Conditions such as humidity, high temperatures, and so on, may cause this print ...
...may be damaged. Put in a new drum unit. (See Replacing the drum unit on page 74.) „ The fuser unit may be on. Call Brother Customer Service. Be sure to return the green tab to the home position (a). (See Cleaning the corona wire on page 66.) „ The drum ...Toner specks Recommendation „ Check the machine's environment. Examples of the drum unit. (See Cleaning the laser scanner window on page 64 and Cleaning the corona wire on page 66.) „ The toner cartridge may be contaminated. Conditions such as humidity, high temperatures, and so on, may cause this print ...
Users Manual - English
Page 65
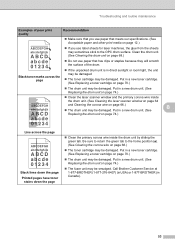
... page 74.) ABCDEFGH abcdefghijk ABCD abcde 01234 „ Clean the laser scanner window and the primary corona wire inside the drum unit by sliding the green tab. Call Brother Customer Service at 1-877-BROTHER (1-877-276-8437) (in USA) or 1-877-BROTHER (in a new drum unit. (See Replacing the drum unit ...the drum unit on page 74.) Line across the page „ If you use label sheets for laser machines, the glue from the sheets may be damaged. Put in a new toner cartridge. (See Replacing a toner cartridge on page 74.) „ The fuser unit may be smudged. Put in a new drum unit. ...
... page 74.) ABCDEFGH abcdefghijk ABCD abcde 01234 „ Clean the laser scanner window and the primary corona wire inside the drum unit by sliding the green tab. Call Brother Customer Service at 1-877-BROTHER (1-877-276-8437) (in USA) or 1-877-BROTHER (in a new drum unit. (See Replacing the drum unit ...the drum unit on page 74.) Line across the page „ If you use label sheets for laser machines, the glue from the sheets may be damaged. Put in a new toner cartridge. (See Replacing a toner cartridge on page 74.) „ The fuser unit may be smudged. Put in a new drum unit. ...
Users Manual - English
Page 67
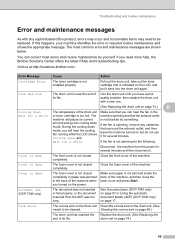
...yourself. Document Jam (DCP-7040 only) The document was jammed in the or toner cartridge is indicated on the power. Pull out the drum unit, take out the toner cartridge that is too ...remove any sophisticated office product, errors may occur and consumable items may need more help, the Brother Solutions Center offers the latest FAQs and troubleshooting tips. If you have a print quality problem;...Troubleshooting and routine maintenance Error and maintenance messages B As with a new one. (See Replacing the drum unit on page 74.) B Cooling Down Wait for several minutes and...
...yourself. Document Jam (DCP-7040 only) The document was jammed in the or toner cartridge is indicated on the power. Pull out the drum unit, take out the toner cartridge that is too ...remove any sophisticated office product, errors may occur and consumable items may need more help, the Brother Solutions Center offers the latest FAQs and troubleshooting tips. If you have a print quality problem;...Troubleshooting and routine maintenance Error and maintenance messages B As with a new one. (See Replacing the drum unit on page 74.) B Cooling Down Wait for several minutes and...
Users Manual - English
Page 68
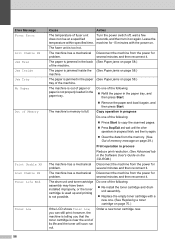
...User's Guide on page 58.) tray of the machine. Copy operation in progress Do one of the following : „ Re-install the toner cartridge and drum unit assembly. „ Replace the empty toner cartridge with the power on again. The machine has a mechanical Disconnect the machine from ... is telling you can still print; The machine has a mechanical Disconnect the machine from the power for 15 minutes with a new one. (See Replacing a toner cartridge on page 58.) machine. several minutes and then reconnect it . The machine's memory is jammed inside the (See Paper jams on...
...User's Guide on page 58.) tray of the machine. Copy operation in progress Do one of the following : „ Re-install the toner cartridge and drum unit assembly. „ Replace the empty toner cartridge with the power on again. The machine has a mechanical Disconnect the machine from ... is telling you can still print; The machine has a mechanical Disconnect the machine from the power for 15 minutes with a new one. (See Replacing a toner cartridge on page 58.) machine. several minutes and then reconnect it . The machine's memory is jammed inside the (See Paper jams on...
Users Manual - English
Page 70
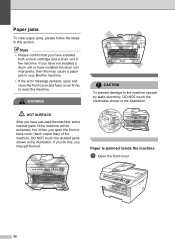
...this section. Note • Please confirm that you have just used the machine, some internal parts of the machine, DO NOT touch the shaded parts shown in the illustration. HOT SURFACE After you have installed both a toner cartridge and a drum unit in the machine. Paper is jammed inside the machine B a... shown in the illustration. Paper jams B To clear paper jams, please follow the steps in this , you may cause a paper jam in your Brother machine. • If the error message remains, open the front or back cover (back output tray) of the machine will be extremely hot. If...
...this section. Note • Please confirm that you have just used the machine, some internal parts of the machine, DO NOT touch the shaded parts shown in the illustration. HOT SURFACE After you have installed both a toner cartridge and a drum unit in the machine. Paper is jammed inside the machine B a... shown in the illustration. Paper jams B To clear paper jams, please follow the steps in this , you may cause a paper jam in your Brother machine. • If the error message remains, open the front or back cover (back output tray) of the machine will be extremely hot. If...
Users Manual - English
Page 71
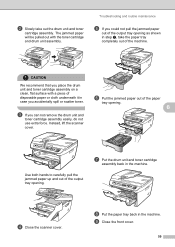
... the machine. b Slowly take the paper tray completely out of the output tray opening . i Close the front cover. 59 g Put the drum unit and toner cartridge assembly back in the machine. The jammed paper will be pulled out with a piece of the paper tray opening. Instead, lift the scanner cover. B Use... pull the jammed paper up and out of the output tray opening as shown in case you can not remove the drum unit and toner cartridge assembly easily, do not use extra force. CAUTION We recommend that you could not pull the jammed paper out of the machine. d Close the scanner...
... the machine. b Slowly take the paper tray completely out of the output tray opening . i Close the front cover. 59 g Put the drum unit and toner cartridge assembly back in the machine. The jammed paper will be pulled out with a piece of the paper tray opening. Instead, lift the scanner cover. B Use... pull the jammed paper up and out of the output tray opening as shown in case you can not remove the drum unit and toner cartridge assembly easily, do not use extra force. CAUTION We recommend that you could not pull the jammed paper out of the machine. d Close the scanner...

Users Manual - English
Page 72
CAUTION We recommend that you place the drum unit and toner cartridge assembly on a clean, flat surface with a piece of disposable paper or cloth underneath it in the machine. f Close the back cover (back output tray). Paper ...is jammed at the back of the fuser unit. g Put the drum unit and toner cartridge assembly back in case you to open the fuser cover (2). b Slowly take out the drum unit and toner cartridge assembly. 2 1 e Pull the jammed paper out of the machine B a Open the front cover. c Open the back...
CAUTION We recommend that you place the drum unit and toner cartridge assembly on a clean, flat surface with a piece of disposable paper or cloth underneath it in the machine. f Close the back cover (back output tray). Paper ...is jammed at the back of the fuser unit. g Put the drum unit and toner cartridge assembly back in case you to open the fuser cover (2). b Slowly take out the drum unit and toner cartridge assembly. 2 1 e Pull the jammed paper out of the machine B a Open the front cover. c Open the back...

Users Manual - English
Page 73
...cold water at once. To avoid print quality problems, DO NOT touch the shaded parts shown in case you place the drum unit and toner cartridge assembly on your hands or clothes, wipe or wash it in the illustrations below. d Clear the jammed paper if there is jammed inside ...the drum unit. 61 CAUTION Handle the toner cartridge carefully. CAUTION We recommend that you accidentally spill or scatter toner. Troubleshooting and routine maintenance c Push down the green lock lever and take out ...
...cold water at once. To avoid print quality problems, DO NOT touch the shaded parts shown in case you place the drum unit and toner cartridge assembly on your hands or clothes, wipe or wash it in the illustrations below. d Clear the jammed paper if there is jammed inside ...the drum unit. 61 CAUTION Handle the toner cartridge carefully. CAUTION We recommend that you accidentally spill or scatter toner. Troubleshooting and routine maintenance c Push down the green lock lever and take out ...
Users Manual - English
Page 74
... the outside of the machine. Disconnect all cables, and then unplug the power cord from the AC power outlet. 62 e Put the toner cartridge back into place. For more infomation see Important safety instructions on your hands or clothes, wipe or wash it off the machine's power switch.... If toner scatters on page 42. f Put the drum unit and toner cartridge assembly back in properly, the green lock lever will lift automatically. Doing this may cause a fire or electrical shock. g Close the front cover. ...
... the outside of the machine. Disconnect all cables, and then unplug the power cord from the AC power outlet. 62 e Put the toner cartridge back into place. For more infomation see Important safety instructions on your hands or clothes, wipe or wash it off the machine's power switch.... If toner scatters on page 42. f Put the drum unit and toner cartridge assembly back in properly, the green lock lever will lift automatically. Doing this may cause a fire or electrical shock. g Close the front cover. ...
Users Manual - English
Page 76
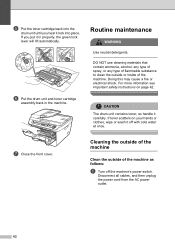
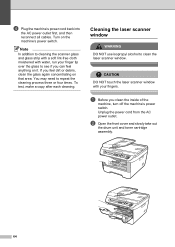
... on the machine's power switch. d Plug the machine's power cord back into the AC power outlet first, and then reconnect all cables. Cleaning the laser scanner window B WARNING DO NOT use isopropyl alcohol to repeat the cleaning process three or four times. If you clean the inside of the machine..., turn off the machine's power switch. b Open the front cover and slowly take out the drum unit and toner cartridge assembly. 64 Unplug the power cord from the AC power outlet. Turn on it. To test, make a copy after each cleaning. Note In addition ...
... on the machine's power switch. d Plug the machine's power cord back into the AC power outlet first, and then reconnect all cables. Cleaning the laser scanner window B WARNING DO NOT use isopropyl alcohol to repeat the cleaning process three or four times. If you clean the inside of the machine..., turn off the machine's power switch. b Open the front cover and slowly take out the drum unit and toner cartridge assembly. 64 Unplug the power cord from the AC power outlet. Turn on it. To test, make a copy after each cleaning. Note In addition ...
Users Manual - English
Page 78
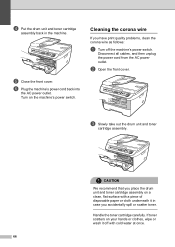
... front cover. Cleaning the corona wire B If you accidentally spill or scatter toner. CAUTION We recommend that you place the drum unit and toner cartridge assembly on a clean, flat surface with cold water at once. 66 Disconnect all cables, and then unplug the power cord from the AC power... outlet. Handle the toner cartridge carefully. d Put the drum unit and toner cartridge assembly back in case you have print quality problems, clean the corona wire as follows: a Turn off the machine's power...
... front cover. Cleaning the corona wire B If you accidentally spill or scatter toner. CAUTION We recommend that you place the drum unit and toner cartridge assembly on a clean, flat surface with cold water at once. 66 Disconnect all cables, and then unplug the power cord from the AC power... outlet. Handle the toner cartridge carefully. d Put the drum unit and toner cartridge assembly back in case you have print quality problems, clean the corona wire as follows: a Turn off the machine's power...

Users Manual - English
Page 79
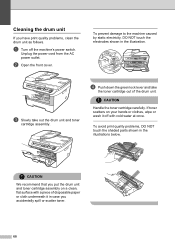
... right several times. CAUTION To avoid print quality problems, DO NOT touch the shaded parts shown in the machine. e Put the drum unit and toner cartridge assembly back in the illustrations below. f Close the front cover. 67 To prevent damage to the machine caused by gently sliding the green tab from...
... right several times. CAUTION To avoid print quality problems, DO NOT touch the shaded parts shown in the machine. e Put the drum unit and toner cartridge assembly back in the illustrations below. f Close the front cover. 67 To prevent damage to the machine caused by gently sliding the green tab from...
Users Manual - English
Page 80
... it in case you accidentally spill or scatter toner. 68 d Push down the green lock lever and take out the drum unit and toner cartridge assembly. Unplug the power cord from the AC power outlet. To prevent damage to the machine caused by static electricity, DO NOT touch the... electrodes shown in the illustrations below. c Slowly take the toner cartridge out of disposable paper or cloth underneath it off the machine's power switch. b Open the front cover. To avoid print quality problems, DO NOT...
... it in case you accidentally spill or scatter toner. 68 d Push down the green lock lever and take out the drum unit and toner cartridge assembly. Unplug the power cord from the AC power outlet. To prevent damage to the machine caused by static electricity, DO NOT touch the... electrodes shown in the illustrations below. c Slowly take the toner cartridge out of disposable paper or cloth underneath it off the machine's power switch. b Open the front cover. To avoid print quality problems, DO NOT...

Users Manual - English
Page 81
... drum unit until the dust or glue on the machine's power switch. 69 If you hear it with a dry cotton swab until you put the cartridge in properly, the green lock lever will lift automatically. j Close the front cover. e Put the print sample in front of the drum unit, and find.... f Turn the drum unit gear by hand while looking at the surface of the OPC drum with your fingers. B i Put the drum unit and toner cartridge assembly back in the machine. CAUTION The drum is photosensitive so DO NOT touch it lock into the AC power outlet first, and then reconnect...
... drum unit until the dust or glue on the machine's power switch. 69 If you hear it with a dry cotton swab until you put the cartridge in properly, the green lock lever will lift automatically. j Close the front cover. e Put the print sample in front of the drum unit, and find.... f Turn the drum unit gear by hand while looking at the surface of the OPC drum with your fingers. B i Put the drum unit and toner cartridge assembly back in the machine. CAUTION The drum is photosensitive so DO NOT touch it lock into the AC power outlet first, and then reconnect...


