
Users Manual - English
Page 4
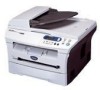
..., which are available for purchase.) In USA: In Canada: 1-888-879-3232 (voice) 1-800-947-1445 (fax) http://www.brothermall.com 1-877-BROTHER (voice) Description Toner Cartridge Drum Unit External Wireless Print/Scan Server (Option) External Print Server (Option) User's Guide Quick Setup Guide Item TN-350 (Prints up to 2,500 pages...
..., which are available for purchase.) In USA: In Canada: 1-888-879-3232 (voice) 1-800-947-1445 (fax) http://www.brothermall.com 1-877-BROTHER (voice) Description Toner Cartridge Drum Unit External Wireless Print/Scan Server (Option) External Print Server (Option) User's Guide Quick Setup Guide Item TN-350 (Prints up to 2,500 pages...
Users Manual - English
Page 6
...one year from the original purchase date. • Accompanying Consumable and Accessory Items: 90 days from other than defects in materials or workmanship. (6)Normal Periodic Maintenance Items, such as Paper Feeding Kit, Fuser and Laser...drums, ink cartridges, print cartridges, refill ribbons, therma PLUS paper and thermal paper. • Except as otherwise provided herein, Brother...DCP and 1-800-276-7746 for the cost of shipping, packing product, and insurance (if you desire). Supply Brother or the Brother...this Product in shipping. Brother® One Year Limited Warranty and Replacement...
...one year from the original purchase date. • Accompanying Consumable and Accessory Items: 90 days from other than defects in materials or workmanship. (6)Normal Periodic Maintenance Items, such as Paper Feeding Kit, Fuser and Laser...drums, ink cartridges, print cartridges, refill ribbons, therma PLUS paper and thermal paper. • Except as otherwise provided herein, Brother...DCP and 1-800-276-7746 for the cost of shipping, packing product, and insurance (if you desire). Supply Brother or the Brother...this Product in shipping. Brother® One Year Limited Warranty and Replacement...
Users Manual - English
Page 8
For laser products: Failure to remove the Toner Cartridge (and Toner Drum Unit on applicable models) during shipping. No.... Damage to your print head resulting from packing without limitation, print cartridges, print head, toner and drum) or damage caused by accident, neglect, misuse or improper installation or operation, any damage caused from ...EXTENT THAT ANY WARRANTIES IMPLIED BY LAW CANNOT BE VALIDLY WAIVED. Internet support: support@brother.ca or browse Brother's Web Site: www.brother.com Brother International Corporation (Canada) Ltd. 1 Rue Hôtel de Ville Dollard-Des-Ormeaux, QC...
For laser products: Failure to remove the Toner Cartridge (and Toner Drum Unit on applicable models) during shipping. No.... Damage to your print head resulting from packing without limitation, print cartridges, print head, toner and drum) or damage caused by accident, neglect, misuse or improper installation or operation, any damage caused from ...EXTENT THAT ANY WARRANTIES IMPLIED BY LAW CANNOT BE VALIDLY WAIVED. Internet support: support@brother.ca or browse Brother's Web Site: www.brother.com Brother International Corporation (Canada) Ltd. 1 Rue Hôtel de Ville Dollard-Des-Ormeaux, QC...
Users Manual - English
Page 12
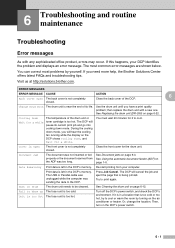
... Canada Compliance Statement (Canada only 5-2 Disconnect device 5-2 International Energy Star® Compliance Statement 5-2 Laser safety 5-2 FDA regulations 5-2 Important safety instructions 5-3 Trademarks 5-4 6 Troubleshooting and routine maintenance Troubleshooting 6-1 Error messages 6-1 Document jams 6-3 Paper jams ...6-4 If you are having difficulty with your DCP 6-8 Improving the print quality 6-11 Cleaning the drum unit 6-12 Packing and shipping the...
... Canada Compliance Statement (Canada only 5-2 Disconnect device 5-2 International Energy Star® Compliance Statement 5-2 Laser safety 5-2 FDA regulations 5-2 Important safety instructions 5-3 Trademarks 5-4 6 Troubleshooting and routine maintenance Troubleshooting 6-1 Error messages 6-1 Document jams 6-3 Paper jams ...6-4 If you are having difficulty with your DCP 6-8 Improving the print quality 6-11 Cleaning the drum unit 6-12 Packing and shipping the...
Users Manual - English
Page 41
... running while the display on the air conditioner or heater. Visit us at http://solutions.brother.com. then replace the drum unit with any sophisticated office product, errors may occur. The DCP will cancel the job and eject the page that is being printed. During the cooling down... by yourself. Then, turn on page 6-22. 6 Troubleshooting and routine maintenance Troubleshooting Error messages As with a new one. Change Drum Soon The drum unit is left in the DCP's memory. Print data is near the end of its current print job and go into cooling down mode, you need...
... running while the display on the air conditioner or heater. Visit us at http://solutions.brother.com. then replace the drum unit with any sophisticated office product, errors may occur. The DCP will cancel the job and eject the page that is being printed. During the cooling down... by yourself. Then, turn on page 6-22. 6 Troubleshooting and routine maintenance Troubleshooting Error messages As with a new one. Change Drum Soon The drum unit is left in the DCP's memory. Print data is near the end of its current print job and go into cooling down mode, you need...
Users Manual - English
Page 42
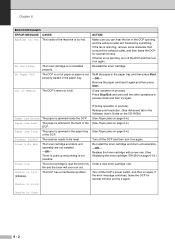
.../Exit and wait until the other operations in process finish and then try it again. Re-install the toner cartridge and drum unit assembly. -OR- Replace the toner cartridge with a new one. (See Replacing the toner cartridge (TN-350) on again. Unable to Print Unable to be reset. Out of Memory The... Software User's Guide on the CD-ROM.) (See Paper jams on page 6-4.) (See Paper jams on page 6-4.) (See Paper jams on page 6-4.) Turn off the DCP and then turn it on page 6-19.) Order a new toner cartridge now. Reinstall the toner cartridge. Paper Jam Rear The paper is full. Toner is...
.../Exit and wait until the other operations in process finish and then try it again. Re-install the toner cartridge and drum unit assembly. -OR- Replace the toner cartridge with a new one. (See Replacing the toner cartridge (TN-350) on again. Unable to Print Unable to be reset. Out of Memory The... Software User's Guide on the CD-ROM.) (See Paper jams on page 6-4.) (See Paper jams on page 6-4.) (See Paper jams on page 6-4.) Turn off the DCP and then turn it on page 6-19.) Order a new toner cartridge now. Reinstall the toner cartridge. Paper Jam Rear The paper is full. Toner is...
Users Manual - English
Page 44
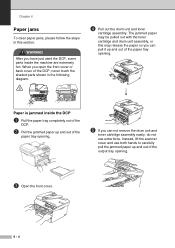
... hot. The jammed paper may be pulled out with the toner cartridge and drum unit assembly, or this section. WARNING After you have just used the DCP, some parts inside the DCP 1 Pull the paper tray completely out of the DCP. 2 Pull the jammed paper up and out of the paper tray opening. 5 If... you can not remove the drum unit and toner cartridge assembly easily, do not use both...
... hot. The jammed paper may be pulled out with the toner cartridge and drum unit assembly, or this section. WARNING After you have just used the DCP, some parts inside the DCP 1 Pull the paper tray completely out of the DCP. 2 Pull the jammed paper up and out of the paper tray opening. 5 If... you can not remove the drum unit and toner cartridge assembly easily, do not use both...
Users Manual - English
Page 45
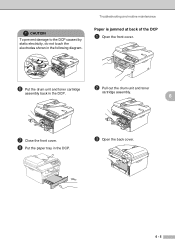
CAUTION To prevent damage to the DCP caused by static electricity, do not touch the electrodes shown in the DCP. 3 Open the back cover. 6 - 5 cartridge assembly. 6 7 Close the front cover. 8 Put the paper tray in the following diagram. Troubleshooting and routine maintenance Paper is jammed at back of the DCP 1 Open the front cover. 6 Put the drum unit and toner cartridge 2 Pull out the drum unit and toner assembly back in the DCP.
CAUTION To prevent damage to the DCP caused by static electricity, do not touch the electrodes shown in the DCP. 3 Open the back cover. 6 - 5 cartridge assembly. 6 7 Close the front cover. 8 Put the paper tray in the following diagram. Troubleshooting and routine maintenance Paper is jammed at back of the DCP 1 Open the front cover. 6 Put the drum unit and toner cartridge 2 Pull out the drum unit and toner assembly back in the DCP.

Users Manual - English
Page 46
Chapter 6 4 Pull the tab toward you gently pull out the paper with one hand as you to open the rear chute cover. 7 Put the drum unit and toner cartridge assembly back into the DCP. 8 Close the front cover. 5 Pull the jammed paper out of the fuser unit. If the jammed paper cannot be pulled out easily, push down on the blue tab with the other hand. 6 Close the back cover. 6 - 6
Chapter 6 4 Pull the tab toward you gently pull out the paper with one hand as you to open the rear chute cover. 7 Put the drum unit and toner cartridge assembly back into the DCP. 8 Close the front cover. 5 Pull the jammed paper out of the fuser unit. If the jammed paper cannot be pulled out easily, push down on the blue tab with the other hand. 6 Close the back cover. 6 - 6

Users Manual - English
Page 47
...cover. 6 - 7 If you hear it lock into the drum unit until you put it in properly, the lock lever will lift automatically. 2 Pull out the drum unit and toner cartridge assembly. 5 Put the drum unit and toner cartridge assembly back in the DCP. 6 3 Hold down the lock lever on the left ...and pull the toner cartridge out of the drum unit. Paper is any inside the drum unit and toner cartridge assembly 1 ...
...cover. 6 - 7 If you hear it lock into the drum unit until you put it in properly, the lock lever will lift automatically. 2 Pull out the drum unit and toner cartridge assembly. 5 Put the drum unit and toner cartridge assembly back in the DCP. 6 3 Hold down the lock lever on the left ...and pull the toner cartridge out of the drum unit. Paper is any inside the drum unit and toner cartridge assembly 1 ...

Users Manual - English
Page 48
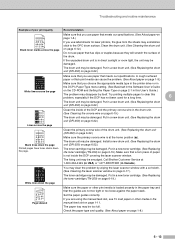
... on. -OR- • The toner cartridge and drum unit are having difficulty with your DCP If you think there is a problem with your document and try again. Click Start and then Printer and Faxes. Select the 'Brother DCP-7020' and right-click. Adjust the top and bottom margins... in your document to work with your DCP, check the chart below and follow the troubleshooting tips. Clean your copies. Reduce the ...
... on. -OR- • The toner cartridge and drum unit are having difficulty with your DCP If you think there is a problem with your document and try again. Click Start and then Printer and Faxes. Select the 'Brother DCP-7020' and right-click. Adjust the top and bottom margins... in your document to work with your DCP, check the chart below and follow the troubleshooting tips. Clean your copies. Reduce the ...
Users Manual - English
Page 51
... whole page is not connected to a computer, turn off Toner Save mode in the DCP itself. (See Toner Save on page 2-2.) Clean the laser scanner window and the primary corona wire on the drum unit. (See Cleaning the laser scanner window on page 6-17 and Cleaning the corona wire on page 6-19.) If... the print quality has not improved, install a new drum unit. (See Replacing the drum unit (DR-350) on page 6-22.) Install a new toner cartridge. (See...
... whole page is not connected to a computer, turn off Toner Save mode in the DCP itself. (See Toner Save on page 2-2.) Clean the laser scanner window and the primary corona wire on the drum unit. (See Cleaning the laser scanner window on page 6-17 and Cleaning the corona wire on page 6-19.) If... the print quality has not improved, install a new drum unit. (See Replacing the drum unit (DR-350) on page 6-22.) Install a new toner cartridge. (See...

Users Manual - English
Page 52
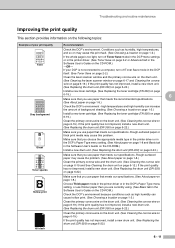
Do not use a scrubbing or wiping motion because this might cause permanent damage to the drum unit. OPC drum surface 4 When you find the substance on the drum as you check the surface of the OPC drum. Make 10 to 15 copies of a blank, white sheet of paper. (See Making multiple copies on page ... graphics at 3.1 in. (78.5 mm) intervals 3.1 in. (78.5 mm) 3.1 in. (78.5 mm) Black Spots at 3.1 in front of the drum unit so you need to install a new drum. (See Replacing the drum unit (DR-350) on printed documents. If the print quality still has not improved you will know the exact position...
Do not use a scrubbing or wiping motion because this might cause permanent damage to the drum unit. OPC drum surface 4 When you find the substance on the drum as you check the surface of the OPC drum. Make 10 to 15 copies of a blank, white sheet of paper. (See Making multiple copies on page ... graphics at 3.1 in. (78.5 mm) intervals 3.1 in. (78.5 mm) 3.1 in. (78.5 mm) Black Spots at 3.1 in front of the drum unit so you need to install a new drum. (See Replacing the drum unit (DR-350) on printed documents. If the print quality still has not improved you will know the exact position...
Users Manual - English
Page 53
...the corona wire on page 6-19.) The drum unit may be damaged. Put in a new drum unit. (See Replacing the drum unit (DR-350) on page 6-22.) ABCDEFGH abcdefghijk ABCD abcde 01234 Lines across the page Clean the inside the DCP covering the laser scanner window. ABCDEFGH abcdefghijk ABCD abcde 01234 ...22.) The toner cartridge may be too full. Put in Canada). The paper tray may be damaged. The drum unit may be smudged. The fixing unit may be damaged. Call Brother Customer Service at the home position (▲). Put in a new toner cartridge. (See Replacing the toner cartridge ...
...the corona wire on page 6-19.) The drum unit may be damaged. Put in a new drum unit. (See Replacing the drum unit (DR-350) on page 6-22.) ABCDEFGH abcdefghijk ABCD abcde 01234 Lines across the page Clean the inside the DCP covering the laser scanner window. ABCDEFGH abcdefghijk ABCD abcde 01234 ...22.) The toner cartridge may be too full. Put in Canada). The paper tray may be damaged. The drum unit may be smudged. The fixing unit may be damaged. Call Brother Customer Service at the home position (▲). Put in a new toner cartridge. (See Replacing the toner cartridge ...

Users Manual - English
Page 55
...use the packing materials that came with the carrier. 1 Turn off the DCP's power switch. 2 Unplug the DCP from the AC power outlet. 3 Unplug the cable from the DCP. 4 Open the front cover. 5 Remove the drum unit and toner cartridge assembly. Leave the toner cartridge installed in the ...original carton as part of the Exchange Service, pack only the DCP. Troubleshooting and routine maintenance 8 Wrap the DCP in the plastic bag and place it shut. 6 - 15 Keep all separate parts and printed materials to Brother...
...use the packing materials that came with the carrier. 1 Turn off the DCP's power switch. 2 Unplug the DCP from the AC power outlet. 3 Unplug the cable from the DCP. 4 Open the front cover. 5 Remove the drum unit and toner cartridge assembly. Leave the toner cartridge installed in the ...original carton as part of the Exchange Service, pack only the DCP. Troubleshooting and routine maintenance 8 Wrap the DCP in the plastic bag and place it shut. 6 - 15 Keep all separate parts and printed materials to Brother...

Users Manual - English
Page 56
...Remove anything that contain ammonia. ■ Do not use isopropyl alcohol to remove dust. 5 Re-load the paper and put the paper tray in the DCP. 6 - 16 If toner scatters and your hands or clothes get dirty, immediately wipe or wash it carefully. Cleaning with cold water. Chapter 6 Routine... maintenance CAUTION The drum unit contains toner, so handle it off with volatile liquids such as thinner or benzine will damage the outside surface of the DCP. ■ Do not use cleaning materials that is stuck inside the paper tray....
...Remove anything that contain ammonia. ■ Do not use isopropyl alcohol to remove dust. 5 Re-load the paper and put the paper tray in the DCP. 6 - 16 If toner scatters and your hands or clothes get dirty, immediately wipe or wash it carefully. Cleaning with cold water. Chapter 6 Routine... maintenance CAUTION The drum unit contains toner, so handle it off with volatile liquids such as thinner or benzine will damage the outside surface of the DCP. ■ Do not use cleaning materials that is stuck inside the paper tray....
Users Manual - English
Page 57
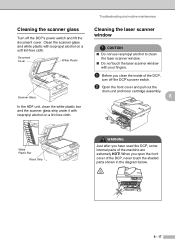
... isopropyl alcohol on a lint-free cloth. Troubleshooting and routine maintenance Cleaning the laser scanner window CAUTION ■ Do not use isopropyl alcohol to clean the laser scanner window. ■ Do not touch the laser scanner window with isopropyl alcohol on a soft lint-free cloth. Document Cover ...document cover. When you have used the DCP, some internal parts of the DCP, never touch the shaded parts shown in the diagram below. 6 - 17 Cleaning the scanner glass Turn off the DCP's power switch. 2 Open the front cover and pull out the drum unit and toner cartridge assembly. 6 ...
... isopropyl alcohol on a lint-free cloth. Troubleshooting and routine maintenance Cleaning the laser scanner window CAUTION ■ Do not use isopropyl alcohol to clean the laser scanner window. ■ Do not touch the laser scanner window with isopropyl alcohol on a soft lint-free cloth. Document Cover ...document cover. When you have used the DCP, some internal parts of the DCP, never touch the shaded parts shown in the diagram below. 6 - 17 Cleaning the scanner glass Turn off the DCP's power switch. 2 Open the front cover and pull out the drum unit and toner cartridge assembly. 6 ...
Users Manual - English
Page 58
Laser Scanner Window 4 Put the drum unit and toner cartridge assembly back into the DCP. 5 Close the front cover. 6 - 18 Chapter 6 CAUTION To prevent damage to the DCP from static electricity, do not touch the electrodes shown below. 6 Turn on the DCP's power switch. 3 Gently clean the laser scanner window by wiping it with a clean soft, dry, lint-free cloth. Do not use isopropyl alcohol.
Laser Scanner Window 4 Put the drum unit and toner cartridge assembly back into the DCP. 5 Close the front cover. 6 - 18 Chapter 6 CAUTION To prevent damage to the DCP from static electricity, do not touch the electrodes shown below. 6 Turn on the DCP's power switch. 3 Gently clean the laser scanner window by wiping it with a clean soft, dry, lint-free cloth. Do not use isopropyl alcohol.
Users Manual - English
Page 59
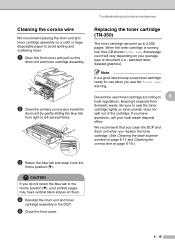
...19 Discard the used toner cartridge according to 6 local regulations, keeping it into the Home position (▼). We recommend that you clean the DCP and drum unit when you do not return the blue tab to the Home position (▼), your average type of the cartridge. CAUTION If you replace...(See Cleaning the laser scanner window on page 6-17 and Cleaning the corona wire on page 6-19.) 3 Return the blue tab and snap it separate from right to left several times. Troubleshooting and routine maintenance Cleaning the corona wire We recommend placing the drum unit and toner ...
...19 Discard the used toner cartridge according to 6 local regulations, keeping it into the Home position (▼). We recommend that you clean the DCP and drum unit when you do not return the blue tab to the Home position (▼), your average type of the cartridge. CAUTION If you replace...(See Cleaning the laser scanner window on page 6-17 and Cleaning the corona wire on page 6-19.) 3 Return the blue tab and snap it separate from right to left several times. Troubleshooting and routine maintenance Cleaning the corona wire We recommend placing the drum unit and toner ...

Users Manual - English
Page 60
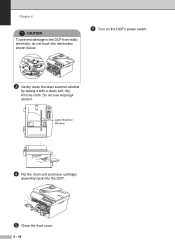
Chapter 6 How to replace the toner cartridge WARNING Just after you use the DCP, some internal parts of the drum unit. 1 Open the front cover and pull out the drum unit and toner cartridge assembly. Never touch the shaded parts shown in the illustration. 2 Hold down the lock lever on the left and pull... the toner cartridge out of the machine will be extremely HOT! CAUTION ■ Place the drum unit on your hands or clothes, immediately wipe it off or wash it according to the DCP from static electricity, do not touch the electrodes shown below. If toner scatters on a drop cloth...
Chapter 6 How to replace the toner cartridge WARNING Just after you use the DCP, some internal parts of the drum unit. 1 Open the front cover and pull out the drum unit and toner cartridge assembly. Never touch the shaded parts shown in the illustration. 2 Hold down the lock lever on the left and pull... the toner cartridge out of the machine will be extremely HOT! CAUTION ■ Place the drum unit on your hands or clothes, immediately wipe it off or wash it according to the DCP from static electricity, do not touch the electrodes shown below. If toner scatters on a drop cloth...


