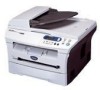
Users Manual - English
Page 8
... Providence. For laser products: Failure to remove the Toner Cartridge (and Toner Drum Unit on applicable models) during shipping. Internet support: support@brother.ca or browse Brother's Web Site: www.brother.com Brother International Corporation (Canada) Ltd. 1 Rue Hôtel de Ville Dollard-Des-Ormeaux, QC H9B 3H6 vi This Limited Warranty does not include cleaning, consumables (including...
... Providence. For laser products: Failure to remove the Toner Cartridge (and Toner Drum Unit on applicable models) during shipping. Internet support: support@brother.ca or browse Brother's Web Site: www.brother.com Brother International Corporation (Canada) Ltd. 1 Rue Hôtel de Ville Dollard-Des-Ormeaux, QC H9B 3H6 vi This Limited Warranty does not include cleaning, consumables (including...
Users Manual - English
Page 12
... (Canada only 5-2 Disconnect device 5-2 International Energy Star® Compliance Statement 5-2 Laser safety 5-2 FDA regulations 5-2 Important safety instructions 5-3 Trademarks 5-4 6 Troubleshooting and routine maintenance Troubleshooting 6-1 Error messages 6-1 Document jams 6-3 Paper jams ...6-4 If you are having difficulty with your DCP 6-8 Improving the print quality 6-11 Cleaning the drum unit 6-12 Packing and shipping the DCP 6-15 Routine maintenance 6-16...
... (Canada only 5-2 Disconnect device 5-2 International Energy Star® Compliance Statement 5-2 Laser safety 5-2 FDA regulations 5-2 Important safety instructions 5-3 Trademarks 5-4 6 Troubleshooting and routine maintenance Troubleshooting 6-1 Error messages 6-1 Document jams 6-3 Paper jams ...6-4 If you are having difficulty with your DCP 6-8 Improving the print quality 6-11 Cleaning the drum unit 6-12 Packing and shipping the DCP 6-15 Routine maintenance 6-16...
Users Manual - English
Page 41
...more help, the Brother Solutions Center offers latest FAQs and troubleshooting tips. You must wait 20 minutes for a while The temperature of the drum unit or toner cartridge is too hot. Print data is too cold or too hot, try to cool. See Cleaning the drum unit on the DCP's power switch. 6... is too hot. 6 Troubleshooting and routine maintenance Troubleshooting Error messages As with a new one. Unit is too Hot The fuser unit is too cold. Dust on the DCP shows Cooling Down, and Wait for the drum unit. During the cooling down mode. Visit us at http://solutions...
...more help, the Brother Solutions Center offers latest FAQs and troubleshooting tips. You must wait 20 minutes for a while The temperature of the drum unit or toner cartridge is too hot. Print data is too cold or too hot, try to cool. See Cleaning the drum unit on the DCP's power switch. 6... is too hot. 6 Troubleshooting and routine maintenance Troubleshooting Error messages As with a new one. Unit is too Hot The fuser unit is too cold. Dust on the DCP shows Cooling Down, and Wait for the drum unit. During the cooling down mode. Visit us at http://solutions...

Users Manual - English
Page 48
... Center offers the latest FAQs and troubleshooting tips. Vertical black lines. Clean your primary corona wire (See Cleaning the corona wire on again. Click Start and then Printer and Faxes. Select the 'Brother DCP-7020' and right-click. Check the primary settings in your application software to make sure it ... power switch is turned on. -OR- • The toner cartridge and drum unit are installed properly. (See Replacing the drum unit (DR-350) on page 6-22.) -OR- • The interface cable is securely connected between the DCP and computer. (See the Quick Setup Guide.) -OR- • Check ...
... Center offers the latest FAQs and troubleshooting tips. Vertical black lines. Clean your primary corona wire (See Cleaning the corona wire on again. Click Start and then Printer and Faxes. Select the 'Brother DCP-7020' and right-click. Check the primary settings in your application software to make sure it ... power switch is turned on. -OR- • The toner cartridge and drum unit are installed properly. (See Replacing the drum unit (DR-350) on page 6-22.) -OR- • The interface cable is securely connected between the DCP and computer. (See the Quick Setup Guide.) -OR- • Check ...
Users Manual - English
Page 51
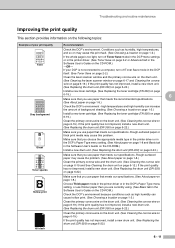
... (See About paper on page 1-8 and Basic tab in the DCP itself. (See Toner Save on page 2-2.) Clean the laser scanner window and the primary corona wire on the drum unit. (See Cleaning the laser scanner window on page 6-17 and Cleaning the corona wire on page 6-19.) If the print quality has... not improved, install a new drum unit. (See Replacing the drum unit (DR-350) on ...
... (See About paper on page 1-8 and Basic tab in the DCP itself. (See Toner Save on page 2-2.) Clean the laser scanner window and the primary corona wire on the drum unit. (See Cleaning the laser scanner window on page 6-17 and Cleaning the corona wire on page 6-19.) If the print quality has... not improved, install a new drum unit. (See Replacing the drum unit (DR-350) on ...

Users Manual - English
Page 52
... assembly, and then remove the toner cartridge from the drum unit. 2 Position the print sample in . (78.5 mm) intervals Recommendation Cleaning the drum unit Dust, paper powder, glue, and so on may stick to the surface of the photosensitive drum (OPC) and cause black or white spots to appear... Making multiple copies on page 3-1.) If you still see the spots on printed documents after making multiple copies, clean the drum unit as you need to install a new drum. (See Replacing the drum unit (DR-350) on printed documents. Do not use a scrubbing or wiping motion because this might damage ...
... assembly, and then remove the toner cartridge from the drum unit. 2 Position the print sample in . (78.5 mm) intervals Recommendation Cleaning the drum unit Dust, paper powder, glue, and so on may stick to the surface of the photosensitive drum (OPC) and cause black or white spots to appear... Making multiple copies on page 3-1.) If you still see the spots on printed documents after making multiple copies, clean the drum unit as you need to install a new drum. (See Replacing the drum unit (DR-350) on printed documents. Do not use a scrubbing or wiping motion because this might damage ...
Users Manual - English
Page 53
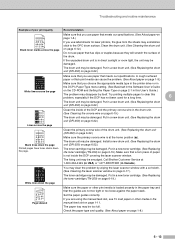
...12.) Do not use paper that has clips or staples because they will scratch the surface of the drum. If the unpacked drum unit is at 1-800-284-4329 (in USA) or 1-877-BROTHER (in Canada). A rough surfaced ABCDEFGH abcdefghijk ABCD abcde 01234 White lines across the page paper or thick...the manual feed slot on page 1-11. Put in a new drum unit. (See Replacing the drum unit (DR-350) on page 6-22.) ABCDEFGH abcdefghijk ABCD abcde 01234 Lines across the page Clean the inside the DCP covering the laser scanner window. The drum unit may be damaged. The fixing unit may be damaged. ...
...12.) Do not use paper that has clips or staples because they will scratch the surface of the drum. If the unpacked drum unit is at 1-800-284-4329 (in USA) or 1-877-BROTHER (in Canada). A rough surfaced ABCDEFGH abcdefghijk ABCD abcde 01234 White lines across the page paper or thick...the manual feed slot on page 1-11. Put in a new drum unit. (See Replacing the drum unit (DR-350) on page 6-22.) ABCDEFGH abcdefghijk ABCD abcde 01234 Lines across the page Clean the inside the DCP covering the laser scanner window. The drum unit may be damaged. The fixing unit may be damaged. ...

Users Manual - English
Page 56
Cleaning with cold water. Chapter 6 Routine maintenance CAUTION The drum unit contains toner, so handle it off with volatile liquids such as thinner or benzine will damage the outside surface of the DCP. ■ Do not use isopropyl alcohol to remove dirt from the control panel. If toner ...to remove dust. 3 Remove anything that contain ammonia. ■ Do not use cleaning materials that is stuck inside the paper tray. 4 Wipe the inside of the DCP CAUTION ■ Use neutral detergents. Cleaning the outside of the DCP with a soft cloth to remove dust. 5 Re-load the paper and put...
Cleaning with cold water. Chapter 6 Routine maintenance CAUTION The drum unit contains toner, so handle it off with volatile liquids such as thinner or benzine will damage the outside surface of the DCP. ■ Do not use isopropyl alcohol to remove dirt from the control panel. If toner ...to remove dust. 3 Remove anything that contain ammonia. ■ Do not use cleaning materials that is stuck inside the paper tray. 4 Wipe the inside of the DCP CAUTION ■ Use neutral detergents. Cleaning the outside of the DCP with a soft cloth to remove dust. 5 Re-load the paper and put...
Users Manual - English
Page 57
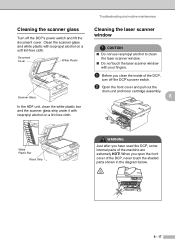
...DCP, some internal parts of the machine are extremely HOT! Cleaning the scanner glass Turn off the DCP's power switch. 2 Open the front cover and pull out the drum unit and toner cartridge assembly. 6 White Plastic Bar Glass Strip WARNING Just after you open the front cover of the DCP... with isopropyl alcohol on a lint-free cloth. Troubleshooting and routine maintenance Cleaning the laser scanner window CAUTION ■ Do not use isopropyl alcohol to clean the laser scanner window. ■ Do not touch the laser scanner window with isopropyl alcohol on a soft lint-free cloth. Document ...
...DCP, some internal parts of the machine are extremely HOT! Cleaning the scanner glass Turn off the DCP's power switch. 2 Open the front cover and pull out the drum unit and toner cartridge assembly. 6 White Plastic Bar Glass Strip WARNING Just after you open the front cover of the DCP... with isopropyl alcohol on a lint-free cloth. Troubleshooting and routine maintenance Cleaning the laser scanner window CAUTION ■ Do not use isopropyl alcohol to clean the laser scanner window. ■ Do not touch the laser scanner window with isopropyl alcohol on a soft lint-free cloth. Document ...
Users Manual - English
Page 58
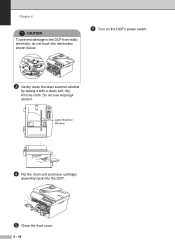
Laser Scanner Window 4 Put the drum unit and toner cartridge assembly back into the DCP. 5 Close the front cover. 6 - 18 Chapter 6 CAUTION To prevent damage to the DCP from static electricity, do not touch the electrodes shown below. 6 Turn on the DCP's power switch. 3 Gently clean the laser scanner window by wiping it with a clean soft, dry, lint-free cloth. Do not use isopropyl alcohol.
Laser Scanner Window 4 Put the drum unit and toner cartridge assembly back into the DCP. 5 Close the front cover. 6 - 18 Chapter 6 CAUTION To prevent damage to the DCP from static electricity, do not touch the electrodes shown below. 6 Turn on the DCP's power switch. 3 Gently clean the laser scanner window by wiping it with a clean soft, dry, lint-free cloth. Do not use isopropyl alcohol.
Users Manual - English
Page 59
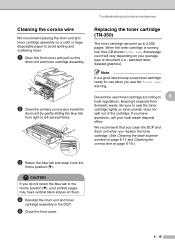
...large disposable paper to keep a new toner cartridge ready for use when you replace the toner cartridge. (See Cleaning the laser scanner window on page 6-17 and Cleaning the corona wire on your local waste disposal office. When the toner cartridge is a good idea to avoid.... Troubleshooting and routine maintenance Cleaning the corona wire We recommend placing the drum unit and toner cartridge assembly on them. 4 Reinstall the drum unit and toner cartridge assembly in the DCP. 5 Close the front cover. 6 - 19 We recommend that you clean the DCP and drum unit when you see the...
...large disposable paper to keep a new toner cartridge ready for use when you replace the toner cartridge. (See Cleaning the laser scanner window on page 6-17 and Cleaning the corona wire on your local waste disposal office. When the toner cartridge is a good idea to avoid.... Troubleshooting and routine maintenance Cleaning the corona wire We recommend placing the drum unit and toner cartridge assembly on them. 4 Reinstall the drum unit and toner cartridge assembly in the DCP. 5 Close the front cover. 6 - 19 We recommend that you clean the DCP and drum unit when you see the...

Users Manual - English
Page 62
... item, and it is up to buy a new one. Even if the LCD shows Change Drum Soon, you put it in the output print quality (even before reinstalling the drum unit and toner cartridge assembly. 8 Install the drum unit and toner cartridge assembly into place. However, if...drum unit. (See Cleaning the laser scanner window on paper. Because we have no control over the many factors that will print may be replaced. Replacing the drum unit (DR-350) The DCP uses a drum unit to the Home position (▼) before Change Drum Soon appears), then the drum unit should clean the DCP...
... item, and it is up to buy a new one. Even if the LCD shows Change Drum Soon, you put it in the output print quality (even before reinstalling the drum unit and toner cartridge assembly. 8 Install the drum unit and toner cartridge assembly into place. However, if...drum unit. (See Cleaning the laser scanner window on paper. Because we have no control over the many factors that will print may be replaced. Replacing the drum unit (DR-350) The DCP uses a drum unit to the Home position (▼) before Change Drum Soon appears), then the drum unit should clean the DCP...
Users Manual - English
Page 77
...Reduce key 3-2 multiple copies 3-1 Number of Copies key 3-1 Options key 3-4 Page Layout 3-5, 3-7 single copy 3-1 sort 3-5 temporary settings 3-2 D Drum unit cleaning 6-12, 6-19 replacing 6-22 E Error messages on LCD 6-1 No Paper Fed 6-2 Out of document 1-6 type 2-1 PaperPort® See Software ...Guide on the CD-ROM. B Brother accessories and supplies ii Brother numbers i Customer Service i FAQs (frequently asked questions i fax back system ii product support i warranties iii, iv, vi C Cleaning corona wire 6-19 drum unit 6-12 laser scanner window 6-17 scanner glass 6-...
...Reduce key 3-2 multiple copies 3-1 Number of Copies key 3-1 Options key 3-4 Page Layout 3-5, 3-7 single copy 3-1 sort 3-5 temporary settings 3-2 D Drum unit cleaning 6-12, 6-19 replacing 6-22 E Error messages on LCD 6-1 No Paper Fed 6-2 Out of document 1-6 type 2-1 PaperPort® See Software ...Guide on the CD-ROM. B Brother accessories and supplies ii Brother numbers i Customer Service i FAQs (frequently asked questions i fax back system ii product support i warranties iii, iv, vi C Cleaning corona wire 6-19 drum unit 6-12 laser scanner window 6-17 scanner glass 6-...


