
Accessory Catalog
Page 7
It can be used for stitching heavy fabrics together. 1. Attach the seam guide on the needle plate with all Brother presser feet. Place the cut edge like a serger or overlock. Lower the presser foot and guide the fabric through the presser foot as needed. 3. Sew the stitches keeping a certain seam allowance. Available in the seam line of the fabric. 2. SA189 ABCDEFGHJKLMNO www.brother.com Brother General Sewing Accessories 11 Seam Guide Side Cutter Stitch Guide Foot Seam Guide Guides fabric edge with the center straight stitch. Make a cut about 2 cm (3/4'') long in Fall ...
It can be used for stitching heavy fabrics together. 1. Attach the seam guide on the needle plate with all Brother presser feet. Place the cut edge like a serger or overlock. Lower the presser foot and guide the fabric through the presser foot as needed. 3. Sew the stitches keeping a certain seam allowance. Available in the seam line of the fabric. 2. SA189 ABCDEFGHJKLMNO www.brother.com Brother General Sewing Accessories 11 Seam Guide Side Cutter Stitch Guide Foot Seam Guide Guides fabric edge with the center straight stitch. Make a cut about 2 cm (3/4'') long in Fall ...

Accessory Catalog
Page 11
... select zigzag stitch with brother sewing machines of 7 mm feed width. 1. Perfect for couching! 1. Place cord under the presser foot. 3. Set the zigzag width slightly wider than the width of the braid. 6. Perfect for quilting appliqué! 1. It can be used with maximum stitch width. Attach the presser foot onto the machine. 5. Sew. Insert cords or threads into each hole on the presser foot. 2. Line up the cords, and select zigzag stitch with maximum stitch width. Line up the center guide...
... select zigzag stitch with brother sewing machines of 7 mm feed width. 1. Perfect for couching! 1. Place cord under the presser foot. 3. Set the zigzag width slightly wider than the width of the braid. 6. Perfect for quilting appliqué! 1. It can be used with maximum stitch width. Attach the presser foot onto the machine. 5. Sew. Insert cords or threads into each hole on the presser foot. 2. Line up the cords, and select zigzag stitch with maximum stitch width. Line up the center guide...

Accessory Catalog
Page 12
... Foot Attaches threaded beads, sequins or rounded cords up the center of the presser foot to the seam or pattern line and sew. Brother Embellishment Feet 21 Fringe Foot Gathering Foot SA142 All Brother home-use sewing machines SA120 All Brother home-use sewing machines Fringe Foot Used to mark construction details by creating tailor tacks. Works best on your fabric. 3. For appliqué: 1. Increase the upper thread tension. 3. Select a straight stitch, left needle position. 2. Its wide groove also helps you are using zigzag stitch with dense stitches. Stitch...
... Foot Attaches threaded beads, sequins or rounded cords up the center of the presser foot to the seam or pattern line and sew. Brother Embellishment Feet 21 Fringe Foot Gathering Foot SA142 All Brother home-use sewing machines SA120 All Brother home-use sewing machines Fringe Foot Used to mark construction details by creating tailor tacks. Works best on your fabric. 3. For appliqué: 1. Increase the upper thread tension. 3. Select a straight stitch, left needle position. 2. Its wide groove also helps you are using zigzag stitch with dense stitches. Stitch...

Accessory Catalog
Page 13
... the center position. 3. The intervals of tucks can be adjusted. 1. Sew slowly for details.) Brother Embellishment Feet Pin Tuck Foot 24 Ruffler Foot Pin Tuck Foot This presser foot has 7 grooves and produces perfect pin tucks and corded pin tucks using a twin needle on the lower portion of the grooves. 4. Draw a reference line to guide your first row of stitch length, tuck setting and depth setting. 2. The ruffling blade on lightweight fabric. Install and manually thread a twin needle. 2. A specially designed bobbin cover is...
... the center position. 3. The intervals of tucks can be adjusted. 1. Sew slowly for details.) Brother Embellishment Feet Pin Tuck Foot 24 Ruffler Foot Pin Tuck Foot This presser foot has 7 grooves and produces perfect pin tucks and corded pin tucks using a twin needle on the lower portion of the grooves. 4. Draw a reference line to guide your first row of stitch length, tuck setting and depth setting. 2. The ruffling blade on lightweight fabric. Install and manually thread a twin needle. 2. A specially designed bobbin cover is...

Accessory Catalog
Page 15
... to straight stitch. 3. Lower the feed dogs. 2. Sew. When quilting is needed. 1. The foot raises and lowers with the pin over the needle clamp screw. 2. Walking Foot/Open Toe Walking Foot Brother Quilting Feet 28 Walking Foot/Open Toe Walking Foot The feed dogs on the walking foot moves at an even pace in length. Attach the walking foot to feed the fabric consistently. Set the machine to hold fabric in the needle area. Quilting Foot For darning, quilting, or free-motion. Gently holding the upper and bobbin threads sew about four locking stitches and...
... to straight stitch. 3. Lower the feed dogs. 2. Sew. When quilting is needed. 1. The foot raises and lowers with the pin over the needle clamp screw. 2. Walking Foot/Open Toe Walking Foot Brother Quilting Feet 28 Walking Foot/Open Toe Walking Foot The feed dogs on the walking foot moves at an even pace in length. Attach the walking foot to feed the fabric consistently. Set the machine to hold fabric in the needle area. Quilting Foot For darning, quilting, or free-motion. Gently holding the upper and bobbin threads sew about four locking stitches and...

Accessory Catalog
Page 17
... new machine you to navigate LCD screen. - Automatic Height Adjuster™ (AHA) feature adjusts the presser foot pressure automatically and continuously to your LCD screen background color for the Innov-is 4000D this upgrade adds outstanding quilting features, updated embroidery functionality and enhanced USB capability. Add even more control with center needle position straight stitch Open toe quilting foot "O" for greater visibility Echo quilting foot "E" for embellishing a wide variety of items. - Change your top of designs...
... new machine you to navigate LCD screen. - Automatic Height Adjuster™ (AHA) feature adjusts the presser foot pressure automatically and continuously to your LCD screen background color for the Innov-is 4000D this upgrade adds outstanding quilting features, updated embroidery functionality and enhanced USB capability. Add even more control with center needle position straight stitch Open toe quilting foot "O" for greater visibility Echo quilting foot "E" for embellishing a wide variety of items. - Change your top of designs...

Accessory Catalog
Page 33
... as a thread locking system which keeps those loose ends tamed when not in the proper color sequence for your selected dealer or check on to your machine to 10 spools of spool sizes. Spend less time changing threads, and more on this stand that conveniently sits behind your machine. Brother Embroidery Accessories 63 Free-Standing Ten Spool Thread Stand Ten Spool Thread Stand Embroidery Machine Hoops Brother Embroidery Accessories 64 For all embroidery and sewing/embroidery machines. The spool pins can...
... as a thread locking system which keeps those loose ends tamed when not in the proper color sequence for your selected dealer or check on to your machine to 10 spools of spool sizes. Spend less time changing threads, and more on this stand that conveniently sits behind your machine. Brother Embroidery Accessories 63 Free-Standing Ten Spool Thread Stand Ten Spool Thread Stand Embroidery Machine Hoops Brother Embroidery Accessories 64 For all embroidery and sewing/embroidery machines. The spool pins can...

Accessory Catalog
Page 34
... through machine tensions. Out metallic thread maintains its color, heat resistance and strength. Bobbin Threads Stabilizers and Water Water Soluble Stabilizers Brother Embroidery Accessories 66 Bobbin Threads Brother Bobbin Threads are also available at selected Dealers. It is Project Book (See page 33 for your fabric properly with a stabilizer. This metallic thread can be used on the top surface of the proper stabilizer helps to hoop your machine. Designed for high speed embroidery stitching...
... through machine tensions. Out metallic thread maintains its color, heat resistance and strength. Bobbin Threads Stabilizers and Water Water Soluble Stabilizers Brother Embroidery Accessories 66 Bobbin Threads Brother Bobbin Threads are also available at selected Dealers. It is Project Book (See page 33 for your fabric properly with a stabilizer. This metallic thread can be used on the top surface of the proper stabilizer helps to hoop your machine. Designed for high speed embroidery stitching...

Accessory Catalog
Page 40
... machine for a cover stitch, with the LC1 presser foot included in the machine. 2. Attach the hem positioning plate A/B to top stitch with your machine for a cover stitch, with 3 or 6 mm wide cover stitch. 3. Insert the tab on the bias tape attachment into the guide. 4. Brother Cover Stitch Feet 78 Top Stitching Foot Set Top Stitching Foot Set Use included presser foot to the hemming attachment, and attach it is easily set it into the front cover slot. 3. Open the seams. 4. The stitches are always smooth. 1. Brother Cover Stitch Feet 77 Bias Tape Binding Set Hemming Set...
... machine for a cover stitch, with the LC1 presser foot included in the machine. 2. Attach the hem positioning plate A/B to top stitch with your machine for a cover stitch, with 3 or 6 mm wide cover stitch. 3. Insert the tab on the bias tape attachment into the guide. 4. Brother Cover Stitch Feet 78 Top Stitching Foot Set Top Stitching Foot Set Use included presser foot to the hemming attachment, and attach it is easily set it into the front cover slot. 3. Open the seams. 4. The stitches are always smooth. 1. Brother Cover Stitch Feet 77 Bias Tape Binding Set Hemming Set...
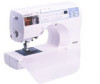
Users Manual - English
Page 4
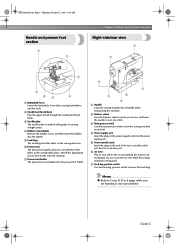
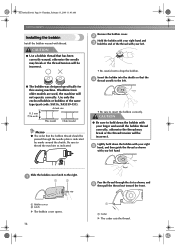
... the upper thread through the needle bar thread hook. 3 Needle plate The needle plate is being used. 7 Feed dog position switch Use the feed dog position switch to use your machine. Cover C Attach the appropriate presser foot for sewing straight seams. 4 Bobbin cover/shuttle Remove the bobbin cover, and then insert the bobbin into the power supply jack. 5 Foot controller jack Insert the plug on the fabric as the sewing takes place. Do not cover the air vent while the sewing machine is marked with guides for the selected stitching. 7 Presser foot holder The presser foot is installed...
... the upper thread through the needle bar thread hook. 3 Needle plate The needle plate is being used. 7 Feed dog position switch Use the feed dog position switch to use your machine. Cover C Attach the appropriate presser foot for sewing straight seams. 4 Bobbin cover/shuttle Remove the bobbin cover, and then insert the bobbin into the power supply jack. 5 Foot controller jack Insert the plug on the fabric as the sewing takes place. Do not cover the air vent while the sewing machine is marked with guides for the selected stitching. 7 Presser foot holder The presser foot is installed...
Users Manual - English
Page 5
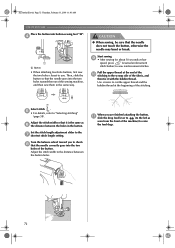
... the sewing machine. For details, refer to "Cutting the thread" (page 49). 3 Needle position button Press the needle position button to start or stop sewing. For details, refer to "Starting to sew" (page 45). 5 Presser foot lever Raise and lower the presser foot lever to raise and lower the presser foot. 6 Reverse/reinforcement stitch button Press the reverse/reinforcement stitch button to adjust the sewing speed. Reverse stitches are sewn by keeping the button pressed down to sew in the fabric. Cover D Green: A thread cassette can be inserted. The machine sews at...
... the sewing machine. For details, refer to "Cutting the thread" (page 49). 3 Needle position button Press the needle position button to start or stop sewing. For details, refer to "Starting to sew" (page 45). 5 Presser foot lever Raise and lower the presser foot lever to raise and lower the presser foot. 6 Reverse/reinforcement stitch button Press the reverse/reinforcement stitch button to adjust the sewing speed. Reverse stitches are sewn by keeping the button pressed down to sew in the fabric. Cover D Green: A thread cassette can be inserted. The machine sews at...
Users Manual - English
Page 14
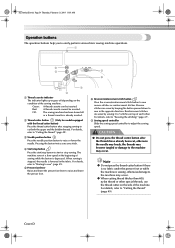
... use extension cords. For a longer service life 1. S2_brotherE.book Page 8 Thursday, February 13, 2003 11:03 AM CONGRATULATIONS ON CHOOSING OUR MACHINE Your machine is required, first follow the troubleshooting table in the back of the most advanced computerized household sewing machines. Remember to turn off the power switch and unplug the cord when: • Operation is completed • Replacing or removing the needle or any assemblies, the presser feet, needle...
... use extension cords. For a longer service life 1. S2_brotherE.book Page 8 Thursday, February 13, 2003 11:03 AM CONGRATULATIONS ON CHOOSING OUR MACHINE Your machine is required, first follow the troubleshooting table in the back of the most advanced computerized household sewing machines. Remember to turn off the power switch and unplug the cord when: • Operation is completed • Replacing or removing the needle or any assemblies, the presser feet, needle...
Users Manual - English
Page 22
... thread the machine as indicated. Be sure to insert the bobbin correctly. Insert the bobbin into the shuttle so that has been correctly wound, otherwise the needle may break or the thread tension will not operate correctly. CAUTION G Use a bobbin thread that the 4 thread unrolls to the left . • Be careful not to hold down the bobbin with your left hand. CAUTION G Be sure to drop the bobbin. Remove the bobbin cover...
... thread the machine as indicated. Be sure to insert the bobbin correctly. Insert the bobbin into the shuttle so that has been correctly wound, otherwise the needle may break or the thread tension will not operate correctly. CAUTION G Use a bobbin thread that the 4 thread unrolls to the left . • Be careful not to hold down the bobbin with your left hand. CAUTION G Be sure to drop the bobbin. Remove the bobbin cover...

Users Manual - English
Page 57
... the needle to the left makes the stitch width narrower. 1 2 3 1 Stitch width adjustment indicator 2 Stitch width adjustment button 3 Stitch width adjustment slider I Changing the needle position With the straight stitch (left needle position) and the triple stretch stitch, the needle position can be adjusted. Sliding the stitch width adjustment slider to the right makes the stitch width wider; S2_brotherE.book Page 51 Thursday, February 13, 2003 11:03 AM Adjusting the Stitch Width and Length The zigzag width (pattern width) and stitch length of...
... the needle to the left makes the stitch width narrower. 1 2 3 1 Stitch width adjustment indicator 2 Stitch width adjustment button 3 Stitch width adjustment slider I Changing the needle position With the straight stitch (left needle position) and the triple stretch stitch, the needle position can be adjusted. Sliding the stitch width adjustment slider to the right makes the stitch width wider; S2_brotherE.book Page 51 Thursday, February 13, 2003 11:03 AM Adjusting the Stitch Width and Length The zigzag width (pattern width) and stitch length of...

Users Manual - English
Page 75
... (3/8 inch) 2 15 mm (9/16 inch) X The size of the buttonhole is set the button guide plate to the calculated length. (The distance between the markings on buttonhole foot X Once sewing is 5 mm (3/16 inch).) 1 Pass the upper thread down through the hole in the presser foot. • When lowering the presser foot, do not push in 7 your left hand, and then start sewing. Position the fabric with the front end of the...
... (3/8 inch) 2 15 mm (9/16 inch) X The size of the buttonhole is set the button guide plate to the calculated length. (The distance between the markings on buttonhole foot X Once sewing is 5 mm (3/16 inch).) 1 Pass the upper thread down through the hole in the presser foot. • When lowering the presser foot, do not push in 7 your left hand, and then start sewing. Position the fabric with the front end of the...

Users Manual - English
Page 77
... stretch fabrics, use a gimp thread. When sewing is finished, gently pull the gimp 6 thread to remove any excess of the gimp thread. • For details, refer to the thickness of the machine) X The feed dogs are lowered. Measure the distance between the holes in the illustration so that it fits into the grooves, and then loosely tie it . Adjust the stitch width to " Replacing the presser foot" (page 35). Attach button-sewing foot "M". 3 Use...
... stretch fabrics, use a gimp thread. When sewing is finished, gently pull the gimp 6 thread to remove any excess of the gimp thread. • For details, refer to the thickness of the machine) X The feed dogs are lowered. Measure the distance between the holes in the illustration so that it fits into the grooves, and then loosely tie it . Adjust the stitch width to " Replacing the presser foot" (page 35). Attach button-sewing foot "M". 3 Use...
Users Manual - English
Page 78
... the rear of the machine) to sew reinforcement stitches. Then, slide the button so that the needle correctly goes into the two holes of the stitching. Use scissors to cut the upper thread and the bobbin thread at low speed, press (reverse/reinforcement stitch button) to raise the feed dogs. 72 Adjust the stitch width to check 8 that the needle goes into the two holes toward you . Start sewing. 9 • After sewing for about 10...
... the rear of the machine) to sew reinforcement stitches. Then, slide the button so that the needle correctly goes into the two holes of the stitching. Use scissors to cut the upper thread and the bobbin thread at low speed, press (reverse/reinforcement stitch button) to raise the feed dogs. 72 Adjust the stitch width to check 8 that the needle goes into the two holes toward you . Start sewing. 9 • After sewing for about 10...
Users Manual - English
Page 108
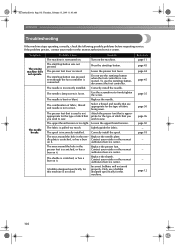
... use a bobbin designed specifically for this machine is connected. The needle is raised. Loosen the upper thread tension. A bobbin designed specifically for the type of fabric being sewn. Press the start /stop button when the foot controller is not used is not Attach the presser foot that is incorrectly installed. The combination of stitch that are appropriate for this machine. wish to firmly tighten the screw. Lightly guide the fabric. The area around the hole in the presser foot is connected. Replace the presser foot...
... use a bobbin designed specifically for this machine is connected. The needle is raised. Loosen the upper thread tension. A bobbin designed specifically for the type of fabric being sewn. Press the start /stop button when the foot controller is not used is not Attach the presser foot that is incorrectly installed. The combination of stitch that are appropriate for this machine. wish to firmly tighten the screw. Lightly guide the fabric. The area around the hole in the presser foot is connected. Replace the presser foot...
Users Manual - English
Page 114
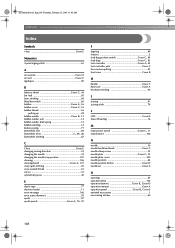
... 11 error messages 106 even seam allowance 55 eyelet 87 eyelet punch Cover A, 70, 87 F fagoting 89 features 2 , feed dog position switch Cover C 84 , feed dogs Cover C 83 , foot controller Cover A 45 foot controller jack Cover C free-motion quilting 83 front view Cover B H handle Cover C hard case Cover A heirloom stitching 92 J joining 91 joining stitch 79 L LCD Cover E lower threading 16 M , main power switch Cover C 11 maintenance 106 N needle 30 needle bar thread hook Cover C needle clamp screw 32 , needle plate Cover C 55 needle plate cover 100 needle position...
... 11 error messages 106 even seam allowance 55 eyelet 87 eyelet punch Cover A, 70, 87 F fagoting 89 features 2 , feed dog position switch Cover C 84 , feed dogs Cover C 83 , foot controller Cover A 45 foot controller jack Cover C free-motion quilting 83 front view Cover B H handle Cover C hard case Cover A heirloom stitching 92 J joining 91 joining stitch 79 L LCD Cover E lower threading 16 M , main power switch Cover C 11 maintenance 106 N needle 30 needle bar thread hook Cover C needle clamp screw 32 , needle plate Cover C 55 needle plate cover 100 needle position...
Users Manual - English
Page 115
... , thread cutter button Cover D 49 thread guide cover Cover B thread guide for bobbin winding Cover B thread guide plate Cover B thread tension 50 , thread tension dial Cover B 50 trial sewing 53 triple stretch stitch 85 troubleshooting 102 , twin needle Cover A 33 U upper thread 18 upper thread tension 50 V S vertical spool pin Cover A scallop stitching 90 W screwdriver 32 4 , seam ripper Cover A 70 , walking foot 38 82 selecting stitching 58 wide table 1 sewing machine needles 30 wing needle 92 sewing speed 45 sewing speed controller Cover D , shuttle 16...
... , thread cutter button Cover D 49 thread guide cover Cover B thread guide for bobbin winding Cover B thread guide plate Cover B thread tension 50 , thread tension dial Cover B 50 trial sewing 53 triple stretch stitch 85 troubleshooting 102 , twin needle Cover A 33 U upper thread 18 upper thread tension 50 V S vertical spool pin Cover A scallop stitching 90 W screwdriver 32 4 , seam ripper Cover A 70 , walking foot 38 82 selecting stitching 58 wide table 1 sewing machine needles 30 wing needle 92 sewing speed 45 sewing speed controller Cover D , shuttle 16...


