Users Manual - English
Page 9
S2_brotherE.book Page 3 Thursday, February 13, 2003 11:03 AM Contents Enclosed Accessories Cover A Accessories ...Cover A Names of Machine Parts and Their Functions Cover B Front view ...Cover B Needle and presser foot section ...Cover C Right-side/rear view ...Cover C Operation buttons ...... Needle ...30 Needle precautions ...30 Needle types and their uses ...30 Checking the needle ...31 Replacing the needle ...32 Replacing the Presser Foot 35 Presser foot precautions ...35 Replacing the presser foot ...35 Removing the presser foot holder ...37 Using the optional walking foot ...38 Sewing ...
S2_brotherE.book Page 3 Thursday, February 13, 2003 11:03 AM Contents Enclosed Accessories Cover A Accessories ...Cover A Names of Machine Parts and Their Functions Cover B Front view ...Cover B Needle and presser foot section ...Cover C Right-side/rear view ...Cover C Operation buttons ...... Needle ...30 Needle precautions ...30 Needle types and their uses ...30 Checking the needle ...31 Replacing the needle ...32 Replacing the Presser Foot 35 Presser foot precautions ...35 Replacing the presser foot ...35 Removing the presser foot holder ...37 Using the optional walking foot ...38 Sewing ...
Users Manual - English
Page 12
...) products are being used or where oxygen is required around the machine needle. 11. This sewing machine is not working properly, if it must be replaced by pulling on cord. Young children should be supervised to the symbol "{" position when making any adjustments in the needle area, such as contained in... 13, 2003 11:03 AM Important Safety Instructions When using this machine, basic safety precautions should always be taken, including the following: Read all moving parts. Always unplug the machine from the accumulation of lint, dust, and loose cloth. 5. DANGER - WARNING -
...) products are being used or where oxygen is required around the machine needle. 11. This sewing machine is not working properly, if it must be replaced by pulling on cord. Young children should be supervised to the symbol "{" position when making any adjustments in the needle area, such as contained in... 13, 2003 11:03 AM Important Safety Instructions When using this machine, basic safety precautions should always be taken, including the following: Read all moving parts. Always unplug the machine from the accumulation of lint, dust, and loose cloth. 5. DANGER - WARNING -
Users Manual - English
Page 14
...not touch the hand wheel, thread take- For a longer service life 1. Use only neutral soaps or detergents to keep your local authorized Brother dealer. PLEASE READ BEFORE USING THIS MACHINE For safe operation 1. Plug the machine directly into the wall. Do not use extension cords. ... avoid direct sunlight and high humidity locations. Do not drop or hit the machine. 4. Always consult the operation manual when replacing or installing any other moving parts. 2. S2_brotherE.book Page 8 Thursday, February 13, 2003 11:03 AM CONGRATULATIONS ON CHOOSING OUR MACHINE Your machine is one...
...not touch the hand wheel, thread take- For a longer service life 1. Use only neutral soaps or detergents to keep your local authorized Brother dealer. PLEASE READ BEFORE USING THIS MACHINE For safe operation 1. Plug the machine directly into the wall. Do not use extension cords. ... avoid direct sunlight and high humidity locations. Do not drop or hit the machine. 4. Always consult the operation manual when replacing or installing any other moving parts. 2. S2_brotherE.book Page 8 Thursday, February 13, 2003 11:03 AM CONGRATULATIONS ON CHOOSING OUR MACHINE Your machine is one...
Users Manual - English
Page 32
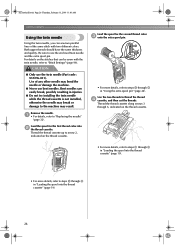
... cut the threads. Load the spool for the first thread color into the thread cassette" (page 19). 26 Use the two threads to " Replacing the needle" (page 32). Use of the same stitch with the twin needle, refer to arrow 2, indicated on the stitches that can be sewn... pin" (page 24). Thread the thread cassette up to " Stitch Settings" (page 96). For details on the thread cassette. G Never use the twin needle (Part code : X59296-051). Thread the thread cassette along arrows 3 through 6, indicated on the thread cassette. • For more details, refer to steps 0 through c...
... cut the threads. Load the spool for the first thread color into the thread cassette" (page 19). 26 Use the two threads to " Replacing the needle" (page 32). Use of the same stitch with the twin needle, refer to arrow 2, indicated on the stitches that can be sewn... pin" (page 24). Thread the thread cassette up to " Stitch Settings" (page 96). For details on the thread cassette. G Never use the twin needle (Part code : X59296-051). Thread the thread cassette along arrows 3 through 6, indicated on the thread cassette. • For more details, refer to steps 0 through c...
Users Manual - English
Page 38
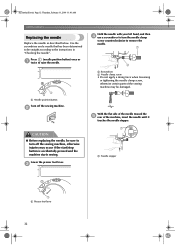
CAUTION G Before replacing the needle, be straight according to remove the needle. 1 2 1 Screwdriver 2 Needle clamp screw • Do not apply a strong force when loosening or tightening the needle clamp screw, otherwise certain parts of the machine, insert the needle until it touches the needle stopper. Use the screwdriver and a needle that has been... the start/stop button is accidentally pressed and the machine starts sewing. S2_brotherE.book Page 32 Thursday, February 13, 2003 11:03 AM GETTING READY Replacing the needle Replace the needle as described below.
CAUTION G Before replacing the needle, be straight according to remove the needle. 1 2 1 Screwdriver 2 Needle clamp screw • Do not apply a strong force when loosening or tightening the needle clamp screw, otherwise certain parts of the machine, insert the needle until it touches the needle stopper. Use the screwdriver and a needle that has been... the start/stop button is accidentally pressed and the machine starts sewing. S2_brotherE.book Page 32 Thursday, February 13, 2003 11:03 AM GETTING READY Replacing the needle Replace the needle as described below.

Users Manual - English
Page 77
... Use a handsewing needle to pull the gimp 7 thread to the thickness of the buttonhole. Buttonhole Stitching 71 Hook the gimp thread onto the part of the gimp thread. • For details, refer to be attached. Measure the distance between the holes in the illustration so that it ...loosely tie it . When sewing is finished, gently pull the gimp 6 thread to remove any excess of 1 buttonhole foot "A" shown in the 1 button to " Replacing the presser foot" (page 35). Trim off any slack. 1 1 Drop feed lever (as seen from the front of the machine). 3 Attach buttonhole foot "A". ...
... Use a handsewing needle to pull the gimp 7 thread to the thickness of the buttonhole. Buttonhole Stitching 71 Hook the gimp thread onto the part of the gimp thread. • For details, refer to be attached. Measure the distance between the holes in the illustration so that it ...loosely tie it . When sewing is finished, gently pull the gimp 6 thread to remove any excess of 1 buttonhole foot "A" shown in the 1 button to " Replacing the presser foot" (page 35). Trim off any slack. 1 1 Drop feed lever (as seen from the front of the machine). 3 Attach buttonhole foot "A". ...

