Brother International CS-6000/6000b/6000t/6000i Support and Manuals
Get Help and Manuals for this Brother International item
View All Support Options Below
Free Brother International CS-6000/6000b/6000t/6000i manuals!
Problems with Brother International CS-6000/6000b/6000t/6000i?
Ask a Question
Free Brother International CS-6000/6000b/6000t/6000i manuals!
Problems with Brother International CS-6000/6000b/6000t/6000i?
Ask a Question
Popular Brother International CS-6000/6000b/6000t/6000i Manual Pages
Operation Manual - Page 4
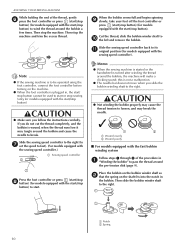
..., halogen lamp, or other parts to assure correct installation.
9 For repair or adjustment:
• If the Light unit (light-emitting diode) is damaged, it must be replaced by authorized dealer.
• In the event a malfunction occurs or adjustment is required, first follow the troubleshooting table in the back of the operation manual to the danger of...
Operation Manual - Page 5
... models equipped with a twin needle 19
REPLACING THE PRESSER FOOT 20
Replacing the presser foot 20 Removing the presser foot holder 21
2. APPENDIX 45 STITCH SETTINGS 45
Utility stitches 45
MAINTENANCE 50
Restrictions on oiling 50 Precautions on storing the machine 50 Cleaning the machine surface 50 Cleaning the bobbin case 50
TROUBLESHOOTING 52 ERROR MESSAGES...
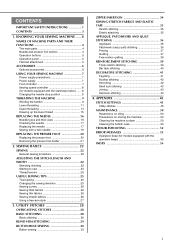
Operation Manual - Page 6
... main parts
i Operation buttons (page 5) j Operation panel (page 5) k Handwheel
Used to circulate. Attach the appropriate presser foot for models equipped with the needle threader) (page 15)
c Presser foot holder The presser foot is being used. Do not cover the air vent while the sewing machine is installed onto the presser foot holder. g Quick-set...
Operation Manual - Page 12
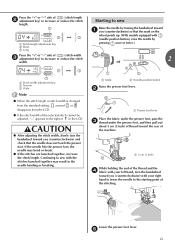
...shaft to break. Slide the sewing speed controller to the right (to
g set the speed to fast). (For models equipped with the sewing speed controller.)
1 Sewing speed controller
Press the foot controller ...speed controller back to its k original position (for models equipped with the start/stop
button) to start.
If you follow the instructions carefully. When the bobbin seems full and begins spinning ...
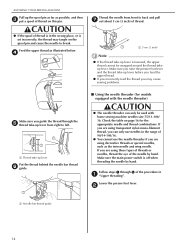
Operation Manual - Page 15

... thread before threading the sewing machine.
13
a Spool pin b Thread guide c Mark on the needle threader, see page 14.
1
Replace the bobbin cover. Raise the presser foot using the presser foot a ... for models equipped with the needle position button) once or twice to turn the handwheel so that the mark
on the wheel points up the lower thread" (page 15). Upper threading
Set the...
Operation Manual - Page 16
.../16.
● You cannot use needles in the wrong place, or is set incorrectly, the thread may cause sewing problems.
Make sure you are using those types of threads or needles, thread the ...foot lever.
b
a Needle bar thread guide
14 d
Thread the needle from right to back and pull g out about 5 cm (2 inch) of thread on page 16 for models equipped with the needle threader)
CAUTION
...
Operation Manual - Page 17
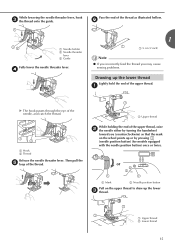
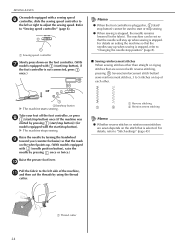
...either by turning the handwheel
toward you may cause sewing problems.
Drawing up the lower thread
Lightly hold the end of... points up the lower c thread. f
a Needle holder b Needle threader
lever c Guide
Fully lower the needle threader lever. d
1
a 5 cm (2 inch)
Note
&#...draw up or by pressing (needle position button) (for models equipped with the needle position button) once or twice.
Then...
Operation Manual - Page 18
a Upper thread b Lower thread
■ For models equipped with the quick-set bobbin You can begin sewing immediately without cutting it there without ... you can easily break, possibly resulting in the direction of the machine
under the presser foot. c
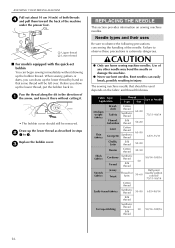
REPLACING THE NEEDLE
This section provides information on the fabric and thread thickness.
Fabric Type/ Application
Thread Size of...
Operation Manual - Page 21
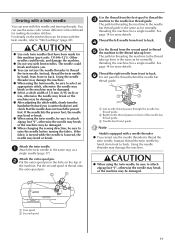
...guide. Using the needle threader may bend or break. Sewing with a twin needle
You can sew with this machine (part code...: 131096-121).
Put the second spool of 5.0 mm (3/16 inch) or less, otherwise the needle may break or the machine may bend or break.
● When using the twin needle, be sure to "Stitch settings... c Needle bar thread guide
Note
Models equipped with a needle ...
Operation Manual - Page 25
...handwheel toward you (counterclockwise) and check that the mark on the
wheel points up. (With models equipped with (needle position button), raise the needle by turning the handwheel toward a you (... Narrow c Wide
Note
● When the stitch length or stitch width is changed from the standard setting, around or disappears from the LCD.
● If the stitch width of the selected stitch cannot...
Operation Manual - Page 26
... stitch button) sews reinforcement stitches, 3 to 5 stitches on the foot controller. (With g models equipped with (start /stop button
The machine starts sewing. a Sewing speed controller
Slowly... thread
cutter.
For details, refer to "Sewing speed controller" (page 8).
Refer to "Stitch settings" (page 45). a Thread cutter
24
Take your foot off the foot controller, or press ...
Operation Manual - Page 35
...
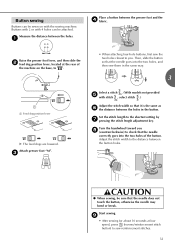
3
a Feed dog position lever
The feed dogs are lowered. c
Select a stitch . (With models not provided e with stitch , select stitch .)
Adjust the stitch width so that the needle goes into the ... that the needle
correctly goes into the two holes, and then sew them in the button. Set the stitch length to sew reinforcement stitches.
33 Buttons with 2 or with the sewing machine.
...
Operation Manual - Page 43
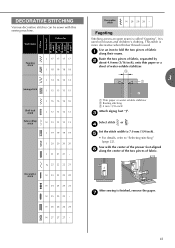
... water soluble stabilizer b Basting stitching c 4 mm (3/16 inch)
Attach zigzag foot "J". c
Select stitch or . d
Set the stitch width to "Selecting stitching" (page 22).
e
• For details, refer to 7.0 mm (1/4 inch). ... when thicker thread is used .
Pattern Presser Foot 70 stitches model 60 stitches model 50 stitches model 40 stitches model
Fagoting stitch
J 17 17 17 17 J 18 18 18 ...
Operation Manual - Page 47
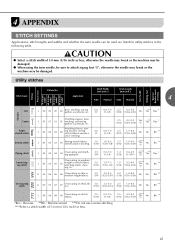
...
45
gathers or pintucks, etc.
4 APPENDIX
STITCH SETTINGS
Applications, stitch lengths and widths and whether the twin...
Stitch Length [mm (inch.)]
Stitch Name
Application
4
Auto Manual Auto Manual
Straight Pattern
Presser Foot 70 stitches
model 60 stitches
model 50 stitches
model 40 stitches
model Twin Needle Walking Foot
Reverse/ Reinforcement
Stitching
Left
Center
Triple stretch...
Operation Manual - Page 57
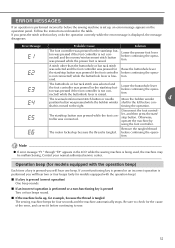
... beeps (only for models equipped with the operation...error message is displayed, the message disappears.
shaft is moved to the right.
Operation beep (for four seconds and the machine automatically stops. Follow the instructions...error, and correct it before the sewing machine is set...error message appears on the operation panel. Contact your nearest authorized service center.
ERROR MESSAGES
If...
Brother International CS-6000/6000b/6000t/6000i Reviews
We have not received any reviews for Brother International yet.