
Accessory Catalog
Page 4
Its position can be adjusted exactly on the edge of zipper/piping, avoiding the non-flat parts of the presser foot and slide the presser foot so that the needle fits on the opening on the presser foot. 4. Screw on either left ). 2. ... tighten the clamp screw with just right pressure. 1. Requires Low Shank Adapter for ULT series, PC-6500, PC-8200 and PC-8500 sewing machines. Sew. Brother General Sewing Accessories 05 Sew as you like. Use these utility presser feet and accessories to add a professional finish to your sewing projects. SA161 All...
Its position can be adjusted exactly on the edge of zipper/piping, avoiding the non-flat parts of the presser foot and slide the presser foot so that the needle fits on the opening on the presser foot. 4. Screw on either left ). 2. ... tighten the clamp screw with just right pressure. 1. Requires Low Shank Adapter for ULT series, PC-6500, PC-8200 and PC-8500 sewing machines. Sew. Brother General Sewing Accessories 05 Sew as you like. Use these utility presser feet and accessories to add a professional finish to your sewing projects. SA161 All...

Accessory Catalog
Page 6
... the fabric approximately 1/8" from the edge and sew 2-3 stitches. 4. Slowly sew 2-3 stitches, making sure the fabric is rolling around the curled part of the foot. 7. Non Stick Foot Designed for consistent feeding with the wrong side facing up under the presser foot. 3. Lower the presser foot... Non Stick Foot Overlock Foot Picot Foot Brother General Sewing Accessories 10 SA126 ABCDEFJKMN SA127 GHILOP Skirt Innov-is exactly against the edge of the fabric. 4. Hold the fabric from the back and front and roll it into the curled part of the fabric. Select a desired stitch...
... the fabric approximately 1/8" from the edge and sew 2-3 stitches. 4. Slowly sew 2-3 stitches, making sure the fabric is rolling around the curled part of the foot. 7. Non Stick Foot Designed for consistent feeding with the wrong side facing up under the presser foot. 3. Lower the presser foot... Non Stick Foot Overlock Foot Picot Foot Brother General Sewing Accessories 10 SA126 ABCDEFJKMN SA127 GHILOP Skirt Innov-is exactly against the edge of the fabric. 4. Hold the fabric from the back and front and roll it into the curled part of the fabric. Select a desired stitch...
Users Manual - English
Page 2
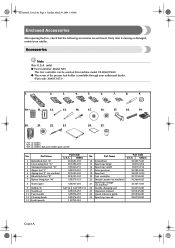
only) ● Foot controller: Model N5V This foot controller can be used on this machine model CS-8060/CS-80. ● The screw of the presser foot holder is missing or damaged, contact your authorized dealer. (Part code: XA4813-051) 1. 2. 3. 4. 5. 6. 7. 8. 9. 10.* 11. 12. 13. 14. 15. 16... foot "R" 7 Button fitting foot "M" 8 Seam ripper 9 Bobbin (4) 10 Needle set 11 Twin needle 12 Cleaning brush 13 Eyelet punch Part Code U.S.A. S2_brotherE_Cover2.fm Page A Tuesday, March 30, 2004 1:36 PM Enclosed Accessories After opening the box, check that the following accessories are...
only) ● Foot controller: Model N5V This foot controller can be used on this machine model CS-8060/CS-80. ● The screw of the presser foot holder is missing or damaged, contact your authorized dealer. (Part code: XA4813-051) 1. 2. 3. 4. 5. 6. 7. 8. 9. 10.* 11. 12. 13. 14. 15. 16... foot "R" 7 Button fitting foot "M" 8 Seam ripper 9 Bobbin (4) 10 Needle set 11 Twin needle 12 Cleaning brush 13 Eyelet punch Part Code U.S.A. S2_brotherE_Cover2.fm Page A Tuesday, March 30, 2004 1:36 PM Enclosed Accessories After opening the box, check that the following accessories are...
Users Manual - English
Page 3
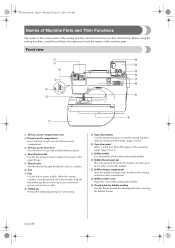
... of thread for bobbin winding Pass the thread around this cover when winding the bobbin. B Bobbin thread spool pin Place the spool of the machine parts. Front view 1 E 2 D 3 C B 4 A ? 5 9 6 8 7 1 7 Thread cassette compartment cover 2 Thread cassette compartment Insert a thread cassette into the thread cassette ...winding the bobbin thread. S2_brotherE.book Page B Thursday, February 13, 2003 11:03 AM Names of Machine Parts and Their Functions The names of the various parts of the upper thread. 5 Thread cutter Pass the threads through the thread cutter to cut them. 6 ...
... of thread for bobbin winding Pass the thread around this cover when winding the bobbin. B Bobbin thread spool pin Place the spool of the machine parts. Front view 1 E 2 D 3 C B 4 A ? 5 9 6 8 7 1 7 Thread cassette compartment cover 2 Thread cassette compartment Insert a thread cassette into the thread cassette ...winding the bobbin thread. S2_brotherE.book Page B Thursday, February 13, 2003 11:03 AM Names of Machine Parts and Their Functions The names of the various parts of the upper thread. 5 Thread cutter Pass the threads through the thread cutter to cut them. 6 ...
Users Manual - English
Page 4
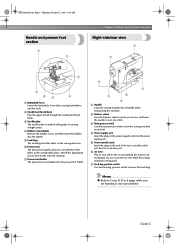
.... 5 Feed dogs The feed dogs feed the fabric in the sewing direction. 6 Presser foot The presser foot applies pressure consistently on the end of Machine Parts and Their Functions Needle and presser foot section 1 2 Right-side/rear view 1 2 3 7 65 4 1 Buttonhole lever Lower the buttonhole lever when sewing buttonholes and bar tacks...
.... 5 Feed dogs The feed dogs feed the fabric in the sewing direction. 6 Presser foot The presser foot applies pressure consistently on the end of Machine Parts and Their Functions Needle and presser foot section 1 2 Right-side/rear view 1 2 3 7 65 4 1 Buttonhole lever Lower the buttonhole lever when sewing buttonholes and bar tacks...
Users Manual - English
Page 6
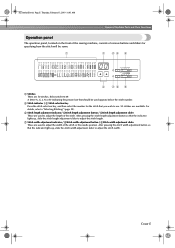
... width of the stitch or the needle position. Select stitch 00-49. S2_brotherE.book Page E Thursday, February 13, 2003 11:03 AM Names of Machine Parts and Their Functions Operation panel The operation panel, located on the front of the sewing machine, consists of various buttons and sliders for the stitch...
... width of the stitch or the needle position. Select stitch 00-49. S2_brotherE.book Page E Thursday, February 13, 2003 11:03 AM Names of Machine Parts and Their Functions Operation panel The operation panel, located on the front of the sewing machine, consists of various buttons and sliders for the stitch...
Users Manual - English
Page 7
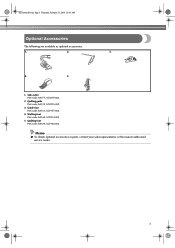
S2_brotherE.book Page 1 Thursday, February 13, 2003 11:03 AM Optional Accessories The following are available as optional accessories. 1. 2. 3. 4. 5. 1. Quilting foot Part code: SA129, XC1948-002 Memo G To obtain optional accessories or parts, contact your sales representative or the nearest authorized service center. 1 Guide foot Part code: SA133, XC1957-002 4. Walking foot Part code: SA140, XC2214-002 5. Quilting guide Part code: SA132, XC2215-002 3. Side cutter Part code: SA177, XC3879-002 2.
S2_brotherE.book Page 1 Thursday, February 13, 2003 11:03 AM Optional Accessories The following are available as optional accessories. 1. 2. 3. 4. 5. 1. Quilting foot Part code: SA129, XC1948-002 Memo G To obtain optional accessories or parts, contact your sales representative or the nearest authorized service center. 1 Guide foot Part code: SA133, XC1957-002 4. Walking foot Part code: SA140, XC2214-002 5. Quilting guide Part code: SA132, XC2215-002 3. Side cutter Part code: SA177, XC3879-002 2.
Users Manual - English
Page 9
S2_brotherE.book Page 3 Thursday, February 13, 2003 11:03 AM Contents Enclosed Accessories Cover A Accessories ...Cover A Names of Machine Parts and Their Functions Cover B Front view ...Cover B Needle and presser foot section ...Cover C Right-side/rear view ...Cover C Operation buttons ...Cover D Operation panel ...Cover E Optional ...
S2_brotherE.book Page 3 Thursday, February 13, 2003 11:03 AM Contents Enclosed Accessories Cover A Accessories ...Cover A Names of Machine Parts and Their Functions Cover B Front view ...Cover B Needle and presser foot section ...Cover C Right-side/rear view ...Cover C Operation buttons ...Cover D Operation panel ...Cover E Optional ...
Users Manual - English
Page 12
.... 8. Do not use outdoors. 7. It may deflect the needle causing it to break. 12. The machine should be taken, including the following: Read all moving parts. Use this machine only for examination, repair, electrical or mechanical adjustment. 4. Keep fingers away from outlet. 9. The wrong plate can cause the needle to break...
.... 8. Do not use outdoors. 7. It may deflect the needle causing it to break. 12. The machine should be taken, including the following: Read all moving parts. Use this machine only for examination, repair, electrical or mechanical adjustment. 4. Keep fingers away from outlet. 9. The wrong plate can cause the needle to break...
Users Manual - English
Page 14
...lever, needle, or other hot objects. 2. For a longer service life 1. For additional product information and updates, visit our web site at www.brother.com 8 PLEASE READ BEFORE USING THIS MACHINE For safe operation 1. Remember to turn off the power switch and unplug the cord when: • ...use or store the machine near a space heater, iron, halogen lamp, or other moving parts. 2. Always consult the operation manual when replacing or installing any other parts to keep your local authorized Brother dealer. To fully enjoy all the features, we suggest that you study the manual before...
...lever, needle, or other hot objects. 2. For a longer service life 1. For additional product information and updates, visit our web site at www.brother.com 8 PLEASE READ BEFORE USING THIS MACHINE For safe operation 1. Remember to turn off the power switch and unplug the cord when: • ...use or store the machine near a space heater, iron, halogen lamp, or other moving parts. 2. Always consult the operation manual when replacing or installing any other parts to keep your local authorized Brother dealer. To fully enjoy all the features, we suggest that you study the manual before...
Users Manual - English
Page 18
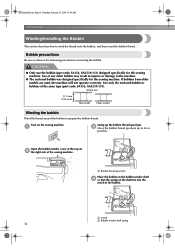
... machine. 1 Bobbin thread spool pin Place the bobbin on the bobbin winder shaft 4 so that the spring on 2 the right side of the same type (part code: SA156, XA5539-151). Turn on the sewing machine. 1 Swing up the bobbin thread spool pin. 3 Move the bobbin thread spool pin up as far... was designed specifically for this sewing machine. If bobbins from older models are used, the machine will not operate correctly. CAUTION G Only use the bobbin (part code: SA156, XA5539-151) designed specifically for this sewing machine.
... machine. 1 Bobbin thread spool pin Place the bobbin on the bobbin winder shaft 4 so that the spring on 2 the right side of the same type (part code: SA156, XA5539-151). Turn on the sewing machine. 1 Swing up the bobbin thread spool pin. 3 Move the bobbin thread spool pin up as far... was designed specifically for this sewing machine. If bobbins from older models are used, the machine will not operate correctly. CAUTION G Only use the bobbin (part code: SA156, XA5539-151) designed specifically for this sewing machine.
Users Manual - English
Page 22
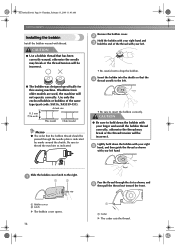
... thread. CAUTION G Use a bobbin thread that the bobbin thread should be passed through the slot as indicated. Lightly hold the end of the same type (part code: SA156, XA5539-151). CAUTION G Be sure to drop the bobbin. Insert the bobbin into the shuttle so that the 4 thread unrolls to the left...
... thread. CAUTION G Use a bobbin thread that the bobbin thread should be passed through the slot as indicated. Lightly hold the end of the same type (part code: SA156, XA5539-151). CAUTION G Be sure to drop the bobbin. Insert the bobbin into the shuttle so that the 4 thread unrolls to the left...
Users Manual - English
Page 32
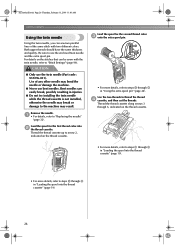
... thread cassette" (page 19). • For more details, refer to use the enclosed twin needle and the extra spool pin. G Never use the twin needle (Part code : X59296-051). G Do not try installing the twin needle while the thread cassette is not installed, otherwise the needle may break or damage to...
... thread cassette" (page 19). • For more details, refer to use the enclosed twin needle and the extra spool pin. G Never use the twin needle (Part code : X59296-051). G Do not try installing the twin needle while the thread cassette is not installed, otherwise the needle may break or damage to...
Users Manual - English
Page 38
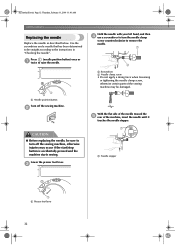
... counterclockwise to remove the needle. 1 2 1 Screwdriver 2 Needle clamp screw • Do not apply a strong force when loosening or tightening the needle clamp screw, otherwise certain parts of the sewing machine may be sure to turn off the sewing machine. 2 With the flat side of the needle toward the 5 rear of the...
... counterclockwise to remove the needle. 1 2 1 Screwdriver 2 Needle clamp screw • Do not apply a strong force when loosening or tightening the needle clamp screw, otherwise certain parts of the sewing machine may be sure to turn off the sewing machine. 2 With the flat side of the needle toward the 5 rear of the...
Users Manual - English
Page 46
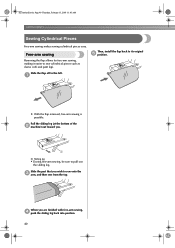
...) out toward you. 1 1 Sliding leg • During free-arm sewing, be sure to sew onto the 3 arm, and then sew from the top. Slide the part that you are finished with free-arm sewing, 4 push the sliding leg back into position. 40 When you wish to pull out the sliding leg...
...) out toward you. 1 1 Sliding leg • During free-arm sewing, be sure to sew onto the 3 arm, and then sew from the top. Slide the part that you are finished with free-arm sewing, 4 push the sliding leg back into position. 40 When you wish to pull out the sliding leg...

Users Manual - English
Page 48
... too hard while sewing, otherwise injuries may occur or the needle may break or bend. 42 In addition, keep your hands away from all moving parts such as the needle and balance wheel, otherwise injuries may occur. Bent needles can easily break, possibly resulting in operation, pay special attention to the...
... too hard while sewing, otherwise injuries may occur or the needle may break or bend. 42 In addition, keep your hands away from all moving parts such as the needle and balance wheel, otherwise injuries may occur. Bent needles can easily break, possibly resulting in operation, pay special attention to the...
Users Manual - English
Page 74
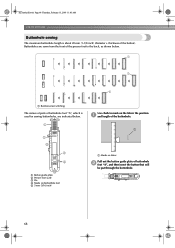
Buttonholes are indicated below . 1 1 1 1 Reinforcement stitching The names of parts of buttonhole foot " A" , which is about 28 mm (1-1/8 inch) (diameter + thickness of buttonhole 2 foot "A", and then insert the button that will be put through the ...
Buttonholes are indicated below . 1 1 1 1 Reinforcement stitching The names of parts of buttonhole foot " A" , which is about 28 mm (1-1/8 inch) (diameter + thickness of buttonhole 2 foot "A", and then insert the button that will be put through the ...

Users Manual - English
Page 77
... in the 1 button to the thickness of the buttonhole. Select stitch 3 or . Hook the gimp thread onto the part of the fabric, and then tie it . With a seam ripper, cut the middle part of the 8 gimp thread remaining at the rear of the machine on the base, to (to the right as...
... in the 1 button to the thickness of the buttonhole. Select stitch 3 or . Hook the gimp thread onto the part of the fabric, and then tie it . With a seam ripper, cut the middle part of the 8 gimp thread remaining at the rear of the machine on the base, to (to the right as...
Users Manual - English
Page 107
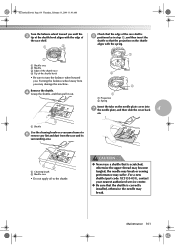
... then slide the cover back 4 on. 1 1 Shuttle Use the cleaning brush or a vacuum cleaner to 5 remove any lint and dust from you . For a new shuttle (part code: XC3153-051), contact your nearest authorized service center. Maintenance 101 G Be sure that is correctly installed, otherwise the needle may suffer. Turning the balance...
... then slide the cover back 4 on. 1 1 Shuttle Use the cleaning brush or a vacuum cleaner to 5 remove any lint and dust from you . For a new shuttle (part code: XC3153-051), contact your nearest authorized service center. Maintenance 101 G Be sure that is correctly installed, otherwise the needle may suffer. Turning the balance...

