Users Manual - English
Page 3
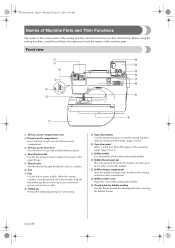
... the sewing machine is not being used, store the machine with the flap folded up. D Bobbin winder cover Open this compartment. E Thread guide for bobbin winding Pass the thread around this lever to eject the installed thread cassette. 4 Thread tension dial Use the thread tension dial to... needle. (page Cover D) 0 Operation panel Select a stitch from those that appear in the operation panel. (page Cover E) A Bobbin winder Use the bobbin winder when winding the bobbin. Remove the flap to sew cylindrical pieces such as sleeve cuffs. 8 Sliding leg Pull out the sliding leg during free-arm sewing...
... the sewing machine is not being used, store the machine with the flap folded up. D Bobbin winder cover Open this compartment. E Thread guide for bobbin winding Pass the thread around this lever to eject the installed thread cassette. 4 Thread tension dial Use the thread tension dial to... needle. (page Cover D) 0 Operation panel Select a stitch from those that appear in the operation panel. (page Cover E) A Bobbin winder Use the bobbin winder when winding the bobbin. Remove the flap to sew cylindrical pieces such as sleeve cuffs. 8 Sliding leg Pull out the sliding leg during free-arm sewing...
Users Manual - English
Page 8
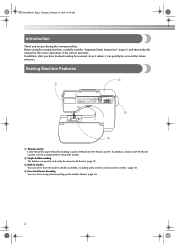
In addition, after you for purchasing this manual, store it where it can start sewing without pulling up the bobbin thread. (page 16) 2 S2_brotherE.book Page 2 Thursday, February 13, 2003 11:03 AM Introduction Thank you have finished reading this sewing machine. Sewing Machine ...and then study this manual for future reference. In addition, simply insert the thread cassette into the compartment to thread the needle. 2 Simple bobbin-winding The bobbin can quickly and easily be wound with thread. (page 12) 3 Built-in stitches You can select from the built-in stitches available, ...
In addition, after you for purchasing this manual, store it where it can start sewing without pulling up the bobbin thread. (page 16) 2 S2_brotherE.book Page 2 Thursday, February 13, 2003 11:03 AM Introduction Thank you have finished reading this sewing machine. Sewing Machine ...and then study this manual for future reference. In addition, simply insert the thread cassette into the compartment to thread the needle. 2 Simple bobbin-winding The bobbin can quickly and easily be wound with thread. (page 12) 3 Built-in stitches You can select from the built-in stitches available, ...
Users Manual - English
Page 9
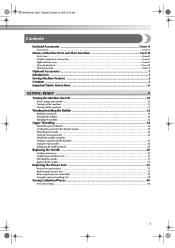
... 9 Turning the Machine On/Off 10 Power supply precautions ...10 Turning on the machine ...11 Turning off the machine ...11 Winding/Installing the Bobbin 12 Bobbin precautions ...12 Winding the bobbin ...12 Installing the bobbin ...16 Upper Threading ...18 About the spool of thread ...18 Loading the spool into the thread cassette ...19 Threading the needle...
... 9 Turning the Machine On/Off 10 Power supply precautions ...10 Turning on the machine ...11 Turning off the machine ...11 Winding/Installing the Bobbin 12 Bobbin precautions ...12 Winding the bobbin ...12 Installing the bobbin ...16 Upper Threading ...18 About the spool of thread ...18 Loading the spool into the thread cassette ...19 Threading the needle...
Users Manual - English
Page 15
S2_brotherE.book Page 9 Thursday, February 13, 2003 11:03 AM 1 GETTING READY The various preparations required before starting to sew are described in this chapter. Turning the Machine On/Off 10 Winding/Installing the Bobbin 12 Upper Threading ...18 Replacing the Needle 30 Replacing the Presser Foot 35 Sewing Cylindrical Pieces 40
S2_brotherE.book Page 9 Thursday, February 13, 2003 11:03 AM 1 GETTING READY The various preparations required before starting to sew are described in this chapter. Turning the Machine On/Off 10 Winding/Installing the Bobbin 12 Upper Threading ...18 Replacing the Needle 30 Replacing the Presser Foot 35 Sewing Cylindrical Pieces 40
Users Manual - English
Page 18
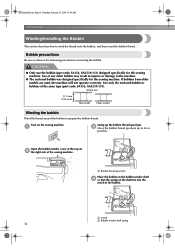
... specifically for this sewing machine. Actual size 11.5 mm (7/16 inch) This model Older model Winding the bobbin Wind the thread around the bobbin to observe the following precautions concerning the bobbin. Bobbin precautions Be sure to prepare the bobbin thread. If bobbins from older models are used, the machine will not operate correctly. Use only the enclosed...
... specifically for this sewing machine. Actual size 11.5 mm (7/16 inch) This model Older model Winding the bobbin Wind the thread around the bobbin to observe the following precautions concerning the bobbin. Bobbin precautions Be sure to prepare the bobbin thread. If bobbins from older models are used, the machine will not operate correctly. Use only the enclosed...
Users Manual - English
Page 19
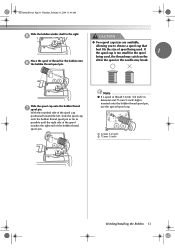
... spool 1 being used , the thread may break. If the spool cap is inserted onto the bobbin thread spool pin, use the special spool cap. 2 1 1 12 mm (1/2 inch) 2 75 mm (3 inch) Winding/Installing the Bobbin 13 Note G If a spool of spool being used . S2_brotherE.book Page 13 Thursday, February 13..., 2003 11:03 AM Slide the bobbin winder shaft to choose a spool cap that best fits the size of thread 12...
... spool 1 being used , the thread may break. If the spool cap is inserted onto the bobbin thread spool pin, use the special spool cap. 2 1 1 12 mm (1/2 inch) 2 75 mm (3 inch) Winding/Installing the Bobbin 13 Note G If a spool of spool being used . S2_brotherE.book Page 13 Thursday, February 13..., 2003 11:03 AM Slide the bobbin winder shaft to choose a spool cap that best fits the size of thread 12...

Users Manual - English
Page 20
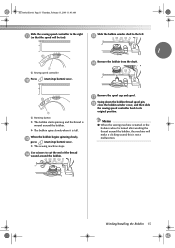
... cap Pull out some thread, and then thread the 8 thread guide for bobbin winding 2 Two slits 14 If the spool net is wound without cutting the thread using your left hand to hold the end of 9 the thread that winds off quickly, such as described. S2_brotherE.book Page 14 Thursday, February 13, 2003... 11:03 AM GETTING READY Memo G When using thread that wraps around the thread guide for bobbin winding, use your right hand to wind the free end of the thread clockwise around the bobbin five or six times. 4 3 Pull the thread to the right and pass it to fit the size of...
... cap Pull out some thread, and then thread the 8 thread guide for bobbin winding 2 Two slits 14 If the spool net is wound without cutting the thread using your left hand to hold the end of 9 the thread that winds off quickly, such as described. S2_brotherE.book Page 14 Thursday, February 13, 2003... 11:03 AM GETTING READY Memo G When using thread that wraps around the thread guide for bobbin winding, use your right hand to wind the free end of the thread clockwise around the bobbin five or six times. 4 3 Pull the thread to the right and pass it to fit the size of...
Users Manual - English
Page 21
... spinning and the thread is turned after winding the thread around the bobbin, the machine will be fast). When the bobbin begins spinning slowly, c press (start /stop button) once. g Swing down the bobbin thread spool pin, h close the bobbin winder cover, and then slide the sewing...will make a clicking sound; X The sewing machine stops. Remove the bobbin from the shaft. this is full. Winding/Installing the Bobbin 15 Slide the bobbin winder shaft to its original position. Remove the spool cap and spool. X The bobbin spins slowly when it is not a malfunction. e 1 1 1 Sewing...
... spinning and the thread is turned after winding the thread around the bobbin, the machine will be fast). When the bobbin begins spinning slowly, c press (start /stop button) once. g Swing down the bobbin thread spool pin, h close the bobbin winder cover, and then slide the sewing...will make a clicking sound; X The sewing machine stops. Remove the bobbin from the shaft. this is full. Winding/Installing the Bobbin 15 Slide the bobbin winder shaft to its original position. Remove the spool cap and spool. X The bobbin spins slowly when it is not a malfunction. e 1 1 1 Sewing...
Users Manual - English
Page 23
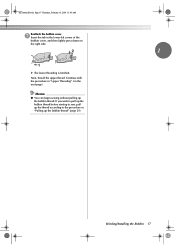
... starting to sew, pull up the thread according to the procedure in "Pulling up the bobbin thread. Next, thread the upper thread. Memo G You can begin sewing without pulling up the bobbin thread" (page 29). Winding/Installing the Bobbin 17 Continue with the procedure in "Upper Threading" (on the right side. 2 1 1 X The lower threading...
... starting to sew, pull up the thread according to the procedure in "Pulling up the bobbin thread. Next, thread the upper thread. Memo G You can begin sewing without pulling up the bobbin thread" (page 29). Winding/Installing the Bobbin 17 Continue with the procedure in "Upper Threading" (on the right side. 2 1 1 X The lower threading...
Users Manual - English
Page 114
... stitch 61 A accessories Cover A air vent Cover C appliques 80 B , balance wheel Cover C 44 bar tack 85 basic stitching 64 blind hem stitch 65 , bobbin Cover A 16 , bobbin cover Cover C 16 bobbin thread 16 pulling up 29 , bobbin winder Cover B 13 bobbin winder seat 14 bobbin winder shaft spring 12 bobbin-winding 12 button sewing 71 buttonhole foot 69 buttonhole...
... stitch 61 A accessories Cover A air vent Cover C appliques 80 B , balance wheel Cover C 44 bar tack 85 basic stitching 64 blind hem stitch 65 , bobbin Cover A 16 , bobbin cover Cover C 16 bobbin thread 16 pulling up 29 , bobbin winder Cover B 13 bobbin winder seat 14 bobbin winder shaft spring 12 bobbin-winding 12 button sewing 71 buttonhole foot 69 buttonhole...
Users Manual - English
Page 115
.../reinforcement stitch button Cover D thick fabrics 54 thin fabrics 55 thread cutter Cover B , thread cutter button Cover D 49 thread guide cover Cover B thread guide for bobbin winding Cover B thread guide plate Cover B thread tension 50 , thread tension dial Cover B 50 trial sewing 53 triple stretch stitch 85 troubleshooting 102 , twin needle Cover...
.../reinforcement stitch button Cover D thick fabrics 54 thin fabrics 55 thread cutter Cover B , thread cutter button Cover D 49 thread guide cover Cover B thread guide for bobbin winding Cover B thread guide plate Cover B thread tension 50 , thread tension dial Cover B 50 trial sewing 53 triple stretch stitch 85 troubleshooting 102 , twin needle Cover...


