
Users Manual - English
Page 3
... the View 23 Hiding the Sequence and Properties Panels Automatically 24 Viewing Different Parts of the Workspace (Panning 25 Taking Measurements 26 Displaying a Hoop While Designing 26 Viewing and Hiding the Embroidery Hoop 27 Selecting a Hoop 27 Creating a Custom Hoop 28 Help 29 Opening the Help 29 Using the Contents 29...
... the View 23 Hiding the Sequence and Properties Panels Automatically 24 Viewing Different Parts of the Workspace (Panning 25 Taking Measurements 26 Displaying a Hoop While Designing 26 Viewing and Hiding the Embroidery Hoop 27 Selecting a Hoop 27 Creating a Custom Hoop 28 Help 29 Opening the Help 29 Using the Contents 29...
Users Manual - English
Page 5
... Choosing the Default Recipe 88 Saving a Design 89 Selecting and Moving Parts of a Design 90 The Select Tool 90 Copying, Cutting, and Pasting Design Components 93 Aligning Items in the Design Horizontally and Vertically 95 Moving Parts of a Design Manually 96 Nudging Design Components 96 Deleting Design Components 97 Rotating Design Components 97 Working with the Color Palette...
... Choosing the Default Recipe 88 Saving a Design 89 Selecting and Moving Parts of a Design 90 The Select Tool 90 Copying, Cutting, and Pasting Design Components 93 Aligning Items in the Design Horizontally and Vertically 95 Moving Parts of a Design Manually 96 Nudging Design Components 96 Deleting Design Components 97 Rotating Design Components 97 Working with the Color Palette...
Users Manual - English
Page 6
4 Pacesetter BES Lettering Instruction Manual Special Design Tools 101 Merging Design Files 101 Add Designs Feature 103 Distorting Segments 105 Sequencing Outline Segments 109 Sequencing Segments 109 Inserting Segments Earlier in the Segment Sequence 110 Moving a Segment Forward or Backward 110 Moving a Segment to the Start or End of the Design 112 Moving a Segment to the nearest Matching Color Group 113 Printing Designs 116 Previewing a Design before Printing 116 Printing Design Worksheets 117 Changing the Print Settings 118 Glossary 121 Index 127
4 Pacesetter BES Lettering Instruction Manual Special Design Tools 101 Merging Design Files 101 Add Designs Feature 103 Distorting Segments 105 Sequencing Outline Segments 109 Sequencing Segments 109 Inserting Segments Earlier in the Segment Sequence 110 Moving a Segment Forward or Backward 110 Moving a Segment to the Start or End of the Design 112 Moving a Segment to the nearest Matching Color Group 113 Printing Designs 116 Previewing a Design before Printing 116 Printing Design Worksheets 117 Changing the Print Settings 118 Glossary 121 Index 127
Users Manual - English
Page 7
Topics covered in this chapter: • Learn the basics of the basic components outlined in the workspace, and create your own customized hoop. • Find out how to show a hoop in this section. CHAPTER 1: Learning about the Workspace Before you start using the software, we recommend that you understand the Pacesetter BES Lettering design workspace and learn a few of how to set up the design workspace environment. • Learn how to access the Pacesetter BES Lettering help.
Topics covered in this chapter: • Learn the basics of the basic components outlined in the workspace, and create your own customized hoop. • Find out how to show a hoop in this section. CHAPTER 1: Learning about the Workspace Before you start using the software, we recommend that you understand the Pacesetter BES Lettering design workspace and learn a few of how to set up the design workspace environment. • Learn how to access the Pacesetter BES Lettering help.
Users Manual - English
Page 8
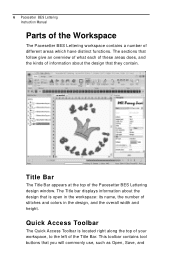
... Manual Parts of the Workspace The Pacesetter BES Lettering workspace contains a number of the Title Bar. Quick Access Toolbar The Quick Access Toolbar is open in the workspace: its name, the number of stitches and colors in the design, and the overall width and height. The sections that they contain. Title... Bar The Title Bar appears at the top of information about the design that you will commonly use, such as Open, Save, and This toolbar contains tool buttons that is located right along the top of your ...
... Manual Parts of the Workspace The Pacesetter BES Lettering workspace contains a number of the Title Bar. Quick Access Toolbar The Quick Access Toolbar is open in the workspace: its name, the number of stitches and colors in the design, and the overall width and height. The sections that they contain. Title... Bar The Title Bar appears at the top of information about the design that you will commonly use, such as Open, Save, and This toolbar contains tool buttons that is located right along the top of your ...

Users Manual - English
Page 14
... the tools available in turn will let you print the current design. Merge: Opens the Merge Design dialog, which in Pacesetter BES Lettering through the various tool bars. Open: Opens an existing design file. Pacesetter Menu Tools Tool What it as. 12 Pacesetter BES Lettering Instruction Manual Toolbar and Ribbon Buttons You can use to...
... the tools available in turn will let you print the current design. Merge: Opens the Merge Design dialog, which in Pacesetter BES Lettering through the various tool bars. Open: Opens an existing design file. Pacesetter Menu Tools Tool What it as. 12 Pacesetter BES Lettering Instruction Manual Toolbar and Ribbon Buttons You can use to...
Users Manual - English
Page 15
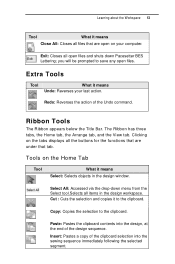
... the end of the design sequence. Ribbon Tools The Ribbon appears below the Title Bar. The Ribbon has three tabs, the Home tab, the Arrange tab, and the View tab. Select All: Accessed via the drop-down Pacesetter BES Lettering; you will be prompted to the clipboard. ... Pastes the clipboard contents into the sewing sequence immediately following the selected segment. Extra Tools Tool What it means Select: Selects objects in the design workspace. Copy: Copies the selection to the clipboard. Clicking on the Home Tab Tool What it means Undo: Reverses your computer. Exit: ...
... the end of the design sequence. Ribbon Tools The Ribbon appears below the Title Bar. The Ribbon has three tabs, the Home tab, the Arrange tab, and the View tab. Select All: Accessed via the drop-down Pacesetter BES Lettering; you will be prompted to the clipboard. ... Pastes the clipboard contents into the sewing sequence immediately following the selected segment. Extra Tools Tool What it means Select: Selects objects in the design workspace. Copy: Copies the selection to the clipboard. Clicking on the Home Tab Tool What it means Undo: Reverses your computer. Exit: ...
Users Manual - English
Page 16
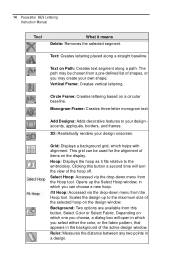
... the color, or the fabric pattern, that appears in a design. Clicking this button, Select Color or Select Fabric. Vertical Frame: Creates vertical lettering. Opens up to the maximum size of the active design window. Monogram Frame: Creates three-letter monogram text. 14 Pacesetter BES Lettering Instruction Manual Tool What it fits relative to the embroidery...
... the color, or the fabric pattern, that appears in a design. Clicking this button, Select Color or Select Fabric. Vertical Frame: Creates vertical lettering. Opens up to the maximum size of the active design window. Monogram Frame: Creates three-letter monogram text. 14 Pacesetter BES Lettering Instruction Manual Tool What it fits relative to the embroidery...
Users Manual - English
Page 17
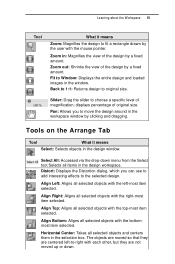
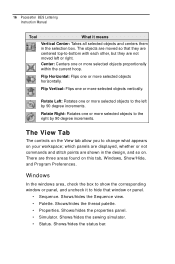
...Horizontal Center: Takes all selected objects with the top-most item selected. Align Left: Aligns all items in the design workspace. Zoom out: Shrinks the view of the design by the user with the left-most item selected. Select All: Accessed via the drop-down . The objects are...of magnification; Pan: Allows you can use to add interesting effects to move the design around in the workspace window by a fixed amount. Distort: Displays the Distortion dialog, which you to the selected design. Align Bottom: Aligns all selected objects with the bottommost item selected. Zoom in:...
...Horizontal Center: Takes all selected objects with the top-most item selected. Align Left: Aligns all items in the design workspace. Zoom out: Shrinks the view of the design by the user with the left-most item selected. Select All: Accessed via the drop-down . The objects are...of magnification; Pan: Allows you can use to add interesting effects to move the design around in the workspace window by a fixed amount. Distort: Displays the Distortion dialog, which you to the selected design. Align Bottom: Aligns all selected objects with the bottommost item selected. Zoom in:...
Users Manual - English
Page 18
... check the box to show the corresponding window or panel, and uncheck it means Vertical Center: Takes all selected objects and centers them in the design, and so on. Shows/hides the properties panel. • Simulator. Center: Centers one or more selected objects to -bottom with each other..., but they are centered top-to the left or right. Flip Horizontal: Flips one or more selected objects horizontally. 16 Pacesetter BES Lettering Instruction Manual Tool What it to the right by 90 degree increments. Rotate Right: Rotates one or more selected objects to hide that ...
... check the box to show the corresponding window or panel, and uncheck it means Vertical Center: Takes all selected objects and centers them in the design, and so on. Shows/hides the properties panel. • Simulator. Center: Centers one or more selected objects to -bottom with each other..., but they are centered top-to the left or right. Flip Horizontal: Flips one or more selected objects horizontally. 16 Pacesetter BES Lettering Instruction Manual Tool What it to the right by 90 degree increments. Rotate Right: Rotates one or more selected objects to hide that ...
Users Manual - English
Page 19
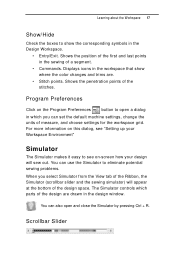
..., see on the Program Preferences button to eliminate potential sewing problems. When you can set the default machine settings, change the units of the design are . • Stitch points. You can use the Simulator to open and close the Simulator by pressing Ctrl + R. Shows the penetration ... • Commands. Program Preferences Click on -screen how your Workspace Environment" Simulator The Simulator makes it easy to see "Setting up your design will appear at the bottom of the Ribbon, the Simulator (scrollbar slider and the sewing simulator) will sew out. You can also open a...
..., see on the Program Preferences button to eliminate potential sewing problems. When you can set the default machine settings, change the units of the design are . • Stitch points. You can use the Simulator to open and close the Simulator by pressing Ctrl + R. Shows the penetration ... • Commands. Program Preferences Click on -screen how your Workspace Environment" Simulator The Simulator makes it easy to see "Setting up your design will appear at the bottom of the Ribbon, the Simulator (scrollbar slider and the sewing simulator) will sew out. You can also open a...

Users Manual - English
Page 20
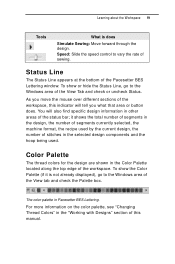
... resume sewing your machine. Clicking on a stitch-by-stitch basis, simulating the sewing action of your design, stitching will advance or retrace the design position by one stitch. 18 Pacesetter BES Lettering Instruction Manual The length of the scrollbar slider represents all of the stitches in the... design by one stitch. The entire length of sewing. Pause/Stop: Pause or stop , sew forward and sew ...
... resume sewing your machine. Clicking on a stitch-by-stitch basis, simulating the sewing action of your design, stitching will advance or retrace the design position by one stitch. 18 Pacesetter BES Lettering Instruction Manual The length of the scrollbar slider represents all of the stitches in the... design by one stitch. The entire length of sewing. Pause/Stop: Pause or stop , sew forward and sew ...
Users Manual - English
Page 21
... area or button does. it is does Simulate Sewing: Move forward through the design. Status Line The Status Line appears at the bottom of sewing. Speed: Slide the speed control to vary the rate of the Pacesetter BES Lettering window. Learning about the Workspace 19 Tools What is not already displayed), go...
... area or button does. it is does Simulate Sewing: Move forward through the design. Status Line The Status Line appears at the bottom of sewing. Speed: Slide the speed control to vary the rate of the Pacesetter BES Lettering window. Learning about the Workspace 19 Tools What is not already displayed), go...
Users Manual - English
Page 22
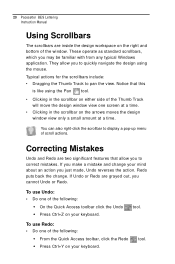
... to correct mistakes. To use Undo: • Do one of the Thumb Track will move the design window view one of scroll actions. 20 Pacesetter BES Lettering Instruction Manual Using Scrollbars The scrollbars are two significant features that this is like using the mouse. Correcting... Mistakes Undo and Redo are inside the design workspace on the arrows moves the design window view only a small amount at ...
... to correct mistakes. To use Undo: • Do one of the Thumb Track will move the design window view one of scroll actions. 20 Pacesetter BES Lettering Instruction Manual Using Scrollbars The scrollbars are two significant features that this is like using the mouse. Correcting... Mistakes Undo and Redo are inside the design workspace on the arrows moves the design window view only a small amount at ...
Users Manual - English
Page 23
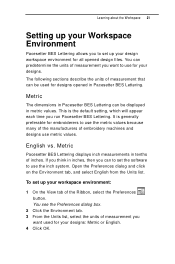
... of the Ribbon, select the Preferences button. The following sections describe the units of embroidery machines and designs use metric values. Metric Pacesetter BES Lettering displays inch measurements in inches, then you can predetermine the units of measurement you want used for your... select the units of inches. This is generally preferable for embroiderers to use for designs opened design files. Metric The dimensions in Pacesetter BES Lettering can be displayed in Pacesetter BES Lettering. If you think in tenths of measurement you want to use the metric values because...
... of the Ribbon, select the Preferences button. The following sections describe the units of embroidery machines and designs use metric values. Metric Pacesetter BES Lettering displays inch measurements in inches, then you can predetermine the units of measurement you want used for your... select the units of inches. This is generally preferable for embroiderers to use for designs opened design files. Metric The dimensions in Pacesetter BES Lettering can be displayed in Pacesetter BES Lettering. If you think in tenths of measurement you want to use the metric values because...

Users Manual - English
Page 24
... the Machine format list, select the machine format that you want applied to new design files. 4 Click OK. The selected machine format can select the recipe for the specific design. This will override whichever recipe is read. To change the machine format of the...machine format properties after a design file has been opened will not change machine format properties: 1 On the View tab of the embroidery designs in that design. 22 Pacesetter BES Lettering Instruction Manual Changing Machine Format Properties All designs in Pacesetter BES Lettering have their own profile settings ...
... the Machine format list, select the machine format that you want applied to new design files. 4 Click OK. The selected machine format can select the recipe for the specific design. This will override whichever recipe is read. To change the machine format of the...machine format properties after a design file has been opened will not change machine format properties: 1 On the View tab of the embroidery designs in that design. 22 Pacesetter BES Lettering Instruction Manual Changing Machine Format Properties All designs in Pacesetter BES Lettering have their own profile settings ...

Users Manual - English
Page 25
You can either of the following: Š Right-click to make your design larger. Š Left-click that box. When you will zoom to make your design smaller. This tool turns Zoom Mode on , you turn Zoom Mode on and off. To use the Zoom Tool: 1 On the Ribbon, select the Home ..., using the point you clicked on as the center for the display. • Left-Drag: If you want to magnify or reduce parts of your design. With Zoom you clicked on as the center for the display. • Right-Click: This zooms the display out, using the Zoom tool. The pointer...
You can either of the following: Š Right-click to make your design larger. Š Left-click that box. When you will zoom to make your design smaller. This tool turns Zoom Mode on , you turn Zoom Mode on and off. To use the Zoom Tool: 1 On the Ribbon, select the Home ..., using the point you clicked on as the center for the display. • Left-Drag: If you want to magnify or reduce parts of your design. With Zoom you clicked on as the center for the display. • Right-Click: This zooms the display out, using the Zoom tool. The pointer...

Users Manual - English
Page 26
...of the screen, the panel will be on this : . You can set the Sequence and Properties panels to see the design at the top-right of the panel. 24 Pacesetter BES Lettering Instruction Manual 4 Do one of the following options on its side, like this menu: • Zoom In to make ...your design larger. • Zoom Out to make your design smaller. • To Fit to make the whole design the size of the design window. • To Selection ...
...of the screen, the panel will be on this : . You can set the Sequence and Properties panels to see the design at the top-right of the panel. 24 Pacesetter BES Lettering Instruction Manual 4 Do one of the following options on its side, like this menu: • Zoom In to make ...your design larger. • Zoom Out to make your design smaller. • To Fit to make the whole design the size of the design window. • To Selection ...
Users Manual - English
Page 27
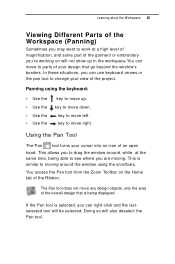
Panning using the scrollbars. key to move up in the workspace.You can move to move left. This is similar to move any design objects, only the area of the overall design that go beyond the window's borders. If the Pan tool is being able to see where you are moving around , while... . key to parts of your view of an open hand. In these situations, you can use keyboard arrows or the pan tool to change your design that is selected, you can right-click and the lastselected tool will be selected. You access the Pan tool from the Zoom Toolbar on will...
Panning using the scrollbars. key to move up in the workspace.You can move to move left. This is similar to move any design objects, only the area of the overall design that go beyond the window's borders. If the Pan tool is being able to see where you are moving around , while... . key to parts of your view of an open hand. In these situations, you can use keyboard arrows or the pan tool to change your design that is selected, you can right-click and the lastselected tool will be selected. You access the Pan tool from the Zoom Toolbar on will...
Users Manual - English
Page 28
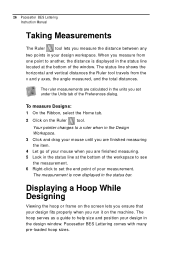
... see the measurement. 6 Right-click to a ruler when in the Design Workspace. 3 Click and drag your mouse until you are finished measuring the item. 4 Let go of your design workspace. Pacesetter BES Lettering comes with many pre-loaded hoop sizes. The ruler measurements are finished measuring.... 5 Look in your mouse when you are calculated in the status bar. The measurement is displayed in the design window. The status line ...
... see the measurement. 6 Right-click to a ruler when in the Design Workspace. 3 Click and drag your mouse until you are finished measuring the item. 4 Let go of your design workspace. Pacesetter BES Lettering comes with many pre-loaded hoop sizes. The ruler measurements are finished measuring.... 5 Look in your mouse when you are calculated in the status bar. The measurement is displayed in the design window. The status line ...


