
Wiper Problems and Solutions - English
Page 2
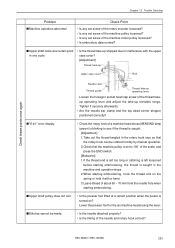
... machine or after a trim and the wiper extended caught the thread and retracted all • Blown fuse on power supply circuit board. (Refer to Instruction Manual) • Wiper solenoid is defective. (See checking the wiper solenoid) • Circuit board is bad. (See checking the voltage to be past the sensor. (See...
... machine or after a trim and the wiper extended caught the thread and retracted all • Blown fuse on power supply circuit board. (Refer to Instruction Manual) • Wiper solenoid is defective. (See checking the wiper solenoid) • Circuit board is bad. (See checking the voltage to be past the sensor. (See...
Wiper Problems and Solutions - English
Page 5
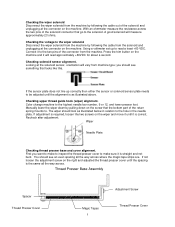
... the sensor or solenoid sensor plate needs to . you want to make to inspect the thread presser cover to read approximately +60VDC for about a second. Manually lower the wiper down by pulling down on the wiper and move it is straight and not bent. Checking upper thread guide hook (wiper) alignment...
... the sensor or solenoid sensor plate needs to . you want to make to inspect the thread presser cover to read approximately +60VDC for about a second. Manually lower the wiper down by pulling down on the wiper and move it is straight and not bent. Checking upper thread guide hook (wiper) alignment...
Motor Locks - English
Page 2
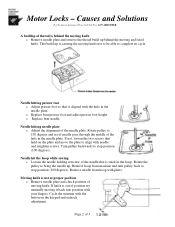
... (100 degrees). Remove needle from machine and turn pulley back to bring the needle up. o Replace bent needle. Moving knife is out of position try manually moving it back into position with needle and retighten screws. Turn pulley backwards to 150 degrees and see if needle goes through the middle of...
... (100 degrees). Remove needle from machine and turn pulley back to bring the needle up. o Replace bent needle. Moving knife is out of position try manually moving it back into position with needle and retighten screws. Turn pulley backwards to 150 degrees and see if needle goes through the middle of...
Motor Locks - English
Page 3
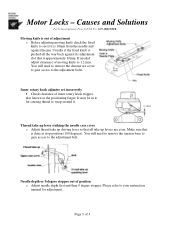
Causes and Solutions For Technical Assistance Please Call Toll Free 1-877-4BROTHER Moving knife is out of adjustment o Before adjusting moving knife to your instruction manual for adjustment. Thread take up lever striking the needle case cover o Adjust thread take up levers are cover to gain access to see if it . ...
Causes and Solutions For Technical Assistance Please Call Toll Free 1-877-4BROTHER Moving knife is out of adjustment o Before adjusting moving knife to your instruction manual for adjustment. Thread take up lever striking the needle case cover o Adjust thread take up levers are cover to gain access to see if it . ...
Changing Needle Bar Cushions - English
Page 2
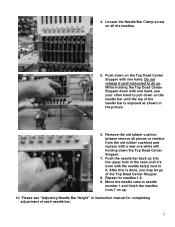
... (please remove all the needles. 5. Loosen the Needle Bar Clamp screw on all pieces or residue from 7 on up into the upper hole in instruction manual for needles 1-6. 9. While holding down on the Top Dead Center Stopper with the needle bar(s) next to it until the top of the needle bar...
... (please remove all the needles. 5. Loosen the Needle Bar Clamp screw on all pieces or residue from 7 on up into the upper hole in instruction manual for needles 1-6. 9. While holding down on the Top Dead Center Stopper with the needle bar(s) next to it until the top of the needle bar...
Maintenance Schedule - English
Page 5
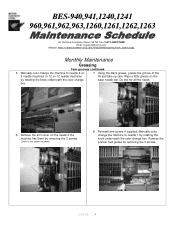
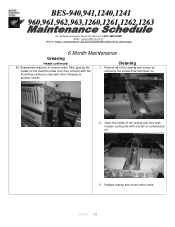
...,961,962,963,1260,1261,1262,1263 For Technical Assistance Please Call Toll Fre e 1-877-4BROTHER Email: tsupport@brother.com Website: http://www.brother-usa.com/industembroidery/tech_down.aspx Monthly Maintenance Greasing Cam grooves continued 5. Manually color change the machine to needle 9 on the by removing the 3 screws. 5/24/05 5 Do this for...
...,961,962,963,1260,1261,1262,1263 For Technical Assistance Please Call Toll Fre e 1-877-4BROTHER Email: tsupport@brother.com Website: http://www.brother-usa.com/industembroidery/tech_down.aspx Monthly Maintenance Greasing Cam grooves continued 5. Manually color change the machine to needle 9 on the by removing the 3 screws. 5/24/05 5 Do this for...
Maintenance Schedule - English
Page 6
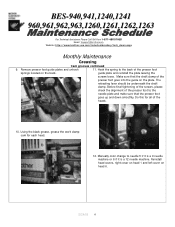
...into the guide on the back. Make sure that the presser foot goes up and down smoothly. Do this for each head. 12. Manually color change to the needle plate and make sure that the shaft clamp of the heads. 10. Remove presser foot guide plates and ...1240,1241 960,961,962,963,1260,1261,1262,1263 For Technical Assistance Please Call Toll Fre e 1-877-4BROTHER Email: tsupport@brother.com Website: http://www.brother-usa.com/industembroidery/tech_down.aspx Monthly Maintenance Greasing Cam grooves continued 9. The retracting lever should be underneath the shaft clamp. Reinstall head...
...into the guide on the back. Make sure that the presser foot goes up and down smoothly. Do this for each head. 12. Manually color change to the needle plate and make sure that the shaft clamp of the heads. 10. Remove presser foot guide plates and ...1240,1241 960,961,962,963,1260,1261,1262,1263 For Technical Assistance Please Call Toll Fre e 1-877-4BROTHER Email: tsupport@brother.com Website: http://www.brother-usa.com/industembroidery/tech_down.aspx Monthly Maintenance Greasing Cam grooves continued 9. The retracting lever should be underneath the shaft clamp. Reinstall head...
Maintenance Schedule - English
Page 9
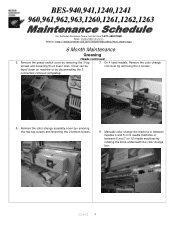
Remove the power switch cover by removing the 2 screws. Cover can be rod cover by removing the 3 top 7. Manually color change the machine in between needles 4 and 5 on 9 needle machines or between 6 and 7 on machine or by disconnecting the 3 connectors removed completely...941,1240,1241 960,961,962,963,1260,1261,1262,1263 For Technical Assistance Please Call Toll Fre e 1-877-4BROTHER Email: tsupport@brother.com Website: http://www.brother-usa.com/industembroidery/tech_down.aspx 6 Month Maintenance Greasing Heads continued 5. On 4 head models. layed down on 12 needle machines by ...
Remove the power switch cover by removing the 2 screws. Cover can be rod cover by removing the 3 top 7. Manually color change the machine in between needles 4 and 5 on 9 needle machines or between 6 and 7 on machine or by disconnecting the 3 connectors removed completely...941,1240,1241 960,961,962,963,1260,1261,1262,1263 For Technical Assistance Please Call Toll Fre e 1-877-4BROTHER Email: tsupport@brother.com Website: http://www.brother-usa.com/industembroidery/tech_down.aspx 6 Month Maintenance Greasing Heads continued 5. On 4 head models. layed down on 12 needle machines by ...
Maintenance Schedule - English
Page 14
Remove all of the sewing arm and hook module cooling fan with the mounting surface by manually color changing to another needle. After placing the heads on . 2. Replace sewing arm covers when done. 5/24/05 14 Cleaning 1. Clean the inside of the ... air. 3. BES-940,941,1240,1241 960,961,962,963,1260,1261,1262,1263 For Technical Assistance Please Call Toll Fre e 1-877-4BROTHER Email: tsupport@brother.com Website: http://www.brother-usa.com/industembroidery/tech_down.aspx 6 Month Maintenance Greasing Heads continued 25. Reassemble machine in reverse order.
Remove all of the sewing arm and hook module cooling fan with the mounting surface by manually color changing to another needle. After placing the heads on . 2. Replace sewing arm covers when done. 5/24/05 14 Cleaning 1. Clean the inside of the ... air. 3. BES-940,941,1240,1241 960,961,962,963,1260,1261,1262,1263 For Technical Assistance Please Call Toll Fre e 1-877-4BROTHER Email: tsupport@brother.com Website: http://www.brother-usa.com/industembroidery/tech_down.aspx 6 Month Maintenance Greasing Heads continued 25. Reassemble machine in reverse order.
Tubular to Cap - English
Page 1
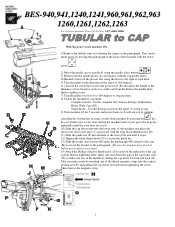
... cap driver unit onto the lower arms of the machine and place the driver over the locator pins (C) and secure with the cap needle plates. 4)Manually lower all the presser feet using the lever to the right of each head. 5) Turn the pulley in the direction of the arrow to 200...
... cap driver unit onto the lower arms of the machine and place the driver over the locator pins (C) and secure with the cap needle plates. 4)Manually lower all the presser feet using the lever to the right of each head. 5) Turn the pulley in the direction of the arrow to 200...

Cap to Tubular - English
Page 1
... for safekeeping. 5) Move the needle case to needle #1 using the needle select buttons . 6) Remove the cap needle plates (A) and replace with the flat needle plates. 7) Manually lower all the parts removed on the driver for 5 seconds and power back on the right of each head. 8) Turn the pulley in the needle...
... for safekeeping. 5) Move the needle case to needle #1 using the needle select buttons . 6) Remove the cap needle plates (A) and replace with the flat needle plates. 7) Manually lower all the parts removed on the driver for 5 seconds and power back on the right of each head. 8) Turn the pulley in the needle...

Parts Manual - English
Page 87
...64 64-1 64-2 539821000 547263001 547227000 593960041 6 - VV )( -f z.. CORD CLAMP, 19P7 IF HARNESS SET, 20M IF HARNESS ASSY, 20M INSTRUCTION MANUAL, CABLE 155-960-515 80 CODE Q'TY E >,c -f NAME OF PARTS RM 4 541195101 6 I )77/\-47/ 3. HEAD PCB ASSY 6 ... 539820000 1 a - g IV.1* (BES-960BC, 1260BC) / Power supply equipment mechanism (BES-960BC, 12608C) / Stromversorgung (BES-960BC, 1260BC) / Mecanisme de l'equipment en alimentation electrique (BES-960BC, 1260BC) / Mecanismo del equipo de alimentation de corriente (BES-9608C, 1260BC) REF.NO. HEAD MOTOR HARNESS ASSY 11 543005000 1...
...64 64-1 64-2 539821000 547263001 547227000 593960041 6 - VV )( -f z.. CORD CLAMP, 19P7 IF HARNESS SET, 20M IF HARNESS ASSY, 20M INSTRUCTION MANUAL, CABLE 155-960-515 80 CODE Q'TY E >,c -f NAME OF PARTS RM 4 541195101 6 I )77/\-47/ 3. HEAD PCB ASSY 6 ... 539820000 1 a - g IV.1* (BES-960BC, 1260BC) / Power supply equipment mechanism (BES-960BC, 12608C) / Stromversorgung (BES-960BC, 1260BC) / Mecanisme de l'equipment en alimentation electrique (BES-960BC, 1260BC) / Mecanismo del equipo de alimentation de corriente (BES-9608C, 1260BC) REF.NO. HEAD MOTOR HARNESS ASSY 11 543005000 1...
Instruction Manual - English
Page 1
... is provided by identifying the model name. Chapter 6 Embroidering Explains how to be conducted before using the machine. BES-1260BC (12 needles) Explanation for individual model is BES-1260BC. Configuration of this manual This manual consists of the following chapters: Chapter 1 An Introduction of Embroidery Machine Provides information on the specifications of Machine Provides...
... is provided by identifying the model name. Chapter 6 Embroidering Explains how to be conducted before using the machine. BES-1260BC (12 needles) Explanation for individual model is BES-1260BC. Configuration of this manual This manual consists of the following chapters: Chapter 1 An Introduction of Embroidery Machine Provides information on the specifications of Machine Provides...
Instruction Manual - English
Page 3
Software 17 2-1. Notes on the Machine Power 65 8 BES-960BC • BES-1260BC Handling of floppy disk 23 Chapter 2 Preparation of Table 33 2-5. Mounting of Embroidery Machine 1. Connection of ...47 3-3. Lubrication to Machines (for Embroidering 44 3-1. Replacement of Machine Components 26 2. Bed Retract 55 3-6. Contents SAFTY INSTRUCTIONS 1 Procedure of Reading This Manual 6 Contents ...8 Chapter 1 An Introduction of Software 17 2-3. Specifications 16 2. Configuration of Embroidery Machine 1. Basic Operation of Machines 28 2-2. Installation 28...
Software 17 2-1. Notes on the Machine Power 65 8 BES-960BC • BES-1260BC Handling of floppy disk 23 Chapter 2 Preparation of Table 33 2-5. Mounting of Embroidery Machine 1. Connection of ...47 3-3. Lubrication to Machines (for Embroidering 44 3-1. Replacement of Machine Components 26 2. Bed Retract 55 3-6. Contents SAFTY INSTRUCTIONS 1 Procedure of Reading This Manual 6 Contents ...8 Chapter 1 An Introduction of Software 17 2-3. Specifications 16 2. Configuration of Embroidery Machine 1. Basic Operation of Machines 28 2-2. Installation 28...
Instruction Manual - English
Page 107
...selected, a mask is a rectangle, the pattern within the hoop may be displayed as follows: Automatic Manual The system measures the image size to specify the mask. 112 BES-960BC • BES-1260BC s There are two types of embroidery data. s Mask is selected, drag the area with the mouse... to create a mask automatically. Select automatic or manual mode. After selecting this case, set masking in a khaki line. ...
...selected, a mask is a rectangle, the pattern within the hoop may be displayed as follows: Automatic Manual The system measures the image size to specify the mask. 112 BES-960BC • BES-1260BC s There are two types of embroidery data. s Mask is selected, drag the area with the mouse... to create a mask automatically. Select automatic or manual mode. After selecting this case, set masking in a khaki line. ...
Instruction Manual - English
Page 174
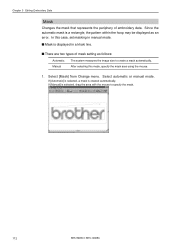
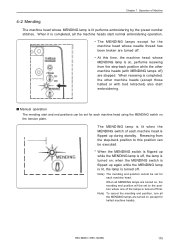
... end position, turn all the machine heads start normal embroidering operation. • The MENDING lamps except for halted machine heads) . s Manual operation The mending start embroidering. BES-960BC • BES-1260BC 179 When resewing is completed, the other machine heads (with bed retracted) also start and end positions can be set to...
... end position, turn all the machine heads start normal embroidering operation. • The MENDING lamps except for halted machine heads) . s Manual operation The mending start embroidering. BES-960BC • BES-1260BC 179 When resewing is completed, the other machine heads (with bed retracted) also start and end positions can be set to...
Instruction Manual - English
Page 216
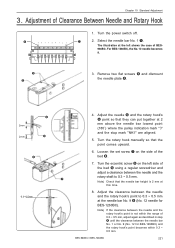
... No. 12 needle becomes 9. Turn the rotary hook manually so that they can put together at the needle bar No. 9 o (No. 12 needle for BES-1260BC) and the rotary hook's point becomes within the range of 0.3 ~ 0.5 mm, adjust again as described in step r until the ...plate e. 2mm 2mm r t i 0.3~0.5mm 4. Turn the eccentric screw i on the side of Clearance Between Needle and Rotary Hook 1. BES-960BC • BES-1260BC 221 Chapter 10 Standard Adjustment 3. Turn the power switch off. w e 3. Adjust the needle r and the rotary hook's t point so that the point comes upward...
... No. 12 needle becomes 9. Turn the rotary hook manually so that they can put together at the needle bar No. 9 o (No. 12 needle for BES-1260BC) and the rotary hook's point becomes within the range of 0.3 ~ 0.5 mm, adjust again as described in step r until the ...plate e. 2mm 2mm r t i 0.3~0.5mm 4. Turn the eccentric screw i on the side of Clearance Between Needle and Rotary Hook 1. BES-960BC • BES-1260BC 221 Chapter 10 Standard Adjustment 3. Turn the power switch off. w e 3. Adjust the needle r and the rotary hook's t point so that the point comes upward...
Instruction Manual - English
Page 217
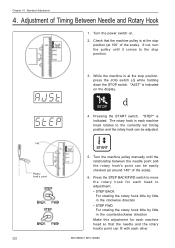
... For rotating the rotary hook little by little in each other. 222 BES-960BC • BES-1260BC Adjustment of the scale). "STEP" is at the stop position (at the stop position. 3. Turn the machine pulley manually until it comes to the currently set timing position and the rotary hook can fit with...
... For rotating the rotary hook little by little in each other. 222 BES-960BC • BES-1260BC Adjustment of the scale). "STEP" is at the stop position (at the stop position. 3. Turn the machine pulley manually until it comes to the currently set timing position and the rotary hook can fit with...
Instruction Manual - English
Page 228
... starting embroidering, hook the thread end on ? Lower the presser foot for the six machine heads using the lever. sStitches cannot be rotated forcibly by manual operation. 2.Check that the machine pulley is set screw of the machine motor pulley loosened? • Is embroidery data normal? s"E-b1" error display • Check... or stitching is left loosened before starting embroidering, the thread is caught in the machine and operation stops. 2.When starting embroidering. BES-960BC • BES-1260BC 233
... starting embroidering, hook the thread end on ? Lower the presser foot for the six machine heads using the lever. sStitches cannot be rotated forcibly by manual operation. 2.Check that the machine pulley is set screw of the machine motor pulley loosened? • Is embroidery data normal? s"E-b1" error display • Check... or stitching is left loosened before starting embroidering, the thread is caught in the machine and operation stops. 2.When starting embroidering. BES-960BC • BES-1260BC 233


