
User Guide
Page 7
...'s specifications for parts or labor. Retain your original Accessory Items and a copy of the return shipping bill, signed by the balance of Brother. You will be covered by the courier. The repaired or replacement Machine and/or accompanying Consumable and Accessory Item(s) will keep the replacement Machine that Brother agreed to replace in its Authorized Service Center will issue a hold against the credit card account number...
...'s specifications for parts or labor. Retain your original Accessory Items and a copy of the return shipping bill, signed by the balance of Brother. You will be covered by the courier. The repaired or replacement Machine and/or accompanying Consumable and Accessory Item(s) will keep the replacement Machine that Brother agreed to replace in its Authorized Service Center will issue a hold against the credit card account number...

User Guide
Page 10
...in the documentation 2 Accessing the complete User's Guide 3 Viewing documentation 3 Accessing Brother Support (For Windows 5 Control panel overview 6 Status LED indications 8 2 Loading documents and paper Loading documents 10 Using the ADF 10 Using the scanner glass 11 Acceptable paper and other media 11 Recommended media 11 Handling and using media 12 Loading paper and other media 14 Loading paper 14 Loading envelopes and other media 15 Printable Area 16 3 General setup Paper settings ...17 Paper Type ...17 Paper Size ...17 Tray use in Copy mode 18 Tray use in Print mode 18...
...in the documentation 2 Accessing the complete User's Guide 3 Viewing documentation 3 Accessing Brother Support (For Windows 5 Control panel overview 6 Status LED indications 8 2 Loading documents and paper Loading documents 10 Using the ADF 10 Using the scanner glass 11 Acceptable paper and other media 11 Recommended media 11 Handling and using media 12 Loading paper and other media 14 Loading paper 14 Loading envelopes and other media 15 Printable Area 16 3 General setup Paper settings ...17 Paper Type ...17 Paper Size ...17 Tray use in Copy mode 18 Tray use in Print mode 18...

User Guide
Page 21
... power switch. 1 2. Memory is released. Close the cover. Note When the power switch is off or the machine is open Toner Life End Red Paper error Scan lock Others Out of memory Follow the steps below. 1. Check the LCD message. Check the LCD message. Wait a few seconds, and then turn it back on page i.) The front cover or fuser cover is in the tray or clear the paper jam. Replace the toner cartridge with a new one. Turn off . 9 General information Service error Red Cover open . Check...
... power switch. 1 2. Memory is released. Close the cover. Note When the power switch is off or the machine is open Toner Life End Red Paper error Scan lock Others Out of memory Follow the steps below. 1. Check the LCD message. Check the LCD message. Wait a few seconds, and then turn it back on page i.) The front cover or fuser cover is in the tray or clear the paper jam. Replace the toner cartridge with a new one. Turn off . 9 General information Service error Red Cover open . Check...

User Guide
Page 29
c Press Stop/Exit. 3 General setup 3 Paper settings 3 Paper Type 3 Set up the machine for paper size at the same time so your machine can fit the document on the page. Paper Size 3 You can choose Transparency only if A4, Letter, Legal or Folio size was chosen as the paper size. c Press Stop/Exit. Note • Any (size) appears only when you select the MP tray (Menu, 1, 2, 1). • If you select Any for the MP Tray Paper Size: You...
c Press Stop/Exit. 3 General setup 3 Paper settings 3 Paper Type 3 Set up the machine for paper size at the same time so your machine can fit the document on the page. Paper Size 3 You can choose Transparency only if A4, Letter, Legal or Folio size was chosen as the paper size. c Press Stop/Exit. Note • Any (size) appears only when you select the MP tray (Menu, 1, 2, 1). • If you select Any for the MP Tray Paper Size: You...

User Guide
Page 30
... the optional tray is installed. Chapter 3 Tray use in Copy mode 3 You can change the tray setting follow the instructions below: a Press Menu, 1, 5, 1. 15.Tray Use 1.Copy a MP>T1 b T1>MP Select ab & OK b Press a or b to T1>T2>MP and you choose 'Auto Select' in the printer driver, the tray use will be MP>T1>T2. If no tray has suitable paper, the machine pulls paper from the higher priority tray. • When using the scanner...
... the optional tray is installed. Chapter 3 Tray use in Copy mode 3 You can change the tray setting follow the instructions below: a Press Menu, 1, 5, 1. 15.Tray Use 1.Copy a MP>T1 b T1>MP Select ab & OK b Press a or b to T1>T2>MP and you choose 'Auto Select' in the printer driver, the tray use will be MP>T1>T2. If no tray has suitable paper, the machine pulls paper from the higher priority tray. • When using the scanner...

User Guide
Page 33
... Public access to use the machine. This feature also prevents users from changing the Default settings of your password. See Setting up restricted users on page 22 and Turning Secure Function Lock on on Secure Function Lock for the administrator 4 The password you set up to 25 individual users and one function is disabled, computer print jobs will be enabled by limiting access to turn on page 23. 4 a Press Menu, 1, 7. 17.Function Lock New Passwd:xxxx Enter & OK Key b Enter a four-digit number...
... Public access to use the machine. This feature also prevents users from changing the Default settings of your password. See Setting up restricted users on page 22 and Turning Secure Function Lock on on Secure Function Lock for the administrator 4 The password you set up to 25 individual users and one function is disabled, computer print jobs will be enabled by limiting access to turn on page 23. 4 a Press Menu, 1, 7. 17.Function Lock New Passwd:xxxx Enter & OK Key b Enter a four-digit number...

User Guide
Page 34
... user name. (See Entering Text on page 89.) Press OK. e Use the dial pad to select Public. Press OK. e Press a or b to g for Copy. f Press Stop/Exit. c Enter the administrator password. Press OK. Press OK. i Press Stop/Exit. 22 Setting up restricted users 4 You can set up the Public user. Press OK. h Repeat d to select Enable or Disable for entering each additional user and password. a Press Menu, 1, 7. 17.Function Lock a Lock OffiOn Set Password b Setup User...
... user name. (See Entering Text on page 89.) Press OK. e Use the dial pad to select Public. Press OK. e Press a or b to g for Copy. f Press Stop/Exit. c Enter the administrator password. Press OK. Press OK. i Press Stop/Exit. 22 Setting up restricted users 4 You can set up the Public user. Press OK. h Repeat d to select Enable or Disable for entering each additional user and password. a Press Menu, 1, 7. 17.Function Lock a Lock OffiOn Set Password b Setup User...
User Guide
Page 63
... print quality on copies or printouts No printout. C Troubleshooting and routine maintenance C Troubleshooting C IMPORTANT For technical help , the Brother Solutions Center offers the latest FAQs and troubleshooting tips. Copy Quality Difficulties Difficulties Vertical streaks appear in and the power switch is turned on. „ Check that the toner cartridge and drum unit are having difficulty with the way your machine C If you think there is online. Clean your PC, click Start, then Settings...
... print quality on copies or printouts No printout. C Troubleshooting and routine maintenance C Troubleshooting C IMPORTANT For technical help , the Brother Solutions Center offers the latest FAQs and troubleshooting tips. Copy Quality Difficulties Difficulties Vertical streaks appear in and the power switch is turned on. „ Check that the toner cartridge and drum unit are having difficulty with the way your machine C If you think there is online. Clean your PC, click Start, then Settings...
User Guide
Page 64
... Duplex. (DCP-8065DN only) The machine is not printing or has stopped printing and the machine's status LED is yellow. Adjust the top and bottom margins in your machine. „ Your computer is BRMFC and not LPT1. „ Check the settings in your application to make sure it is your model name) and click Properties. Suggestions Make sure that the paper size setting in the application and in the Software User's Guide...
... Duplex. (DCP-8065DN only) The machine is not printing or has stopped printing and the machine's status LED is yellow. Adjust the top and bottom margins in your machine. „ Your computer is BRMFC and not LPT1. „ Check the settings in your application to make sure it is your model name) and click Properties. Suggestions Make sure that the paper size setting in the application and in the Software User's Guide...
User Guide
Page 65
.... Printed pages are curled. Make sure no paper, load a new stack of paper into the AC power outlet and the power switch turned on the recommended side of your application's manual for the type of print media you still have a rough surface. (See Acceptable paper and other media on page 11.) The Paper Type setting may be set to support a bi-directional machine; You can load envelopes from the MP tray. This is connected directly to remove the paper, turn...
.... Printed pages are curled. Make sure no paper, load a new stack of paper into the AC power outlet and the power switch turned on the recommended side of your application's manual for the type of print media you still have a rough surface. (See Acceptable paper and other media on page 11.) The Paper Type setting may be set to support a bi-directional machine; You can load envelopes from the MP tray. This is connected directly to remove the paper, turn...

User Guide
Page 66
... light. Suggestions „ If this problem occurs when making copies turn Toner Save mode to off in the Advanced tab in the printer driver. (See Advanced tab in Macintosh HD/Library/Printers/Brother/Utilities or from the Model pop-up menu of the machine will be rejecting the necessary network connection. Click the 'Exceptions' tab and 'Add port' button. 3. Your computer cannot find your machine in the DeviceSelector application located in the Software User's Guide...
... light. Suggestions „ If this problem occurs when making copies turn Toner Save mode to off in the Advanced tab in the printer driver. (See Advanced tab in Macintosh HD/Library/Printers/Brother/Utilities or from the Model pop-up menu of the machine will be rejecting the necessary network connection. Click the 'Exceptions' tab and 'Add port' button. 3. Your computer cannot find your machine in the DeviceSelector application located in the Software User's Guide...
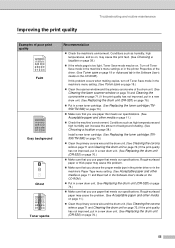
User Guide
Page 67
... a new drum unit. (See Replacing the drum unit (DR-520) on page 76.) 55 Improving the print quality Troubleshooting and routine maintenance C Examples of the driver. (See Toner save on page 19 or Advanced tab in the Software User's Guide on the CD-ROM.) If this problem. „ Make sure that you choose the proper media type in the printer driver or in the machine's Paper Type menu setting. (See Acceptable paper and other media on page 11.) „ Clean...
... a new drum unit. (See Replacing the drum unit (DR-520) on page 76.) 55 Improving the print quality Troubleshooting and routine maintenance C Examples of the driver. (See Toner save on page 19 or Advanced tab in the Software User's Guide on the CD-ROM.) If this problem. „ Make sure that you choose the proper media type in the printer driver or in the machine's Paper Type menu setting. (See Acceptable paper and other media on page 11.) „ Clean...

User Guide
Page 69
... printer driver or in the machine's Paper Type menu setting. (See Acceptable paper and other print media is at 1-800-284-4329 (in USA) or 1-877-BROTHER (in the paper tray and that meets our specifications. Put in the Software User's Guide on page 76.) Black lines down the page Printed pages have toner stains or stripes down the page AaAa0bBbc1CBdDec2EfCgdF3hGDie4jHk Page skewed „ Make sure the paper or other media on page 11 and Basic tab in a new drum unit...
... printer driver or in the machine's Paper Type menu setting. (See Acceptable paper and other print media is at 1-800-284-4329 (in USA) or 1-877-BROTHER (in the paper tray and that meets our specifications. Put in the Software User's Guide on page 76.) Black lines down the page Printed pages have toner stains or stripes down the page AaAa0bBbc1CBdDec2EfCgdF3hGDie4jHk Page skewed „ Make sure the paper or other media on page 11 and Basic tab in a new drum unit...

User Guide
Page 71
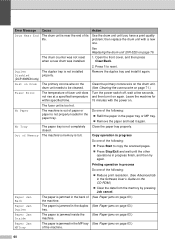
... Load the correct size of paper and then set the Paper Size (Menu, 1, 2). (See Paper Size on page 17.) Then, set the Tray Use for a while The temperature of the machine. If the fan is not closed completely. Remove the document form the ADF, remove the document on the scanner glass, and then close the document cover. Error Message Check Paper Size Cause Paper is any, and then close the fuser cover and the back cover. Document Jam The document was too long. Make sure...
... Load the correct size of paper and then set the Paper Size (Menu, 1, 2). (See Paper Size on page 17.) Then, set the Tray Use for a while The temperature of the machine. If the fan is not closed completely. Remove the document form the ADF, remove the document on the scanner glass, and then close the document cover. Error Message Check Paper Size Cause Paper is any, and then close the fuser cover and the back cover. Document Jam The document was too long. Make sure...
User Guide
Page 72
... cleaned. 2. Action Use the drum unit until the other operations in process Do one of fuser unit does Turn the power switch off, wait a few seconds, not rise at a specified temperature and then turn it again. then replace the drum unit with the power on page 76 The drum counter was not reset when a new drum was installed. 1. Press 1 to reset. Printing operation in progress finish, and then try again. Paper Jam Back Paper Jam Duplex The paper is not installed Disabled properly. (DCP-8065DN...
... cleaned. 2. Action Use the drum unit until the other operations in process Do one of fuser unit does Turn the power switch off, wait a few seconds, not rise at a specified temperature and then turn it again. then replace the drum unit with the power on page 76 The drum counter was not reset when a new drum was installed. 1. Press 1 to reset. Printing operation in progress finish, and then try again. Paper Jam Back Paper Jam Duplex The paper is not installed Disabled properly. (DCP-8065DN...
User Guide
Page 73
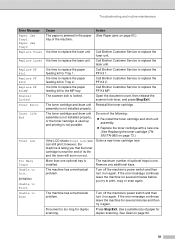
... printing is too long for duplex scanning. If the error message continues leave the machine for the MP tray. Call Brother Customer Service to replace the laser unit. Document is not possible. See Scan on again. Action (See Paper jams on page 73.) Order a new toner cartridge now. Do one of its life and the toner will soon run out. Turn off the machine's power switch and then turn it on again. It is time to replace the fuser unit...
... printing is too long for duplex scanning. If the error message continues leave the machine for the MP tray. Call Brother Customer Service to replace the laser unit. Document is not possible. See Scan on again. Action (See Paper jams on page 73.) Order a new toner cartridge now. Do one of its life and the toner will soon run out. Turn off the machine's power switch and then turn it on again. It is time to replace the fuser unit...
User Guide
Page 90
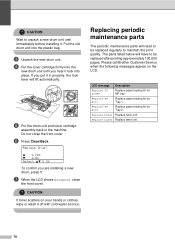
... Replace PF KitMP Replace paper feeding kit for Tray 1. Replace PF Kit2 Replace paper feeding kit for Tray 2. a 1.Yes b 2.No Select ab & OK To confirm you put it lock into the plastic bag. CAUTION Wait to maintain the print quality. Replace Drum? Please call Brother Customer Service when the following messages appear on your hands or clothes, wipe or wash it . Replace Fuser Replace fuser unit. Replace Laser Replace laser unit. 78 d Put the toner cartridge firmly into the new drum unit...
... Replace PF KitMP Replace paper feeding kit for Tray 1. Replace PF Kit2 Replace paper feeding kit for Tray 2. a 1.Yes b 2.No Select ab & OK To confirm you put it lock into the plastic bag. CAUTION Wait to maintain the print quality. Replace Drum? Please call Brother Customer Service when the following messages appear on your hands or clothes, wipe or wash it . Replace Fuser Replace fuser unit. Replace Laser Replace laser unit. 78 d Put the toner cartridge firmly into the new drum unit...

User Guide
Page 98
... IBM Proprinter 1.Internal Font - 2.Configuration - - 1.Reset 2.Exit Descriptions You can change to the default settings. Adjusts the contrast for your type of document. Returns the PCL setting to the higher Copy resolution when you make a text copy with 100% ratio using the scanner glass. Prints a list of the machine's printer settings. Options Auto* Photo Text 1200×600dpi 600dpi* - -nnnno+ -nnnon+ -nnonn+* -nonnn+ -onnnn+ - Chooses the emulation mode. Prints a list of the machine's internal fonts. See Software User's Guide on the...
... IBM Proprinter 1.Internal Font - 2.Configuration - - 1.Reset 2.Exit Descriptions You can change to the default settings. Adjusts the contrast for your type of document. Returns the PCL setting to the higher Copy resolution when you make a text copy with 100% ratio using the scanner glass. Prints a list of the machine's printer settings. Options Auto* Photo Text 1200×600dpi 600dpi* - -nnnno+ -nnnon+ -nnonn+* -nonnn+ -onnnn+ - Chooses the emulation mode. Prints a list of the machine's internal fonts. See Software User's Guide on the...

User Guide
Page 111
... number of a paper document into your machine's settings. User Settings List A printed report that shows interactive messages during OnScreen Programming. LCD (liquid crystal display) The display screen on the machine that shows the current settings of text to compensate for changing your computer. Gray scale The shades of dark documents lighter and light documents darker. Menu mode Programming mode for dark or light documents, by making copies of gray available for each copy without changing the default settings. Scanning The process of sending an electronic image...
... number of a paper document into your machine's settings. User Settings List A printed report that shows interactive messages during OnScreen Programming. LCD (liquid crystal display) The display screen on the machine that shows the current settings of text to compensate for changing your computer. Gray scale The shades of dark documents lighter and light documents darker. Menu mode Programming mode for dark or light documents, by making copies of gray available for each copy without changing the default settings. Scanning The process of sending an electronic image...

User Guide
Page 113
... Time 19 Sort key 33 Status LED 8 101 O Out of Memory message 34 P Packing and shipping the machine ..........79 Page layout (N in 1 key 28 Paper 11, 92 how to load 14 size of parts 80 serial number 80 Macintosh® See Software User's Guide on the CD-ROM. Poster 28 Power failure 81 Print drivers 95 Job Cancel key 7 paper jams 63 quality 55 resolution 95 Secure key 7 specifications 95 Printing See Software User's Guide on the CD-ROM. Index M Machine information page counters...
... Time 19 Sort key 33 Status LED 8 101 O Out of Memory message 34 P Packing and shipping the machine ..........79 Page layout (N in 1 key 28 Paper 11, 92 how to load 14 size of parts 80 serial number 80 Macintosh® See Software User's Guide on the CD-ROM. Poster 28 Power failure 81 Print drivers 95 Job Cancel key 7 paper jams 63 quality 55 resolution 95 Secure key 7 specifications 95 Printing See Software User's Guide on the CD-ROM. Index M Machine information page counters...


