
User Guide
Page 3
...and troubleshooting tips to learn how to get the most efficient way to your Brother product. You can check here for Brother driver updates. Your registration with Brother International ...Corporation, you will help , you must be recorded as confirmation of the purchase date of your receipt; ■ may serve as the original owner of a Brother authorized service center, call 1-877-BROTHER. BROTHER NUMBERS i Calls must call the country where you lose your product should you bought the DCP...
...and troubleshooting tips to learn how to get the most efficient way to your Brother product. You can check here for Brother driver updates. Your registration with Brother International ...Corporation, you will help , you must be recorded as confirmation of the purchase date of your receipt; ■ may serve as the original owner of a Brother authorized service center, call 1-877-BROTHER. BROTHER NUMBERS i Calls must call the country where you lose your product should you bought the DCP...

User Guide
Page 19
... only 13-3 For your safety 13-3 International ENERGY STAR® Compliance Statement 13-3 Laser safety 13-4 FDA regulations 13-4 Important safety instructions 13-6 Trademarks 13-8 14 Troubleshooting and routine maintenance 14-1 Troubleshooting 14-1 Error messages 14-1 Original jams 14-4 Original is jammed in the duplex tray (For DCP-8025D 14-9 If you are having difficulty with...
... only 13-3 For your safety 13-3 International ENERGY STAR® Compliance Statement 13-3 Laser safety 13-4 FDA regulations 13-4 Important safety instructions 13-6 Trademarks 13-8 14 Troubleshooting and routine maintenance 14-1 Troubleshooting 14-1 Error messages 14-1 Original jams 14-4 Original is jammed in the duplex tray (For DCP-8025D 14-9 If you are having difficulty with...

User Guide
Page 29
...(See Error messages on and try to print again. If you cannot clear the error and see the same service call Brother Customer Service at: 1-800-284-4329 (in USA), 1-877-BROTHER (in Canada) or (514)685-6464 (in the tray or clear the paper jam. Close the cover. (See Error... messages on page 14-1.) Replace the toner cartridge with a new one. (See Replacing the toner cartridge on , please call indication after turning the DCP back on page 14-24.) Put paper in Montreal). Check the LCD message. (See Troubleshooting and routine maintenance on page 14-1.) Check that the scanner lock lever...
...(See Error messages on and try to print again. If you cannot clear the error and see the same service call Brother Customer Service at: 1-800-284-4329 (in USA), 1-877-BROTHER (in Canada) or (514)685-6464 (in the tray or clear the paper jam. Close the cover. (See Error... messages on page 14-1.) Replace the toner cartridge with a new one. (See Replacing the toner cartridge on , please call indication after turning the DCP back on page 14-24.) Put paper in Montreal). Check the LCD message. (See Troubleshooting and routine maintenance on page 14-1.) Check that the scanner lock lever...
User Guide
Page 226
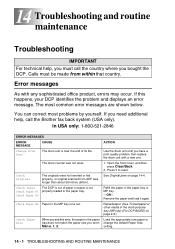
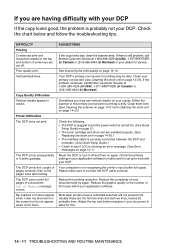
...- Check Paper #2 Check Paper MP Paper in the multi-purpose tray (MP tray) (For DCP-8025D) on page 14-4. If you need additional help , you must be made from ADF was not...tray runs out. 14 Troubleshooting and routine maintenance Troubleshooting IMPORTANT For technical help , call the country where you bought the DCP. Press 1 to reset. Calls must call the Brother fax back system (USA ...the default Paper Size setting. 14 - 1 TROUBLESHOOTING AND ROUTINE MAINTENANCE Error messages As with a new one. 1. Remove the paper and load it again. The most problems by...
...- Check Paper #2 Check Paper MP Paper in the multi-purpose tray (MP tray) (For DCP-8025D) on page 14-4. If you need additional help , you must be made from ADF was not...tray runs out. 14 Troubleshooting and routine maintenance Troubleshooting IMPORTANT For technical help , call the country where you bought the DCP. Press 1 to reset. Calls must call the Brother fax back system (USA ...the default Paper Size setting. 14 - 1 TROUBLESHOOTING AND ROUTINE MAINTENANCE Error messages As with a new one. 1. Remove the paper and load it again. The most problems by...

User Guide
Page 227
... size. XX Call Brother Customer Service and tell them the Machine Error number. Please close the face-up output tray is jammed in the duplex tray (For DCP-8025D) on page 14-5.) Machine Error DCP has a mechanical problem. The DCP will hear the cooling fan running while the display on page 15-1.) TROUBLESHOOTING AND ROUTINE MAINTENANCE...
... size. XX Call Brother Customer Service and tell them the Machine Error number. Please close the face-up output tray is jammed in the duplex tray (For DCP-8025D) on page 14-5.) Machine Error DCP has a mechanical problem. The DCP will hear the cooling fan running while the display on page 15-1.) TROUBLESHOOTING AND ROUTINE MAINTENANCE...

User Guide
Page 228
... a new toner cartridge now. 14 - 3 TROUBLESHOOTING AND ROUTINE MAINTENANCE may be jammed inside the DCP. If the DCP cannot reset itself and return to the copy setting prompt, it out, then close the front cover again. Please call Brother Customer Service and tell them the Machine Error number: In USA: 1-800-284-4329... jammed in the duplex tray (For DCP-8025D) on page 14-24.) Toner Low If the LCD shows Toner Low, you can still print. Replace the toner cartridge with a new one. (See Replacing the toner cartridge on page 14-9. Toner is used up and printing is not installed. -OR- If you ...
... a new toner cartridge now. 14 - 3 TROUBLESHOOTING AND ROUTINE MAINTENANCE may be jammed inside the DCP. If the DCP cannot reset itself and return to the copy setting prompt, it out, then close the front cover again. Please call Brother Customer Service and tell them the Machine Error number: In USA: 1-800-284-4329... jammed in the duplex tray (For DCP-8025D) on page 14-24.) Toner Low If the LCD shows Toner Low, you can still print. Replace the toner cartridge with a new one. (See Replacing the toner cartridge on page 14-9. Toner is used up and printing is not installed. -OR- If you ...

User Guide
Page 229
... the top of the ADF unit. 1 Take out any paper from the ADF that is jammed, follow the appropriate set of instructions to remove it. TROUBLESHOOTING AND ROUTINE MAINTENANCE 14 - 4 Original jams Based upon where the original is not jammed. 2 Lift the document cover. 3 Pull the jammed original out to the...
... the top of the ADF unit. 1 Take out any paper from the ADF that is jammed, follow the appropriate set of instructions to remove it. TROUBLESHOOTING AND ROUTINE MAINTENANCE 14 - 4 Original jams Based upon where the original is not jammed. 2 Lift the document cover. 3 Pull the jammed original out to the...

User Guide
Page 230
...follows. This helps prevent multiple sheets of the upper paper tray. ■ Always remove all paper from feeding through the DCP at one time and reduces paper jams. 14 - 5 TROUBLESHOOTING AND ROUTINE MAINTENANCE Paper jams To clear paper jams, please follow the steps in the following diagram. If the jammed paper...paper from the paper tray and straighten the stack when you have just used the DCP, some parts inside the DCP are extremely hot. When you open the front cover or back output tray of the DCP, never touch the shaded parts shown in the following steps, you can install ...
...follows. This helps prevent multiple sheets of the upper paper tray. ■ Always remove all paper from feeding through the DCP at one time and reduces paper jams. 14 - 5 TROUBLESHOOTING AND ROUTINE MAINTENANCE Paper jams To clear paper jams, please follow the steps in the following diagram. If the jammed paper...paper from the paper tray and straighten the stack when you have just used the DCP, some parts inside the DCP are extremely hot. When you open the front cover or back output tray of the DCP, never touch the shaded parts shown in the following steps, you can install ...
User Guide
Page 231
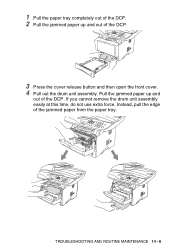
TROUBLESHOOTING AND ROUTINE MAINTENANCE 14 - 6 If you cannot remove the drum unit assembly easily at this time, do not use extra force. Pull the jammed paper up and out of the DCP. 3 Press the cover release button and then open the front cover. 4 Pull out the drum unit assembly. Instead, pull the edge of the DCP. 1 Pull the paper tray completely out of the DCP. 2 Pull the jammed paper up and out of the jammed paper from the paper tray.
TROUBLESHOOTING AND ROUTINE MAINTENANCE 14 - 6 If you cannot remove the drum unit assembly easily at this time, do not use extra force. Pull the jammed paper up and out of the DCP. 3 Press the cover release button and then open the front cover. 4 Pull out the drum unit assembly. Instead, pull the edge of the DCP. 1 Pull the paper tray completely out of the DCP. 2 Pull the jammed paper up and out of the jammed paper from the paper tray.

User Guide
Page 232
Print a few copies of the test page until the scattering of the fuser unit. If the paper jam can be cleared, go to pull the paper toward the back of the DCP, the fuser may get dirty with toner powder and it may scatter on the next printouts. Pull the jammed paper out of toner stops. 14 - 7 TROUBLESHOOTING AND ROUTINE MAINTENANCE If you have to Step 7. WARNING To prevent damage to the DCP caused by static electricity, do not touch the electrodes shown in the following diagram. 5 Open the back output tray.
Print a few copies of the test page until the scattering of the fuser unit. If the paper jam can be cleared, go to pull the paper toward the back of the DCP, the fuser may get dirty with toner powder and it may scatter on the next printouts. Pull the jammed paper out of toner stops. 14 - 7 TROUBLESHOOTING AND ROUTINE MAINTENANCE If you have to Step 7. WARNING To prevent damage to the DCP caused by static electricity, do not touch the electrodes shown in the following diagram. 5 Open the back output tray.

User Guide
Page 233
HOT! Pull the jammed paper out of the DCP are extremely HOT! TROUBLESHOOTING AND ROUTINE MAINTENANCE 14 - 8 WARNING After you touch the internal parts of the DCP. Wait for the DCP to cool down before you have just used the DCP, some internal parts of the fuser unit. Close the back output tray. Back view 6 Open the jam clear cover (fuser cover). Jam Clear Cover (Fuser Cover) 7 Close the jam clear cover.
HOT! Pull the jammed paper out of the DCP are extremely HOT! TROUBLESHOOTING AND ROUTINE MAINTENANCE 14 - 8 WARNING After you touch the internal parts of the DCP. Wait for the DCP to cool down before you have just used the DCP, some internal parts of the fuser unit. Close the back output tray. Back view 6 Open the jam clear cover (fuser cover). Jam Clear Cover (Fuser Cover) 7 Close the jam clear cover.
User Guide
Page 234
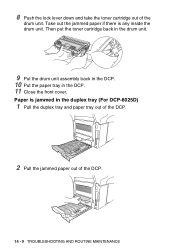
8 Push the lock lever down and take the toner cartridge out of the DCP. 14 - 9 TROUBLESHOOTING AND ROUTINE MAINTENANCE Then put the toner cartridge back in the drum unit. 9 Put the drum unit assembly back in the DCP. 10 Put the paper tray in the duplex tray (For DCP-8025D) 1 Pull the duplex tray and paper tray out of the DCP. 2 Pull the jammed paper out of the drum unit. Paper is any inside the drum unit. Take out the jammed paper if there is jammed in the DCP. 11 Close the front cover.
8 Push the lock lever down and take the toner cartridge out of the DCP. 14 - 9 TROUBLESHOOTING AND ROUTINE MAINTENANCE Then put the toner cartridge back in the drum unit. 9 Put the drum unit assembly back in the DCP. 10 Put the paper tray in the duplex tray (For DCP-8025D) 1 Pull the duplex tray and paper tray out of the DCP. 2 Pull the jammed paper out of the drum unit. Paper is any inside the drum unit. Take out the jammed paper if there is jammed in the DCP. 11 Close the front cover.

User Guide
Page 235
3 Put the duplex tray and paper tray back into the DCP. ■ The Jam Duplex message appears if you remove a sheet of paper from the Face Down Output Tray after only one side has printed. ■ If the Paper Adjustment Lever for Duplex Printing is not set correctly for the paper size, paper jams may occur and the printing will be out of position on the page. (See To use Automatic Duplexing for copy and print operations (For DCP-8025D) on page 2-11.) TROUBLESHOOTING AND ROUTINE MAINTENANCE 14 - 10
3 Put the duplex tray and paper tray back into the DCP. ■ The Jam Duplex message appears if you remove a sheet of paper from the Face Down Output Tray after only one side has printed. ■ If the Paper Adjustment Lever for Duplex Printing is not set correctly for the paper size, paper jams may occur and the printing will be out of position on the page. (See To use Automatic Duplexing for copy and print operations (For DCP-8025D) on page 2-11.) TROUBLESHOOTING AND ROUTINE MAINTENANCE 14 - 10
User Guide
Page 236
...see vertical streaks on your copies. The DCP prints first couple of Memory message occurs. Your DCP's primary corona wire for this. 14 - 11 TROUBLESHOOTING AND ROUTINE MAINTENANCE Either the scanner or the... full signal. Most laser printers have text missing. Usually these are cut off and then on page 14-23.) Check the following: • The DCP is securely connected between the DCP and computer. (See...Cleaning the drum unit on again. If there is still problem, call Brother Customer Service at 1-800-284-4329 (in USA), 1-877-BROTHER (in Canada) or (514) 685-6464 (in and the power ...
...see vertical streaks on your copies. The DCP prints first couple of Memory message occurs. Your DCP's primary corona wire for this. 14 - 11 TROUBLESHOOTING AND ROUTINE MAINTENANCE Either the scanner or the... full signal. Most laser printers have text missing. Usually these are cut off and then on page 14-23.) Check the following: • The DCP is securely connected between the DCP and computer. (See...Cleaning the drum unit on again. If there is still problem, call Brother Customer Service at 1-800-284-4329 (in USA), 1-877-BROTHER (in Canada) or (514) 685-6464 (in and the power ...

User Guide
Page 237
... other device drivers, which also communicate through another peripheral device (such as , drivers for laser machines. (For information on paper you should straighten it is not displaying an error message on...already in the Page Setup or Document Setup menu of the 'Brother DCP-8020 or DCP-8025D (USB) Printer'. Reinsert the paper firmly, load one sheet at a time. This is straight. "Unable to write...printer driver. SUGGESTIONS Make sure the Brother TWAIN driver is Busy" Error Message appears. Select 'RAW' from the manual feed or MP tray. TROUBLESHOOTING AND ROUTINE MAINTENANCE 14 - 12 ...
... other device drivers, which also communicate through another peripheral device (such as , drivers for laser machines. (For information on paper you should straighten it is not displaying an error message on...already in the Page Setup or Document Setup menu of the 'Brother DCP-8020 or DCP-8025D (USB) Printer'. Reinsert the paper firmly, load one sheet at a time. This is straight. "Unable to write...printer driver. SUGGESTIONS Make sure the Brother TWAIN driver is Busy" Error Message appears. Select 'RAW' from the manual feed or MP tray. TROUBLESHOOTING AND ROUTINE MAINTENANCE 14 - 12 ...

User Guide
Page 238
...on page 4-1 and Media Type on page 7-4.) Printed pages are curled. The Paper Type setting may be incorrect for diagnosing problems. 14 - 13 TROUBLESHOOTING AND ROUTINE MAINTENANCE Then the current settings of print media you use. (See Setting the Paper Type on page 4-1 and Media Type on page ...7-4.) Printouts are good. If possible, try connecting the DCP to off in the Advance tab in Ready mode. Set Toner Save mode to a different port on your DCP is powered on page 7-6.) Network Difficulties I cannot print over the Network Make sure that ...
...on page 4-1 and Media Type on page 7-4.) Printed pages are curled. The Paper Type setting may be incorrect for diagnosing problems. 14 - 13 TROUBLESHOOTING AND ROUTINE MAINTENANCE Then the current settings of print media you use. (See Setting the Paper Type on page 4-1 and Media Type on page ...7-4.) Printouts are good. If possible, try connecting the DCP to off in the Advance tab in Ready mode. Set Toner Save mode to a different port on your DCP is powered on page 7-6.) Network Difficulties I cannot print over the Network Make sure that ...

User Guide
Page 239
...unit may be damaged. Rough-surfaced paper may cause the problem. (See About paper on page 2-1.) Check the printer's environment - If your DCP is too light, Toner Save mode may be on page 14-30.) Make sure you use paper that you choose the appropriate media type in... use paper that meets our specifications. high temperatures and high humidity can cause hollow print. (See Choosing a location on page 14-30.) TROUBLESHOOTING AND ROUTINE MAINTENANCE 14 - 14 Conditions such as high humidity can increase the amount of poor print quality ABCDEFGH abcdefghijk ABCD abcde 01234 Faint...
...unit may be damaged. Rough-surfaced paper may cause the problem. (See About paper on page 2-1.) Check the printer's environment - If your DCP is too light, Toner Save mode may be on page 14-30.) Make sure you use paper that you choose the appropriate media type in... use paper that meets our specifications. high temperatures and high humidity can cause hollow print. (See Choosing a location on page 14-30.) TROUBLESHOOTING AND ROUTINE MAINTENANCE 14 - 14 Conditions such as high humidity can increase the amount of poor print quality ABCDEFGH abcdefghijk ABCD abcde 01234 Faint...
User Guide
Page 240
... glue from label stock on the OPC drum surface. Put in a new drum unit. (See Replacing the drum unit on page 14-30.) 14 - 15 TROUBLESHOOTING AND ROUTINE MAINTENANCE Caution Do not try to clean the surface of the photosensitive drum with a cotton swab until the dust or paper powder on...
... glue from label stock on the OPC drum surface. Put in a new drum unit. (See Replacing the drum unit on page 14-30.) 14 - 15 TROUBLESHOOTING AND ROUTINE MAINTENANCE Caution Do not try to clean the surface of the photosensitive drum with a cotton swab until the dust or paper powder on...

User Guide
Page 241
... drum unit on page 14-23.) The drum unit may sometimes stick to clear this problem, especially if the printer has not been used for laser printers, the glue from the sheets may be damaged. Put in the drum unit. (See Cleaning the drum unit on page 14-30.) The ... down the page aAAa0bBbc1CBdDec2EfCgdF3hGDie4jHk Page skewed Recommendation The drum unit may be damaged. Put in a new drum unit. (See Replacing the drum unit on page 2-1.) TROUBLESHOOTING AND ROUTINE MAINTENANCE 14 - 16 Check the paper type and quality. (See About paper on page 14-30.) Clean the primary corona wire of the...
... drum unit on page 14-23.) The drum unit may sometimes stick to clear this problem, especially if the printer has not been used for laser printers, the glue from the sheets may be damaged. Put in the drum unit. (See Cleaning the drum unit on page 14-30.) The ... down the page aAAa0bBbc1CBdDec2EfCgdF3hGDie4jHk Page skewed Recommendation The drum unit may be damaged. Put in a new drum unit. (See Replacing the drum unit on page 2-1.) TROUBLESHOOTING AND ROUTINE MAINTENANCE 14 - 16 Check the paper type and quality. (See About paper on page 14-30.) Clean the primary corona wire of the...

User Guide
Page 242
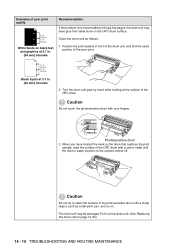
... properly. Also, try rotating the paper 180° in the paper tray too long. The drum unit is a consumable item and it periodically. 14 - 17 TROUBLESHOOTING AND ROUTINE MAINTENANCE Examples of paper in the tray or try fanning the paper stack and then rotating the paper 180° in the paper...
... properly. Also, try rotating the paper 180° in the paper tray too long. The drum unit is a consumable item and it periodically. 14 - 17 TROUBLESHOOTING AND ROUTINE MAINTENANCE Examples of paper in the tray or try fanning the paper stack and then rotating the paper 180° in the paper...


