
Assembly Manual
Page 2
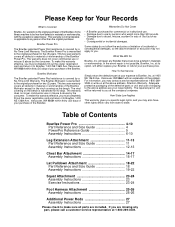
... by a No-Time-Limit Warranty. Table of Contents Bowflex Power Pro 4-10 Part Reference and Size Guide 4 PowerPro Reference Guide 5 Assembly Instructions 6-10 Leg Extension Attachment 11-13 Part Reference and Size Guide 11 Assembly Instructions 12-13 Chest Bar Attachment 14-17 Assembly Instructions 15-17 Lat Pulldown Attachment 18-22 Part Reference and Size Guide 18...
... by a No-Time-Limit Warranty. Table of Contents Bowflex Power Pro 4-10 Part Reference and Size Guide 4 PowerPro Reference Guide 5 Assembly Instructions 6-10 Leg Extension Attachment 11-13 Part Reference and Size Guide 11 Assembly Instructions 12-13 Chest Bar Attachment 14-17 Assembly Instructions 15-17 Lat Pulldown Attachment 18-22 Part Reference and Size Guide 18...

Assembly Manual
Page 6
... Step 4. The seat slides onto the Seat Rail by a Quick Release Hinge. After you have installed the Seat, you purchased a CHEST BAR attachment, do not install the u-bar as shown in Boxes 2 and 3 2a. Components for this assembly are in step 3. They are in order to slide the Seat...Main Frame and secure with the #10 Screws. (smallest screws) If the screws are finished with the channels along the sides of the chest bar assembly instructions. Pulling pin out and turning counterclockwise one another. Step 2: Locate Seat and Bench and separate from one quarter turn allows ...
... Step 4. The seat slides onto the Seat Rail by a Quick Release Hinge. After you have installed the Seat, you purchased a CHEST BAR attachment, do not install the u-bar as shown in Boxes 2 and 3 2a. Components for this assembly are in step 3. They are in order to slide the Seat...Main Frame and secure with the #10 Screws. (smallest screws) If the screws are finished with the channels along the sides of the chest bar assembly instructions. Pulling pin out and turning counterclockwise one another. Step 2: Locate Seat and Bench and separate from one quarter turn allows ...

Assembly Manual
Page 9
Adhere Nonskid Pads to page 16, step 8. Locate Nonskid Pads. Place Nonskid Pads here (facing top) Components for this assembly are in Box 2 Hook Hand-Grips into place by inserting D-Ring into Snap Hook on end of cables. Unwrap Cables and Pulleys. D-Ring Cable 10 Note: If you installed a CHEST BAR Attachment, please go to Pulley Frame as shown. Remove paper backing to expose the adhesive surface. Step 8: Place Bench onto the Bowflex.
Adhere Nonskid Pads to page 16, step 8. Locate Nonskid Pads. Place Nonskid Pads here (facing top) Components for this assembly are in Box 2 Hook Hand-Grips into place by inserting D-Ring into Snap Hook on end of cables. Unwrap Cables and Pulleys. D-Ring Cable 10 Note: If you installed a CHEST BAR Attachment, please go to Pulley Frame as shown. Remove paper backing to expose the adhesive surface. Step 8: Place Bench onto the Bowflex.

Assembly Manual
Page 13
Before you begin, you will need a crescent wrench, a 9/16" and a 7/16" open end wrench. (It is an optional attachment. Depending on the machine and accessories you for choosing the Bowflex Chest Bar Attachment. This attachment comes complete in a box labeled Chest Bar Attachment Contents of a bolt while tightening with everything you need to make sure all parts are missing any...
Before you begin, you will need a crescent wrench, a 9/16" and a 7/16" open end wrench. (It is an optional attachment. Depending on the machine and accessories you for choosing the Bowflex Chest Bar Attachment. This attachment comes complete in a box labeled Chest Bar Attachment Contents of a bolt while tightening with everything you need to make sure all parts are missing any...

Assembly Manual
Page 14
... to end of seat rail and lower to be used in a later step. Pulley Frame Remove both top and bottom bolt Step 3: Remove bolts connecting U-Bar to be used in a box labeled Chest Bar Attachment Step 2: Remove indicated bolts going through pulley frame and Vertical Main Frame. Remove both bolts Step 4: Remove...
... to end of seat rail and lower to be used in a later step. Pulley Frame Remove both top and bottom bolt Step 3: Remove bolts connecting U-Bar to be used in a box labeled Chest Bar Attachment Step 2: Remove indicated bolts going through pulley frame and Vertical Main Frame. Remove both bolts Step 4: Remove...

Assembly Manual
Page 15
... to the machine frame where you removed in a box labeled Chest Bar Attachment Step 8: Find existing pulley on machine and Chest Bar. Tighten securely. When finished simply pull up holes on U-Bar that you finish installing your chest bar, go back to page 8, step 4 and continue assembling your Chest Bar upright and insert to remove. 16 Remove Nylon Lock Nut...
... to the machine frame where you removed in a box labeled Chest Bar Attachment Step 8: Find existing pulley on machine and Chest Bar. Tighten securely. When finished simply pull up holes on U-Bar that you finish installing your chest bar, go back to page 8, step 4 and continue assembling your Chest Bar upright and insert to remove. 16 Remove Nylon Lock Nut...
Assembly Manual
Page 16
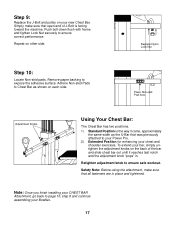
Adhere Non-skid Pads to Chest Bar as the U-Bar that was previously attached to your Power Pro. 2) Extended Position for enhancing your chest and shoulder exercises. Place Non-skid Pad here. Safety Note: Before using the attachment, make sure that all fasteners are in . Step 9: Replace the J-Bolt and...Step 10: Locate Non-skid pads. To extend your CHEST BAR Attachment, go back to expose the adhesive surface. Note: Once you finish installing your bar, simply untighten the adjustment knobs on each side. Repeat on your Bowflex. 17 Remove paper backing to page 10, step 8 ...
Adhere Non-skid Pads to Chest Bar as the U-Bar that was previously attached to your Power Pro. 2) Extended Position for enhancing your chest and shoulder exercises. Place Non-skid Pad here. Safety Note: Before using the attachment, make sure that all fasteners are in . Step 9: Replace the J-Bolt and...Step 10: Locate Non-skid pads. To extend your CHEST BAR Attachment, go back to expose the adhesive surface. Note: Once you finish installing your bar, simply untighten the adjustment knobs on each side. Repeat on your Bowflex. 17 Remove paper backing to page 10, step 8 ...

Owners Manual
Page 19
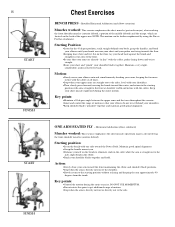
... the back of motion so that your arms are near your chest and your shoulders. •Keep shoulder blades "pinched" together and maintain good spinal alignment. Key points: •The upper arms will be further emphasized by using the Purvis Pec Bar attachment. Key points: •Maintain a 90 degree angle between the upper...
... the back of motion so that your arms are near your chest and your shoulders. •Keep shoulder blades "pinched" together and maintain good spinal alignment. Key points: •The upper arms will be further emphasized by using the Purvis Pec Bar attachment. Key points: •Maintain a 90 degree angle between the upper...
Owners Manual
Page 20
...front at shoulder width and in your palms are located on the bench with one side toward the Power Rods. NOTE: This motion can be further emphasized by using the Purvis Pec Bar attachment. Key points: •Maintain a 90 degree angle between the upper arms and the torso throughout...8226;Do not rotate the spine to the starting position with the cables, palms facing down and wrists straight. •Raise your chest and "pinch" your chest muscles tightened during the entire exercise. Motion: •Slowly move your elbows outward, simultaneously bending your arms, keeping the forearms ...
...front at shoulder width and in your palms are located on the bench with one side toward the Power Rods. NOTE: This motion can be further emphasized by using the Purvis Pec Bar attachment. Key points: •Maintain a 90 degree angle between the upper arms and the torso throughout...8226;Do not rotate the spine to the starting position with the cables, palms facing down and wrists straight. •Raise your chest and "pinch" your chest muscles tightened during the entire exercise. Motion: •Slowly move your elbows outward, simultaneously bending your arms, keeping the forearms ...

Owners Manual
Page 22
...further emphasized by depressing your head toward the center, and return to the starting position by slowly moving the hands toward the Power Rods. 20 START FINISH START FINISH Chest Exercises DECLINE BENCH PRESS - LYING SHOULDER PULLOVER - Starting position: •With the bench flat, lie on the floor, lay... toward your legs. •Keep your shoulder blades on the back of each rep and initiate each new rep by using the Purvis Pec Bar attachment. Key points: •Maintain a 90 degree angle between the upper arms and the torso at the bottom of the motion and slightly less...
...further emphasized by depressing your head toward the center, and return to the starting position by slowly moving the hands toward the Power Rods. 20 START FINISH START FINISH Chest Exercises DECLINE BENCH PRESS - LYING SHOULDER PULLOVER - Starting position: •With the bench flat, lie on the floor, lay... toward your legs. •Keep your shoulder blades on the back of each rep and initiate each new rep by using the Purvis Pec Bar attachment. Key points: •Maintain a 90 degree angle between the upper arms and the torso at the bottom of the motion and slightly less...

Owners Manual
Page 23
...muscles (front deltoids as well as the front part of the exercise. •Keep your chest up . 21 START FRONT SHOULDER RAISE - Action: •The arms may be further emphasized by using the Purvis Pec Bar attachment. Key points: •Keep the abdominals tight throughout the entire motion and maintain good ...NOTE: This motion can be moved alternately, or together. •Keeping your sides. Starting position: •Sit on the bench facing away from the Power Rods, knees bent and feet flat on the floor. •You may wish to sit against the vertical rod holder or be free from the...
...muscles (front deltoids as well as the front part of the exercise. •Keep your chest up . 21 START FRONT SHOULDER RAISE - Action: •The arms may be further emphasized by using the Purvis Pec Bar attachment. Key points: •Keep the abdominals tight throughout the entire motion and maintain good ...NOTE: This motion can be moved alternately, or together. •Keeping your sides. Starting position: •Sit on the bench facing away from the Power Rods, knees bent and feet flat on the floor. •You may wish to sit against the vertical rod holder or be free from the...

Owners Manual
Page 30
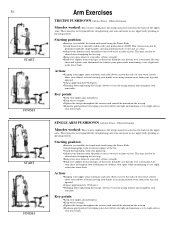
...the motion, your arms should be fully depressed toward your trunk. •The bar may not touch your chest but then you arms straight out to move fully upward, without relaxing the muscles. Starting position: •Attach a single handle to move upward fully, without relaxing the muscles. Bend your...you must be no wider than your elbows. (for some individuals slightly less than elbow width is more comfortable) •Facing the Power Rods, grasp the bar at a width determined above, then sit on the bench. •Position your thighs directly under the pulleys and sit upright with...
...the motion, your arms should be fully depressed toward your trunk. •The bar may not touch your chest but then you arms straight out to move fully upward, without relaxing the muscles. Starting position: •Attach a single handle to move upward fully, without relaxing the muscles. Bend your...you must be no wider than your elbows. (for some individuals slightly less than elbow width is more comfortable) •Facing the Power Rods, grasp the bar at a width determined above, then sit on the bench. •Position your thighs directly under the pulleys and sit upright with...

Owners Manual
Page 33
...from the pulleys, knees bent, and feet flat on your palms facing away from hips (not the waist). •Maintain good spinal alignment, chest lifted, abs tight and maintain a very slight arch in the lower back. Key points: •Do not lose spinal alignment. •Keep...your upper arms. Note: This motion can be fully depressed toward the Power Rods without relaxing the muscles. Then sit on the front of your shoulder blades should be further emphasized using the purvis pec bar attachment. Shoulder Adduction Muscles worked: This exercise emphasizes the latissimus dorsi, teres ...
...from the pulleys, knees bent, and feet flat on your palms facing away from hips (not the waist). •Maintain good spinal alignment, chest lifted, abs tight and maintain a very slight arch in the lower back. Key points: •Do not lose spinal alignment. •Keep...your upper arms. Note: This motion can be fully depressed toward the Power Rods without relaxing the muscles. Then sit on the front of your shoulder blades should be further emphasized using the purvis pec bar attachment. Shoulder Adduction Muscles worked: This exercise emphasizes the latissimus dorsi, teres ...
Owners Manual
Page 36
...;Bend over your hands. Starting position: •Remove (or straddle) the bench and stand facing the Power Rods. •Grasp the lat bar at approximately 90 degrees. •Thinking about tightening the triceps, slowly reverse the arcing motion and straighten ...chest lifted, abs tight and maintain a very slight arch in your distance from the pulleys (one to stabilize your spine while maintaining a very slight arch in front of the bar. •Grasp the hand grip, with Lat Tower - Starting position: •Remove (or straddle) the bench and stand facing the Power Rods. •Attach...
...;Bend over your hands. Starting position: •Remove (or straddle) the bench and stand facing the Power Rods. •Grasp the lat bar at approximately 90 degrees. •Thinking about tightening the triceps, slowly reverse the arcing motion and straighten ...chest lifted, abs tight and maintain a very slight arch in your distance from the pulleys (one to stabilize your spine while maintaining a very slight arch in front of the bar. •Grasp the hand grip, with Lat Tower - Starting position: •Remove (or straddle) the bench and stand facing the Power Rods. •Attach...


