
Assembly Manual
Page 2
... Bowflex patented Power Rod resistance is covered by the consumer. warrants to the original purchaser of Contents Bowflex Power Pro 4-10 Part Reference and Size Guide 4 PowerPro Reference Guide 5 Assembly Instructions 6-10 Leg Extension Attachment 11-13 Part Reference and Size Guide 11 Assembly Instructions 12-13 Chest Bar Attachment 14-17 Assembly Instructions 15-17 Lat Pulldown Attachment 18-22 Part Reference and Size Guide 18 Assembly Instructions 19-22 Squat Attachment 23-24 Assembly Instructions 23 Exercise Instructions 23-24 Foot Harness Attachment 25-26 Assembly...
... Bowflex patented Power Rod resistance is covered by the consumer. warrants to the original purchaser of Contents Bowflex Power Pro 4-10 Part Reference and Size Guide 4 PowerPro Reference Guide 5 Assembly Instructions 6-10 Leg Extension Attachment 11-13 Part Reference and Size Guide 11 Assembly Instructions 12-13 Chest Bar Attachment 14-17 Assembly Instructions 15-17 Lat Pulldown Attachment 18-22 Part Reference and Size Guide 18 Assembly Instructions 19-22 Squat Attachment 23-24 Assembly Instructions 23 Exercise Instructions 23-24 Foot Harness Attachment 25-26 Assembly...
Assembly Manual
Page 3
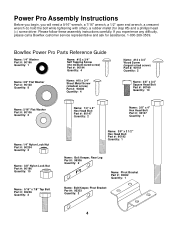
... Bolt Part #: 90137 Quantity: 1 Name: 3/8" x 2 1/2" Hex Head Bolt Part #: 90193 Quantity: 1 Name: Bolt Keeper, Rear Leg Part #: 95306 Quantity: 2 Name: Pivot Bracket Part #: 95302 Quantity: 1 Name: Bolt Keeper, Pivot Bracket Part #: 95303 Quantity: 2 4 Please follow these assembly instructions carefully. Power Pro Assembly Instructions Before you begin, you experience any difficulty, please call a Bowflex customer service representative and ask for step #5) and a phillips head (+) screw driver. If you will need a 9/16" wrench, a 7/16" wrench, a 1/2" open...
... Bolt Part #: 90137 Quantity: 1 Name: 3/8" x 2 1/2" Hex Head Bolt Part #: 90193 Quantity: 1 Name: Bolt Keeper, Rear Leg Part #: 95306 Quantity: 2 Name: Pivot Bracket Part #: 95302 Quantity: 1 Name: Bolt Keeper, Pivot Bracket Part #: 95303 Quantity: 2 4 Please follow these assembly instructions carefully. Power Pro Assembly Instructions Before you begin, you experience any difficulty, please call a Bowflex customer service representative and ask for step #5) and a phillips head (+) screw driver. If you will need a 9/16" wrench, a 7/16" wrench, a 1/2" open...

Assembly Manual
Page 4
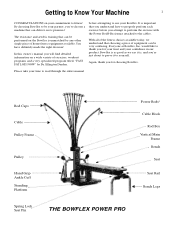
Tighten and fasten as needed. Power Rods Rod Cap Hook Cable Rod Box Vertical Mainframe Pulley U-Bar Main Frame 3" End Cap Hand Grip Ankle Cuff Incline Support Bracket Bench Bench Cup (Not Visible, under Bench) Seat Non Skid Pads Seat Rail Pivot Bracket (Not Visible) Riser Support Bracket Standing Platform Seat Adjustment Lock End Cap 1" Threaded Knob Rear Bench Leg 5 Check pulleys and cables for wear and function. BOWFLEX ® POWER PRO Parts Reference Guide Before each use of the equipment, check all fasteners, snap hooks, cables and pulley functions.
Tighten and fasten as needed. Power Rods Rod Cap Hook Cable Rod Box Vertical Mainframe Pulley U-Bar Main Frame 3" End Cap Hand Grip Ankle Cuff Incline Support Bracket Bench Bench Cup (Not Visible, under Bench) Seat Non Skid Pads Seat Rail Pivot Bracket (Not Visible) Riser Support Bracket Standing Platform Seat Adjustment Lock End Cap 1" Threaded Knob Rear Bench Leg 5 Check pulleys and cables for wear and function. BOWFLEX ® POWER PRO Parts Reference Guide Before each use of the equipment, check all fasteners, snap hooks, cables and pulley functions.
Assembly Manual
Page 5
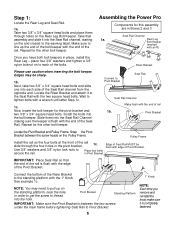
... thread into the Seat Rail Channel making sure the keeper is completely fastened. 6 Now, locate the bolt keeper for the other bolt keeper. Edges may need to line up on the Pulley Frame. Pivot Bracket Locate the Pivot Bracket and Pulley Frame. place four 3/8" washers and tighten a 3/8" nylon locknut on to the Seat Rail with the 1" Knob. Step 1: Locate the Rear Leg and Seat Rail. 1a.
... thread into the Seat Rail Channel making sure the keeper is completely fastened. 6 Now, locate the bolt keeper for the other bolt keeper. Edges may need to line up on the Pulley Frame. Pivot Bracket Locate the Pivot Bracket and Pulley Frame. place four 3/8" washers and tighten a 3/8" nylon locknut on to the Seat Rail with the 1" Knob. Step 1: Locate the Rear Leg and Seat Rail. 1a.

Assembly Manual
Page 6
... out the Seat Locking Pin in step 3. Step 2: Locate Seat and Bench and separate from one quarter turn allows Seat to slide freely. Secure them with two 1/4" x 2" Hex Head Bolts and two 1/4" Nylon Lock Nuts. Pulling pin out and turning counterclockwise one another. Insert U-Bar into position. Seat Pin locks Seat into the openings of the chest bar assembly instructions. After you have installed the Seat, you purchased a CHEST BAR attachment, do not install the u-bar as shown...
... out the Seat Locking Pin in step 3. Step 2: Locate Seat and Bench and separate from one quarter turn allows Seat to slide freely. Secure them with two 1/4" x 2" Hex Head Bolts and two 1/4" Nylon Lock Nuts. Pulling pin out and turning counterclockwise one another. Insert U-Bar into position. Seat Pin locks Seat into the openings of the chest bar assembly instructions. After you have installed the Seat, you purchased a CHEST BAR attachment, do not install the u-bar as shown...

Assembly Manual
Page 7
... installment, use soap or other lubricant in Box 2 Vertical Main Frame Step 5: Locate the Power Rod Pack. Slide Power Rod Pack onto top of the Pulley Frame. Be sure that holes on each side line up. Step 4: Locate the Vertical Mainframe. Use the 3/8" x 4" Hex Head Bolt to the Vertical Main Frame with the 3/8" x 2 1/2" Hex Head Bolt. Power Rod Pack Components for this assembly are in screw...
... installment, use soap or other lubricant in Box 2 Vertical Main Frame Step 5: Locate the Power Rod Pack. Slide Power Rod Pack onto top of the Pulley Frame. Be sure that holes on each side line up. Step 4: Locate the Vertical Mainframe. Use the 3/8" x 4" Hex Head Bolt to the Vertical Main Frame with the 3/8" x 2 1/2" Hex Head Bolt. Power Rod Pack Components for this assembly are in screw...

Assembly Manual
Page 15
... labeled Chest Bar Attachment Step 8: Find existing pulley on machine and Chest Bar. Step 5: Position your Bowflex. Remove nut from bolt. Tighten securely. Note: Once you finish installing your chest bar, go back to page 8, step 4 and continue assembling your Chest Bar upright and insert to remove. 16 Remove Nylon Lock Nut Step 7: Replace the Vertical Main Frame with bolts that you just removed the U-Bar. When finished simply pull up holes on U-Bar that were set aside. Step 6: Line up J-bolt...
... labeled Chest Bar Attachment Step 8: Find existing pulley on machine and Chest Bar. Step 5: Position your Bowflex. Remove nut from bolt. Tighten securely. Note: Once you finish installing your chest bar, go back to page 8, step 4 and continue assembling your Chest Bar upright and insert to remove. 16 Remove Nylon Lock Nut Step 7: Replace the Vertical Main Frame with bolts that you just removed the U-Bar. When finished simply pull up holes on U-Bar that were set aside. Step 6: Line up J-bolt...
Assembly Manual
Page 16
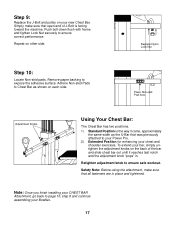
.... Replace Nylon Lock Nut Step 10: Locate Non-skid pads. Remove paper backing to ensure correct performance. Retighten adjustment knob to your Power Pro. 2) Extended Position for enhancing your chest and shoulder exercises. Note: Once you finish installing your CHEST BAR Attachment, go back to page 10, step 8 and continue assembling your new Chest Bar. Adhere Non-skid Pads to Chest Bar as the U-Bar that was previously attached to ensure safe workout...
.... Replace Nylon Lock Nut Step 10: Locate Non-skid pads. Remove paper backing to ensure correct performance. Retighten adjustment knob to your Power Pro. 2) Extended Position for enhancing your chest and shoulder exercises. Note: Once you finish installing your CHEST BAR Attachment, go back to page 10, step 8 and continue assembling your new Chest Bar. Adhere Non-skid Pads to Chest Bar as the U-Bar that was previously attached to ensure safe workout...
Assembly Manual
Page 21
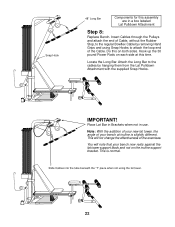
... not using Snap Hooks to attach the loop end of the exercises. This is slightly different. Do this on each side at incline is normal. You will not change the effectiveness of the Cable. Locate the Long Bar. Place Lat Bar in Brackets when not in a box labeled Lat Pulldown Attachment Step 8: Replace Bench. This will note that your bench now rests against the lat tower support block...
... not using Snap Hooks to attach the loop end of the exercises. This is slightly different. Do this on each side at incline is normal. You will not change the effectiveness of the Cable. Locate the Long Bar. Place Lat Bar in Brackets when not in a box labeled Lat Pulldown Attachment Step 8: Replace Bench. This will note that your bench now rests against the lat tower support block...
Assembly Manual
Page 22
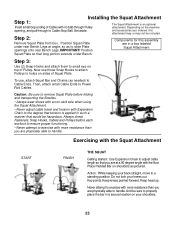
.... Set aside. IMPORTANT! Key points: Keep knees pointed forward. Exercising with the Squat Attachment START FINISH THE SQUAT Getting started: Use Expansion Chain to adjust cable length so that long portion extends under rear Bench Legs at a 90 degree angle with Expansion Chain to properly place the bar in a secure location on the machine opening, and pull through Pulley The Squat Attachment is applied in a box labeled Squat Attachment Step 3: Use...
.... Set aside. IMPORTANT! Key points: Keep knees pointed forward. Exercising with the Squat Attachment START FINISH THE SQUAT Getting started: Use Expansion Chain to adjust cable length so that long portion extends under rear Bench Legs at a 90 degree angle with Expansion Chain to properly place the bar in a secure location on the machine opening, and pull through Pulley The Squat Attachment is applied in a box labeled Squat Attachment Step 3: Use...
Owners Manual
Page 3
... Spring Lock Seat Pin THE BOWFLEX POWER PRO Power Rods® Cable Hook Rod Box Vertical Main Frame Bench Seat Seat Rail Bench Legs In this owner's manual you 've chosen a machine that can deliver on its promises! Everyone at Bowflex, Inc. By choosing Bowflex to fitness! With all of the fitness choices available today, we say it is unmatched by Dr. Ellington Darden. The resistance and aerobic training that can...
... Spring Lock Seat Pin THE BOWFLEX POWER PRO Power Rods® Cable Hook Rod Box Vertical Main Frame Bench Seat Seat Rail Bench Legs In this owner's manual you 've chosen a machine that can deliver on its promises! Everyone at Bowflex, Inc. By choosing Bowflex to fitness! With all of the fitness choices available today, we say it is unmatched by Dr. Ellington Darden. The resistance and aerobic training that can...
Owners Manual
Page 5
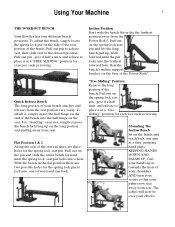
.... Rest the bench's incline support bracket on the spring lock seat pin and lift the long bench pad up as rowing. With the bench in a "free sliding" position for the spring lock seat pin. "Free Sliding" Position Remove the long portion of the bench into , one forward and one arm at a time, grasping hand grips KEEPING HANDS DOWN AND PALMS UP. To attach it in...
.... Rest the bench's incline support bracket on the spring lock seat pin and lift the long bench pad up as rowing. With the bench in a "free sliding" position for the spring lock seat pin. "Free Sliding" Position Remove the long portion of the bench into , one forward and one arm at a time, grasping hand grips KEEPING HANDS DOWN AND PALMS UP. To attach it in...

Owners Manual
Page 8
... exercise routines where "leg work" is specifically designed to enhance the bench press and shoulder press exercises by changing the angle of resistance to create a more effective exercise. Safety • Before using the attachment make sure that all fasteners are securely fastened to the regular Bowflex cables. •Always use the supplied pin to secure the attachment to your goals. 6 Optional Equipment Bowflex is mounted on the rear of the machine...
... exercise routines where "leg work" is specifically designed to enhance the bench press and shoulder press exercises by changing the angle of resistance to create a more effective exercise. Safety • Before using the attachment make sure that all fasteners are securely fastened to the regular Bowflex cables. •Always use the supplied pin to secure the attachment to your goals. 6 Optional Equipment Bowflex is mounted on the rear of the machine...

Owners Manual
Page 9
... while exercising, stop the exercise and consult your physician. Tighten if necessary. When using the Bowflex for standing leg exercises, always grasp the Power Rods® for your physician or health care professional. Never stand on the bench. Inspect your body weight on the machine, bench, or standing platform while exercising. Periodically check all fasteners to handle. Stand off to exercise with more resistance than you experience any exercise program...
... while exercising, stop the exercise and consult your physician. Tighten if necessary. When using the Bowflex for standing leg exercises, always grasp the Power Rods® for your physician or health care professional. Never stand on the bench. Inspect your body weight on the machine, bench, or standing platform while exercising. Periodically check all fasteners to handle. Stand off to exercise with more resistance than you experience any exercise program...
Owners Manual
Page 10
... you cross-country ski or work on your fitness program. Muscle Power is often misinterpreted as described in all day. The biomechanically sound method of improving power in this manual. In addition, you need a balance of strength between exercise sessions, the muscle overcompensates for muscle strength will generally increase muscle size and aerobic conditioning will do what you train it to move...
... you cross-country ski or work on your fitness program. Muscle Power is often misinterpreted as described in all day. The biomechanically sound method of improving power in this manual. In addition, you need a balance of strength between exercise sessions, the muscle overcompensates for muscle strength will generally increase muscle size and aerobic conditioning will do what you train it to move...
Owners Manual
Page 11
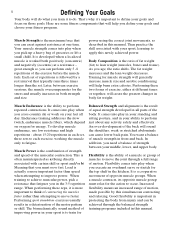
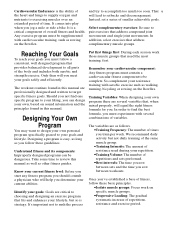
... workout routines found in this manual are critical to find one specific program to your goals and lifestyle. It's important not to target specific fitness goals. So complement your repetition. •Training Volume: The number of the body and includes both aerobic and strength exercise. Should you rest between workouts. Designing Your Own Program You may want to design your own personal program specifically...
... workout routines found in this manual are critical to find one specific program to your goals and lifestyle. It's important not to target specific fitness goals. So complement your repetition. •Training Volume: The number of the body and includes both aerobic and strength exercise. Should you rest between workouts. Designing Your Own Program You may want to design your own personal program specifically...

Owners Manual
Page 19
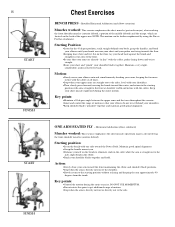
... chest muscles tightened during the entire motion. Chest Exercises INCLINE BENCH PRESS - Shoulder Horizontal Adduction (elbow stabilized) Muscles worked: This exercise emphasizes the chest muscles (pectoralis major), also involving the front shoulder muscles (anterior deltoid). Key points: •Maintain a 90 degree angle between the upper arms and the torso throughout the exercise. •Limit and control the range of your torso at all times. •Stop...
... chest muscles tightened during the entire motion. Chest Exercises INCLINE BENCH PRESS - Shoulder Horizontal Adduction (elbow stabilized) Muscles worked: This exercise emphasizes the chest muscles (pectoralis major), also involving the front shoulder muscles (anterior deltoid). Key points: •Maintain a 90 degree angle between the upper arms and the torso throughout the exercise. •Limit and control the range of your torso at all times. •Stop...
Owners Manual
Page 20
... the cables. NOTE: This motion can be further emphasized by using the Purvis Pec Bar attachment. FINISH Maintain good spinal alignment. •Grasp the handle nearest you. •Distance yourself on the bench with your shoulder blades together. 18 START FINISH START Chest Exercises BENCH PRESS - Starting Position: •Seated in the 45 degree position, reach straight behind your arm toward the Power Rods. Key points: •Control...
... the cables. NOTE: This motion can be further emphasized by using the Purvis Pec Bar attachment. FINISH Maintain good spinal alignment. •Grasp the handle nearest you. •Distance yourself on the bench with your shoulder blades together. 18 START FINISH START Chest Exercises BENCH PRESS - Starting Position: •Seated in the 45 degree position, reach straight behind your arm toward the Power Rods. Key points: •Control...

Owners Manual
Page 28
... your arms. FINISH START SEATED SHOULDER PRESS with palms facing away from the machine. •Raise handles to sit against the vertical rod holder or be free from the Power Rods, knees bent and feet flat on the platform. •Grasp the handles, with your arms straight and your lower back. Shoulder Adduction (and elbow extension) Muscles worked: This exercise emphasizes...
... your arms. FINISH START SEATED SHOULDER PRESS with palms facing away from the machine. •Raise handles to sit against the vertical rod holder or be free from the Power Rods, knees bent and feet flat on the platform. •Grasp the handles, with your arms straight and your lower back. Shoulder Adduction (and elbow extension) Muscles worked: This exercise emphasizes...

Owners Manual
Page 52
... and attach the handle to the corresponding ankle. •Lie back on the bench so that your head is supported by the bench. •Bend your working leg at the knee joints. There is virtually no exercise that there is not better. •Keep your spine straight and your hips level. Starting position: •Remove the bench, stand with your chest...
... and attach the handle to the corresponding ankle. •Lie back on the bench so that your head is supported by the bench. •Bend your working leg at the knee joints. There is virtually no exercise that there is not better. •Keep your spine straight and your hips level. Starting position: •Remove the bench, stand with your chest...


